

集成完后可以使Unity的游戏变为原生APP的一部分,让两个项目完美融合成一个APP。两个项目还可以相互传值,使应用性更强。
一 开发工具版本:
01 iOS 开发工具版本Xcode Version 13.3 (13E113)
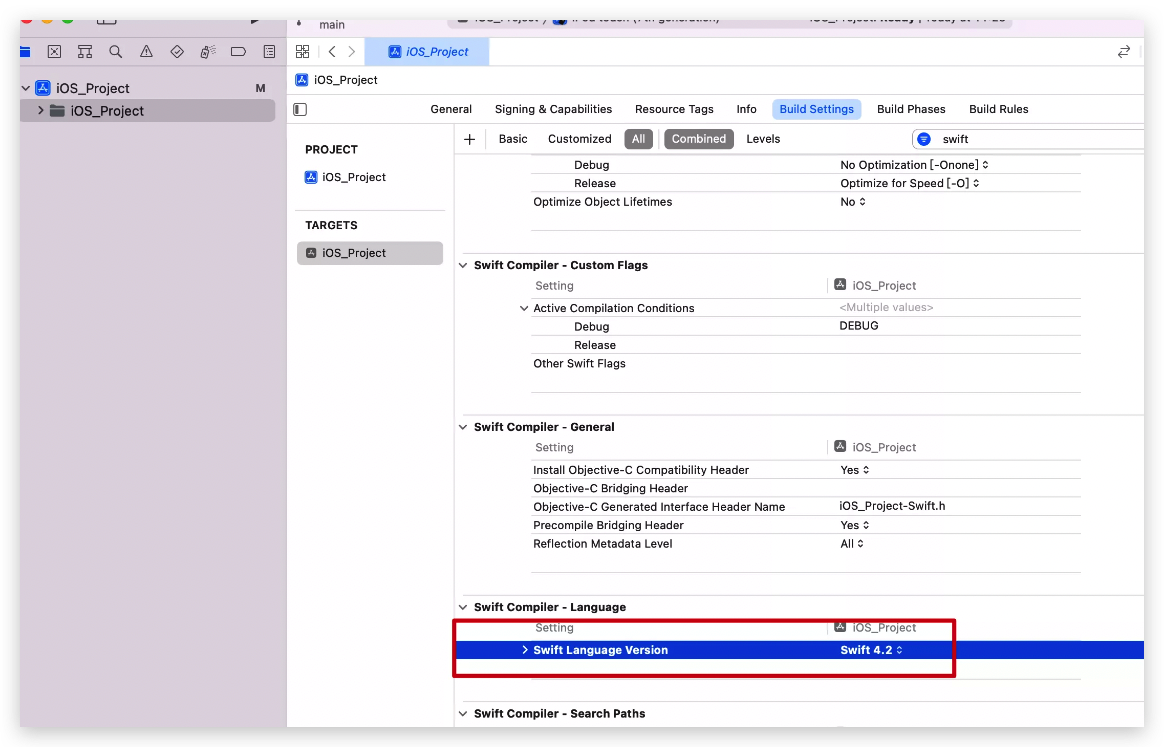
02 iOS项目开发语言为Swift4.2
03 Unity开发工具版本 2019.4.16f1c1

二 新建一个iOS项目和Unity项目
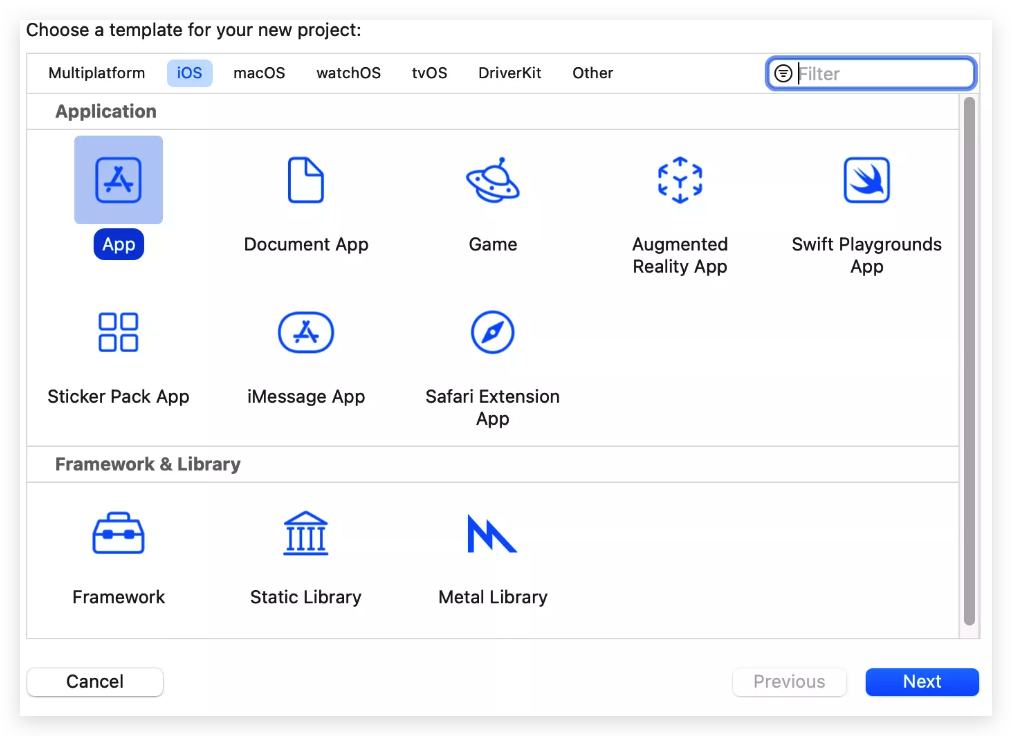
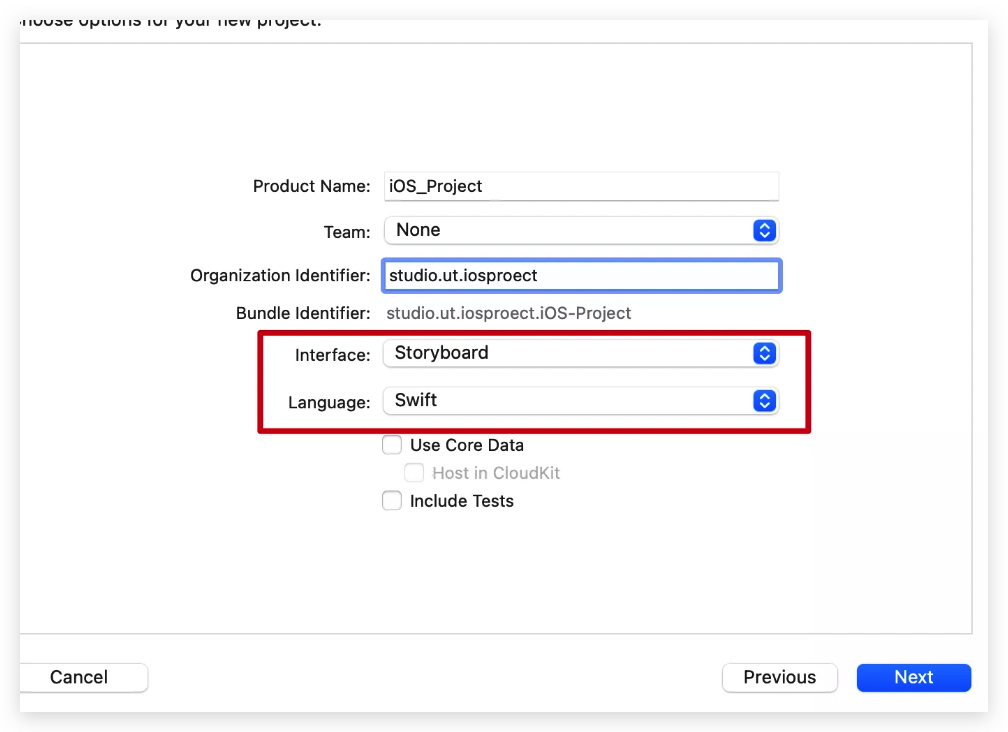
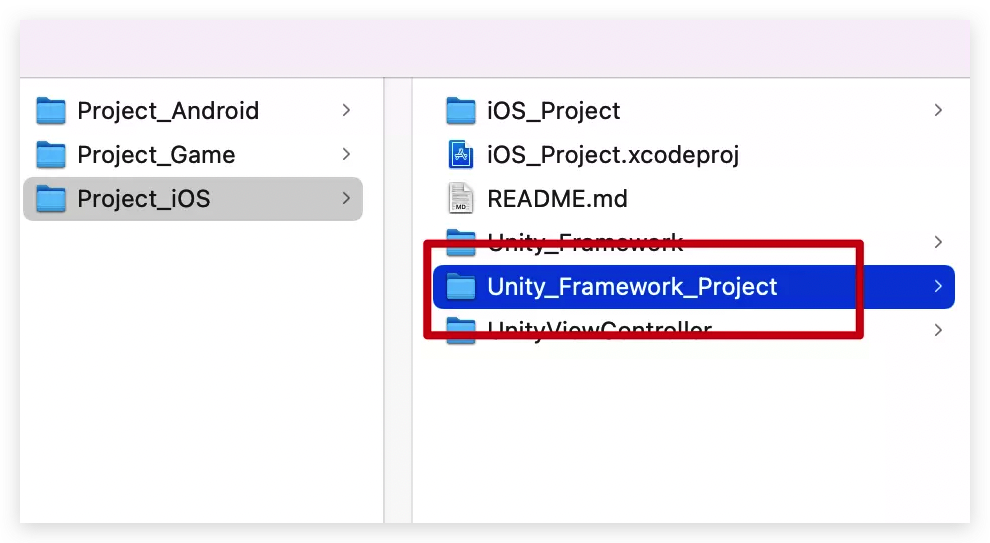
01 iOS新建一个Swift语言的项目。
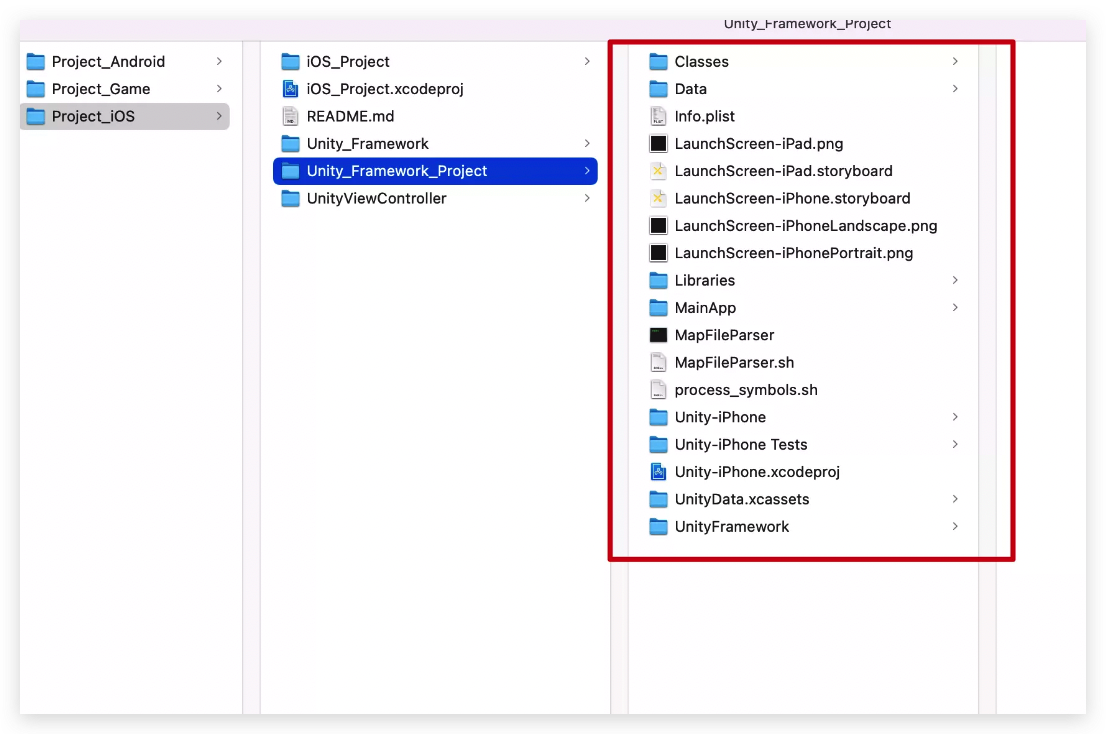
在新建的iOS工程里,新建文件夹Unity_Framework_Project,后续unity导出的工程放到这个文件夹里
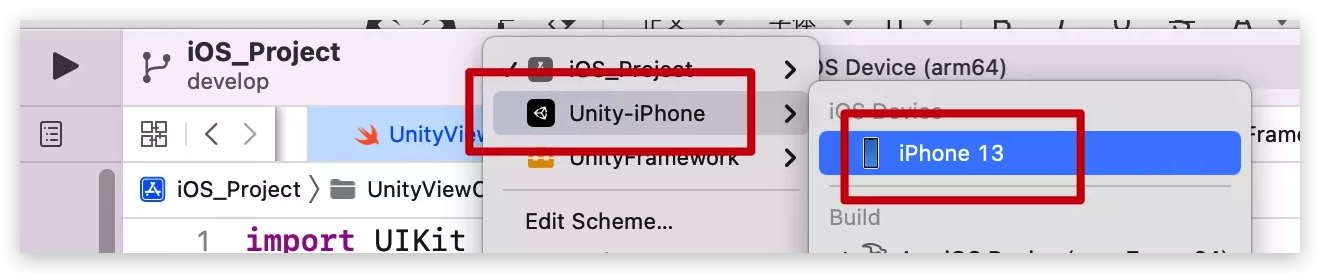
02 Unity项目里,切到iOS平台
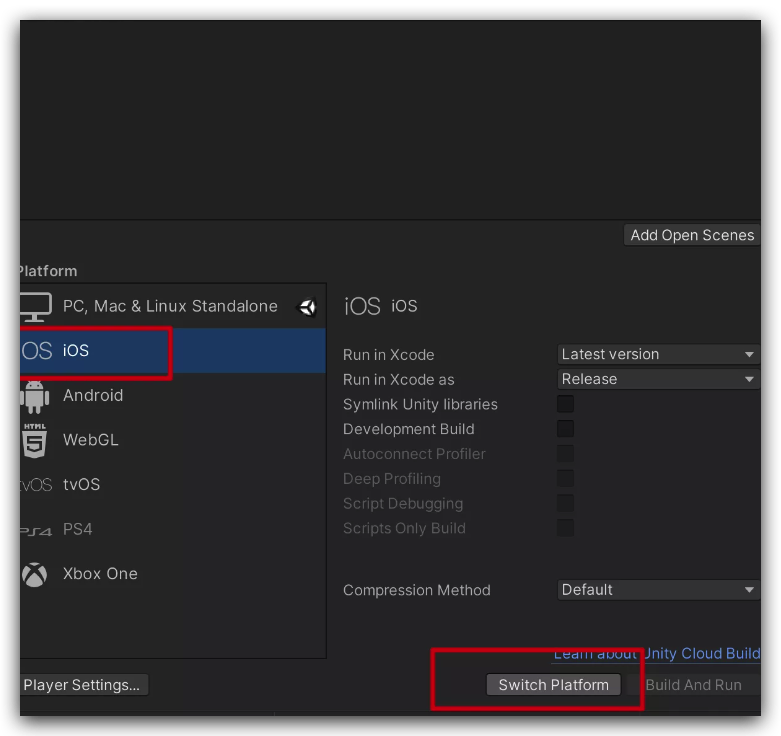
Unity将程序包导出,放入iOS工程里的文件夹Unity_Framework_Project。
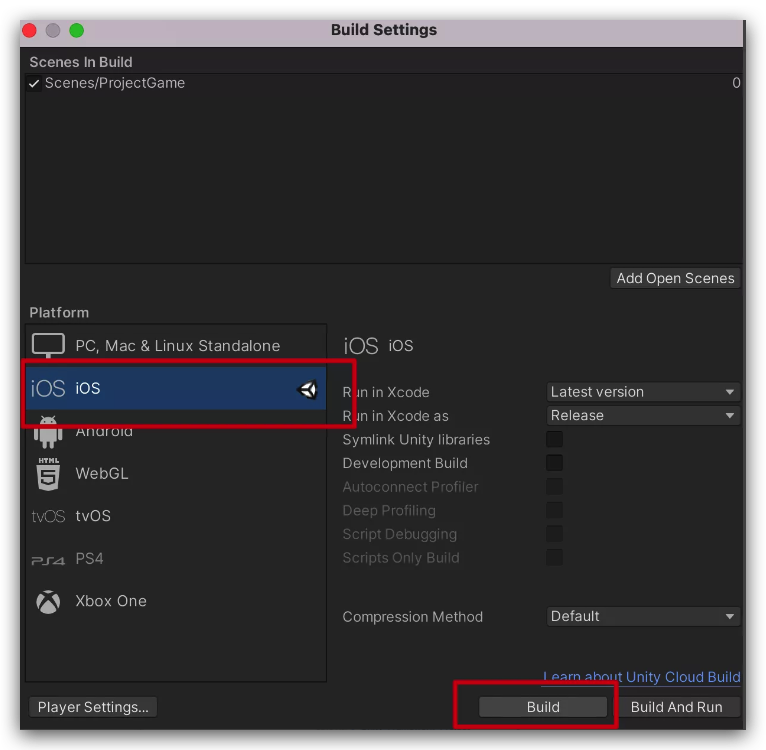
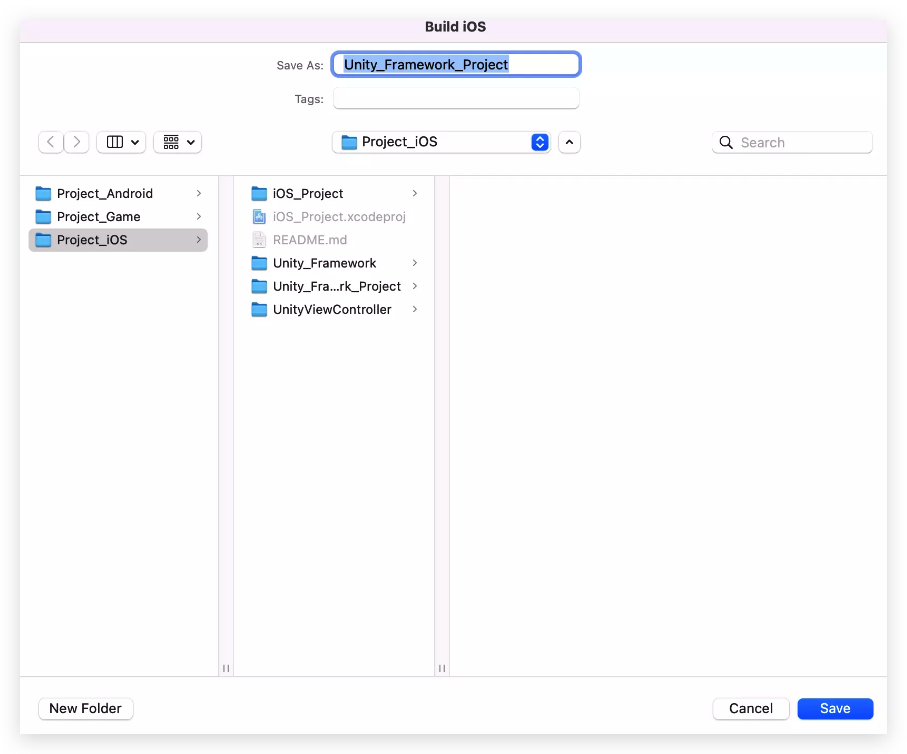
导出的文件
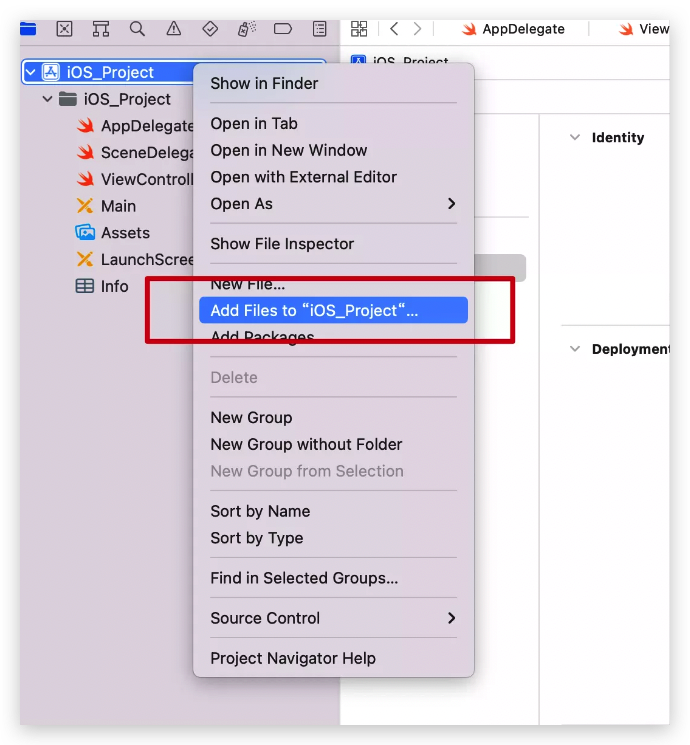
03 把游戏工程导入iOS工程
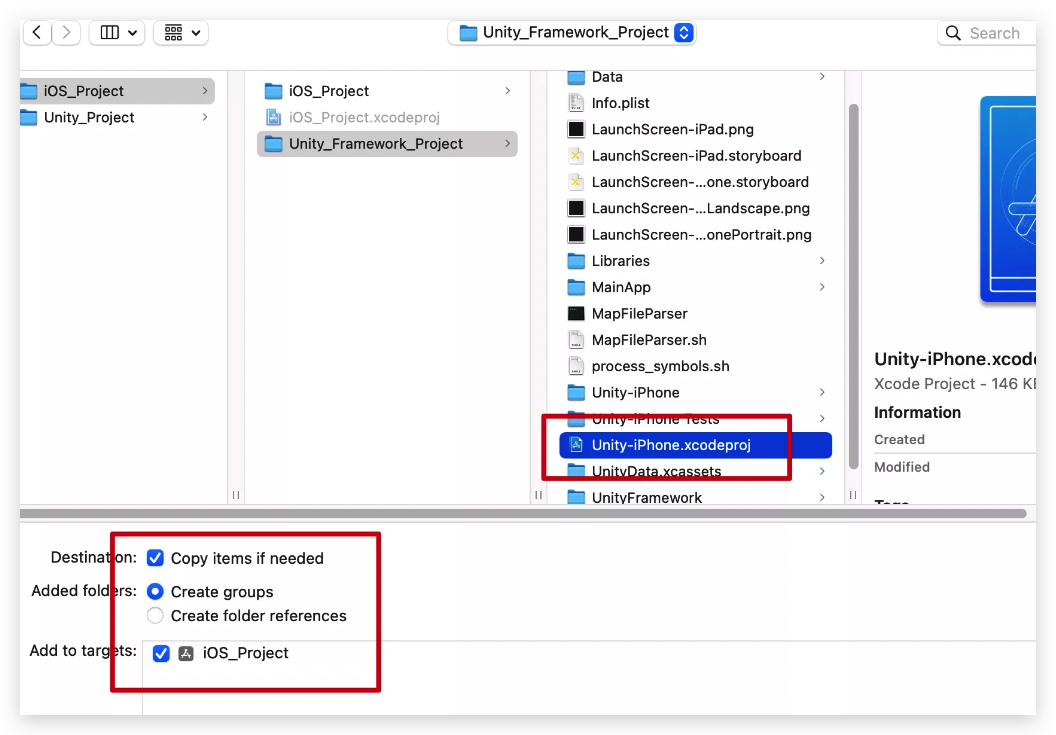
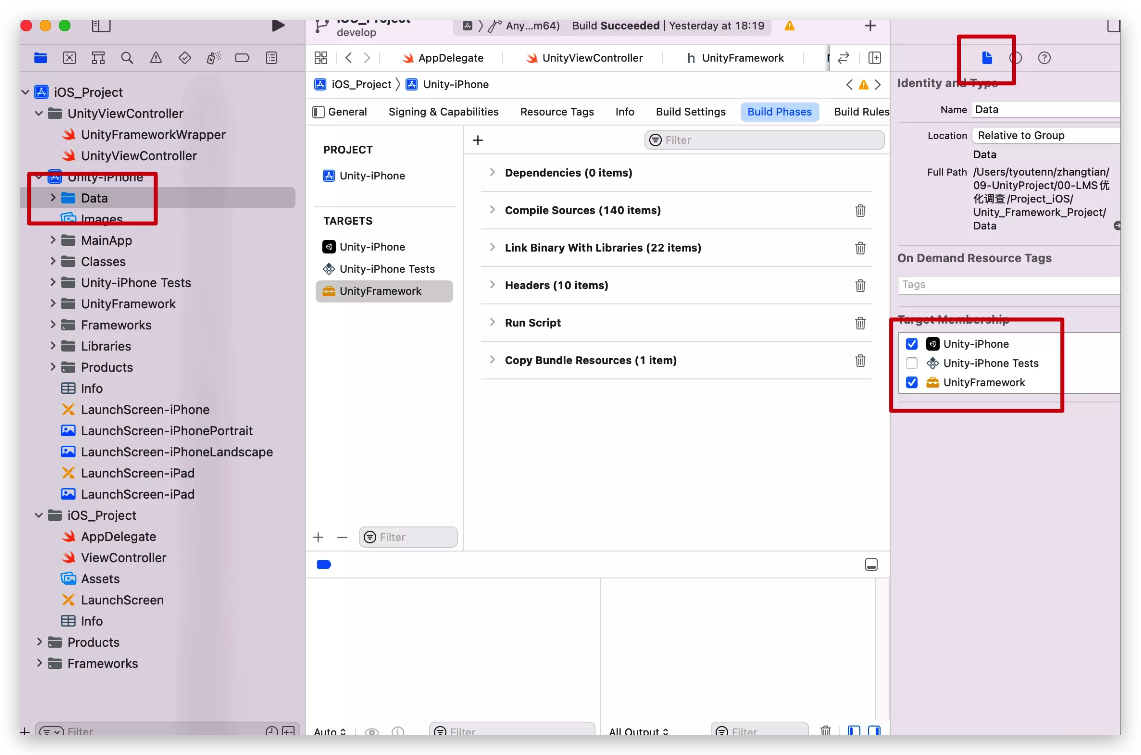
04 做如下设置
05 加入代码做到unity和ios相互传值的代码
unity项目里新建两个文件,加入
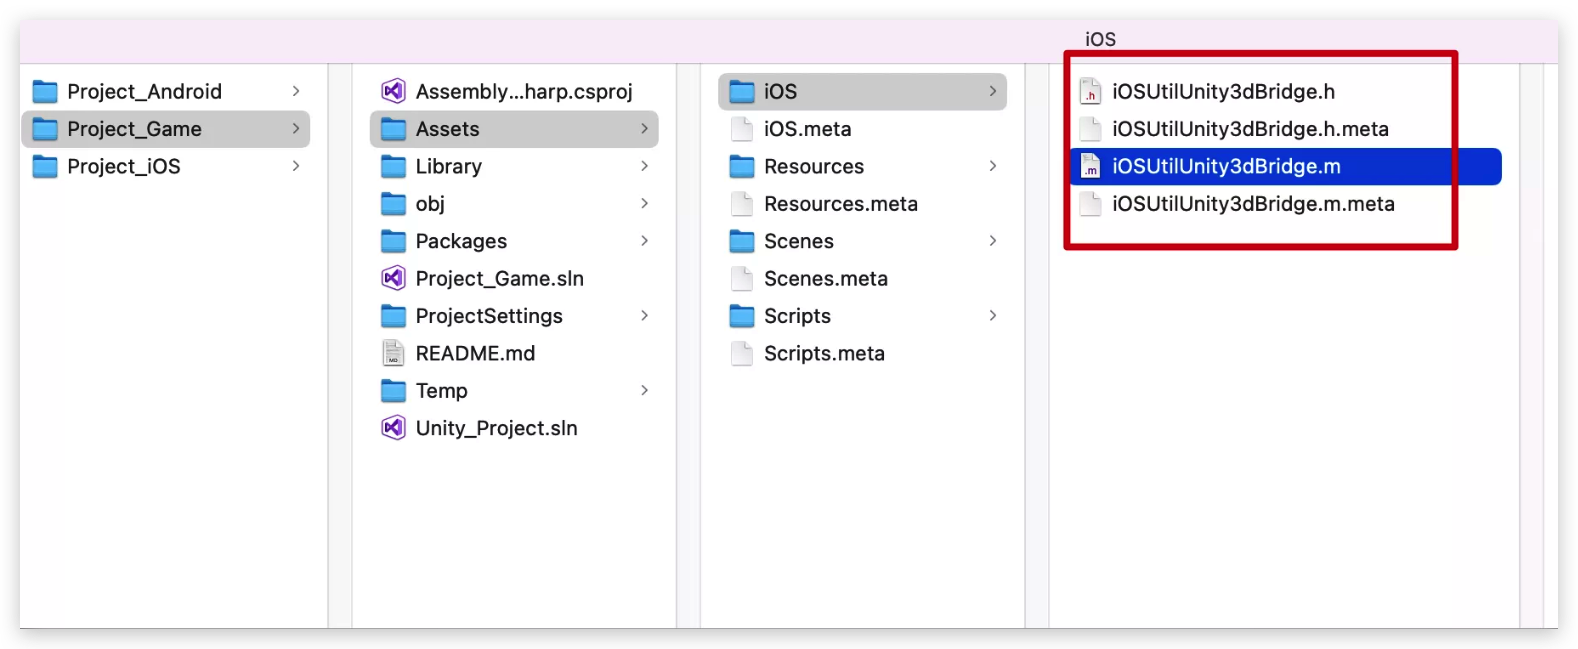
iOSUtilUnity3dBridge.h
#import <Foundation/Foundation.h>
@interface iOSUtilUnity3dBridge : NSObject
#ifdef __cplusplus
extern "C"{
#endif
const char* UnitySendMessageToiOS(const char *str);
NSString* iOSGetMessage();
#ifdef __cplusplus
}
#endif
@end
iOSUtilUnity3dBridge.m
#import <Foundation/Foundation.h>
#import "iOSUtilUnity3dBridge.h"
#ifdef __cplusplus
extern "C"
{
#endif

    NSString *returnString;
    //NSString转char*
    char* _MakeStringCopy(const char* str) {
        if(str == NULL){return NULL;}
        char* res = (char*)malloc(strlen(str)+1);
        strcpy(res, str);
        return res;
    }

    const char* UnitySendMessageToiOS(const char *str)
    {
        NSString *string1 = [[NSString alloc] initWithUTF8String:str];
        NSString *string2 = [NSString stringWithFormat:@"%@", string1];
        returnString = string2;
        return _MakeStringCopy([string2 UTF8String]);
    }


    NSString* iOSGetMessage()
    {
        return returnString;
    }


#ifdef __cplusplus
}
#endif
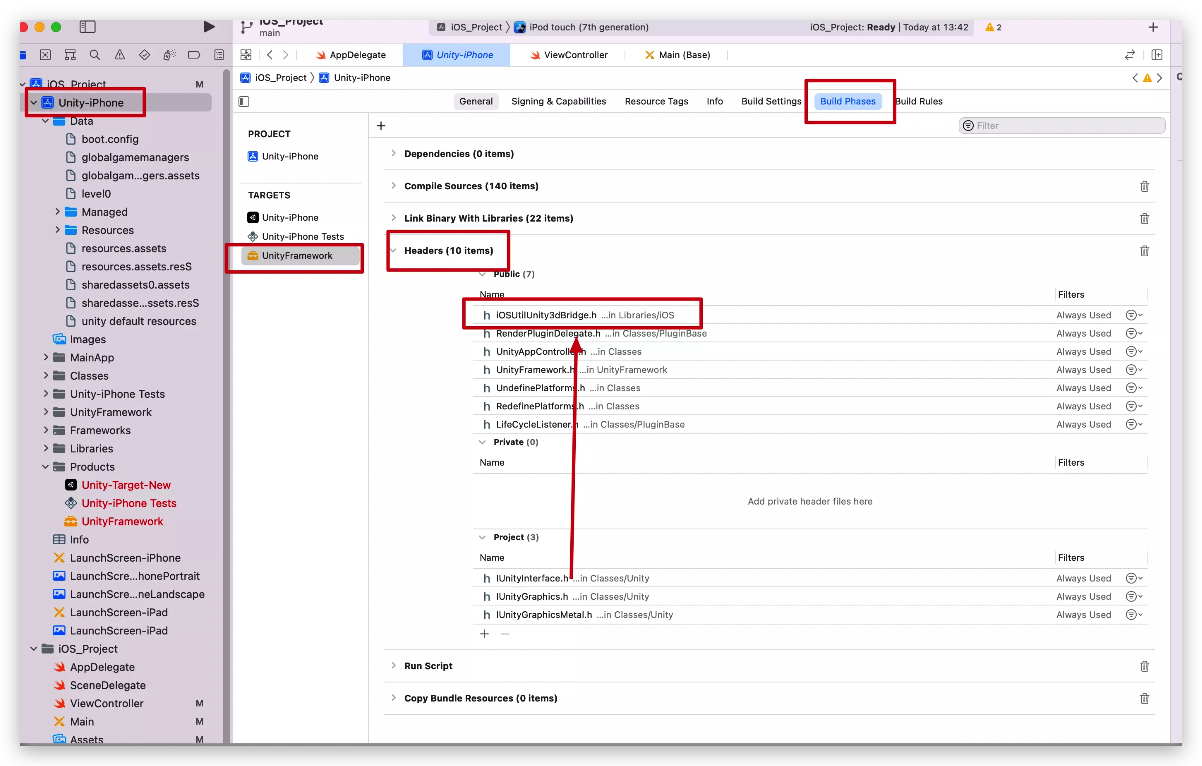
unity导出的ios项目,如下图需要调整iOSUtilUnity3dBridge.h的位置
添加如下代码
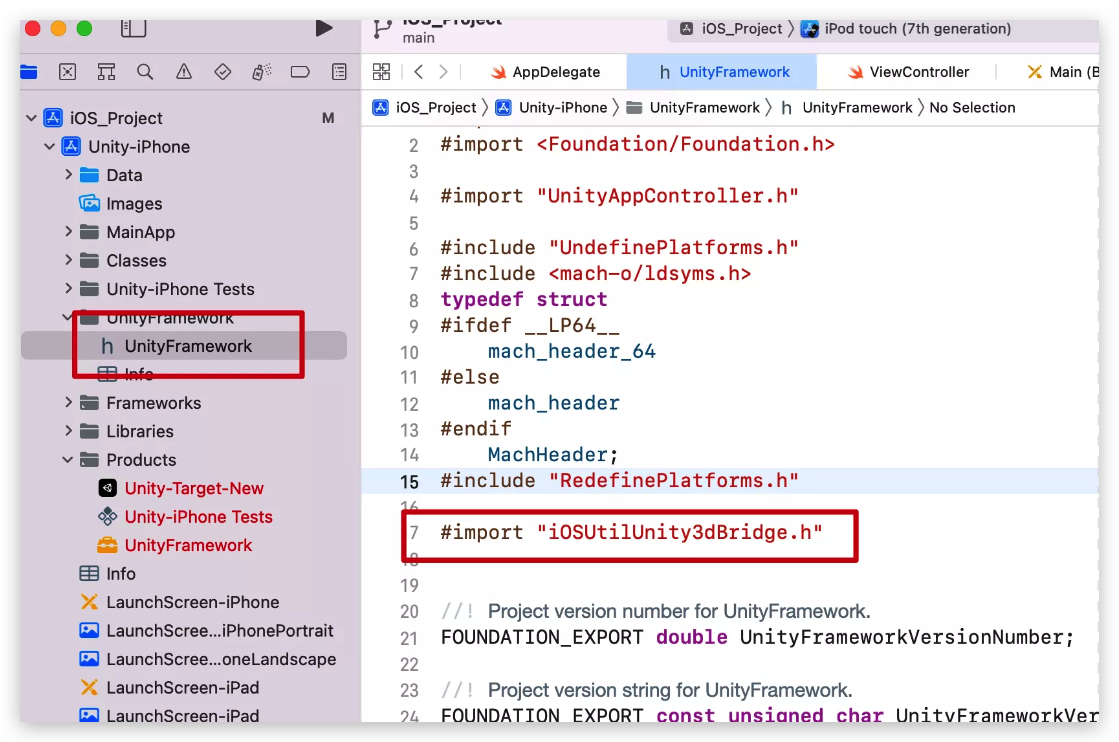
#import “iOSUtilUnity3dBridge.h”
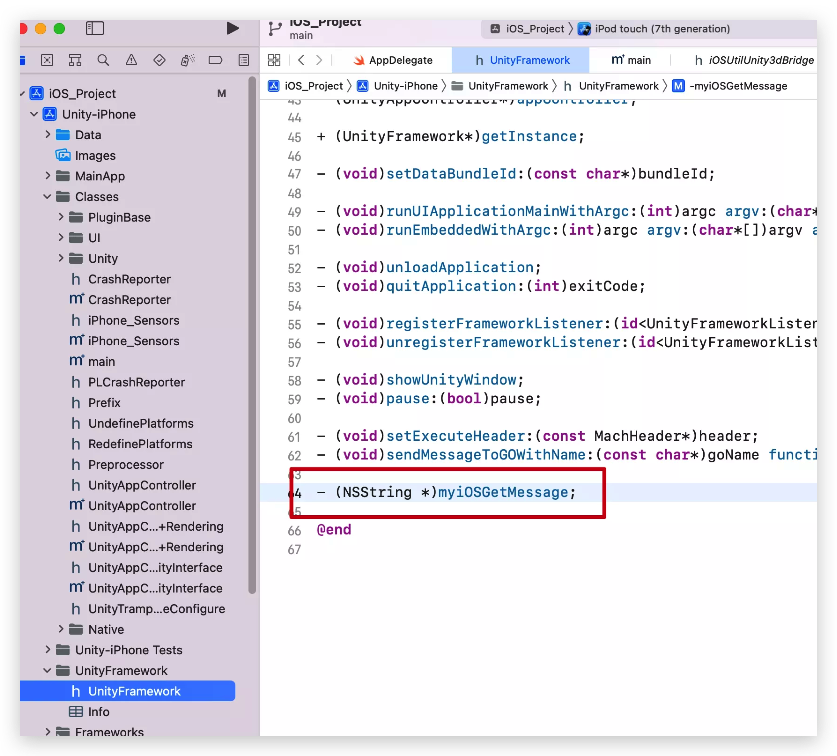
- (NSString *)myiOSGetMessage;
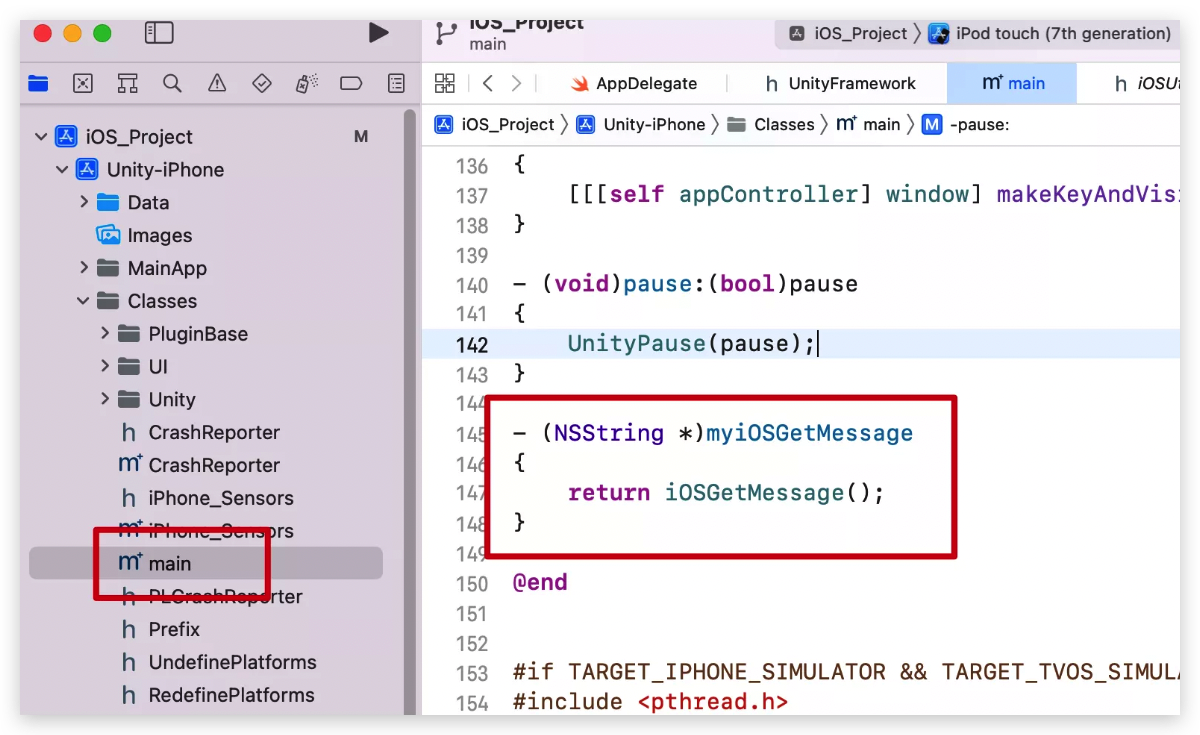
- (NSString *)myiOSGetMessage
{
return iOSGetMessage();
}
添加2个类,控制Unity游戏在APP画面里的显示
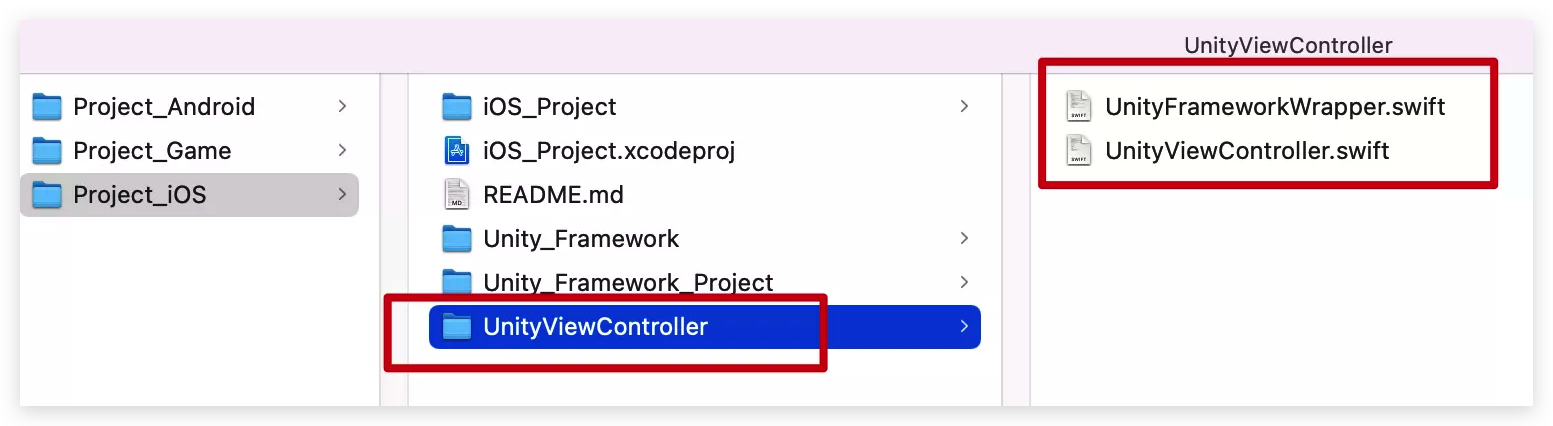
UnityFrameworkWrapper.swift
import Foundation
import UnityFramework
protocol UnityFrameworkDeallocator {
func exitUnity()
}
class UnityFrameworkWrapper: NSObject, UnityFrameworkListener {
static let shared = UnityFrameworkWrapper()
// MARK: - Properties
var framework: UnityFramework
var delegate: UnityFrameworkDeallocator?
// MARK: - init
override init() {
self.framework = UnityFramework.getInstance()
super.init()
//下面的BundleId是unity的ios工程里framework的target里的BundleId,这个要和里面的包名一致。
framework.setDataBundleId("com.unity3d.framework")
framework.register(self)
//这句不加,程序运行不起来
framework.runEmbedded(withArgc: CommandLine.argc, argv: CommandLine.unsafeArgv, appLaunchOpts: nil)
}
// MARK: - NativeCallsProtocol
func showHostMainWindow(_ color: String!) {
delegate?.exitUnity()
}
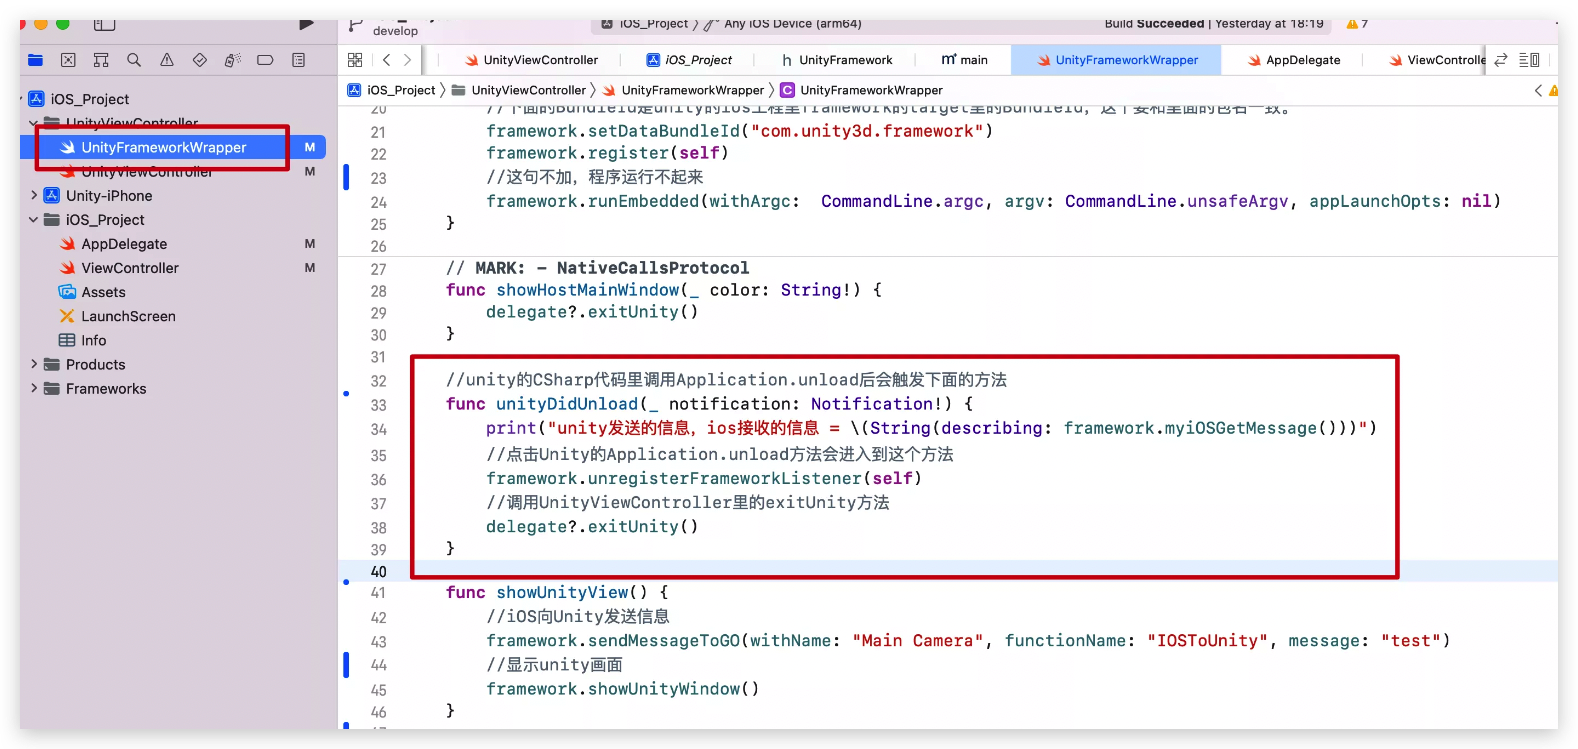
//unity的CSharp代码里调用Application.unload后会触发下面的方法
func unityDidUnload(_ notification: Notification!) {
print("unity发送的信息,ios接收的信息 = \(String(describing: framework.myiOSGetMessage()))")
//点击Unity的Application.unload方法会进入到这个方法
framework.unregisterFrameworkListener(self)
//调用UnityViewController里的exitUnity方法
delegate?.exitUnity()
}
func showUnityView() {
//iOS向Unity发送信息
framework.sendMessageToGO(withName: "Main Camera", functionName: "IOSToUnity", message: "test")
//显示unity画面
framework.showUnityWindow()
}
}
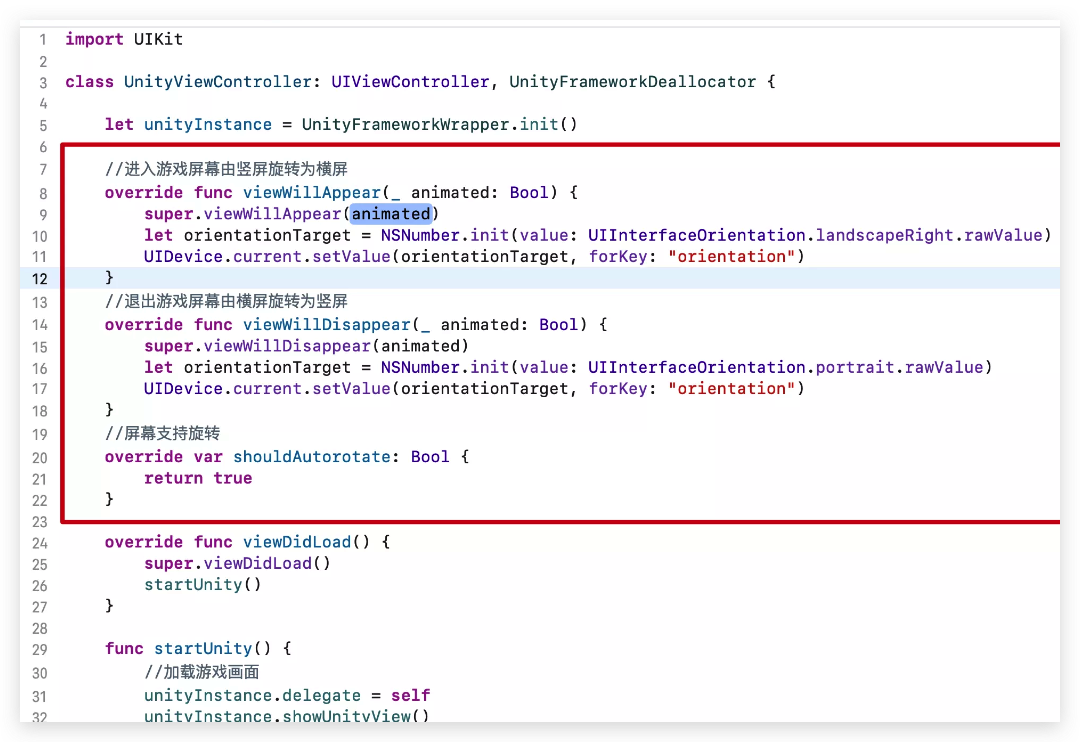
UnityViewController.swift
import UIKit


class UnityViewController: UIViewController, UnityFrameworkDeallocator {


    let unityInstance = UnityFrameworkWrapper.init()


    //进入游戏屏幕由竖屏旋转为横屏
    override func viewWillAppear(_ animated: Bool) {
        super.viewWillAppear(animated)
        let orientationTarget = NSNumber.init(value: UIInterfaceOrientation.landscapeRight.rawValue)
        UIDevice.current.setValue(orientationTarget, forKey: "orientation")
    }
    //退出游戏屏幕由横屏旋转为竖屏
    override func viewWillDisappear(_ animated: Bool) {
        super.viewWillDisappear(animated)
        let orientationTarget = NSNumber.init(value: UIInterfaceOrientation.portrait.rawValue)
        UIDevice.current.setValue(orientationTarget, forKey: "orientation")
    }
    //屏幕支持旋转
    override var shouldAutorotate: Bool {
        return true
    }

    override func viewDidLoad() {
        super.viewDidLoad()
        startUnity()
    }

    func startUnity() {
        //加载游戏画面
        unityInstance.delegate = self
        unityInstance.showUnityView()
    }


    func exitUnity() {
        //退出游戏画面
        let appDelegate = UIApplication.shared.delegate as? AppDelegate
        //不加下面的代码,从游戏回到APP画面会卡主
        if let window = appDelegate?.window {
            window.makeKeyAndVisible()
        }
        //退回上一级画面
        self.dismiss(animated: false, completion: nil)
    }


}
06 新建一个文件夹存放生成的unityframework

编译生成unityframework
找到它
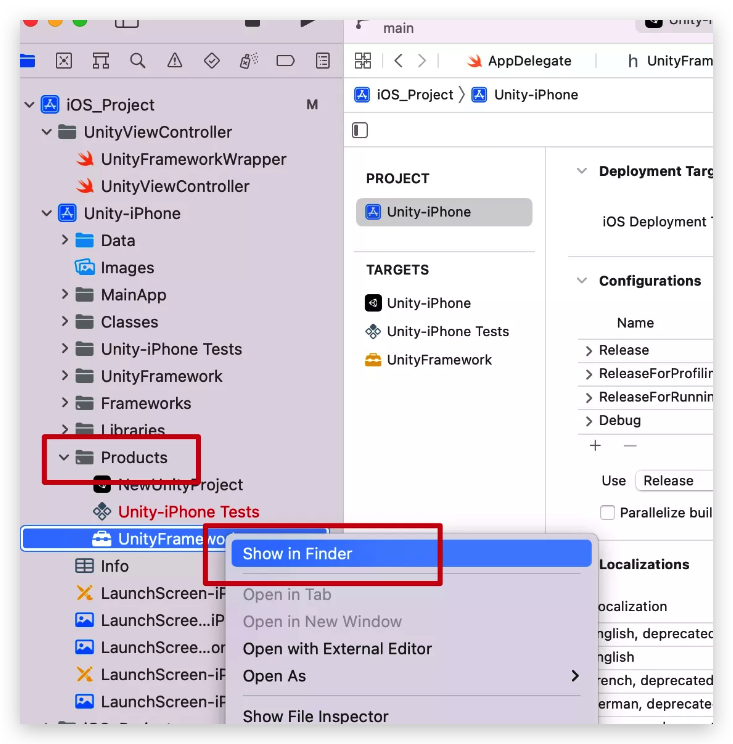

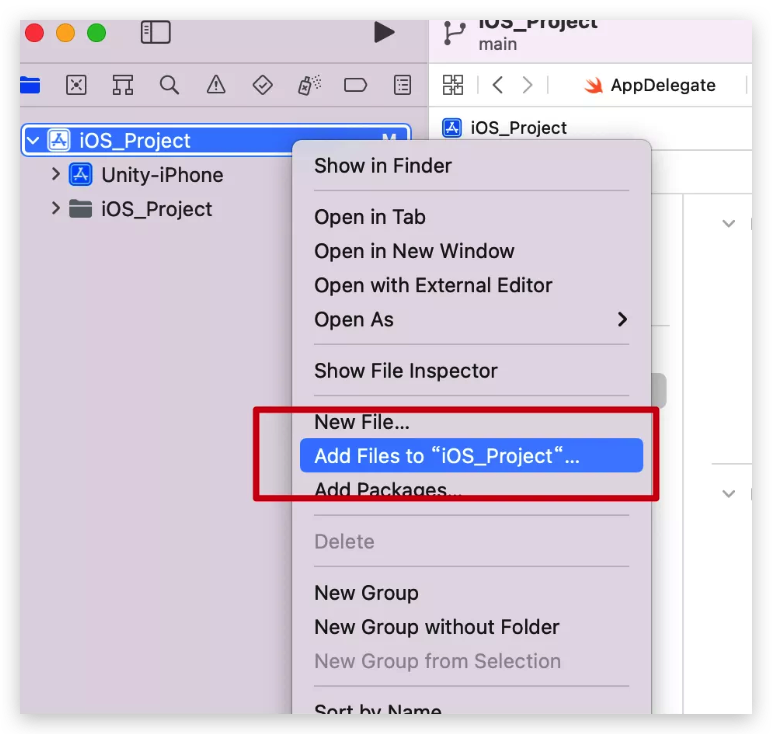
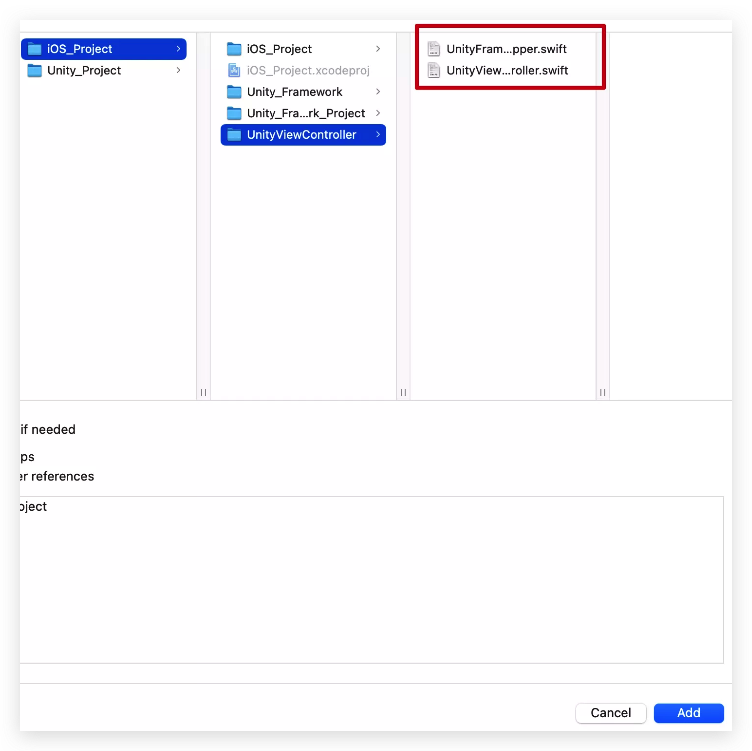
添加进iOS工程
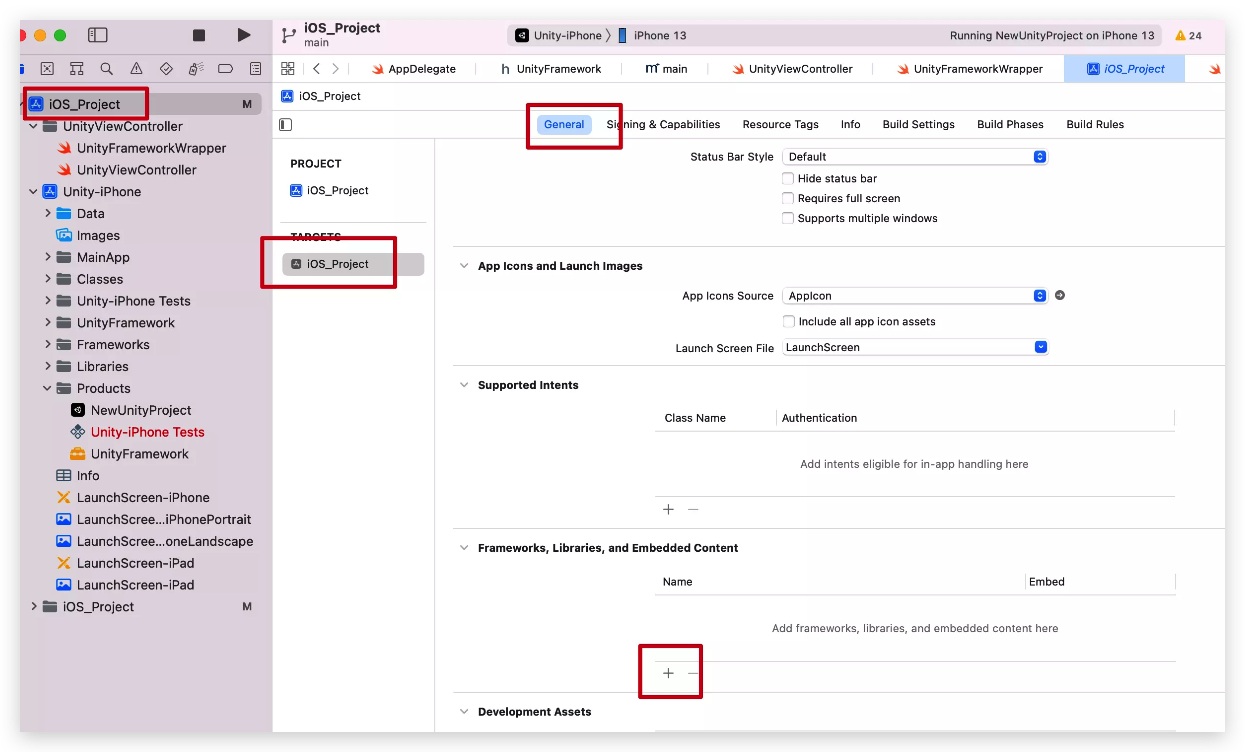

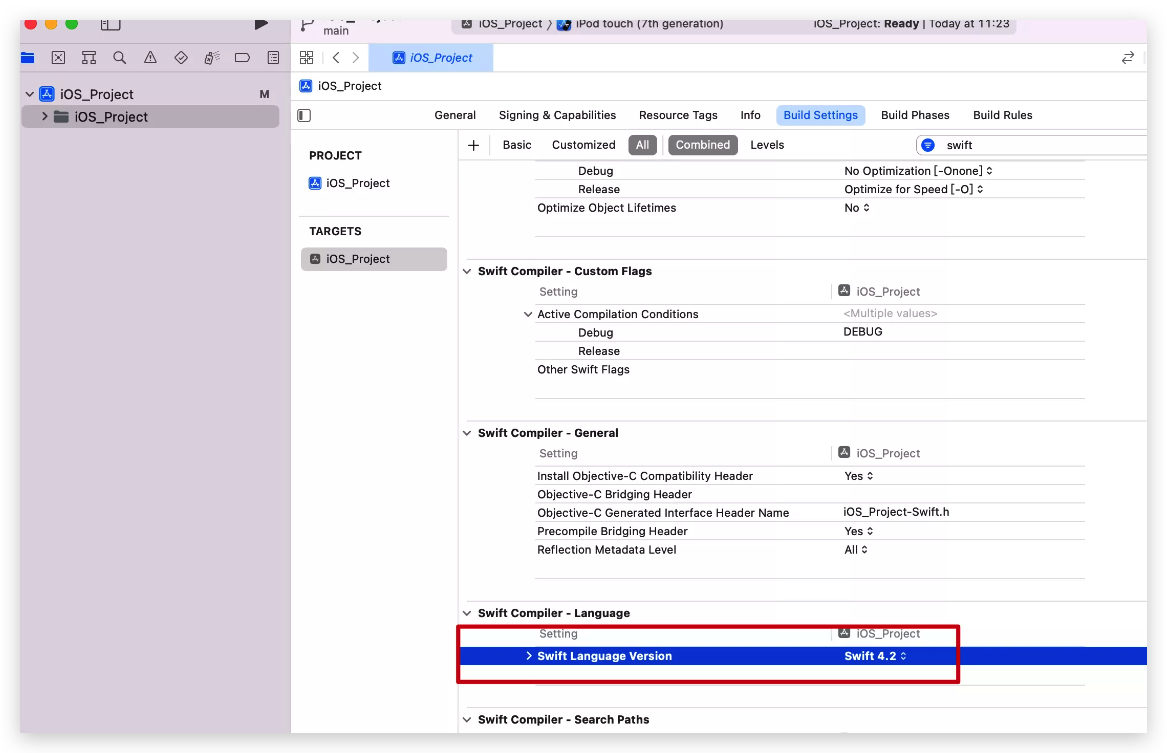
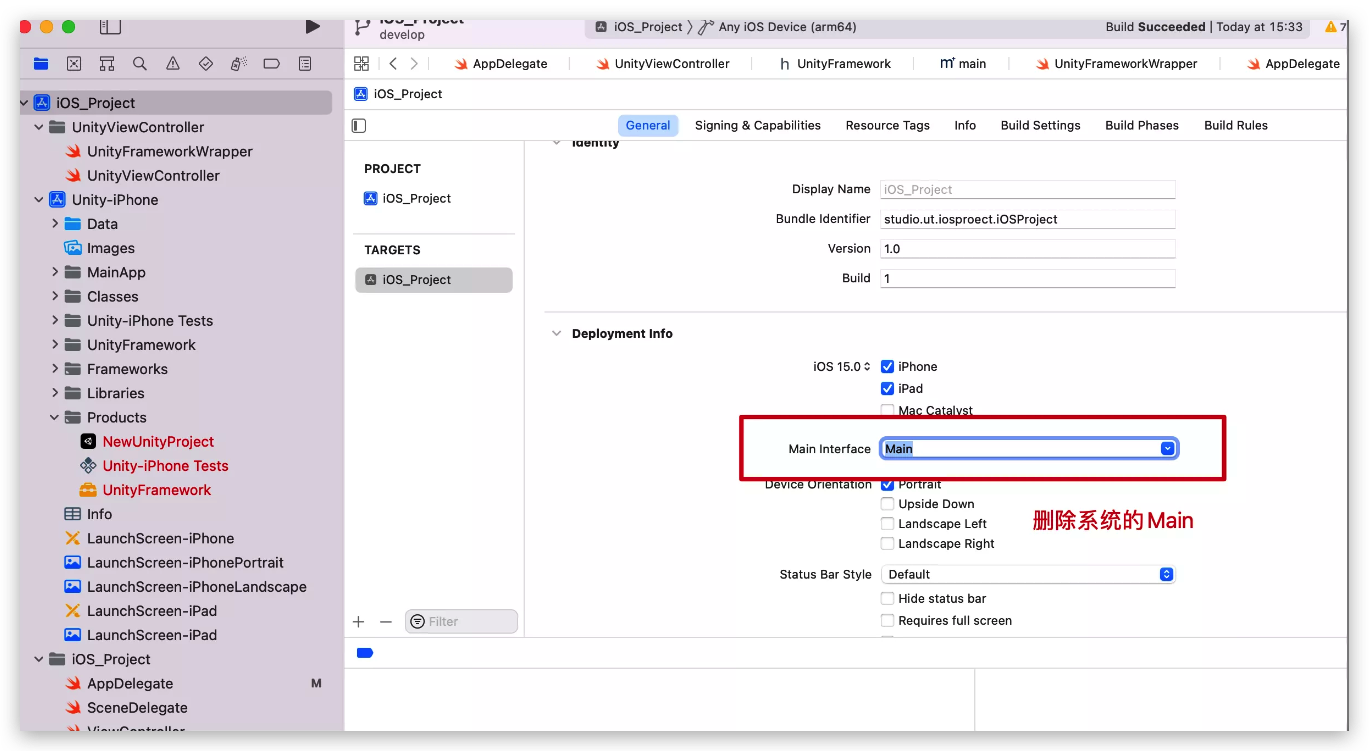
Xcode13建立的工程,iOS做一些设置
开发语言设为Swift4.2
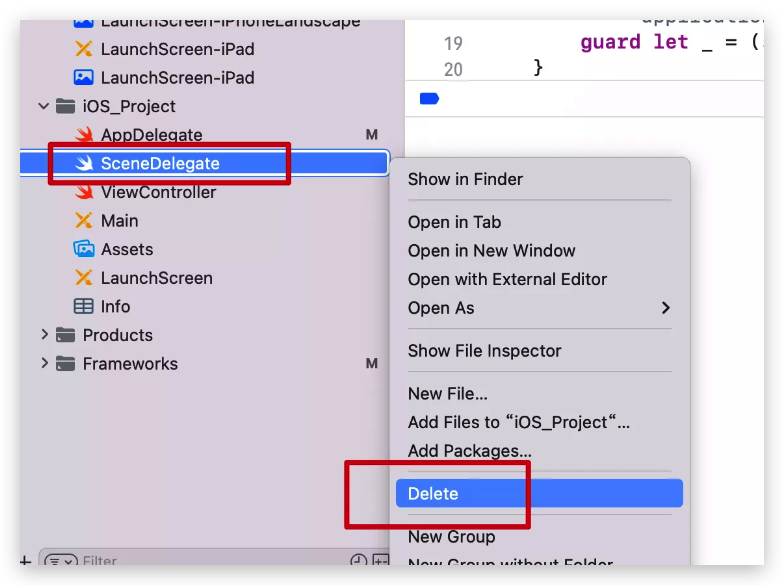
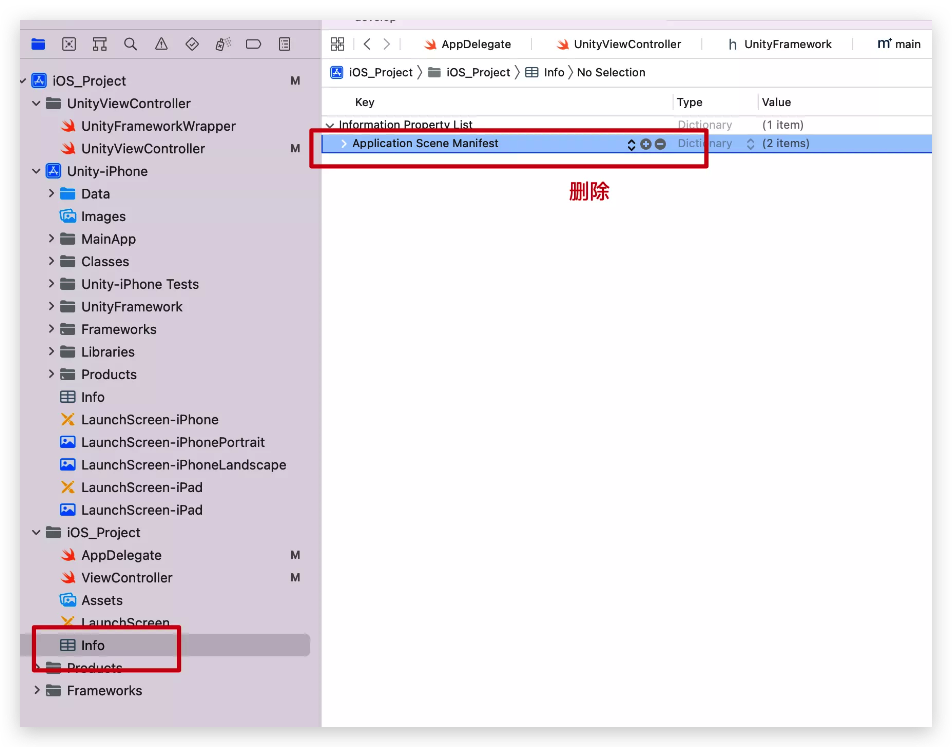
删除系统的Main,自己新建一个
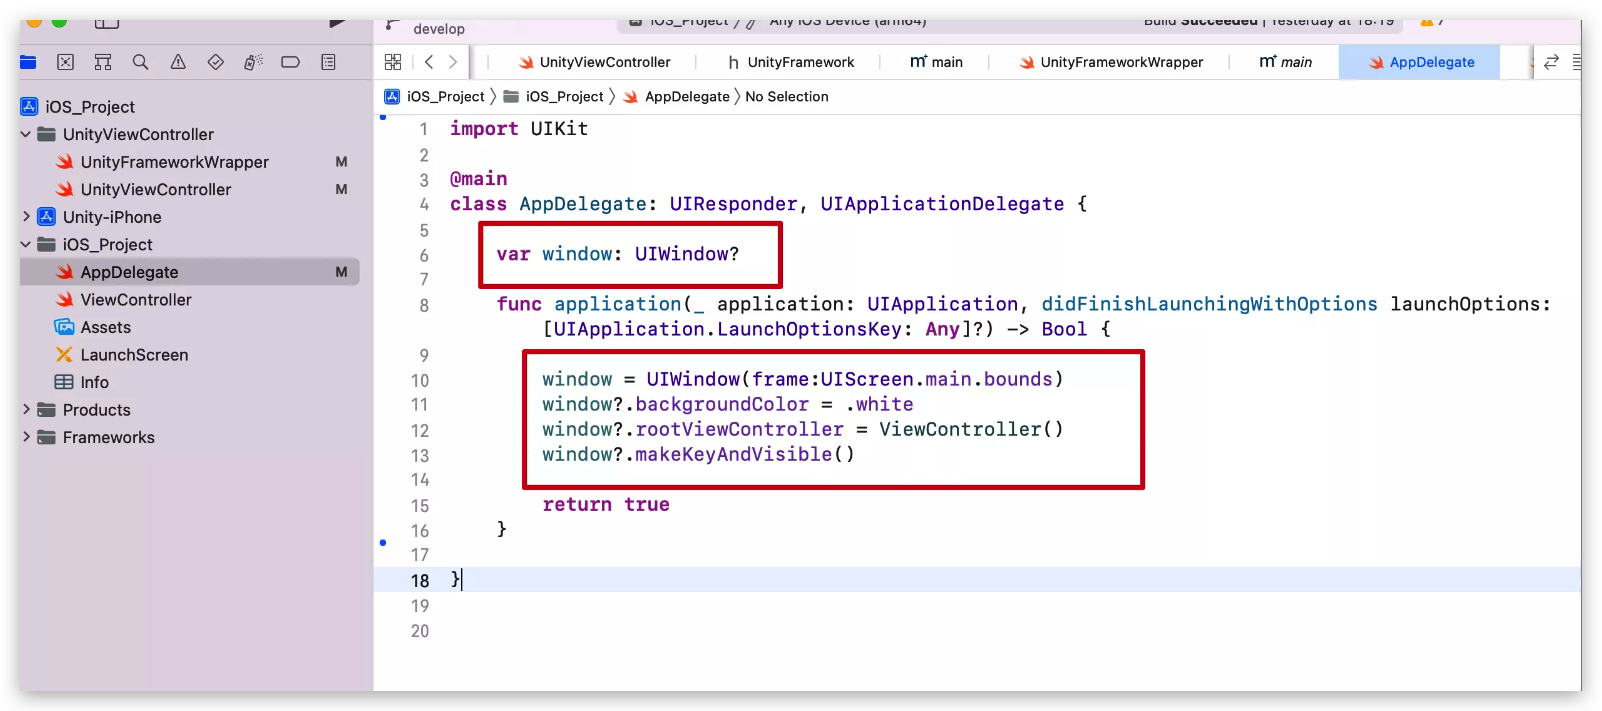
import UIKit


@main
class AppDelegate: UIResponder, UIApplicationDelegate {
    var window: UIWindow?
    func application(_ application: UIApplication, didFinishLaunchingWithOptions launchOptions: [UIApplication.LaunchOptionsKey: Any]?) -> Bool {
        window = UIWindow(frame:UIScreen.main.bounds)
        window?.backgroundColor = .white
        window?.rootViewController = ViewController()
        window?.makeKeyAndVisible()
        return true
    }
}

07 实现进入游戏和传值的部分
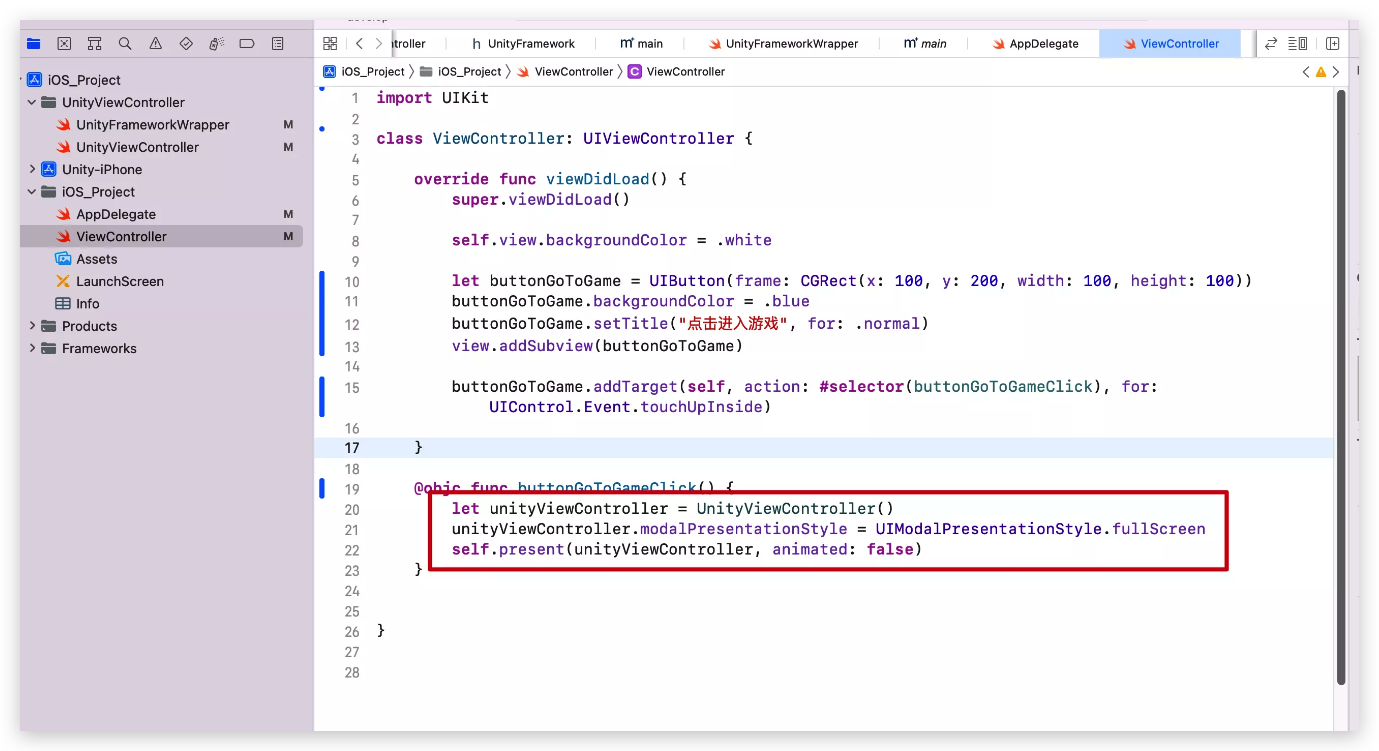
import UIKit


class ViewController: UIViewController {


    override func viewDidLoad() {
        super.viewDidLoad()

        self.view.backgroundColor = .white

        let buttonGoToGame = UIButton(frame: CGRect(x: 100, y: 200, width: 100, height: 100))
        buttonGoToGame.backgroundColor = .blue
        buttonGoToGame.setTitle("点击进入游戏", for: .normal)
        view.addSubview(buttonGoToGame)

        buttonGoToGame.addTarget(self, action: #selector(buttonGoToGameClick), for: UIControl.Event.touchUpInside)

    }

    @objc func buttonGoToGameClick() {
        let unityViewController = UnityViewController()
        unityViewController.modalPresentationStyle = UIModalPresentationStyle.fullScreen
        self.present(unityViewController, animated: false)
    }


}
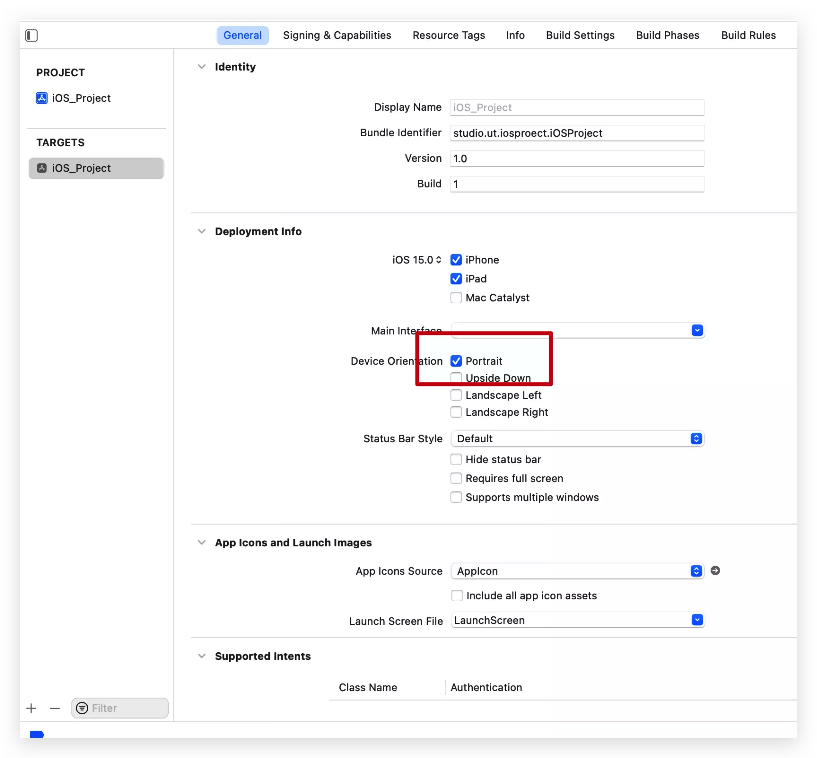
08 项目APP是竖屏,游戏是横屏,做的一些设置
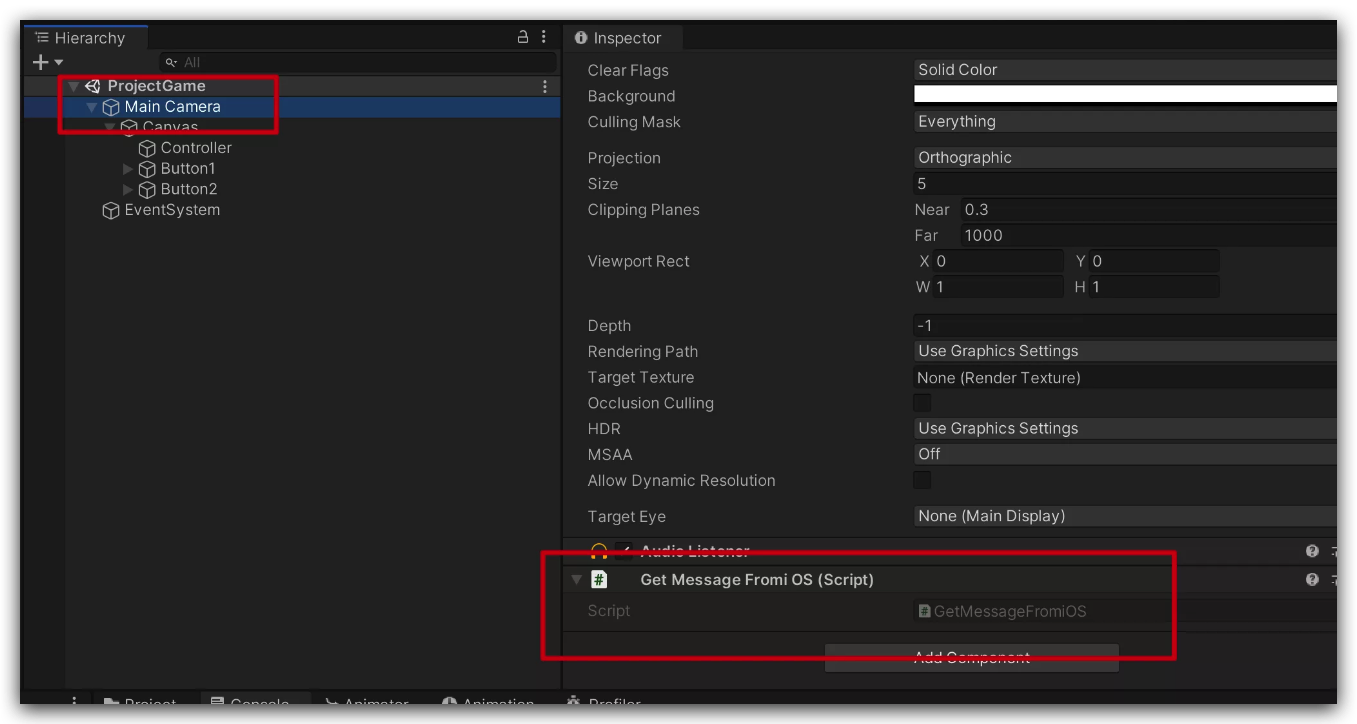
09 ios向unity传值的核心代码

原理是发送的信息给到游戏的主摄像机上,上面挂上脚本接收。
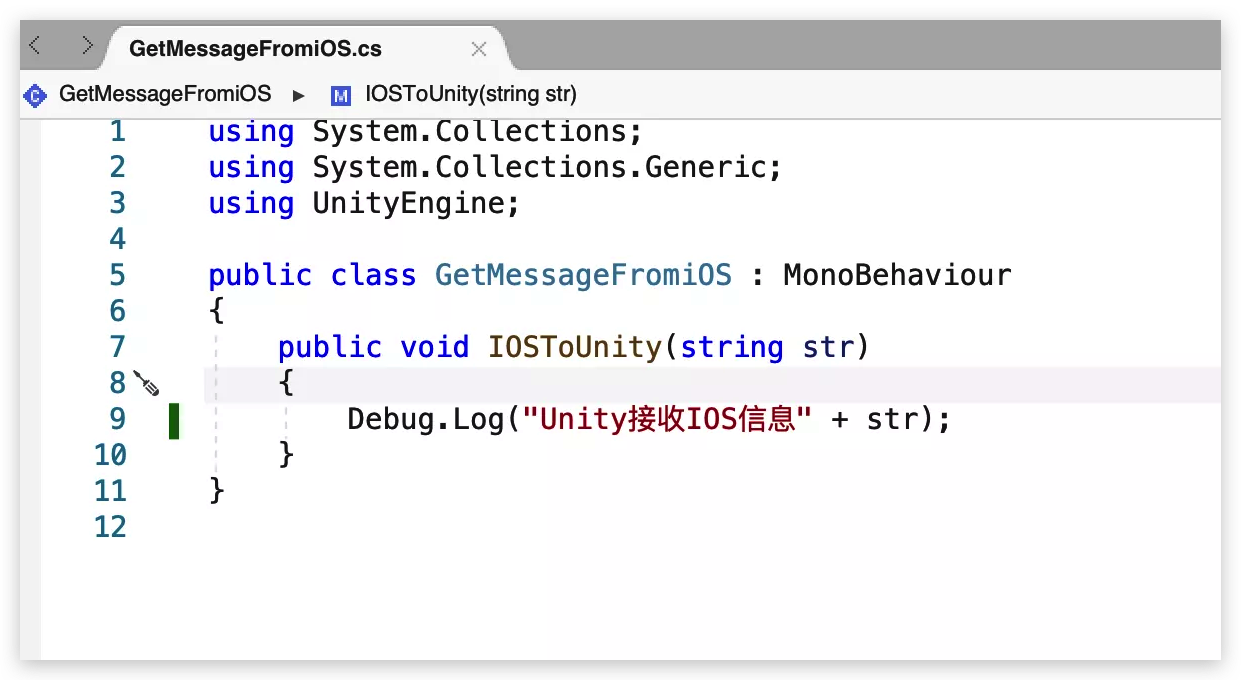
using System.Collections;
using System.Collections.Generic;
using UnityEngine;

public class GetMessageFromiOS : MonoBehaviour
{
    public void IOSToUnity(string str)
    {
        Debug.Log("Unity接收IOS信息" + str);
    }
}
10 unity传值给ios的核心代码

using System.Collections;
using System.Collections.Generic;
using System.Runtime.InteropServices;
using UnityEngine;
using UnityEngine.UI;

public class Demo : MonoBehaviour
{

    public Button button1;
    public Button button2;
    public Camera camera;

#if UNITY_IOS
    [DllImport("__Internal")]
    // Unity传值给iOS
    private static extern string UnitySendMessageToiOS(string message);
#endif

    // Start is called before the first frame update
    void Start()
    {

        button1.onClick.AddListener(()=>
        {
#if UNITY_IOS
            //Unity发送信息给iOS
            UnitySendMessageToiOS("UnityToiOS");
            //unity程序关闭
            Application.Unload();
#endif
        });

        //主相机颜色改变
        button2.onClick.AddListener(() =>
        {
            camera.backgroundColor = new Color(0 / 255, 255 / 255, 255 / 255);
        });
    }
}
版权声明:本文内容由互联网用户自发贡献,该文观点与技术仅代表作者本人。本站仅提供信息存储空间服务,不拥有所有权,不承担相关法律责任。如发现本站有涉嫌侵权/违法违规的内容, 请发送邮件至 [email protected] 举报,一经查实,本站将立刻删除。