
十六:网络启动(ubuntu文件系统)
网络启动,是用 TFTP 在服务器下载内核、dtb文件到目标机的内存中,同时可以用 NFS 挂载网络根文件系统到目标机上,实现目标机的无盘启动。
16.1:服务器配置
与板卡连接的网口网络IP设置成:192.168.8.77,U-Boot设置章节要用到。
⑴ 在服务器(PC机)上部署TFTP
① 安装TFTP服务器
sudo apt install tftp-hpa
sudo apt install tftp
② 创建/tftpboot目录并赋予权限:
mkdir /tftpboot
mkdir /tftpboot/new //nfs要用
sudo chmod 777 /tftpboot
③ 然后修改 TFTP 服务器的配置文件/etc/default/tftpd-hpa,修改内容为:
# /etc/default/tftpd-hpa
TFTP_USERNAME="tftp"
TFTP_DIRECTORY="/tftpboot" #tftp目录
TFTP_ADDRESS="0.0.0.0:69"
TFTP_OPTIONS="-c -s -l"
#TFTP_OPTIONS="--secure"
④ 退出修改后重启 TFTP 服务器:
sudo service tftpd-hpa restart
⑤ 在/tftpboot目录中创建一个文件,测试TFTP服务是否可用:
cd /tftpboot/
touch test //创建一个test文件
cd /tmp
wmh@wmh-VirtualBox:/tmp$ tftp 127.0.0.1
tftp> get test //获取test文件,没有报错,说明文件存在,tftp配置正确。
tftp> get huhu
Error code 1: File not found
tftp> q
⑵ 在服务器上部署NFS服务
① 安装NFS服务器
sudo apt-get install nfs-kernel-server
② 配置NFS
将定制好的根文件系统复制到 /tftpboot目录下。
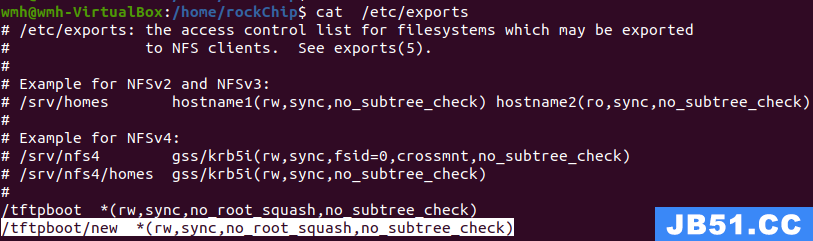
sudo vim /etc/exports //修改文件,在文件内添加下面一行:
/tftpboot *(rw,sync,no_root_squash,no_subtree_check)
/tftpboot/new *(rw,no_subtree_check) //*代表的是所有用户可访问。
//文件系统的所有目录和文件最后都会拷贝到 /tftpboot/new目录下。
③ 重启NFS服务器
sudo service rpcbind restart //映射好端口,通过rpcbind设定
sudo /etc/init.d/nfs-kernel-server restart(或sudo service nfs-kernel-server restart)
④ 本地挂载共享目录,测试NFS服务器是否可用。
sudo mount -t nfs 127.0.0.1:/tftpboot/new /mnt/
sudo umount /mnt //卸载挂载的共享目录
⑤ 显示共享目录
showmount -a
showmount -e

⑥ 显示nfs版本
nfsstat -v
16.2:配置内核支持加载网络根文件系统
如果要做到挂载网络根文件系统,需要在内核中做相关配置,并在 dts 中修改相关挂载根文件系统的配置。
详细说明可以参考内核目录中的 kernel/Documentation/filesystems/nfs/nfsroot.txt。
⑴ 修改内核
| 如果按(2)修改dts文件后,没有按 (1)修改内核,则报以下错误: [ 1.850572] #0: rockchip,hdmi [ 1.850580] #1: rockchip,rk809-codec [ 1.864157] ata1: SATA link down (SStatus 0 SControl 300) [ 1.864183] ata1: ready = 1 sstatus = 0 [ 1.864574] RAMDISK: Couldn't find valid RAM disk image starting at 0. [ 1.865298] VFS: Cannot open root device "nfs" or unknown-block(0,255): error -6 [ 1.865318] Please append a correct "root=" boot option; here are the available partitions: [ 1.865343] 0100 4096 ram0 [ 1.865345] (driver?) ……………………………………………………………………………………… [ 1.865739] Kernel panic - not syncing: VFS: Unable to mount root fs on unknown-block(0,255) [ 1.881189] CPU: 3 PID: 1 Comm: swapper/0 Not tainted 4.19.232 #1 [ 1.881732] Hardware name: Firefly RK3568-ROC-PC HDMI (Linux) (DT) [ 1.882277] Call trace: [ 1.882522] dump_backtrace+0x0/0x188 |
| ## Booting FIT Image Sysmem Error: "KERNEL" (0x00280000 - 0x0195ea00) alloc is overlap with existence "FIT_USER" (0x0027f800 - 0x021f1804) tftpbootm [loadAddress] [[hostIPaddr:]bootfilename] rv1126_set_rgmii_speed can't get clk_mac_speed clock (ret=-22): Could not get PHY for ethernet@fe010000: addr -19 phy_connect() failedFAILED: 0"Synchronous Abort" handler,esr 0x96000004 |
-
首先进行内核配置,在内核目录中执行make
[*] Networking support --->
Networking options --->
[*] IP: kernel level autoconfiguration
[*] IP: DHCP support
[*] IP: BOOTP support
[*] IP: RARP support
File systems --->
<> kernel automounter support(supports v3,v4 and v5) //可以不需要
[*] Network File Systems --->
[*] Root file system on NFS

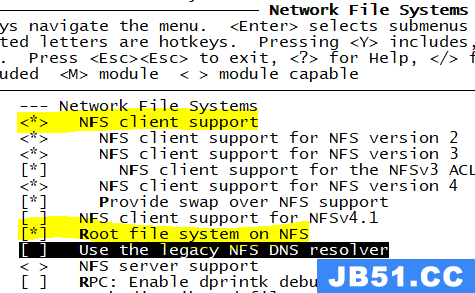
- 修改后,.config里面会多启用以下4行:

⑵ 修改dts文件
- 在dts文件中修改chosen节点下的bootargs参数
| 修改rk3399-firefly.dts配置,选择使用 NFS 挂载远程根文件系统,内容如下: |
chosen { bootargs = "earlycon=uart8250,mmio32,0xff1a0000 swiotlb=1 console=ttyFIQ0 root=/dev/nfs rootfstype=ext4 rootwait"; }; #主要是修改 root 的值,root=/dev/nfs 表示通过 NFS 挂载网络根文件系统 |
- rk3568-linux.dtsi(firefly)(解决启动卡死的问题):
| 原配置: chosen: chosen { bootargs = "earlycon=uart8250,0xfe660000 console=ttyFIQ0 root=PARTLABEL=rootfs rootfstype=ext4 ro rootwait overlayroot=device:dev=PARTLABEL=userdata,fstype=ext4,mkfs=1 coherent_pool=1m systemd.gpt_auto=0 cgroup_enable=memory swapaccount=1"; }; 内核启动打印错误信息: RAMDISK: Couldn't find valid RAM disk image starting at 0. Waiting for root device PARTLABEL=rootfs... [ 2.293197] rk-pcie 3c0800000.pcie: PCIe Linking... LTSSM is 0x0 [ 3.306514] rk-pcie 3c0800000.pcie: PCIe Linking... LTSSM is 0x0 [ 4.319848] rk-pcie 3c0800000.pcie: PCIe Linking... LTSSM is 0x0 [ 5.333168] rk-pcie 3c0800000.pcie: PCIe Linking... LTSSM is 0x0 [ 6.346478] rk-pcie 3c0800000.pcie: PCIe Linking... LTSSM is 0x0 [ 7.359809] rk-pcie 3c0800000.pcie: PCIe Linking... LTSSM is 0x1 [ 8.373204] rk-pcie 3c0800000.pcie: PCIe Linking... LTSSM is 0x0 [ 9.386453] rk-pcie 3c0800000.pcie: PCIe Linking... LTSSM is 0x0 [ 10.399815] rk-pcie 3c0800000.pcie: PCIe Linking... LTSSM is 0x0 [ 11.413134] rk-pcie 3c0800000.pcie: PCIe Link Fail [ 11.413204] rk-pcie 3c0800000.pcie: failed to initialize host [ 32.053256] vcc3v3_lcd0_n: disabling [ 32.053338] vcc3v3_lcd1_n: disabling [ 32.053382] pcie30_3v3: disabling 启动卡住在这里 |
| 修改为(需要做以下修改才支持NFS): chosen: chosen { bootargs = "earlycon=uart8250,0xfe660000 console=ttyFIQ0 root=/dev/nfs rootfstype=ext4 ro rootwait overlayroot=device:dev=PARTLABEL=userdata,mkfs=1 coherent_pool=1m systemd.gpt_auto=0 cgroup_enable=memory swapaccount=1"; }; 或者去掉root,由uboot环境变量bootargs配置root值。 chosen: chosen { bootargs = "earlycon=uart8250,0xfe660000 console=ttyFIQ0 rootfstype=ext4 ro rootwait overlayroot=device:dev=PARTLABEL=userdata,mkfs=1 coherent_pool=1m systemd.gpt_auto=0 cgroup_enable=memory swapaccount=1"; }; 内核启动打印信息: [ 5.597129] RAMDISK: Couldn't find valid RAM disk image starting at 0. //说明已经挂载上了网络根文件系统。 [ 5.637233] VFS: Mounted root (nfs filesystem) readonly on device 0:16. [ 5.639915] devtmpfs: mounted //说明文件系统挂载成功,否则挂载失败。 |
- rk3568-linux.dtsi(firefly)(解决文件系统为只读文件系统的问题):
| 原配置: chosen: chosen { bootargs = "earlycon=uart8250,0xfe660000 console=ttyFIQ0 root=/dev/nfs rootfstype=ext4 ro rootwait overlayroot=device:dev=PARTLABEL=userdata,mkfs=1 coherent_pool=1m systemd.gpt_auto=0 cgroup_enable=memory swapaccount=1"; }; 提示只读文件系统:内核启动打印信息: [ 5.597129] RAMDISK: Couldn't find valid RAM disk image starting at 0. //说明已经挂载上了网络根文件系统。 [ 5.637233] VFS: Mounted root (nfs filesystem) readonly on device 0:16. [ 5.639915] devtmpfs: mounted //说明文件系统挂载成功,否则挂载失败。 .................................................................... [ OK ] Started Serial Getty on ttyFIQ0. [ OK ] Started Getty on tty1. [ OK ] Reached target Login Prompts. Ubuntu 18.04.6 LTS localhost.localdomain ttyFIQ0 localhost login: firefly Password: mktemp: failed to create file via template '/var/lib/update-notifier/tmp.XXXXXXXXXX': Read-only file system run-parts: /etc/update-motd.d/95-hwe-eol exited with return code 1 /usr/lib/update-notifier/update-motd-fsck-at-reboot: 33: /usr/lib/update-notifier/update-motd-fsck-at-reboot: cannot create /var/lib/update-notifier/fsck-at-reboot: Read-only file system -bash: cannot create temp file for here-document: Read-only file system |
| 修改为(需要做以下修改,文件系统才是非只读文件系统): chosen: chosen { //bootargs = "earlycon=uart8250,0xfe660000 console=ttyFIQ0 root=/dev/nfs rootfstype=ext4 ro rootwait overlayroot=device:dev=PARTLABEL=userdata,mkfs=1 coherent_pool=1m systemd.gpt_auto=0 cgroup_enable=memory swapaccount=1"; /*bootargs = "earlycon=uart8250,0xfe660000 console=ttyFIQ0 root=PARTUUID=614e0001-0000-4b53-8000-1d28000054a9 rw rootwait fbcon=rotate:0"; /*bootargs = "earlycon=uart8250,0xfe660000 console=ttyFIQ0 root=/dev/nfs rw rootwait fbcon=rotate:0";*/ bootargs = "earlycon=uart8250,0xfe660000 console=ttyFIQ0 rw rootwait fbcon=rotate:0"; }; 去掉root,由uboot环境变量bootargs配置root值。 |
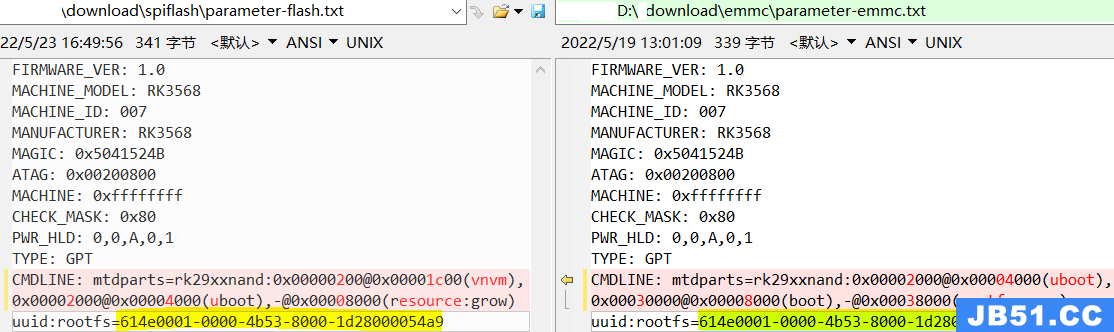
- rk3568-linux.dtsi:
| 原配置: chosen: chosen { bootargs = "earlycon=uart8250,0xfe660000 console=ttyFIQ0 root=PARTUUID=614e0001-0000-4b53-8000-1d28000054a9 rw rootwait fbcon=rotate:0"; }; 默认root的值对应parameter-flash.txt和parameter-emmc.txt里面的rootfs的值:
|
| 修改为(需要做以下修改才支持NFS): chosen: chosen { bootargs = "earlycon=uart8250,0xfe660000 console=ttyFIQ0 root=/dev/nfs rw rootwait fbcon=rotate:0"; }; |
⑶ 编译内核
make ARCH=arm64 rk3568-firefly-roc-pc.img //对应设备树文件rk3568-firefly-roc-pc.dts
⑷ 拷贝文件到/tftpboot目录下
编译完成后,将编译好的内核文件boot.img和rk3568-firefly-roc-pc.dtb文件复制到/tftpboot目录中:
cp boot.img /tftpboot/
cp arch/arm64/boot/dts/rockchip/rk3568-firefly-roc-pc.dtb /tftpboot/

16.3:Ubuntu根文件系统定制
16.3.1:安装qemu:
sudo apt-get install qemu-user-static
16.3.2:下载和解压 ubuntu-core:
- 下载文件(半成品文件系统):
Ubuntu的移植非常简单,不需要我们编译任何东西,因为Ubuntu官方已经将根文件系统制作好了!我们只需要简单配置一下Ubuntu官方提供的base根文件系统,使其在我们的开发 板上跑起来即可。
http://cdimage.ubuntu.com/ubuntu-base/releases/20.04/release/
http://cdimage.ubuntu.com/ubuntu-base/releases/18.04/release/
ubuntu-base-18.04.5-base-arm64.tar.gz(需要找到aarch架构的)
- 解压:
mkdir temp
sudo chmod 777 -R temp/
cd temp/ //之后将ubuntu-base-18.04.5-base-arm64_aarch.tar.gz拷贝到temp目录下。
tar xvzf ubuntu-base-18.04.5-base-arm64_aarch.tar.gz
cd ..
mkdir temp/usr/bin/local //创建一个目录,安装xubuntu (ubuntu桌面)是可能要用到
sudo chmod 777 -R temp/usr/bin/local

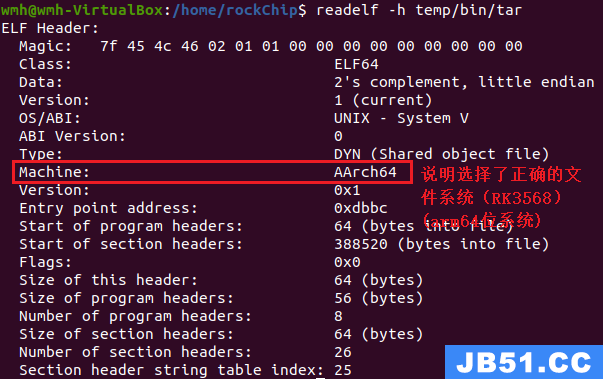
- 查看是否选择了正确的文件系统:
16.3.3:修改根文件系统:
- 准备工作:
- 设置软件源:
① 我们在ubuntu下使用apt-get安装软件的时候,是从网上下载软件并安装的,因此需要指定软件源。在设置软件源之前先将Ubuntu主机下的DNS配置文件/etc/resolv.conf拷贝到根文件系统中,命令如下:
sudo cp -b /etc/resolv.conf temp/etc/resolv.conf
② 手动修改源(一般要选对源)
设置软件源,打开根文件系统中的etc/apt/sources.list文件,在此文件最后面添加软件源,比如国内常用的清华源、中科大源等等,这些软件源可以直接在网上查找。注意,需要使用ARM源,不要找成了X86源。
| # 与etc/apt/sources.list对比,可以把etc/apt/sources.list文件里面不存在的添加到文件里面去。 # See http://help.ubuntu.com/community/UpgradeNotes for how to upgrade to # newer versions of the distribution. deb http://ports.ubuntu.com/ubuntu-ports/ bionic main restricted deb-src http://ports.ubuntu.com/ubuntu-ports/ bionic main restricted ## Major bug fix updates produced after the final release of the ## distribution. deb http://ports.ubuntu.com/ubuntu-ports/ bionic-updates main restricted deb-src http://ports.ubuntu.com/ubuntu-ports/ bionic-updates main restricted ## Uncomment the following two lines to add software from the 'universe' ## repository. ## N.B. software from this repository is ENTIRELY UNSUPPORTED by the Ubuntu ## team. Also,please note that software in universe WILL NOT receive any ## review or updates from the Ubuntu security team. deb http://ports.ubuntu.com/ubuntu-ports/ bionic universe deb-src http://ports.ubuntu.com/ubuntu-ports/ bionic universe deb http://ports.ubuntu.com/ubuntu-ports/ bionic-updates universe deb-src http://ports.ubuntu.com/ubuntu-ports/ bionic-updates universe ## N.B. software from this repository may not have been tested as ## extensively as that contained in the main release,although it includes ## newer versions of some applications which may provide useful features. ## Also,please note that software in backports WILL NOT receive any review ## or updates from the Ubuntu security team. deb http://ports.ubuntu.com/ubuntu-ports/ bionic-backports main restricted deb-src http://ports.ubuntu.com/ubuntu-ports/ bionic-backports main restricted deb http://ports.ubuntu.com/ubuntu-ports/ bionic-security main restricted deb-src http://ports.ubuntu.com/ubuntu-ports/ bionic-security main restricted deb http://ports.ubuntu.com/ubuntu-ports/ bionic-security universe deb-src http://ports.ubuntu.com/ubuntu-ports/ bionic-security universe deb http://ports.ubuntu.com/ubuntu-ports/ bionic-security multiverse deb-src http://ports.ubuntu.com/ubuntu-ports/ bionic-security multiverse |
| #中科大源,可能只支持ARM,不支持ARCH64 deb http://mirrors.ustc.edu.cn/ubuntu-ports/ xenial main multiverse restricted universe deb http://mirrors.ustc.edu.cn/ubuntu-ports/ xenial-backports main multiverse restricted universe deb http://mirrors.ustc.edu.cn/ubuntu-ports/ xenial-proposed main multiverse restricted universe deb http://mirrors.ustc.edu.cn/ubuntu-ports/ xenial-security main multiverse restricted universe deb http://mirrors.ustc.edu.cn/ubuntu-ports/ xenial-updates main multiverse restricted universe deb-src http://mirrors.ustc.edu.cn/ubuntu-ports/ xenial main multiverse restricted universe deb-src http://mirrors.ustc.edu.cn/ubuntu-ports/ xenial-backports main multiverse restricted universe deb-src http://mirrors.ustc.edu.cn/ubuntu-ports/ xenial-proposed main multiverse restricted universe deb-src http://mirrors.ustc.edu.cn/ubuntu-ports/ xenial-security main multiverse restricted universe deb-src http://mirrors.ustc.edu.cn/ubuntu-ports/ xenial-updates main multiverse restricted universe |
③ 从网站上下载源(未完成)
https://developer.aliyun.com/mirror/

- 准备qemu: sudo cp /usr/bin/qemu-aarch64-static temp/usr/bin/
- 在主机挂载并配置根文件系统
接下来将上面制作的根文件系统挂载到主机上,需要挂载proc、sys、dev、dev/pts等文件系统,最后使用chroot将主机的根文件系统切换到我们前面制作的根文件系统中。这里我们通过mount.sh挂载和卸载操作。
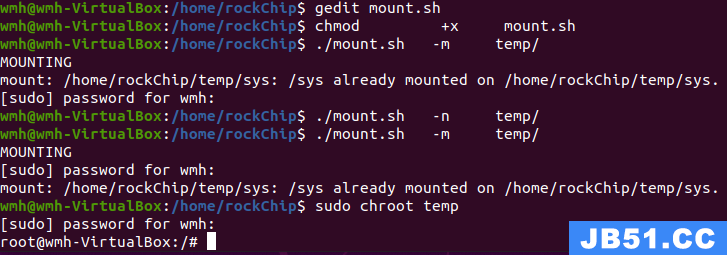
创建mount.sh(touch mount.sh、gedit mount.sh),并添加内容:
| #!/bin/bash mnt() { echo "MOUNTING" sudo mount -t proc /proc ${2}proc sudo mount -t sysfs /sys ${2}sys sudo mount -o bind /dev ${2}dev sudo mount -o bind /dev/pts ${2}dev/pts //sudo mount -t proc /proc temp/proc } umnt() { echo "UNMOUNTING" sudo umount ${2}proc sudo umount ${2}sys sudo umount ${2}dev/pts sudo umount ${2}dev } if [ "$1" == "-m" ] && [ -n "$2" ] ; then mnt $1 $2 elif [ "$1" == "-u" ] && [ -n "$2" ]; then umnt $1 $2 fi |
- 添加执行权限并使用脚本进行挂载:
chmod +x mount.sh
./mount.sh -m temp/
- 进入根文件系统进行操作:
sudo chroot temp
- 更新及安装:
- 更新
apt update
apt upgrade
- 安装一个rpm
apt install rpm
- 至少需要安装一个 systemd,否则开机无法进入系统
apt install -y systemd
- 安装自己需要的功能
apt install sudo //实际已经有啦
apt install vim git
apt install -y ntpdate //系统时间同步更新
apt install python-pyelftools
apt install iptables //网络防火墙,RedHat自带
apt install vnc4server //远程桌面控制软件
apt install telnet
apt install tftp
apt install ftp
apt install ssh //scp基于ssh登录
apt install cron //crontab服务(定时服务)(ubuntu上安装)
apt install gcc //安装gcc(目前版本:7.5.0)
apt install make //安装gcc时,可能会附带安装make。
apt install p7zip-full
apt install ncurses-* //部分应用需要的依赖
| 也可用以下方法安装ncurses: apt-get install build-essential apt-get install libncurses5 apt-get install libncurses5-dev |
apt-get install mysql-server //安装mysql服务器端
apt-get install mysql-client //安装mysql客户端
apt-get install mysql-* //跟mysql相关的全部安装上
apt-get install cmake qt5-default qtcreator //安装QT
apt-get install inetutils-ping
apt-get install net-tools
apt-get install ethtool
apt-get install ifupdown
apt-get install kmod //lsmod、rmmod、insmod、modinfo、modprobe、depmod,已有
apt-get install language-pack-en-base
apt-get install rsyslog
apt-get install htop
apt-get install nfs-common nfs-utils
apt-get install fio //对nvme等大容量设备进行测试
//centos上安装
yum install vixie-cron
yum install crontabs
yum install ncurses-devel
| 待验证: apt install pciutils //lspci apt install lsscsi //lsscsi apt install usbutils //lsusb apt install util-linux //lsblk apt install iperf //待验证。 apt install nmon //nmon 是一个交互式命令行工具,用于监视 CPU、磁盘、NFS、内存和 //网络利用率。使用 nmon 命令,然后按 t 查看利用更多资源的进程。 apt install inxi //显示了系统硬件,CPU,驱动程序,Xorg,台式机,内核,gcc版本, //进程,RAM使用情况以及各种其他有用信息。 apt install nvme-cli apt install mdadm //用于合并硬盘 |
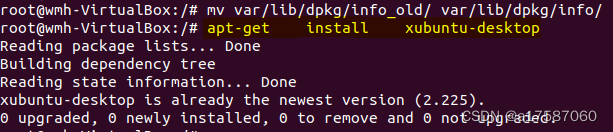
- 安装 xubuntu(ubuntu桌面):
apt-get install xubuntu-desktop
| 可能出现错误(因为找不到安装源): E: Unable to locate package xxxx |
| 安装包的源没有添加到/etc/apt/source.list中,导致无法识别安装包,可以自行添加源,也可以使用下面给出的source.list覆盖原来的 /etc/apt/source.list文件: |
# See http://help.ubuntu.com/community/UpgradeNotes for how to upgrade to # newer versions of the distribution. deb http://ports.ubuntu.com/ubuntu-ports/ bionic main restricted deb-src http://ports.ubuntu.com/ubuntu-ports/ bionic main restricted ## Major bug fix updates produced after the final release of the ## distribution. deb http://ports.ubuntu.com/ubuntu-ports/ bionic-updates main restricted deb-src http://ports.ubuntu.com/ubuntu-ports/ bionic-updates main restricted ## Uncomment the following two lines to add software from the 'universe' ## repository. ## N.B. software from this repository is ENTIRELY UNSUPPORTED by the Ubuntu ## team. Also,please note that software in universe WILL NOT receive any ## review or updates from the Ubuntu security team. deb http://ports.ubuntu.com/ubuntu-ports/ bionic universe deb-src http://ports.ubuntu.com/ubuntu-ports/ bionic universe deb http://ports.ubuntu.com/ubuntu-ports/ bionic-updates universe deb-src http://ports.ubuntu.com/ubuntu-ports/ bionic-updates universe ## N.B. software from this repository may not have been tested as ## extensively as that contained in the main release,although it includes ## newer versions of some applications which may provide useful features. ## Also,please note that software in backports WILL NOT receive any review ## or updates from the Ubuntu security team. deb http://ports.ubuntu.com/ubuntu-ports/ bionic-backports main restricted deb-src http://ports.ubuntu.com/ubuntu-ports/ bionic-backports main restricted deb http://ports.ubuntu.com/ubuntu-ports/ bionic-security main restricted deb-src http://ports.ubuntu.com/ubuntu-ports/ bionic-security main restricted deb http://ports.ubuntu.com/ubuntu-ports/ bionic-security universe deb-src http://ports.ubuntu.com/ubuntu-ports/ bionic-security universe deb http://ports.ubuntu.com/ubuntu-ports/ bionic-security multiverse deb-src http://ports.ubuntu.com/ubuntu-ports/ bionic-security multiverse |
| 报错: invoke-rc.d: initscript dbus,action "reload" failed. dpkg: error processing package blueman (--configure): installed blueman package post-installation script subprocess returned error exit status 1 Setting up rsyslog (8.32.0-1ubuntu4.2) ... /usr/bin/locale: Cannot set LC_CTYPE to default locale: No such file or directory /usr/bin/locale: Cannot set LC_MESSAGES to default locale: No such file or directory /usr/bin/locale: Cannot set LC_ALL to default locale: No such file or directory The user `syslog' is already a member of `adm'. Unsafe symlinks encountered in /var/spool/rsyslog,refusing. Unsafe symlinks encountered in /var/log,refusing. dpkg: error processing package rsyslog (--configure): installed rsyslog package post-installation script subprocess returned error exit status 1 Errors were encountered while processing: blueman rsyslog E: Sub-process /usr/bin/dpkg returned an error code (1) |
| 解决方法: mv var/lib/dpkg/info/ var/lib/dpkg/info_old mkdir var/lib/dpkg/info apt-get update apt-get -f install mv var/lib/dpkg/info/* var/lib/dpkg/info_old/ rm -rf var/lib/dpkg/info/ mv var/lib/dpkg/info_old/ var/lib/dpkg/info/ |
|
|
- 添加用户及设置密码:
useradd -s '/bin/bash' -m -G adm,sudo firefly //添加用户,可以使用sudo
//或者 adduser firefly,可能不可以使用sudo,因为没有加入admin组或sudo组
passwd firefly //给用户设置密码 firefly
passwd root //给root设置密码 root
exit //退出根文件系统
./mount.sh -u temp/ //取消挂载
- 设置新用户可以使用sudo命令
默认情况下新用户可能不能使用sudo命令,即使你输入了密码也不能使用sudo,会提示“fiefly is not in the sudoers file. This incident will be reported.”错误,此时需要修改sudoers文件,方法如下:
su //切换回root用户
chmod u+w /etc/sudoers //文件默认只读,需要先修改成可读写。
vim /etc/sudoers 之后,在文件里面添加一行:firefly ALL=(ALL:ALL) ALL
chmod u-w /etc/sudoers //修改完成后,重新恢复只读属性

16.3.4:更改时区
① 方式一
root@wmh-VirtualBox:/# date
Sun May 22 14:47:43 EEST 2022
root@wmh-VirtualBox:/etc# cp localtime localtime_bak
root@wmh-VirtualBox:/etc# rm /etc/localtime
root@wmh-VirtualBox:/etc# cp /usr/share/zoneinfo/Asia/Shanghai /etc/localtime
//root@wmh-VirtualBox:/# ln -sf /usr/share/zoneinfo/Asia/Shanghai /etc/localtime
root@wmh-VirtualBox:/# date
Sun May 22 19:54:13 CST 2022
root@wmh-VirtualBox:/# echo 'Asia/Shanghai' >/etc/timezone
② 方式二
root@wmh-VirtualBox:/# tzselect //未生效??????。
16.3.5:配置自动登录桌面系统:
| 在/etc/lightdm/lightdm.conf.d/目录下创建20-autologin.conf,文件内容: [Seat:*] user-session=Lubuntu autologin-user=firefly |
|

16.3.6:制作根文件系统:
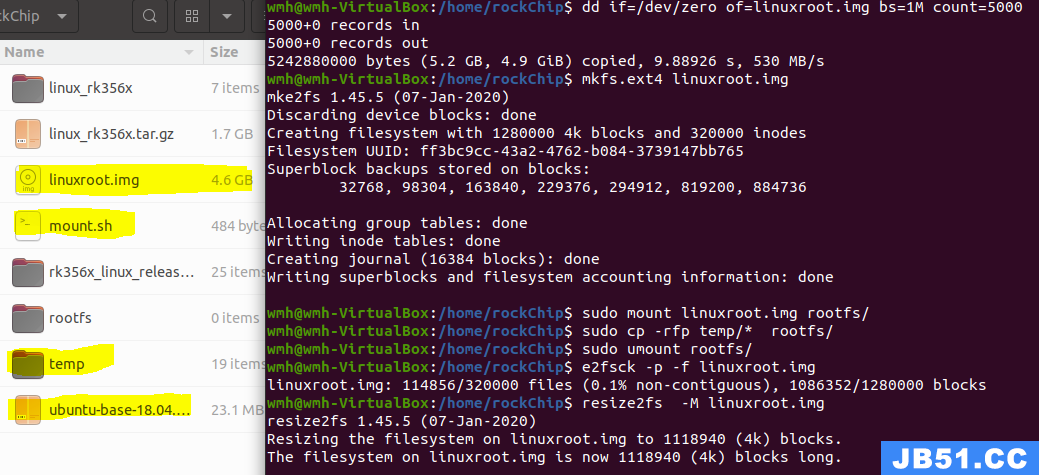
① 制作自己的根文件系统,大小依据自己的根文件系统而定,注意依据temp文件夹的大小来修改count值:
sudo du -h --max-depth=1 //查看当前目录下文件夹大小
mkdir rootfs
dd if=/dev/zero of=linuxroot.img bs=1M count=5000
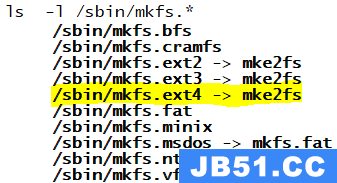
mkfs.ext4 linuxroot.img //预留空间为0(-m0 -F)
//-m0 -F这两个参数可能导致生成的文件系统加载时报错:
// Failed to open system journal: No space left on device
sudo mount linuxroot.img rootfs/
sudo cp -rfp temp/* rootfs
sudo umount rootfs/
e2fsck -p -f linuxroot.img //检查ext2/3/4文件系统的完整性
//执行resize2f指令导致生成的文件系统加载时报错:
// Failed to open system journal: No space left on device
resize2fs -M linuxroot.img //调整已建立的ext2/3/4档案系统的大小(根据实际大小重置)
//linuxroot.img烧录板卡就可以正常启动。下面制作ramdisk,待验证。
gzip -9 linuxroot.img //对.img进行压缩,压缩后得linuxroot.img.gz。
//用mkimage工具制作内核支持的ramdisk img。
mkimage -n "ramdisk" -A arm64 -O linux -T ramdisk
-C gzip -d linuxroot.img.gz linuxroot.img.gz.boot
mkimage -n 'RAM disk' -A powerpc -O linux -T ramdisk -C gzip -d *.gz *.gz.boot
② 这样linuxroot.img就是最终的根文件系统映像文件了。
注意:根文件系统加载后,大小不正常,未占满整个分区,在系统正确加载后执行扩展文件系统命令:
resize2fs /dev/mtd/by-name/linuxroot
③ 指令知识
- e2fsprogs包含以下独立的程式:
e2fsck: ext2/3/4文件系统的fsck程序,用于检查文件系统的完整性。
mke2fs: 用于创建ext2/3/4档案系统。
resize2fs: 调整已建立的ext2/3/4档案系统的大小。
tune2fs: 修改ext2/3/4档案系统的相关参数。
dumpe2fs: 显示ext2/3/4档案系统的相关资讯。
debugfs: 用于调试ext2/3/4文件系统,可以查看与更改文件系统的状态。
e2fsprogs:工具集同时也包含函数库libext2fs。
- gzip
在很久以前,UNIX 操作系统上的压缩工具叫作 compress,这个压缩工具采用了很著名的 LZW 压缩算法。但是由于 Unisys 和 IBM 拥有 LZW 压缩算法的专利,所以 UNIX 操作系统不能再随意使用这个算法和这个压缩工具了。为了解决这个问题,Jean-loup Gailly 编写了 gzip 压缩工具,完全替代了有专利争议的 compress 工具,从此 gzip 诞生了。
gzip 命令确实为用户提供了这样的选择权,包含了九个压缩级别,分别是 1、2、3、4、5、6、7、8、9:
“1 级”表示压缩速度最快,但强度不高。
“9 级”表示压缩强度最高,但速度较慢。
默认情况下是 6 级。
压缩:gzip 文件 //压缩后,原文件消失,出现一个以.gz后缀的新文件。
解压:gzip -d 文件.gz //-d表示解压文件
压缩:gzip -c 文件 > 文件.gz //-c选项表示压缩文件,但不删除源文件,并生成一个新文件.
压缩:gzip --best -c ramdisk > ramdisk.gz
16.3.7:拷贝文件系统:
将temp下的文件系统全部拷贝到 /tftpboot/new目录下:
sudo mv temp/* /tftpboot/new/

16.4:配置内核支持Ram Disk文件系统(未验证)
⑴ 修改内核
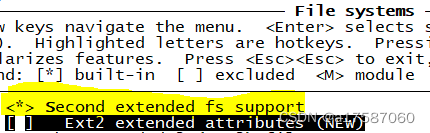
| ① 第一步 File systems ---><*> Second extended fs support
|
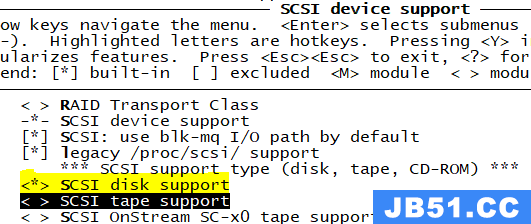
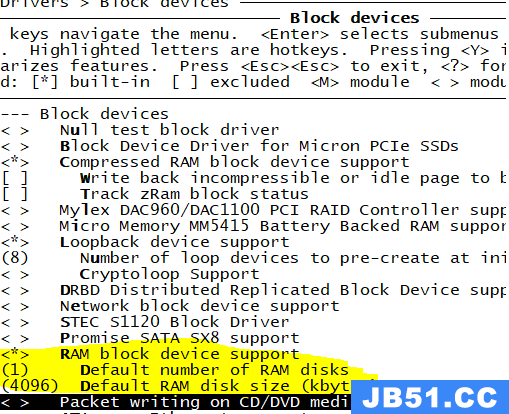
| ② 第二步 Device Drivers --->SCSI device support ------><*> SCSI disk support --->Block devices ------><*>RAM block device support ------> (1)Default number of RAM disks ------> (8192) Default RAM disk size(kbytes)(改为8M,根据ramdisk文件大小修改,只能大,不能小) |
|
添加对ramdisk的支持,修改(4096)Default RAM disk size kbytes,这里就是要制作Ramdisk文件系统大小。当然如果你想制作8192KB大小的ramdisk,这里就要对应为8192了,以此类推。此项的默认配置就是(4096)。如这大小和你做的ramdisk不匹配,则启动时仍然会出现kernel panic内核恐慌,提示ramdisk格式不正确,挂载不上ramdisk。
|
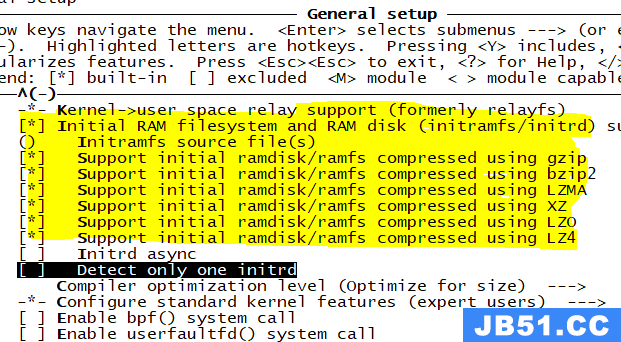
| ③ 第三步 General setup --->[*] Initial RAM filesystem and RAM disk (initramfs/initrd) support
|

16.5:U-Boot设置和启动
16.5.1:设置uboot启动参数:
| => setenv ipaddr 192.168.8.22 => setenv serverip 192.168.8.77 => setenv bootcmd tftpboot 0x0027f800 boot.img \; tftpboot 0x08300000 rk3568-firefly-roc-pc.dtb \; bootm 0x0027f800 - 0x08300000 => setenv bootargs root=/dev/nfs rw nfsroot=192.168.8.77:/tftpboot,v3 ip=192.168.8.22:192.168.8.77:192.168.8.1:255.255.255.0::eth0:off => boot |
| 以下命令已经经过测试1: => setenv ipaddr 192.168.8.22 => setenv serverip 192.168.8.77 => setenv nfsboot 'setenv bootargs root=/dev/nfs rw nfsroot=192.168.8.77:/tftpboot/new,v3 ip=192.168.8.22:192.168.8.77:192.168.8.1:255.255.255.0:$hostname:eth0:off; tftpboot 0x0027f800 boot.img; tftpboot 0x08300000 rk3568-firefly-roc-pc.dtb; bootm 0x0027f800 - 0x08300000' => run nfsboot |
| 以下命令已经经过测试2: => setenv ipaddr 192.168.8.22 => setenv serverip 192.168.8.77 => setenv bootcmd 'tftpboot 0x0027f800 boot.img; tftpboot 0x08300000 rk3568-firefly-roc-pc.dtb; bootm 0x0027f800 - 0x08300000' => setenv bootargs 'root=/dev/nfs rw nfsroot=192.168.8.77:/tftpboot/new,v3 ip=192.168.8.22:192.168.8.77:192.168.8.1:255.255.255.0::eth0:off' => boot |
| 以下命令已经经过测试3: => setenv ipaddr 192.168.8.22 => setenv serverip 192.168.8.77 => setenv baudrate 1500000 => setenv consoledev ttyFIQ0 => setenv hostname firefly => setenv nfsboot 'setenv bootargs root=/dev/nfs rw nfsroot=192.168.8.77:/tftpboot/new,v3 ip=192.168.8.22:192.168.8.77:192.168.8.1:255.255.255.0:$hostname:eth0:off console=$consoledev,$baudrate; tftpboot 0x0027f800 boot.img; tftpboot 0x08300000 rk3568-firefly-roc-pc.dtb; bootm 0x0027f800 - 0x08300000' => run nfsboot |
| 其他参考配置(备用): setenv nandboot 'setenv bootargs root=/dev/mtdblock1 rootfstype=jffs2 rw console=$consoledev,$baudrate $othbootargs;bootm $flashbootaddr - $flashfdtaddr' setenv ramboot1 ‘setenv bootargs root=/dev/ram rw console=$consoledev,$baudrate $othbootargs;cp.b 0xe8000000 $bootaddr 0x1000000;cp.b 0xefe00000 $fdtaddr 0x00020000;cp.b 0xec000000 $ramdiskaddr 0x2000000;bootm $bootaddr $ramdiskaddr $fdtaddr’ |
| root=/dev/nfs(root=/dev/mtdblock3) 是指内核引导的文件系统,在nfs目录或者yaffs2。 |
| 1、v3代表 NFS 版本信息,请添加上以避免出现挂载不成功的问题。 2、在 U-Boot 命令行中,请确认boot.img烧录地址和 dtb 文件烧录地址。(提示:boot.img的文件结构中,开头有2k的头文件,然后才是 kernel。所以在 TFTP 下载内核到目标机时,要下载到对应 kernel 地址减去 0x0800 的地址上)。 |
| nfs未正确配置(如配置成了 nfsroot=192.168.8.77:/tftpboot 或 文件系统未拷贝到/tftpboot/new目录下)会报错: [ 5.627009] RAMDISK: Couldn't find valid RAM disk image starting at 0. [ 5.664780] VFS: Mounted root (nfs filesystem) readonly on device 0:16. [ 5.667522] devtmpfs: error mounting -2 //报错 |
| 忘了以下是什么时候报的错: [ 103.760085] VFS: Unable to mount root fs via NFS,trying floppy. [ 103.761297] VFS: Cannot open root device "nfs" or unknown-block(2,0): error -6 [ 103.761411] Please append a correct "root=" boot option; here are the available partitions: |
16.5.2:开机内核正常启动日志:
[ 0.000000] Kernel command line: root=/dev/nfs rw nfsroot=192.168.8.77:/tftpboot/new,v3 ip=192.168.8.22:192.168.8.77:192.168.8.1:255.255.255.0::eth0:off androidboot.dtbo_idx=0 ro rootwait earlycon=uart8250,0xfe660000 console=ttyFIQ0 rootfstype=ext4 overlayroot=device:dev=PARTLABEL=userdata,mkfs=1 coherent_pool=1m systemd.gpt_auto=0 cgroup_enable=memory swapaccount=1 androidboot.boot_devices=fe310000.sdhci,usbhost/fd000000.dwc3/xhci-hcd.5.auto,fd880000.usb,fd800000.usb,fe2b0000.dwmmc,fc800000.sata,3c0800000.pcie,3c0000000.pcie
[ 0.189831] RPC: Registered tcp NFSv4.1 backchannel transport module.
[ 0.191074] Trying to unpack rootfs image as initramfs...
[ 0.191269] rootfs image is not initramfs (junk in compressed archive); looks like an initrd
[ 0.204780] Freeing initrd memory: 8652K
[ 0.214200] NFS: Registering the id_resolver key type
[ 5.600818] ALSA device list:
[ 5.600836] #0: rockchip,hdmi
[ 5.600844] #1: rockchip,rk809-codec
[ 5.601092] RAMDISK: Couldn't find valid RAM disk image starting at 0.
//说明已经挂载上了网络根文件系统。
[ 5.637592] VFS: Mounted root (nfs filesystem) readonly on device 0:16.
[ 5.640727] devtmpfs: mounted //说明文件系统挂载成功,否则挂载失败。
16.5.3:
[FAILED] Failed to start Load Kernel Modules. See 'systemctl status systemd-modules-load.service' for details. [FAILED] Failed to start Create Volatile Files and Directories. See 'systemctl status systemd-tmpfiles-setup.service' for details. [FAILED] Failed to start Network Name Resolution. See 'systemctl status systemd-resolved.service' for details. [FAILED] Failed to start Network Time Synchronization. See 'systemctl status systemd-timesyncd.service' for details. [FAILED] Failed to start Modem Manager. See 'systemctl status ModemManager.service' for details. [FAILED] Failed to start Hostname Service. See 'systemctl status systemd-hostnamed.service' for details. [FAILED] Failed to start Load/Save RF Kill Switch Status. See 'systemctl status systemd-rfkill.service' for details. |
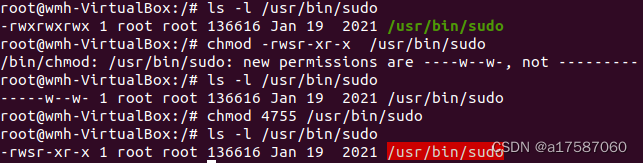
16.6:解决终端提示的错误
| 提示的错误:sudo: /usr/bin/sudo must be owned by uid 0 and have the setuid bit set 解决方法: chmod 4755 /usr/bin/sudo
|
| 提示的错误:sudo: error in /etc/sudo.conf,line 0 while loading plugin "sudoers_policy" sudo: /usr/lib/sudo/sudoers.so must be only be writable by owner sudo: fatal error,unable to load plugins 解决方法: chmod 644 /usr/lib/sudo/sudoers.so 解决方法: chown -R root:root /usr/lib/sudo |
| 提示的错误:sudo: /etc/sudoers is world writable sudo: no valid sudoers sources found,quitting sudo: unable to initialize policy plugin 解决方法: chmod 0440 /etc/sudoers |
| 提示的错误:su: Authentication failure 解决方法: sudo passwd root //必须要给root用户设置密码 |
| 提示的错误:setgid: Operation not permitted 解决方法: chmod a+s /bin/su |
| 提示的错误:sudo: /etc/sudoers.d is world writable 解决方法: chmod 0440 /etc/sudoers.d |
| 提示的错误:sudo: unable to stat /etc/sudoers.d/README: Permission denied 解决方法: chown -R root:root /etc/sudoers.d chmod u=rwx,g=rx,o=rx /etc/sudoers.d/ chmod u=r,g=r,o= /etc/sudoers.d/* 将sudoers.d文件夹的权限设置成root用户和root组,root组只有执行的权限,只有root用户有写入的权限。 |
| 提示的错误: [FAILED] Failed to start Network Time Synchronization. See 'systemctl status systemd-timesyncd.service' for details. See 'systemctl status systemd-resolved.service' for details. [FAILED] Failed to start Network Time Synchronization. See 'systemctl status systemd-timesyncd.service' for details. [FAILED] Failed to start Hostname Service. See 'systemctl status systemd-hostnamed.service' for details. [FAILED] Failed to start Network Name Resolution. See 'systemctl status systemd-resolved.service' for details. 出现以上错误的其中一个原因是硬盘空间不足导致的,已经经过验证。 解决方法: sudo resize2fs /dev/mmcblk0p3 |
| 264 chown -R root:root /usr/bin/sudo 265 chown -R root:root /etc/sudo.conf 266 chown -R root:root /usr/libexec/sudo/sudoers.so 267 chown -R root:root /etc/sudoers 268 chown -R root:root /etc/sudoers.d 269 chown -R root:root /var/db/sudo/lectured 270 chown -R root:root /usr/bin/sudo 271 chown -R root:root /etc/sudo.conf 272 chown -R root:root /usr/libexec/sudo/sudoers.so 273 chown -R root:root /etc/sudoers 274 chown -R root:root /etc/sudoers.d 275 chown -R root:root /var/db/sudo/lectured 276 chmod 4755 /usr/bin/sudo 277 chmod 644 /etc/sudo.conf 280 chown -R root:root /usr/lib/sudo/sudoers.so 282 chmod 644 /usr/lib/sudo/sudoers.so //must be only be writable by owner |
16.7:补充安装 ubuntu桌面知识(未验证)
16.7.1:图形程序安装
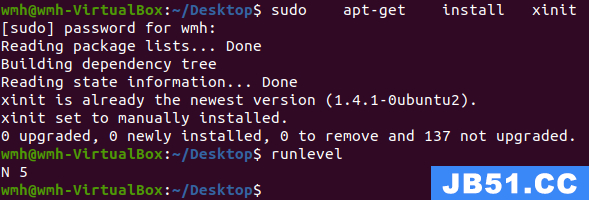
运行StartX命令检查是否已安装,若提示未安装则执行:
sudo apt-get install xinit //安装完,终端由黑色界面变成白底黑字.出现X型的鼠标指针。
sudo apt-get autoremove //卸载掉无用的安装包
16.7.2:环境管理器(安装其中之一)
GNOME: sudo apt-get install gdm
OR
KDE: sudo apt-get install kdm
OR
Xface: sudo apt-get install xdm
16.7.3:桌面环境
sudo apt-get install ubuntu-desktop
如果你只想安装必要的桌面管理软件而不想安装一些诸如 Evolution 和 OpenOffice 的不需要的应用软件,可使用下面的命令:
sudo apt-get install --no-install-recommends ubuntu-desktop
OR
sudo apt-get install kubuntu-desktop //安装 KDE 桌面
OR
sudo apt-get install xubuntu-desktop //安装轻量级桌面 xfce
先执行atp-get update一下。然后执行apt-get install xubuntu-desktop。重启后就自动进入桌面环境了。界面响应很慢,修改virtulbox中虚拟机的内存和显存大小,重启后速度果然快了。
OR 其他几款桌面环境
sudo apt-get install ubuntu-budgie-desktop
sudo apt-get install ubuntu-gnome-desktop
sudo apt-get install ubuntu-mate-desktop
sudo apt-get install ubuntu-unity-desktop //unity环境即xfce桌面,比推荐的xfce节省资源。
16.7.4:核心桌面环境
若网速不佳,或只想体验基本功能可以安装:
sudo apt-get install gnome-core
OR
sudo apt-get install kde-core
OR
sudo apt-get install xface4
注意!:若只安装核心环境,可以考虑安装以下常用:软件:
新立得软件包管理器:sudo apt-get install synaptic
无线上网模块: sudo apt-get install network-manager
中文支持: sudo apt-get install language-support-zh
16.7.5:图形界面开启与关闭
取消自启
# update-rc.d -f gdm remove
恢复自启
# update-rc.d gdm defaults
16.7.6:如何默认不启动桌面,等需要时再启用
修改/etc/default/grub:GRUB_CMDLINE_LINUX_DEFAULT="" 改为 "text",然后update-grub即可
需要启动时,手工输入service lightdm start
不需要是,手工输入 service lightdm stop
(ubuntu的默认的runlevel是2,用runlevel命令可以查看。level2\3\4\5好像都是一样的,都是带GUI的)
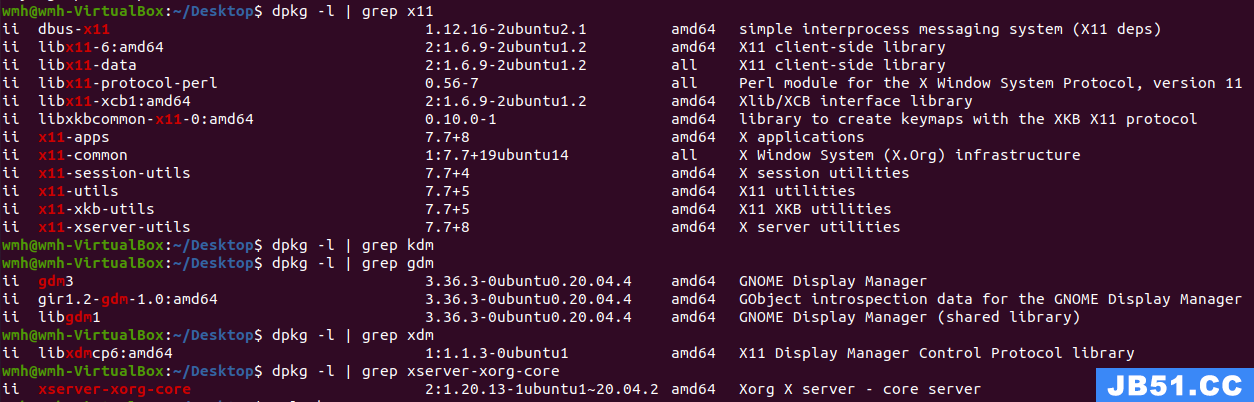
16.7.7:查看是否安装相关服务
查看是否已安装X11:dpkg -l | grep xserver-xorg-core
安装X11:
sudo apt-get install xorg
sudo apt-get install xauth
sudo apt-get install openbox
sudo apt-get install xserver-xorg-legacy

16.8:解决系统空间不足的问题
sudo du -h --max-depth=1 //当前目录下的文件和目录所在空间大小
情况说明:安装系统后,/dev/root空间不足,只有8.5G。总的空间加起来不足16G,实际上emmc空间有64G,所以需要对空间进行调整。
- df -h显示空间不足
firefly@localhost:~$ df -h
Filesystem Size Used Avail Use% Mounted on
/dev/root 8.5G 7.3G 831M 90% /
devtmpfs 1.9G 0 1.9G 0% /dev
tmpfs 2.0G 0 2.0G 0% /dev/shm
tmpfs 2.0G 1.2M 1.9G 1% /run
tmpfs 5.0M 4.0K 5.0M 1% /run/lock
tmpfs 2.0G 0 2.0G 0% /sys/fs/cgroup
tmpfs 390M 20K 390M 1% /run/user/1000
- sudo fdisk -l查看硬盘详情
firefly@localhost:~$ sudo fdisk -l
Disk /dev/ram0: 4 MiB,4194304 bytes,8192 sectors
Units: sectors of 1 * 512 = 512 bytes
Sector size (logical/physical): 512 bytes / 4096 bytes
I/O size (minimum/optimal): 4096 bytes / 4096 bytes
Disk /dev/mtdblock0: 64 MiB, 67108864 bytes,131072 sectors
Units: sectors of 1 * 512 = 512 bytes
Sector size (logical/physical): 512 bytes / 512 bytes
I/O size (minimum/optimal): 512 bytes / 512 bytes
Disklabel type: gpt
Disk identifier: 03510000-0000-4E44-8000-2B7B0000783B
Device Start End Sectors Size Type
/dev/mtdblock0p1 7168 7679 512 256K unknown
/dev/mtdblock0p2 16384 24575 8192 4M unknown
/dev/mtdblock0p3 32768 131038 98271 48M unknown
Disk /dev/mmcblk0: 57.6 GiB,61865984000 bytes,120832000 sectors
Units: sectors of 1 * 512 = 512 bytes
Sector size (logical/physical): 512 bytes / 512 bytes
I/O size (minimum/optimal): 512 bytes / 512 bytes
Disklabel type: gpt
Disk identifier: 85050000-0000-480E-8000-4FEE00002730
Device Start End Sectors Size Type
/dev/mmcblk0p1 16384 24575 8192 4M unknown
/dev/mmcblk0p2 32768 229375 196608 96M unknown
/dev/mmcblk0p3 229376 120831966 120602591 57.5G unknown
- resize2fs /dev/mmcblk0p3 重设硬盘大小
firefly@localhost:~$sudo resize2fs /dev/mmcblk0p3
resize2fs 1.44.1 (24-Mar-2018)
Filesystem at /dev/mmcblk0p3 is mounted on /; on-line resizing required
old_desc_blocks = 2,new_desc_blocks = 8
The filesystem on /dev/mmcblk0p3 is now 15075323 (4k) blocks long.
- df -h重查空间大小
firefly@localhost:~$ df -h
Filesystem Size Used Avail Use% Mounted on
/dev/root 57G 7.4G 47G 14% /
devtmpfs 1.9G 0 1.9G 0% /dev
tmpfs 2.0G 0 2.0G 0% /dev/shm
tmpfs 2.0G 1.2M 1.9G 1% /run
tmpfs 5.0M 4.0K 5.0M 1% /run/lock
tmpfs 2.0G 0 2.0G 0% /sys/fs/cgroup
tmpfs 390M 20K 390M 1% /run/user/1000
- 补充网络知识(树莓派拓展隐藏空间)
在XXX板卡上用以下方式验证失败,sudo reboot后,启动卡死。仅供参考。
① 背景
SD卡烧录了Centos7系统后,原本128G的内存,只使用了部分,绝大部分隐藏没有被分出来。

② 分区说明
/dev/mmcblk0p1: boot分区 不能动
/dev/mmcblk0p2: 文件系统 不能动
/dev/mmcblk0p3: root分区
③ 重建Root分区
- fdisk /dev/mmcblk0:进入磁盘分区工具
- p: 查看分区情况
- d: 删除分区3
- n: 建立分区3,Fist sector从/dev/mmcblk0p2 end处开始
- w: 保存
④ 重启系统
- sudo reboot
- resize2fs /dev/mmcblk0p3: 调整文件系统大小
- df -h: 检查分区
| firefly@localhost:~$ sudo fdisk /dev/mmcblk0 Welcome to fdisk (util-linux 2.31.1). Changes will remain in memory only,until you decide to write them. Be careful before using the write command. Command (m for help): p Disk /dev/mmcblk0: 57.6 GiB,120832000 sectors Units: sectors of 1 * 512 = 512 bytes Sector size (logical/physical): 512 bytes / 512 bytes I/O size (minimum/optimal): 512 bytes / 512 bytes Disklabel type: gpt Disk identifier: 85050000-0000-480E-8000-4FEE00002730 Device Start End Sectors Size Type /dev/mmcblk0p1 16384 24575 8192 4M unknown /dev/mmcblk0p2 32768 229375 196608 96M unknown /dev/mmcblk0p3 229376 120831966 120602591 57.5G unknown Command (m for help): d Partition number (1-3,default 3): 3 Partition 3 has been deleted. Command (m for help): n Partition number (3-128,default 3): 3 First sector (34-120831966,default 229376): 229376 Last sector,+sectors or +size{K,M,G,T,P} (229376-120831966,default 120831966):120831966 Created a new partition 3 of type 'Linux filesystem' and of size 57.5 GiB. Partition #3 contains a ext4 signature. Do you want to remove the signature? [Y]es/[N]o: Y The signature will be removed by a write command. Command (m for help): w The partition table has been altered. Syncing disks. firefly@localhost:~$sudo reboot 系统启动过程中卡死:
|

16.9:查看ubuntu版本
| firefly@localhost:~$ lsb_release -a No LSB modules are available. Distributor ID: Ubuntu Description: Ubuntu 18.04.6 LTS Release: 18.04 Codename: bionic firefly@localhost:~$ cat /etc/issue Ubuntu 18.04.6 LTS \n \l firefly@localhost:~$ cat /etc/os-release NAME="Ubuntu" VERSION="18.04.6 LTS (Bionic Beaver)" ID=ubuntu ID_LIKE=debian PRETTY_NAME="Ubuntu 18.04.6 LTS" VERSION_ID="18.04" HOME_URL="https://www.ubuntu.com/" SUPPORT_URL="https://help.ubuntu.com/" BUG_REPORT_URL="https://bugs.launchpad.net/ubuntu/" PRIVACY_POLICY_URL="https://www.ubuntu.com/legal/terms-and-policies/privacy-policy" VERSION_CODENAME=bionic UBUNTU_CODENAME=bionic firefly@localhost:~$ hostnamectl Static hostname: localhost.localdomain Icon name: computer Machine ID: 5bfae165c02d606570f491cd627629f2 Boot ID: a8b874f127bd4a91bc322255dea87b68 Operating System: Ubuntu 18.04.6 LTS Kernel: Linux 4.19.193 Architecture: arm64 |
16.10:dd命令
16.10.1:dd命令的解释
dd:用指定大小的块拷贝一个文件,并在拷贝的同时进行指定的转换。
注意:指定数字的地方若以下列字符结尾,则乘以相应的数字:b=512;c=1;k=1024;w=2
参数注释:
1. if=文件名:输入文件名,缺省为标准输入。即指定源文件。< if=input file>
2. of=文件名:输出文件名,缺省为标准输出。即指定目的文件。< of=output file>
3. ibs=bytes:一次读入bytes个字节,即指定一个块大小为bytes个字节。
obs=bytes:一次输出bytes个字节,即指定一个块大小为bytes个字节。
bs=bytes:同时设置读入/输出的块大小为bytes个字节。
4. cbs=bytes:一次转换bytes个字节,即指定转换缓冲区大小。
5. skip=blocks:从输入文件开头跳过blocks个块后再开始复制。
6. seek=blocks:从输出文件开头跳过blocks个块后再开始复制。
注意:通常只用当输出文件是磁盘或磁带时才有效,即备份到磁盘或磁带时才有效。
7. count=blocks:仅拷贝blocks个块,块大小等于ibs指定的字节数。
16.10.2:dd应用实例
1.将本地的/dev/hdb整盘备份到/dev/hdd
#dd if=/dev/hdb of=/dev/hdd
2.将/dev/hdb全盘数据备份到指定路径的image文件
#dd if=/dev/hdb of=/root/image
3.将备份文件恢复到指定盘
#dd if=/root/image of=/dev/hdb
4.备份/dev/hdb全盘数据,并利用gzip工具进行压缩,保存到指定路径
#dd if=/dev/hdb | gzip > /root/image.gz
5.将压缩的备份文件恢复到指定盘
#gzip -dc /root/image.gz | dd of=/dev/hdb
6.备份与恢复MBR
备份磁盘开始的512个字节大小的MBR信息到指定文件:
#dd if=/dev/hda of=/root/image count=1 bs=512
count=1指仅拷贝一个块;bs=512指块大小为512个字节。
原文地址:https://blog.csdn.net/a17587060/article/details/130516008
版权声明:本文内容由互联网用户自发贡献,该文观点与技术仅代表作者本人。本站仅提供信息存储空间服务,不拥有所有权,不承担相关法律责任。如发现本站有涉嫌侵权/违法违规的内容, 请发送邮件至 dio@foxmail.com 举报,一经查实,本站将立刻删除。