
ubuntu16.04出现以下画面:

初步估计:引导出现问题了,系统启动找不到引导了。
方案一:
- Reboot.
- Press F2 when the screen is lit up and go to the BIOS settings.
- System Configurations → SATA Operations
- Change RAID to AHCI
结果:没有解决。
方案二:
https://askubuntu.com/questions/247541/gave-up-waiting-for-root-device-on-ubuntu
Attempt #3
I opened terminal and typed the following command:
sudo grub-install /dev/sda
and then I typed another command to update grub:
sudo update-grub
After all of this, I rebooted computer and finally, error disappeared and problem was fixed!
问题是:根本进不去桌面,无法打开终端,也就无法使用sudo命令。
方案三:
I just randomly started typing stuff... try:
(initramfs) blkid
(initramfs) blockdev --rereadpt /dev/sda
(initramfs) blkid
(initramfs) exit
This at least gets you to the desktop where you can begin trouble shooting your problem which is probably due to a proprietary driver or something.
结果:失败,还是进入不了桌面。
下面我决定利用rufus软件制作u盘启动盘并进行引导的修复。
u盘启动盘制作参考:https://www.cnblogs.com/yibeimingyue/p/15479056.html
修复引导的参考链接:
https://www.cxyzjd.com/article/stlinax/107025125
https://blog.csdn.net/laocaibcc229/article/details/79274412
Ubuntu 18.04 启动失败的修复方法_stlinax的博客-程序员宅基地
由于突然断电,重新启动后发现不能进入Ubuntu系统,进入了GRUB界面。按照网上的方法在GRUB界面下修复,但是还是不能成功。原因可能是GRUB启动文件或者启动分区遭到破坏,于是尝试了另外一种方法,就是利用Ubuntu的安装光盘,加载Boot-Repair修复引导程序来解决问题。
这里涉及三个问题:
- 制作Ubuntu安装光盘或U盘,然后启动到Ubuntu安装界面,注意这时候要选择“试用Ubuntu”,然后就能进入Ubuntu桌面。
- 连接上互联网,打开终端,然后下载安装并运行Boot-Repair进行修复。
- 如果发生分区问题,要使用GParted分区软件分出一个BIOS-boot分区,然后再修复。
【一般情况下的修复方法】
打开终端:
sudo add-apt-repository ppa:yannubuntu/boot-repair && sudo apt-get update
sudo apt-get install -y boot-repair && boot-repair
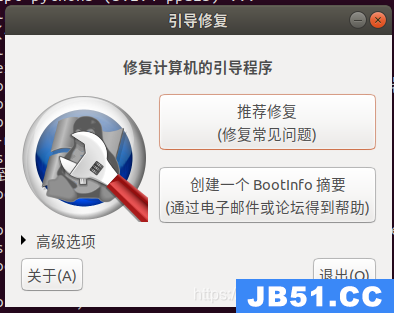
然后进入到Boot-Repair修复引导程序,点击“推荐修复”,如果没有错误提示的话,重启岂可成功修复。
【分区破坏后的修复方法】
点击“推荐修复”,Boot-Repair检测后发现并提示缺乏分区。

打开Ubuntu自带的GParted分区软件,然后分出一个大于1MB的分区,这个分区不需要太大,不超过10MB就够了。注意这个分区不要选择EXT4,而是选择“未格式化”,点击左上角“√”按钮,完成分区。右击这个新建的分区,然后点击管理标识,在bios_grub前面打钩,退出GParted分区软件。
接着重新运行Boot-Repair点击“推荐修复”,按程序提示的要求另外打开一个终端,一步一步手动运行下去。如果需要复制粘贴,可以打开一个Gedit来粘贴。

本例的修复命令如下:
sudo chroot "/mnt/boot-sav/sda2" dpkg --configure -a
sudo chroot "/mnt/boot-sav/sda2" apt-get install -fy
sudo chroot "/mnt/boot-sav/sda2" apt-get purge -y grub*-common shim-signed

sudo chroot "/mnt/boot-sav/sda2" apt-get install -y grub-pc

修复完成后,关闭所有终端和程序,然后关机,取出光盘或U盘,重启电脑,问题解决。
另外,LinuxMint20的安装盘是自带Boot-Repair的,可以直接搜索后使用。

打开终端:
sudo add-apt-repository ppa:yannubuntu/boot-repair && sudo apt-get update
这一步遇到的问题:
** (appstreamcli:9437): CRITICAL **: Error while moving old database out of the way.
AppStream cache update failed.
解决办法:
https://askubuntu.com/questions/1020404/error-while-moving-old-database-out-of-the-way
然后:
sudo apt-get install -y boot-repair && boot-repair
然后进入到Boot-Repair修复引导程序,点击“推荐修复”,如果没有错误提示的话,重启岂可成功修复。

在运行:
sudo apt-get install -y boot-repair && boot-repair
的时候,出现如下界面:

即:无法定位软件包:boot-repair.
尝试的方法:
Workaround: install packages for an older release
It showed a 404 not found error because the PPA was not updated for the newer release (trusty). To install boot-repair in Ubuntu 14.04, run the below commands on terminal:
sudo add-apt-repository ppa:yannubuntu/boot-repair
codename="$(lsb_release -cs)"
sudo sh -c "sed -i 's/$codename/saucy/g' /etc/apt/sources.list.d/yannubuntu-boot-repair-$codename.list"
sudo apt-get update
sudo apt-get install -y boot-repair && (boot-repair &)
Now use the recommended repair option to repair your grub and restart after boot-repair finished repairing.
在运行:
sudo sh -c "sed -i 's/$codename/saucy/g' /etc/apt/sources.list.d/yannubuntu-boot-repair-$codename.list"
的时候,出现的问题是:

sed: can't read /etc/apt/sources.list.d/yannubuntu-boot-repair-.list: No such file or directory
所以:方案三失败。
方案四:
如果安装Ubuntu后启动报错:“Reboot and Select proper Boot device or Insert Boot Media in selected Boot device”。(Ubuntu 16.04)
插上U盘或CD,进入Try Ubuntu模式。
用sudo fdisk -l查看原始分区信息。
sudo fdisk -l

我看网上有个图是:
   Device Boot      Start         End      Blocks   Id  System
/dev/sda1   *        2048     2099199     1048576   83  Linux
/dev/sda2         2099200     4196351     1048576   82  Linux swap / Solaris
/dev/sda3         4196352   125829119    60816384   8e  Linux LVM
Device # 分区名称
Boot # 启动分区,用*表示的是启动分区
Start # 表示开始的柱面
End # 表示结束的柱面
Blocks # block块数量
Id # 分区类型ID
System # 分区类型
但是我自己的没有带root标志的盘,所以可能启动没有了。。。
查看你的Ubuntu安装在哪里。例如:/dev/sda1,对应修改以下命令执行。注意:不要选择EFI分区!
sudo mount /dev/sda1 /mnt
sudo apt-get update
sudo apt-get install grub
接下来修复引导:
sudo grub-install /dev/sda --root-directory=/mnt
会看到这样的界面:

修复ubuntu引导
---------------------------------------------------------------------------------------------------------------------------------------------------------------------------
https://blog.csdn.net/u011553516/article/details/116397597
挂载一个分区的方法:
1、建一个目录(挂载磁盘分区)
|
1 2 |
|
2、挂载/dev/sda1分区
|
1 2 |
|
2. 挂载磁盘
sudo mount /dev/sda9 /mnt
sudo mount /dev/sda8 /mnt/boot
sudo mount /dev/sda10 /mnt/home
sudo mount --bind /sys /mnt/sys
sudo mount --bind /proc /mnt/proc
sudo mount --bind /dev /mnt/dev
linux下mnt目录的作用:mount 可直接理解为“挂载”挂接光驱、USB设备的目录,加载后,会在mnt里多出相应设备的目录。
linux系统根目录下各个目录用途说明:
1、/ 根目录 --------- 所有目录挂在其下
2、/boot --------- 存放Ubuntu内核和系统启动文件。系统启动时这些文件先被装载。
3、/etc --------- 系统的配置文件目录。密码文件、设置网卡信息、环境变量的设置等都在此目录中,许多网络配置文件也在其中。
4、/lib --------- 根文件系统目录下程序和核心模块的共享库。这个目录里存放着系统最基本的动态链接共享库,类似于Windows下的system32目录,几乎所有的应用程序都需要用到这些共享库。
5、/media --------- 主要用于挂载多媒体设备。ubuntu系统自动挂载的光驱、usb设备,存放临时读入的文件。
6、/proc --------- 这个目录是系统内存的映射,我们可以直接访问这个目录来获取系统信息。也就是说,这个目录的内容不在硬盘上而是在内存里。
7、/sbin --------- s就是Super User的意思,这里存放的是系统管理员使用的系统管理程序,如系统管理、目录查询等关键命令文件。
8、/tmp --------- 这个目录是用来存放一些临时文件的,所有用户对此目录都有读写权限。
9、/home --------- 用户的主目录。下面是自己定义的用户名的文件夹。每个用户的设置文件,用户的桌面文件夹,还有用户的数据都放在这里。
10、/mnt --------- 此目录主要是作为挂载点使用。通常包括系统引导后被挂载的文件系统的挂载点。如挂载Windows下的某个分区。
---------------------------------------------------------------------------------------------------------------------------------------------------------------------------
OK。接下来即可重启进入操作系统!
如果安装正确,则可以直接进入系统。当然,也有部分机子会报错:
如果报错“Minimal BASH-like line editing is supported.”
有两种解决方法:
第一种(推荐)
依次输入如下命令(注意字符中空格)
grub>root (hd0,0)
命令含义:从硬盘第一个分区C盘启动
grub>chainloader (hd0,0)+1
命令含义:指示GRUB读取分区的第一个扇区的引导记录
grub>boot
命令含义:启动GRUB
PS:我在执行这样的命令后,ubuntu启动提示“Unable to find a medium containing a live file system”。google有解。
第二种
sudo apt-get -y purge grub
sudo apt-get install grub-efi-amd64 grub-efi-amd64-bin grub-efi-amd64-signed
然后安装
sudo grub-install /dev/sda --efi-directory=/mnt/boot/efi --boot-directory=/mnt/boot
如果在制作Ubuntu To Go或安装Ubuntu出现“error: file '/grub/i386-pc/normal.mod' not found”的报错,请查看下面这篇文章。
Ubuntu引导错误修复 - i386
如果在制作Ubuntu To Go或安装Ubuntu出现“error: file '/grub/i386-pc/normal.mod' not found”的报错,可以进入LiveCD模式进行引导的安装。
插上U盘或CD,进入Try Ubuntu模式。
sudo fdisk -l
查看你的Ubuntu安装在哪里。例如:/dev/sda1,对应修改以下命令执行。
sudo mount /dev/sda1 /mnt
接下来安装GRUB 2:
sudo grub-install /dev/sda --root-directory=/mnt
OK。接下来即可重启进入操作系统!
更多Ubuntu相关信息见Ubuntu 专题页面 http://www.linuxidc.com/topicnews.aspx?tid=2
本文永久更新链接地址:http://www.linuxidc.com/Linux/2016-09/135486.htm
方案四的结局:还是不行。
方案五(2021.11.1):
针对目前出现的这个问题:

再挣扎一次。
https://itsfoss.com/fix-minimal-bash-line-editing-supported-grub-error-linux/
Fixing “minimal BASH like line editing is supported” Grub error
The process is simple if you follow the steps carefully (not blindly). You may have to change the partition names as per your system.
Step 1: Boot in to the live Linux USB.
Step 2: You need to find out iif your system uses EFI or BIOS. To do that, open the terminal and use the following command to list your partitions:
sudo fdisk -lLook closely in its output because it could be a huge output. If you see something like EFI, it’s an indication that your system has EFI. This information is important in later stages.
Device        Start       End   Sectors   Size Type
/dev/sda1      2048    976895    974848   476M EFI System
/dev/sda2    976896  40038399  39061504  18.6G Linux filesystem
/dev/sda3  40038400  79099903  39061504  18.6G Linux filesystem
/dev/sda4  79099904 468875263 389775360 185.9G Linux filesystem
You need to note two things here. The partition where EFI is installed (if it is installed) and the partition where root partition is installed.
Step 3 (only for non-EFI system): Installing grub on non-EFI system is even easier.
Mount the root partition of Linux:
sudo mount /dev/sda1 /mntAnd then install grub:
sudo grub-install /dev/sd1Reboot and it should be fine.
当我执行:
sudo grub-install /dev/sd1
这一步的时候,出现以下错误:

解决这个错误的参考链接:
https://www.cnblogs.com/tsreaper/p/chroot-fix-boot.html
然而,在执行第2步:
2. 挂载虚拟文件系统
Linux 系统运行过程中,还需要 /proc、/dev、/run 等虚拟文件系统。参考资料 1 中使用下面这个命令统一完成虚拟文件系统的挂载:
for i in /dev /dev/pts /proc /sys /run; do sudo mount -B $i /mnt$i; done
我在虚拟机中执行这个指令成功了,但是在修复学校服务器时不知道为什么不能成功(但是现在也无法重现这个失败...)。所以我使用了参考资料 2 中的命令完成虚拟文件系统的挂载:
sudo mount -t proc /proc /mnt/proc
sudo mount --rbind /sys /mnt/sys
sudo mount --rbind /dev /mnt/dev
sudo mount --rbind /run /mnt/run
我后来特地搜索了一下 mount 指令的几个选项,-B(或者 --bind)可以挂载一个文件系统中已有的子目录,--rbind 则是递归版的 --bind(可以看一下 这篇博客 了解两者的区别),-t 则是指定挂载的文件系统类型。网上也说 sudo mount -B /proc /mnt/proc 和 sudo mount -t proc /proc /mnt/proc 一般没什么区别,所以也不太知道发生了什么...如果有知道区别的朋友还请留言赐教。
的时候,出现以下报错信息:

在绝望之际,以“ubuntu硬盘修复”为关键词进行百度搜索,搜到了下面这个文章:
**********************************************************************
https://blog.csdn.net/magicarm_lw/article/details/80185926
前几天最担心的事情发生了,公司里自己的代码编译服务器进不去系统了,当时就想到了里面还有一个新功能的代码没有上传,悲剧了。之前有同事的电脑发生过类似的事情,但是由于里面没有重要的东西,就直接格式化硬盘重装系统。但是这次有些东西还没上传,所以不敢直接格式化重装系统。
先用U盘制作了一个ubuntu安装盘,点试用ubuntu进系统,想在系统里面挂载硬盘,把里面要的东西拷贝出来,结果一挂载就报错,没成功。
在度娘输入“ubuntu修复硬盘”,好像有点眉目,看到有命令fsck -y /dev/sda2这个命令,想着死马当活马医,在刚才试用的那个系统里面输入sudo fsck -y /dev/sda2,看到系统在运行这个命令了,等了半个小时去看了下,显示已经完成了。重启了一下,果然好了!哈哈
sudo fsck -y /dev/sda2
**********************************************************************
此时,我想起了我的机器之前开机一直出现的问题:
https://www.cnblogs.com/yibeimingyue/p/14261416.html
此时输入命令:
sudo fsck -y /dev/sda3
机器一阵狂跑:

上图中的部分内容如下:


最后竟然出现了固态硬盘的盘符,这下数据有可能有救了!!!

先把数据拷贝出来再说。
2021.11.2
部分文件拷贝出来了,重启还是进入不了系统,算了,不挣扎了,重装系统吧。
2021.11.4的挣扎:
https://askubuntu.com/questions/449428/unable-to-locate-package-boot-repair-in-14-04
You can use the following commands to install boot-repair in Ubuntu 14-04:
sudo add-apt-repository ppa:yannubuntu/boot-repair
sudo sh -c "sed -i 's/trusty/saucy/g' /etc/apt/sources.list.d/yannubuntu-boot-repair-trusty.list"
sudo apt-get update
sudo apt-get install -y boot-repair && boot-repair
出现的问题是:
ubuntu@ubuntu:~$ sudo sh -c "sed -i 's/trusty/saucy/g' /etc/apt/sources.list.d/yannubuntu-boot-repair-trusty.list"
sed: can't read /etc/apt/sources.list.d/yannubuntu-boot-repair-trusty.list: No such file or directory
这个是最后的挣扎了:
My solution is to use boot-repair disk iso, it works for 14.04 http://sourceforge.net/projects/boot-repair-cd/files/
要不行,就下定决心重装系统了。
boot-repair-disk-64bit.iso的使用方法参考下面的链接:
https://blog.csdn.net/ccc_cui/article/details/82803846
在选择从usb启动后,现在,出现了这个画面:

点击Recommended repair之后,出现:
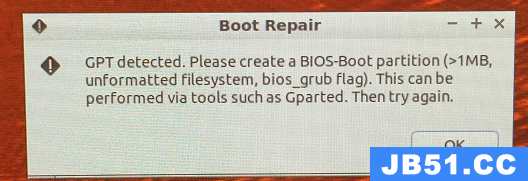
提示可以利用Gparted执行创建BIOS-boot partition, 然后,我点击:

后,出现:

此时,对着第一个分区sda1右键,选择manage flags.
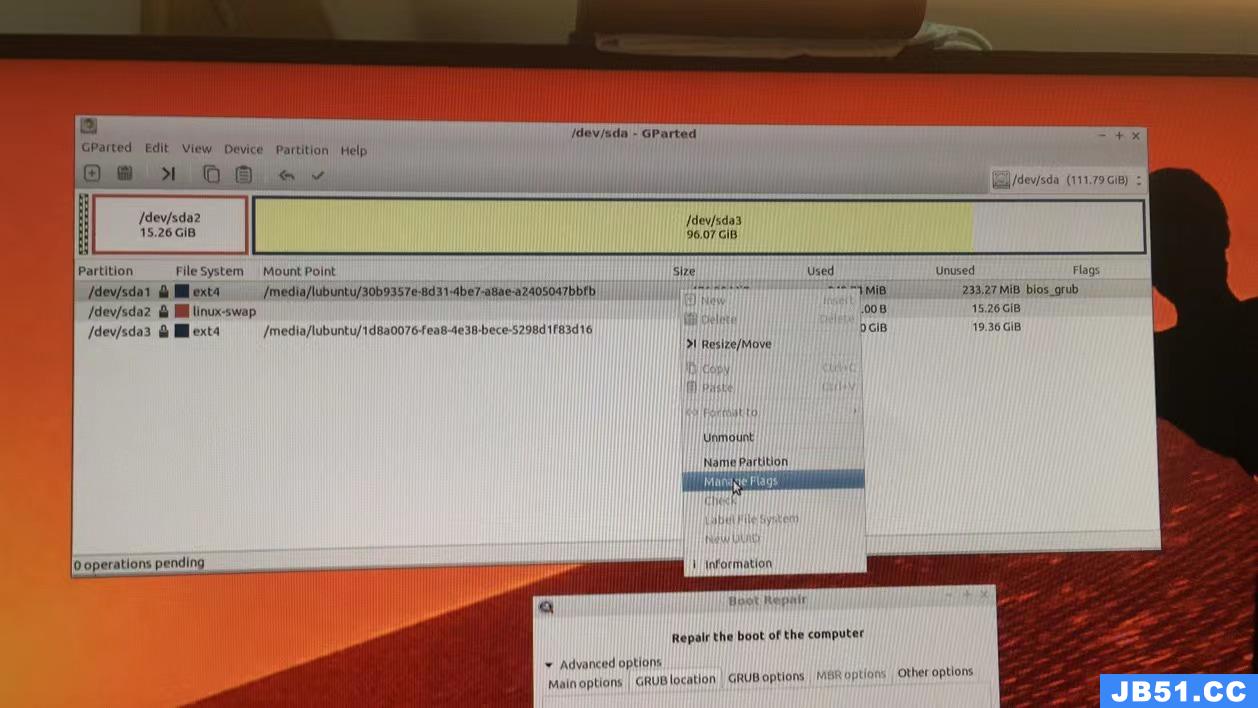
跳出:

之后,在bios_grub那一项打对勾,然后点击close.
此时,敲入命令:
sudo fdisk -l
显示:

重复做这一步:
此时,出现:

这是一个积极的信号,重启一下看看。
结果是:
开机停在grub界面:

还是不行。
参考下面这个链接进行解决:
https://linuxhint.com/grub_rescue_ubuntu_1804/
Using GRUB Rescue to Boot into Ubuntu 18.04 LTS:
In the GRUB Rescue command line interface, you can list the hard drives and partitions you have installed with the following command:
As you can see, I have (hd0), (hd0, gpt1) and (hd0,gpt2) available. (hd0) represents the raw hard drive. (hd0,gpt1) and (hd0,gpt2) are the first and second GPT partitions of (hd0) respectively.

I’ve Ubuntu 18.04 LTS installed on UEFI hardware. So the first partition (hd0,gpt1) is the EFI partition and the second partition (hd0,gpt2) is the root partition. The files required to boot into the operating system is in the /boot directory of (hd0,gpt2) partition in my case. You may have /boot directory in a separate partition, in that case, make changes to the commands as you see fit.
You can list what files you have in a certain partition with ls command from the GRUB Rescue command line interface.
List the files and directories of the root partition (hd0,gpt2) with the following command:
![]()
As you can see, the files and directories are listed.

We are interested in the files we have in the /boot directories.
You should find two files in the /boot directory, vmlinuz and initrd as marked in the screenshot below. These files are required in order to boot correctly.

在这一步的时候,我的电脑的界面是:

这说明,我的硬盘里面是丢失了引导文件内核的。
Now set the root variable to point to the root partition (hd0,gpt2) with the following command:
![]()
Now you have to use the linux command to make the relative path of vmlinuz file known to GRUB bootloader.
You can do that with the following command:

NOTE: Here root=/dev/sda2 is required. Otherwise you may not be able to boot. /dev/sda2 means, that it is the second partition of the first hard drive. I added a table to help you understand how it works.
| GRUB Identifier | Hard Drive | Partition | Linux Identifier |
| (hd0) | First | /dev/sda | |
| (hd0,gpt1) | First | First | /dev/sda1 |
| (hd0,gpt2) | First | Second | /dev/sda2 |
| (hd1) | Second | /dev/sdb | |
| (hd1,gpt2) | Second | Second | /dev/sdb2 |
| (hd1,gpt5) | Second | Fifth | /dev/sdb5 |
Also know that file and directory auto completion with the <Tab> key works in the GRUB command line interface as well, just like it does in a Linux terminal. So you should not have hard time navigating around GRUB command line interface.
Now you have to run the initrd command to make the initrd image know to the GRUB bootloader.
You can do that with the following command:

Now that everything is set, you can run the following GRUB command to boot into your Ubuntu 18.04 LTS operating system.

The boot process should start as you can see from the screenshot below.

You should see the login screen afterward. Login to your Ubuntu 18.04 LTS system.

Now that you’re logged in, run the following command to update the GRUB 2 configuration file:

The GRUB 2 configuration should be updated.

You may also need to re-install GRUB bootloader with the following command:
NOTE: Here /dev/sda is the hard drive where you want to install GRUB bootloader. Usually, it is the hard drive where you have your root partition.

Now that everything is working, you should be able to boot normally. If you still need something fixed, you can do it right now.
Loading Additional Modules:
At times, the GRUB command line interface prompt should be grub rescue> instead of
In that case, you need to run 2 additional commands. They are used to load GRUB modules that are not loaded by default. But are very important to boot the system.
The commands are:
grub rescue> insmod linux
Useful GRUB Rescue Commands:
In this section, I am going to list some of the common GRUB rescue commands that you may need in order to troubleshoot boot problems.
set pager=1 – If the output of any command is long enough that it doesn’t fit the screen, then this commands shows the outputs in a pager, like less in Linux terminal.
lsmod – It lists all the GRUB modules that are loaded.
cat – used to read files.
usb – list all the USB devices attached to your system.
clear – clears all the text from the GRUB command line window.
configfile grub.cfg_filePath – You can add a grub.cfg file using this command.
insmod – load GRUB module.
lspci – list all the attached PCI devices.
ls – list files, directories and block devices of your computer.
Although, this article is geared toward Ubuntu 18.04 LTS, it should work for any other modern Linux distribution that uses GRUB bootloader. Thanks for reading this article.
算了,不折腾了,重装。
重装后的ubuntu:

版权声明:本文内容由互联网用户自发贡献,该文观点与技术仅代表作者本人。本站仅提供信息存储空间服务,不拥有所有权,不承担相关法律责任。如发现本站有涉嫌侵权/违法违规的内容, 请发送邮件至 dio@foxmail.com 举报,一经查实,本站将立刻删除。