
Angular 是一个一站式框架,用于使用相同的可重用代码创建移动和 Web 应用程序。使用 Angular,您可以将整个应用程序划分为可重用的组件,从而更轻松地维护和重用代码。
在本教程系列中,您将学习如何开始使用 Angular 和 MongoDB 作为后端创建 Web 应用程序。您将使用 Node.js 来运行服务器。
在本教程的整个过程中,您将使用 Angular、Node.js 和 MongoDB 构建一个博客应用程序。
在本教程中,您将了解如何开始设置应用程序并创建 Login 组件。
开始使用
让我们开始安装 Angular CLI。
npm install -g @angular/cli
安装 Angular CLI 后,创建一个名为 AngularBlogApp 的项目文件夹。
mkdir AngularBlogApp
cd AngularBlogApp
从项目文件夹中,使用以下命令创建一个新的 Angular 应用:
ng new client
创建 client 应用程序后,导航到项目文件夹并使用节点包管理器 (npm) 安装所需的依赖项。
cd client
npm install
使用 npm 启动客户端服务器。
npm start
您应该让应用程序在 http://localhost:4200/ 上运行。
设置应用程序
您的 Angular Web 应用程序将有一个根组件。在 src/app 文件夹中创建一个名为 root 的文件夹。创建一个名为 root.component.html 的文件并添加以下 HTML 代码:
<h3>
    Root Component
</h3>
添加一个名为 root.component.ts 的文件并添加以下代码:
import { Component } from '@angular/core';

@Component({
  selector: 'app-root',
  templateUrl: './root.component.html'
})
export class RootComponent {

}
删除文件 app.component.html、app.component.ts、app.component.scss 和 app.component.spec.ts。 src/app 文件夹内只有一个名为 app.module.ts 的文件。
在 app.module.ts 文件中导入 RootComponent 。
import { RootComponent } from './root/root.component';
将 RootComponent 包含在 ngModules 中并引导它。
@NgModule({
  declarations: [
    RootComponent
  ],
  imports: [
    BrowserModule,
    FormsModule
  ],
  providers: [],
  bootstrap: [RootComponent]
})
保存更改并重新启动服务器。当应用程序加载时,您将显示 RootComponent。
您将使用 Angular Router 在我们的博客应用程序中进行路由。因此,在 src/app 文件夹内名为 app.routing.ts 的新文件中导入与路由相关的依赖项。
import { RouterModule, Routes } from '@angular/router';
import { ModuleWithProviders } from '@angular/core/src/metadata/ng_module';
定义路由路径以及组件,如下所示:
export const AppRoutes: Routes = [
    { path: '', component: LoginComponent }
];
导出路由以创建包含所有路由提供者的模块。
export const ROUTING: ModuleWithProviders = RouterModule.forRoot(AppRoutes);
以下是 app.routing.ts 文件的外观:
import { RouterModule, Routes } from '@angular/router';
import { ModuleWithProviders } from '@angular/core/src/metadata/ng_module';

import { LoginComponent } from './login/login.component';

export const AppRoutes: Routes = [
    { path: '', component: LoginComponent }
];

export const ROUTING: ModuleWithProviders = RouterModule.forRoot(AppRoutes);
如上面的代码所示,您尚未创建 LoginComponent。添加它是为了清楚起见。
在 app.module.ts 文件中导入 ROUTING 类。
import { ROUTING } from './app.routing';
将其包含在 NgModule 导入中。
imports: [
    BrowserModule,
    ROUTING,
    FormsModule
]
将 RouterOutlet 放置在 root.component.html 页面中。这是渲染路由组件的地方。
<router-outlet></router-outlet>
在 src/app 文件夹内创建一个名为 login 的文件夹。在 login 文件夹中,创建一个名为 login.component.ts 的文件并添加以下代码:
import { Component } from '@angular/core';

@Component({
  selector: 'app-login',
  templateUrl: './login.component.html'
})
export class LoginComponent {

  constructor() {

  }

}
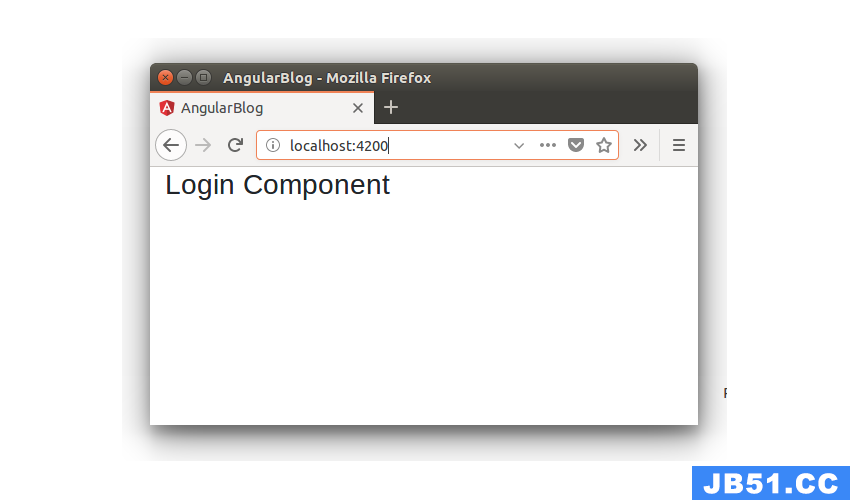
创建一个名为 login.component.html 的文件并添加以下代码:
<h3>
    Login Component
</h3>
保存以上更改并重新启动服务器。根据应用程序加载时定义的路由,将显示 LoginComponent 。
创建登录组件
您在设置应用程序时已经为 LoginComponent 奠定了基础。让我们使用 Bootstrap 创建 LoginComponent 的视图。
下载引导 CSS 样式并将其包含在 assets 文件夹中,并将引用包含在 src/index.html 页面中。
<link rel="stylesheet" type="text/css" href="./assets/bootstrap.min.css">
在 index.html 页面中的 app-root 周围放置一个包装器。
<div class="container">
  	<app-root></app-root>
</div>
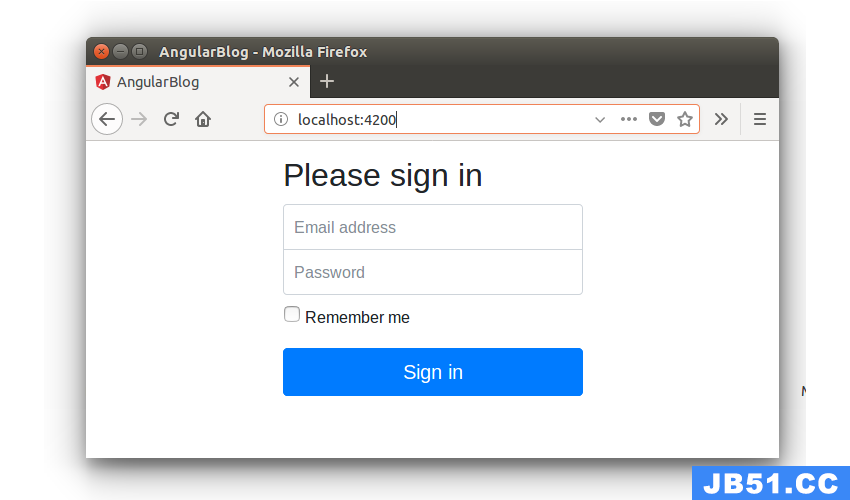
将以下 HTML 添加到 login.component.html 页面。
<form class="form-signin">
     <h2 class="form-signin-heading">Please sign in</h2>
     <label for="inputEmail" class="sr-only">Email address</label>
        <input name="email" type="email" id="inputEmail" class="form-control" placeholder="Email address" required autofocus>
        <label for="inputPassword" class="sr-only">Password</label>
        <input name="password"  type="password" id="inputPassword" class="form-control" placeholder="Password" required>
        <div class="checkbox">
          <label>
            <input type="checkbox" value="remember-me"> Remember me
          </label>
        </div>
    <button class="btn btn-lg btn-primary btn-block" type="button">Sign in</button>
</form>
在 login 文件夹中创建一个名为 login.component.css 的文件,并添加以下 CSS 样式。
.form-signin {
  max-width: 330px;
  padding: 15px;
  margin: 0 auto;
}
.form-signin .form-signin-heading,
.form-signin .checkbox {
  margin-bottom: 10px;
}
.form-signin .checkbox {
  font-weight: 400;
}
.form-signin .form-control {
  position: relative;
  box-sizing: border-box;
  height: auto;
  padding: 10px;
  font-size: 16px;
}
.form-signin .form-control:focus {
  z-index: 2;
}
.form-signin input[type="email"] {
  margin-bottom: -1px;
  border-bottom-right-radius: 0;
  border-bottom-left-radius: 0;
}
.form-signin input[type="password"] {
  margin-bottom: 10px;
  border-top-left-radius: 0;
  border-top-right-radius: 0;
}
修改 @Component 装饰器以包含 CSS 样式。
@Component({
  selector: 'app-login',
  templateUrl: './login.component.html',
  styleUrls: ['./login.component.css']
})
保存上述更改并尝试加载应用程序。您将在登录视图中显示 LoginComponent。
创建登录服务
LoginComponent 需要与数据库交互以查看登录用户是否有效。所以它需要进行 API 调用。您将数据库交互部分保存在名为 login.service.ts 的单独文件中。
创建一个名为 login.service.ts 的文件并添加以下代码:
import { Injectable } from '@angular/core';
import { HttpClient } from '@angular/common/http';

@Injectable()
export class LoginService {

    constructor(private http: HttpClient){

	}

	validateLogin(){

	}

}
在 LoginComponent 中导入 LoginService 并将其添加为组件装饰器中的提供程序。
import { LoginService } from './login.service';
@Component({
  selector: 'app-login',
  templateUrl: './login.component.html',
  styleUrls: ['./login.component.css'],
  providers: [ LoginService ]
})
在 login.service.ts 文件中添加一个名为 validateLogin 的方法,该方法将进行 API 调用。其外观如下:
validateLogin(user: User){
	return this.http.post('/api/user/login',{
		username : user.username,
		password : user.password
	})
}
如上面的代码所示,它返回一个将在 login.component.ts 文件中订阅的可观察对象。以下是 login.service.ts 文件的外观:
import { Injectable } from '@angular/core';
import { HttpClient } from '@angular/common/http';
import { User } from '../models/user.model';

@Injectable()
export class LoginService {

    constructor(private http: HttpClient){

	}

	validateLogin(user: User){
		return this.http.post('/api/user/login',{
			username : user.username,
			password : user.password
		})
	}

}
实施用户登录验证
将 ngModel 指令添加到 login.component.html 中的输入元素。
 <input name="email" [(ngModel)] = "user.username" type="email" id="inputEmail" class="form-control" placeholder="Email address" required autofocus>
 <input name="password" [(ngModel)] = "user.password" type="password" id="inputPassword" class="form-control" placeholder="Password" required>
向登录按钮添加点击事件。
<button class="btn btn-lg btn-primary btn-block" (click)="validateLogin();" type="button">Sign in</button>
以下是修改后的 login.component.html 的外观:
<form class="form-signin">
     <h2 class="form-signin-heading">Please sign in</h2>
     <label for="inputEmail" class="sr-only">Email address</label>
        <input name="email" [(ngModel)] = "user.username" type="email" id="inputEmail" class="form-control" placeholder="Email address" required autofocus>
        <label for="inputPassword" class="sr-only">Password</label>
        <input name="password" [(ngModel)] = "user.password" type="password" id="inputPassword" class="form-control" placeholder="Password" required>
        <div class="checkbox">
          <label>
            <input type="checkbox" value="remember-me"> Remember me
          </label>
        </div>
    <button class="btn btn-lg btn-primary btn-block" (click)="validateLogin();" type="button">Sign in</button>
</form>
在 login.component.ts 文件中定义并初始化用户变量。
public user : User;

constructor(private loginService: LoginService) {
  this.user = new User();
}
User 模型已在 src/app/models 文件夹中定义。其外观如下:
export class User {
    constructor(){
		this.username = '';
		this.password = '';
	}
	public username;
	public password;
}
定义一个名为 validateLogin 的方法,该方法将在单击按钮时调用。该方法如下所示:
validateLogin() {
  if(this.user.username && this.user.password) {
  	this.loginService.validateLogin(this.user).subscribe(result => {
    console.log('result is ', result);
  }, error => {
    console.log('error is ', error);
  });
  } else {
  	alert('enter user name and password');
  }
}
当用户名和密码都输入后,validateLogin 方法会订阅 LoginService 方法来验证用户登录。
以下是 login.component.ts 文件的外观:
import { Component } from '@angular/core';
import { LoginService } from './login.service';
import { User } from '../models/user.model';

@Component({
  selector: 'app-login',
  templateUrl: './login.component.html',
  styleUrls: ['./login.component.css'],
  providers: [ LoginService ]
})
export class LoginComponent {

  public user : User;

  constructor(private loginService: LoginService) {
      this.user = new User();
  }

  validateLogin() {
  	if(this.user.username && this.user.password) {
  		this.loginService.validateLogin(this.user).subscribe(result => {
        console.log('result is ', result);
      }, error => {
        console.log('error is ', error);
      });
  	} else {
  		alert('enter user name and password');
  	}
  }

}
总结
在 Angular 博客应用教程系列的这一部分中,您了解了如何开始使用 Angular 创建 Web 应用。您创建了 Angular 应用程序的基本结构,并创建了 LoginComponent ,这将使用户能够验证用户名和密码。
在本教程系列的下一部分中,您将编写用于用户登录验证的 REST API 并创建主页组件。
本教程的源代码可在 GitHub 上获取。
请在下面的评论中告诉我们您的想法和建议。
以上就是Angular 和 MongoDB:构建具有登录功能的博客应用程序的详细内容,更多请关注编程之家其它相关文章!
版权声明:本文内容由互联网用户自发贡献,该文观点与技术仅代表作者本人。本站仅提供信息存储空间服务,不拥有所有权,不承担相关法律责任。如发现本站有涉嫌侵权/违法违规的内容, 请发送邮件至 dio@foxmail.com 举报,一经查实,本站将立刻删除。