
密码本质上是脆弱的,这已经是一个公认的事实。因此,要求最终用户为他们使用的每个应用程序创建强密码只会让事情变得更糟。
一个简单的解决方法是让用户通过现有的社交帐户(例如 Facebook、Twitter、Google 等)进行身份验证。在本文中,我们将做到这一点,并将此社交登录功能添加到在这是本身份验证系列的第一部分,以便我们能够使用 Passport 中间件通过 Facebook 和 Twitter 帐户进行身份验证。
如果您还没有阅读过上一篇文章,我建议您阅读一下它,因为我们将在此文章奠定的基础上构建新的策略、路线和视图。
社交登录
对于外行来说,社交登录是一种使用来自 Facebook、Twitter 等社交网站的现有信息的单点登录,用户通常应该已经创建了帐户。
社交登录主要依赖于 OAuth 2.0 等身份验证方案。要了解有关 OAuth 支持的不同登录流程的更多信息,请阅读本文。我们选择 Passport 来处理社交登录,因为它为各种 OAuth 提供商提供了不同的模块,无论是 Facebook、Twitter、Google、GitHub 等。在本文中,我们将使用 Passport-facebook 和 Passport-twitter 模块通过现有的 Facebook 或 Twitter 帐户提供登录功能。
Facebook 身份验证
要启用 Facebook 身份验证,我们首先需要使用 Facebook 开发者门户创建 Facebook 应用。记下应用 ID 和应用密钥,然后转至设置并在网站部分指定网站 URL,以指定回调 URL。应用。另请确保在联系电子邮件字段中输入有效的电子邮件地址。需要能够公开此应用程序并可供公众访问。
接下来,转到状态和审核部分,并将滑块转到是以使应用公开。我们创建一个配置文件 fb.js 来保存连接到 Facebook 所需的配置信息。
// facebook app settings - fb.js
module.exports = {
  'appID' : '<your_app_identifier>',
  'appSecret' : '<your_app_secret>',
  'callbackUrl' : 'http://localhost:3000/login/facebook/callback'
}
Facebook 登录策略
回到我们的 Node 应用程序,我们现在使用 FacebookStrategy 模块定义用于 Facebook 身份验证的 Passport 策略,利用上述设置来获取用户的 Facebook 个人资料并在视图中显示详细信息。
passport.use('facebook', new FacebookStrategy({
  clientID        : fbConfig.appID,
  clientSecret    : fbConfig.appSecret,
  callbackURL     : fbConfig.callbackUrl
},

  // facebook will send back the tokens and profile
  function(access_token, refresh_token, profile, done) {
	// asynchronous
	process.nextTick(function() {

	  // find the user in the database based on their facebook id
	  User.findOne({ 'id' : profile.id }, function(err, user) {

	    // if there is an error, stop everything and return that
	    // ie an error connecting to the database
	    if (err)
	      return done(err);

		  // if the user is found, then log them in
	      if (user) {
	        return done(null, user); // user found, return that user
	      } else {
	        // if there is no user found with that facebook id, create them
	        var newUser = new User();

			// set all of the facebook information in our user model
	        newUser.fb.id    = profile.id; // set the users facebook id
	        newUser.fb.access_token = access_token; // we will save the token that facebook provides to the user
	        newUser.fb.firstName  = profile.name.givenName;
	        newUser.fb.lastName = profile.name.familyName; // look at the passport user profile to see how names are returned
	        newUser.fb.email = profile.emails[0].value; // facebook can return multiple emails so we'll take the first

			// save our user to the database
	        newUser.save(function(err) {
	          if (err)
	            throw err;

	          // if successful, return the new user
	          return done(null, newUser);
	        });
	     }
	  });
    });
}));
配置路由
现在我们需要添加某些路由,以启用 Facebook 登录以及在用户授权应用程序使用其 Facebook 帐户后处理回调。
// route for facebook authentication and login
// different scopes while logging in
router.get('/login/facebook',
  passport.authenticate('facebook', { scope : 'email' }
));

// handle the callback after facebook has authenticated the user
router.get('/login/facebook/callback',
  passport.authenticate('facebook', {
    successRedirect : '/home',
	failureRedirect : '/'
  })
);
我们的演示应用程序的登录页面如下所示:

当您点击使用 Facebook 登录按钮时,它将尝试通过 Facebook 进行身份验证。如果您已经登录 Facebook,它将显示以下对话框,请求您的许可,否则它将要求您登录 Facebook,然后显示此对话框。
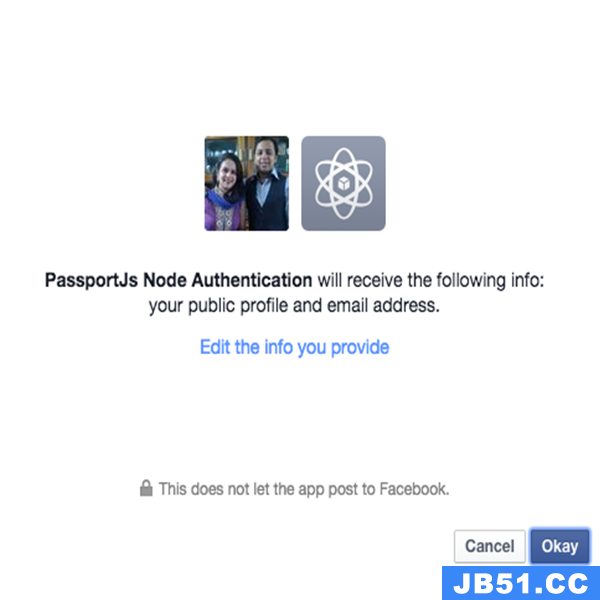
如果您允许应用接收您的公开个人资料和电子邮件地址,那么我们注册的回调函数将与用户一起调用细节。我们可以保存这些信息以供将来参考,或者显示它们,或者干脆选择忽略它们,具体取决于您想要如何处理这些信息。请随时跳转并查看此 git 存储库中的完整代码。
值得注意的是,除了此演示应用程序提供的基本信息之外,您还可以使用相同的身份验证机制通过使用适当的范围并使用Facebook API 以及通过用户个人资料收到的访问令牌。
Twitter 身份验证
需要连接一个类似的身份验证模块来通过 Twitter 处理身份验证,并插入 Passport 芯片以帮助其 passport-twitter 模块。
首先,您需要使用其应用程序管理界面创建一个新的 Twitter 应用程序。这里需要注意的一件事是,在指定回调 URL 时,如果在回调 URL 字段中给出“localhost”,Twitter 似乎无法很好地使用它。为了在开发时克服此限制,您可以使用特殊的环回地址或“127.0.0.1”来代替“localhost”。创建应用程序后,在配置文件中记下以下 API 密钥和机密信息,如下所示:
// twitter app settings - twitter.js
module.exports = {
    'apikey' : '<your_app_key>',
	'apisecret' : '<you_app_secret>',
	'callbackUrl' : 'http://127.0.0.1:3000/login/twitter/callback'
}
Twitter 登录策略
Twitter 的登录策略是 TwitterStrategy 的一个实例,如下所示:
passport.use('twitter', new TwitterStrategy({
    consumerKey     : twitterConfig.apikey,
    consumerSecret  : twitterConfig.apisecret,
    callbackURL     : twitterConfig.callbackURL
  },
  function(token, tokenSecret, profile, done) {
    // make the code asynchronous
    // User.findOne won't fire until we have all our data back from Twitter
    process.nextTick(function() {

	  User.findOne({ 'twitter.id' : profile.id },
        function(err, user) {
          // if there is an error, stop everything and return that
		  // ie an error connecting to the database
	      if (err)
	        return done(err);

			// if the user is found then log them in
	        if (user) {
	           return done(null, user); // user found, return that user
	        } else {
	           // if there is no user, create them
	           var newUser                 = new User();

			   // set all of the user data that we need
	           newUser.twitter.id          = profile.id;
	           newUser.twitter.token       = token;
	           newUser.twitter.username = profile.username;
	           newUser.twitter.displayName = profile.displayName;
	           newUser.twitter.lastStatus = profile._json.status.text;

			   // save our user into the database
	           newUser.save(function(err) {
	             if (err)
	               throw err;
	             return done(null, newUser);
	           });
	        }
	     });
	  });
    })
);
配置路由
// route for twitter authentication and login
// different scopes while logging in
router.get('/login/twitter',
  passport.authenticate('twitter')
);

// handle the callback after facebook has authenticated the user
router.get('/login/twitter/callback',
  passport.authenticate('twitter', {
	successRedirect : '/twitter',
	failureRedirect : '/'
  })
);

/* GET Twitter View Page */
router.get('/twitter', isAuthenticated, function(req, res){
  res.render('twitter', { user: req.user });
});
现在要对此进行测试,请务必使用 http://127.0.0.1:http: //localhost:.正如我们上面已经提到的,在使用“localhost”作为主机名与 Twitter 交换令牌时似乎存在问题。单击使用 Twitter 登录按钮时,正如预期的那样,它会请求用户同意允许此应用程序使用 Twitter。
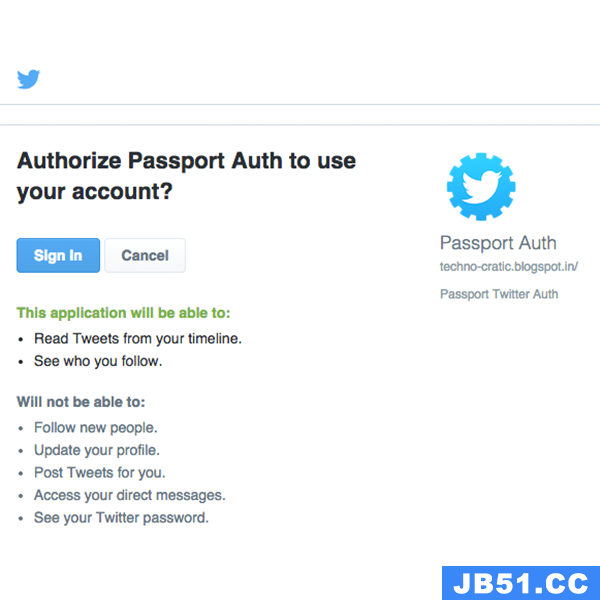
当您允许应用程序访问您的 Twitter 帐户和有限信息时,登录策略中注册的回调处理程序为调用,然后用于将这些详细信息存储在后端数据库中
结论
这就是你拥有的!我们成功地将 Facebook 和 Twitter 登录添加到示例应用程序中,而无需编写大量代码并通过让 Passport 完成繁重的工作来处理与身份验证机制相关的复杂问题。可以为 Passport 支持的各种提供程序编写类似的登录策略。整个应用程序的代码可以在此 git 存储库中找到。请随意扩展它并在您自己的项目中使用它。
以上就是使用Passport为Node.js应用程序提供社交认证的详细内容,更多请关注编程之家其它相关文章!
版权声明:本文内容由互联网用户自发贡献,该文观点与技术仅代表作者本人。本站仅提供信息存储空间服务,不拥有所有权,不承担相关法律责任。如发现本站有涉嫌侵权/违法违规的内容, 请发送邮件至 dio@foxmail.com 举报,一经查实,本站将立刻删除。