

一、父子组件通信
原理:父组件通过props(与vue中的props区分开)向子组件通信,子组件通过回调事件与父组件通信。
首先,先创建一个父组件Parent.js跟子组件Children.js,二者的关系为直接父子关系。
Parent.js父组件如下,给父组件一个默认状态state,引入子组件,通过在子组件加上toChildren={this.state.msg},该处即为向子组件传props。
import React from 'react';
import { Button } from 'element-react';
import Children from './Children';
class Parent extends React.Component {
constructor(props) {
super(props);
this.state = {
msg:'父组件传递给子组件'
};
this.changeMsg = this.changeMsg.bind(this)
}
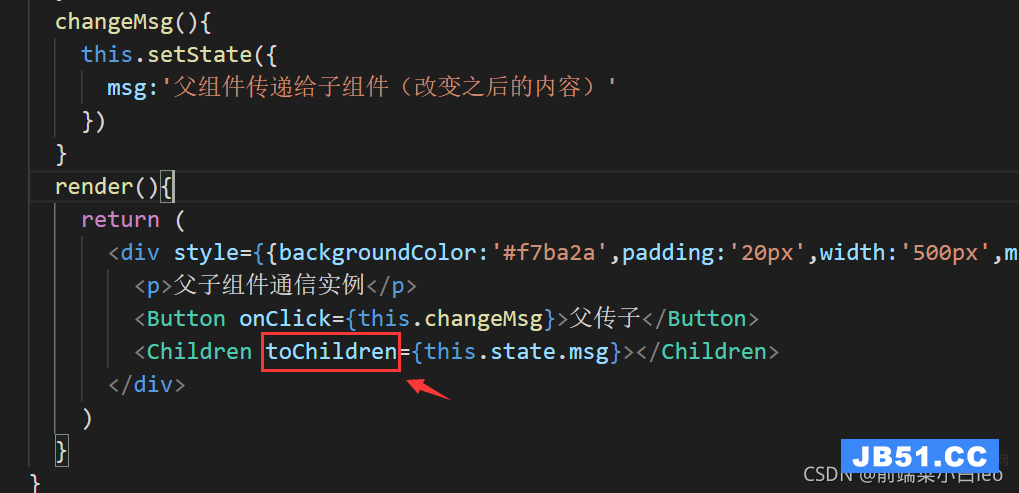
changeMsg(){
this.setState({
msg:'父组件传递给子组件(改变之后的内容)'
})
}
render(){
return (
<p style={{backgroundColor:'#f7ba2a',padding:'20px',width:'500px',margin:'auto',textAlign:'center'}}>
<p>父子组件通信实例</p>
<Button onClick={this.changeMsg}>父传子</Button>
<Children toChildren={this.state.msg}></Children>
</p>
)
}
}
export default ParentChildren.js子组件如下,初始状态通过props拿到父组件传过来的值。
import React from 'react';

class Children extends React.Component {
  constructor(props) {
	super(props);
	this.state = {
		msg:this.props.toChildren   //通过props拿到父组件传过来的值
	};
  }
  render(){
    return (
      <p style={{backgroundColor:'#13ce66',padding:'10px',width:'200px',margin:'auto',marginTop:'20px'}}>
        <p>从父组件传过来:</p>
        <span style={{color:'blue'}}>{this.state.msg}</span>
      </p>
    )
  }
}

export default Children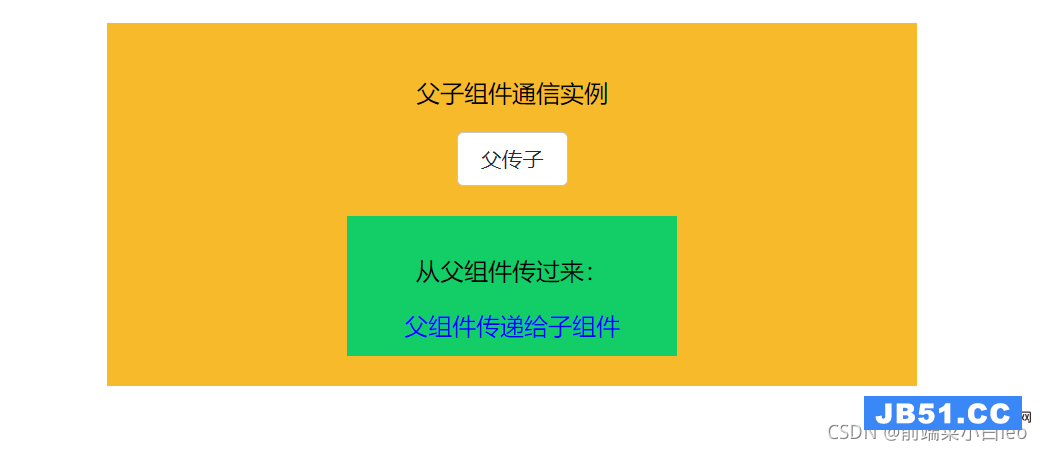
注意:子组件取值时应与父组件放在子组件的字段props一致,即本例中的 toChildren,如下

那么子组件想向父组件传值(向上传值),可以通过调用父组件传过来的回调函数
在Parent.js中向Children.js中加入回调函数callback,绑定changeMsg方法
import React from 'react';
import Children from './Children';
class Parent extends React.Component {
constructor(props) {
super(props);
this.state = {
msg:'父组件传递给子组件',
fromChildrn:''
};
this.changeMsg = this.changeMsg.bind(this)
}
changeMsg(val){
this.setState({
fromChildrn: val
})
}
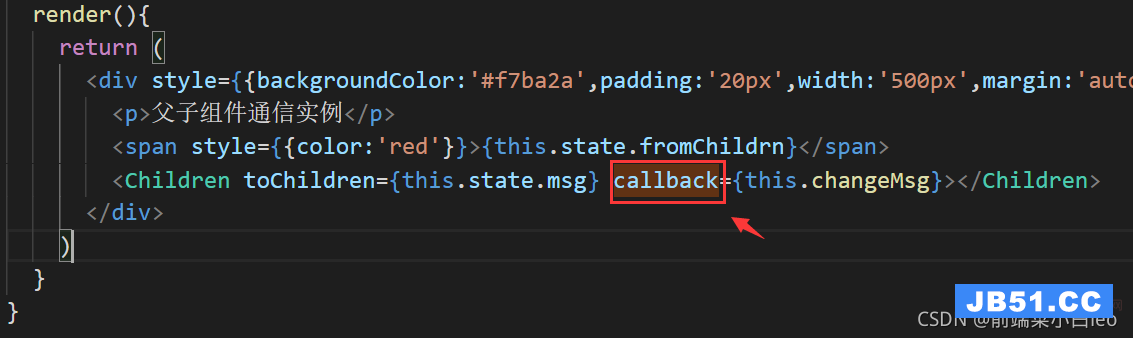
render(){
return (
<p style={{backgroundColor:'#f7ba2a',padding:'20px',width:'500px',margin:'auto',textAlign:'center'}}>
<p>父子组件通信实例</p>
<span style={{color:'red'}}>{this.state.fromChildrn}</span>
<Children toChildren={this.state.msg} callback={this.changeMsg}></Children>
</p>
)
}
}
export default Parent在子组件中,用this.props.callback()执行父组件的回调函数,从而执行绑定方法changeMsg,显示子组件传过来的值
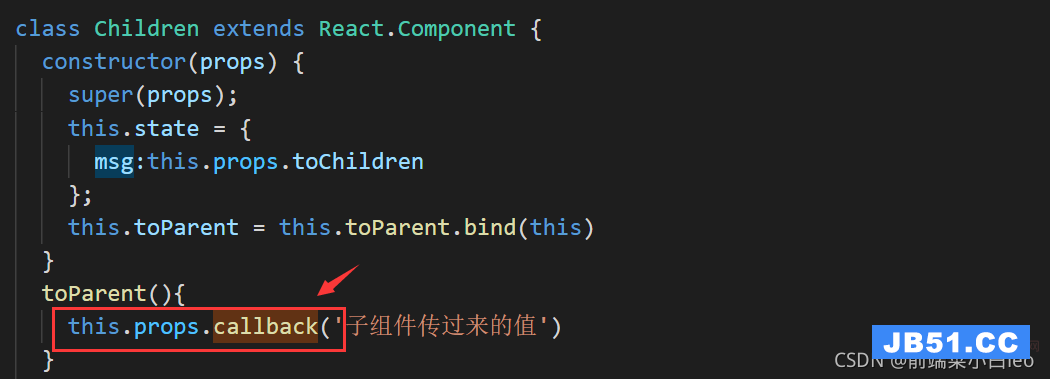
import React from 'react';
import { Button } from 'element-react';

class Children extends React.Component {
  constructor(props) {
	super(props);
	this.state = {
		msg:this.props.toChildren
	};
    this.toParent = this.toParent.bind(this)
  }
  toParent(){
    this.props.callback('子组件传过来的值')   //子组件通过此触发父组件的回调方法
  }
  render(){
    return (
      <p style={{backgroundColor:'#13ce66',padding:'10px',width:'200px',margin:'auto',marginTop:'20px'}}>
        <p>从父组件传过来:</p>
        <span style={{color:'blue'}}>{this.state.msg}</span>
        <Button onClick={this.toParent}>子传父</Button>
      </p>
    )
  }
}

export default Children注意:props中的回调函数名称需一致,即本例中的callback,如下
小结: 以上为直接父子组件通信的其中一种方式,父传子,通过props;子传父,执行回调。
二、跨级组件通信
假设一个父组件中存在一个子组件,这个子组件中又存在一个子组件,暂且称为“孙组件”,当父组件需要与“孙组件”通信时,常用的方式有两种,逐层传值与跨层传值。
1、逐层传值
这种方式就是上面的直接父子通信的基础上在加上一个中间层。如父、“孙”组件通信,可以先父子通信,然后再子“孙”通信,传递的层级变成父-->子-->“孙”,同理,通过props往下传,通过回调往上传。不展开,有兴趣的自己动手实现一下。
2、跨级传值
顾名思义,父跟“孙”通信,不需要经过子(中间层)组件。这里引出了Context。
React官方文档对Context做出了解释:
在一个典型的 React 应用中,数据是通过 props 属性自上而下(由父及子)进行传递的,但这种做法对于某些类型的属性而言是极其繁琐的(例如:地区偏好,UI 主题),这些属性是应用程序中许多组件都需要的。Context 提供了一种在组件之间共享此类值的方式,而不必显式地通过组件树的逐层传递 props。
一句话概括就是:跨级传值,状态共享。
看下简单的实例,直接讲用法。
首先,我先创建一个context.js文件(与父子孙同个目录),默认值为一个对象。
import React from react;
const MyContext = React.createContext({text:'luck'});
export default MyContext
然后,对父组件进行改写,引入context,使用一个 Provider 来将当前的 value 传递给以下的组件树,value为传递的值。
import React from 'react';
import Children from './Children';
import MyContext from './context';
class Parent extends React.Component {
constructor(props) {
super(props);
}
// 使用一个 Provider 来将当前的 value 传递给以下的组件树。
// 无论多深,任何组件都能读取这个值。
render(){
return (
<p style={{backgroundColor:'#f7ba2a',padding:'20px',width:'500px',margin:'auto',textAlign:'center'}}>
<p>context通信实例</p>
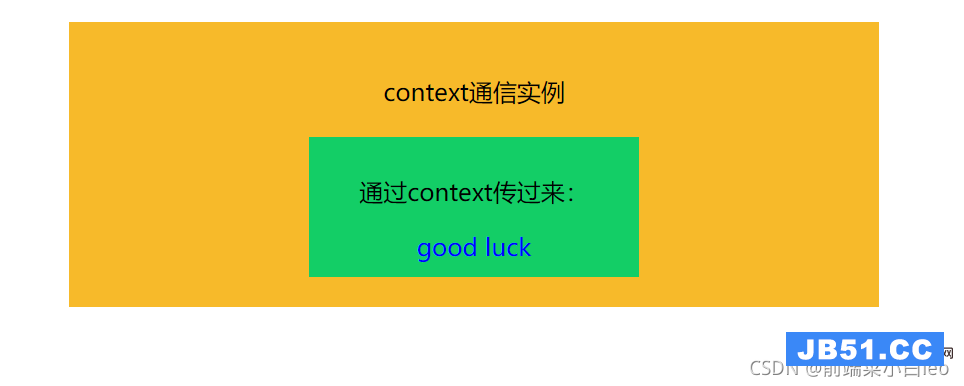
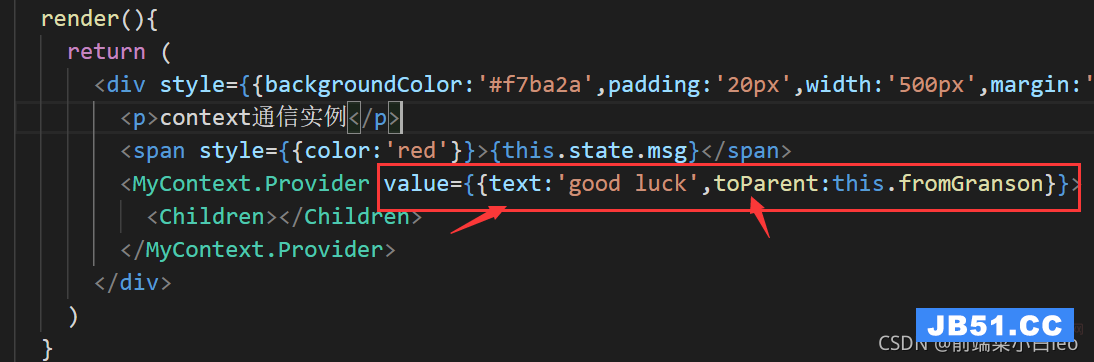
<MyContext.Provider value={{text:'good luck'}}>
<Children></Children>
</MyContext.Provider>
</p>
)
}
}
export default Parent子组件为中间层,不做处理,用于包裹“孙”组件。
import React from 'react';
import Grandson from './Grandson';

class Children extends React.Component {
  render(){
    return (
      <p>
        <Grandson></Grandson>
      </p>
    )
  }
}
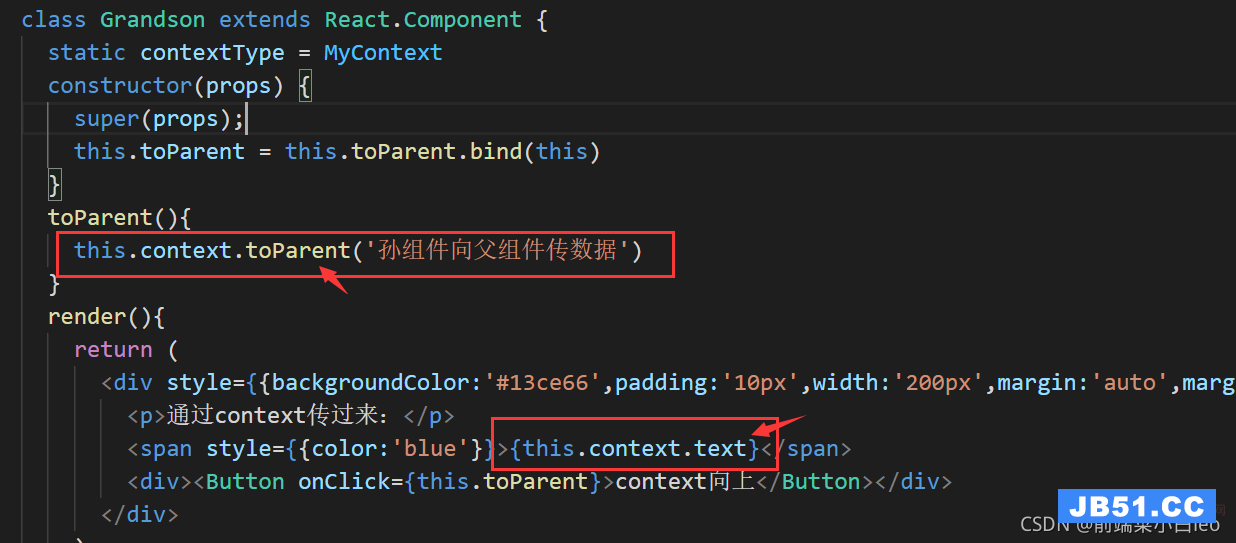
export default Children新增一个“孙”组件,同样需引入context,在组件内部添加static contextType = MyContext,此时将能通过this.context直接获取到上层距离最近的Provider传递的值,此时this.context = {text:good luck},即父组件传递value。
import React from 'react';
import MyContext from './context';

class Grandson extends React.Component {
  static contextType = MyContext
  render(){
    return (
      <p style={{backgroundColor:'#13ce66',padding:'10px',width:'200px',margin:'auto',marginTop:'20px'}}>
        <p>通过context传过来:</p>
        <span style={{color:'blue'}}>{this.context.text}</span>
      </p>
    )
  }
}

export default Grandson
通过this.context.text获取到传递的值。
以上的是一个父-->孙的过程,即向下的流程,如果想孙-->父向上传值,可以通过回调的方式
对父组件进行传值修改,在传过来的对象中添加一个属性,里面绑定父组件的方法value={{text:'good luck',toParent:this.fromGranson}}
import React from 'react';
import Children from './Children';
import MyContext from './context';

class Parent extends React.Component {
  constructor(props) {
	super(props);
    this.state = {
      msg:''
    };
    this.fromGranson = this.fromGranson.bind(this)
  }
  fromGranson(val){
    this.setState({
      msg:val
    })
  }
  // 使用一个 Provider 来将当前的 theme 传递给以下的组件树。
  // 无论多深,任何组件都能读取这个值。
  render(){
    return (
      <p style={{backgroundColor:'#f7ba2a',padding:'20px',width:'500px',margin:'auto',textAlign:'center'}}>
        <p>context通信实例</p>
        <span style={{color:'red'}}>{this.state.msg}</span>
        <MyContext.Provider value={{text:'good luck',toParent:this.fromGranson}}>
          <Children></Children>
        </MyContext.Provider>
      </p>
    )
  }
}

export default Parent
然后在孙组件中添加一个按钮,绑定方法,执行函数回调
toParent(){
this.context.toParent('孙组件向父组件传数据')
}
import React from 'react';
import MyContext from './context';
import { Button } from 'element-react'

class Grandson extends React.Component {
  static contextType = MyContext
  constructor(props) {
		super(props);
    this.toParent = this.toParent.bind(this)
	}
  toParent(){
    this.context.toParent('孙组件向父组件传数据')
  }
  render(){
    return (
      <p style={{backgroundColor:'#13ce66',padding:'10px',width:'200px',margin:'auto',marginTop:'20px'}}>
        <p>通过context传过来:</p>
        <span style={{color:'blue'}}>{this.context.text}</span>
        <p><Button onClick={this.toParent}>context向上</Button></p>
      </p>
    )
  }
}

export default Grandson
默认的页面为:

点击按钮之后,执行context中的回调,向上传值。
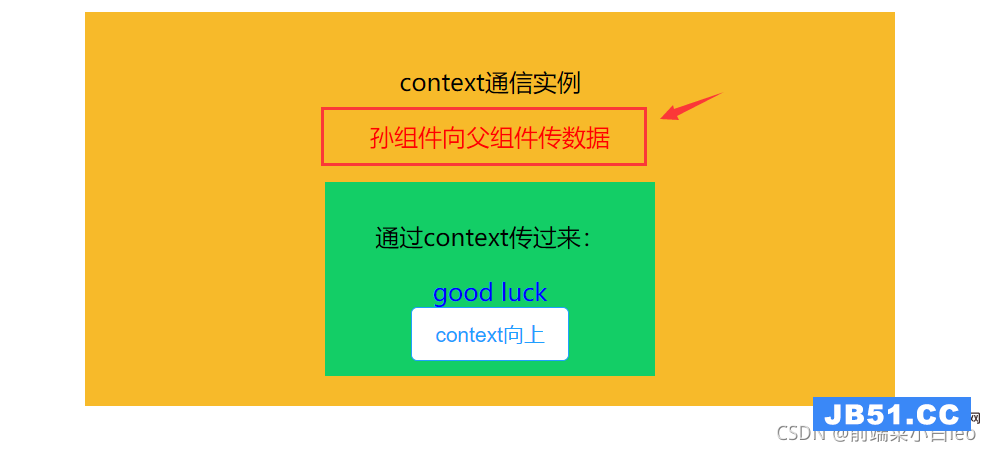
不管层级有多深,都可以使用context进行向下或向上传值。
注意:在下层组件中取的context中的字段需与value中传递字段保持一致。text与toParent
版权声明:本文内容由互联网用户自发贡献,该文观点与技术仅代表作者本人。本站仅提供信息存储空间服务,不拥有所有权,不承担相关法律责任。如发现本站有涉嫌侵权/违法违规的内容, 请发送邮件至 dio@foxmail.com 举报,一经查实,本站将立刻删除。