
ATF bl1 ufshc_dme_get/set处理流程分析
以海思hikey960为例来介绍,简单介绍在ATF BL1阶段的初始化处理。
UFS术语缩略词
UTP:UFS Transport Protocol
DME:Device Management Entity
UCS:UFS Command Set
UIC:UFS Interconnect
UTRD:UTP Transfer Request Descriptor
UPIU:UFS Protocol Information Unit
1 ATF的下载链接
https://github.com/ARM-software/arm-trusted-firmware
可以通过下面的命令来下载ATF的代码,或者通过打包下载的方式也可以。
git clone git@github.com:ARM-software/arm-trusted-firmware.git
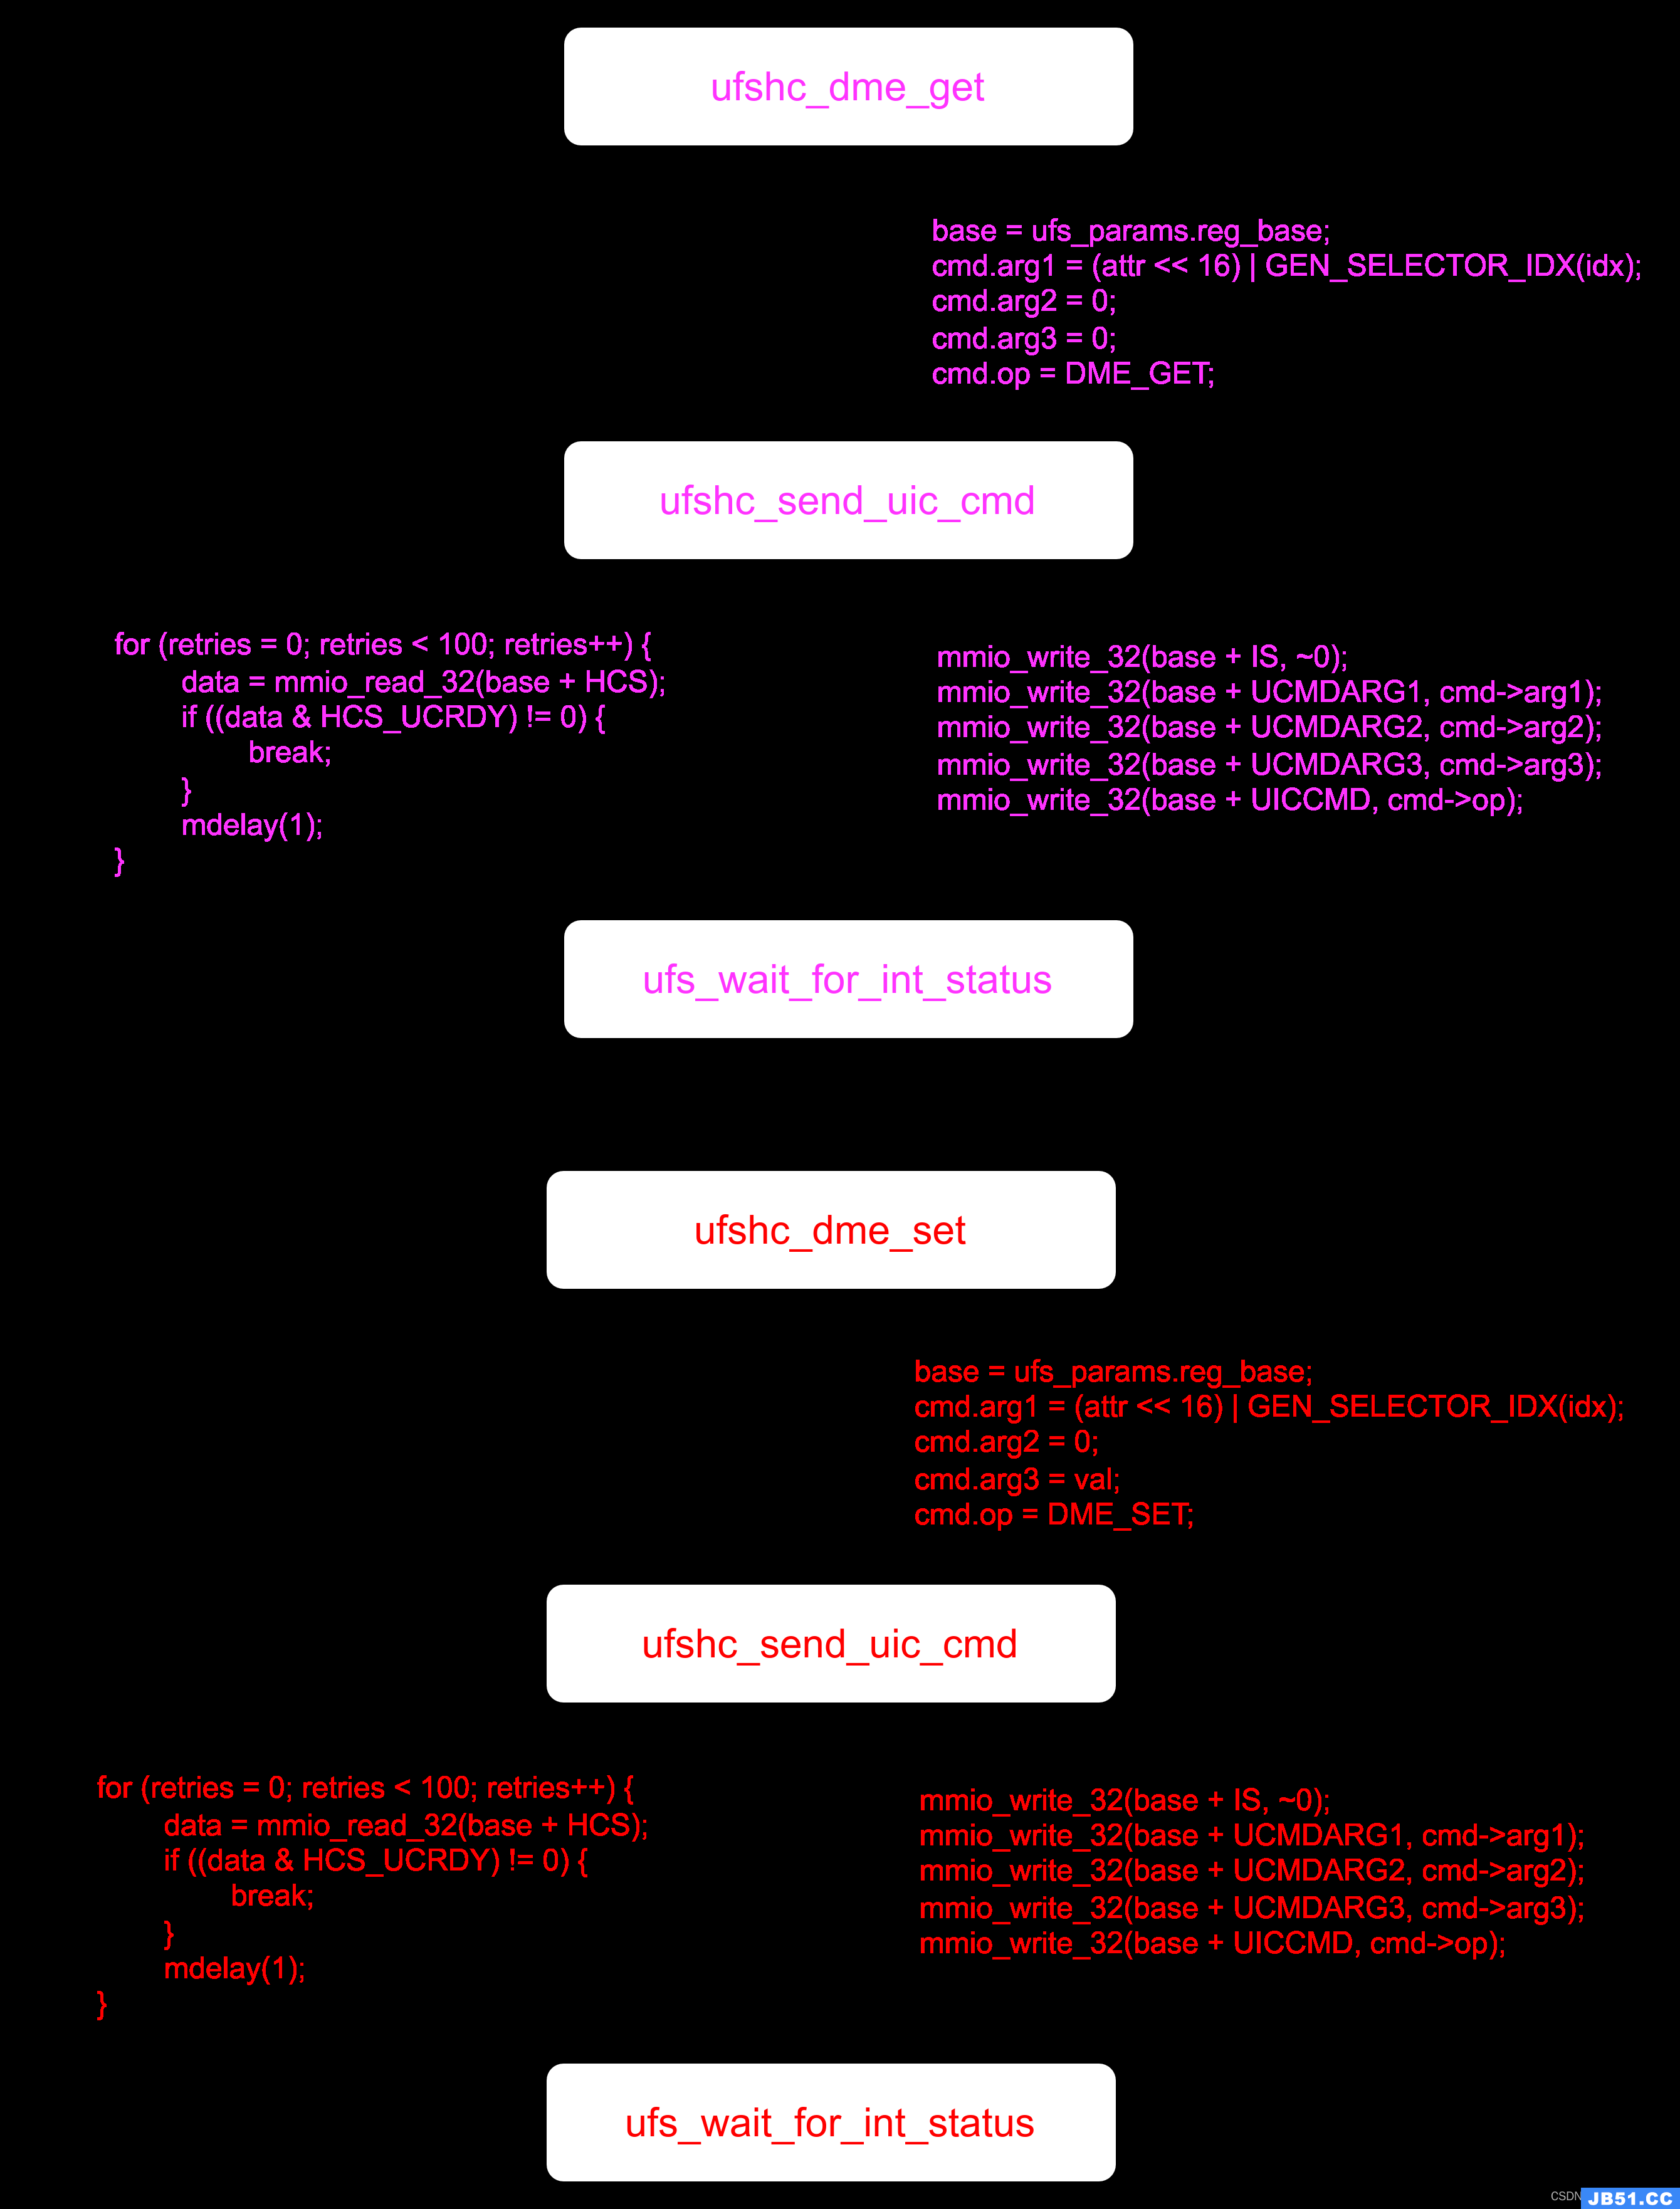
2 ATF BL1 ufshc_dme_get/set流程
- 设置
ufs dme get/set的cmd参数 - 在
ufshc_send_uic_cmd函数中首先等到UIC READY,然后配置UFS CMD ARG寄存器以及UIC CMD寄存器。
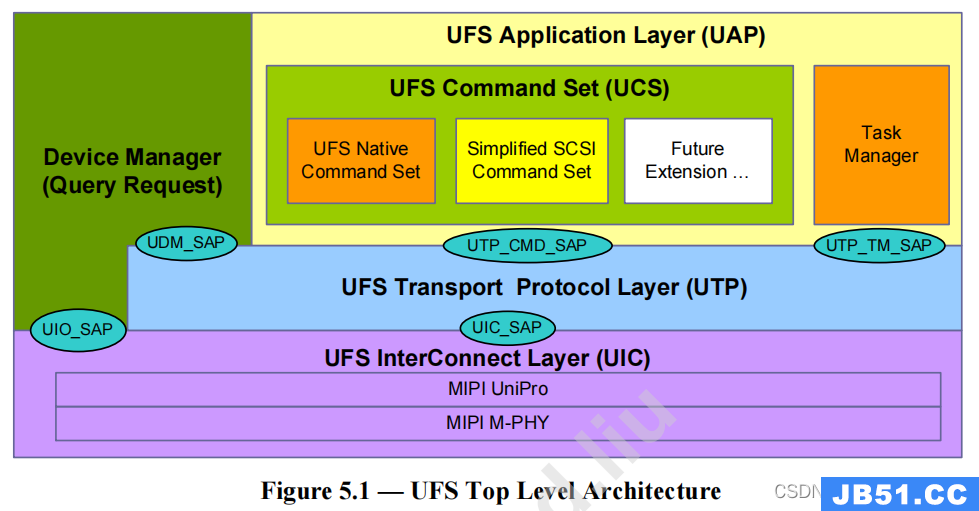
3 ufs总体架构图
3.1 UFS Top Level Architecture
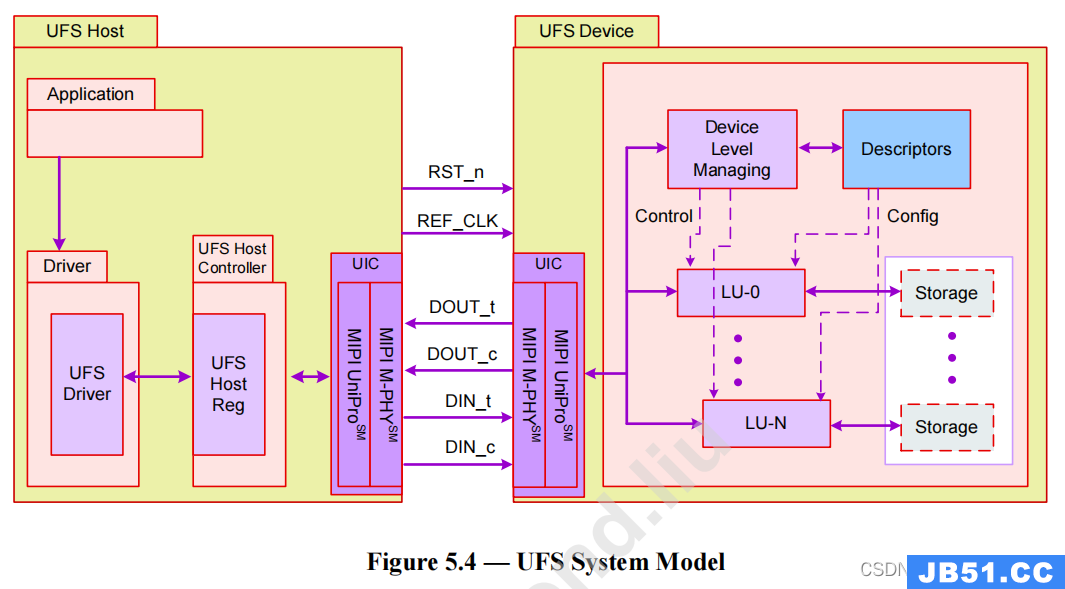
3.2 UFS System Model
4 ufshc_dme_get/set函数接口详细分析
4.1 ufshc_dme_get
cmd.op = DME_GET;ufshc_send_uic_cmd(base,&cmd);
int ufshc_dme_get(unsigned int attr, unsigned int idx, unsigned int *val)
{
        uintptr_t base;
        int result, retries;
        uic_cmd_t cmd;

        assert(ufs_params.reg_base != 0);

        if (val == NULL)
                return -EINVAL;

        base = ufs_params.reg_base;
        cmd.arg1 = (attr << 16) | GEN_SELECTOR_IDX(idx);
        cmd.arg2 = 0;
        cmd.arg3 = 0;
        cmd.op = DME_GET;

        for (retries = 0; retries < UFS_UIC_COMMAND_RETRIES; ++retries) {
                result = ufshc_send_uic_cmd(base, &cmd);
                if (result == 0)
                        break;
                /* -EIO requires UFS re-init */
                if (result == -EIO) {
                        return result;
                }
        }
        if (retries >= UFS_UIC_COMMAND_RETRIES)
                return -EIO;

        *val = mmio_read_32(base + UCMDARG3);
        return 0;
}
4.2 ufshc_dme_set
cmd.op = DME_SET;ufshc_send_uic_cmd(base,&cmd);
int ufshc_dme_set(unsigned int attr, unsigned int val)
{
        uintptr_t base;
        int result, retries;
        uic_cmd_t cmd;

        assert((ufs_params.reg_base != 0));

        base = ufs_params.reg_base;
        cmd.arg1 = (attr << 16) | GEN_SELECTOR_IDX(idx);
        cmd.arg2 = 0;
        cmd.arg3 = val;
        cmd.op = DME_SET;

        for (retries = 0; retries < UFS_UIC_COMMAND_RETRIES; ++retries) {
                result = ufshc_send_uic_cmd(base, &cmd);
                if (result == 0)
                        break;
                /* -EIO requires UFS re-init */
                if (result == -EIO) {
                        return result;
                }
        }
        if (retries >= UFS_UIC_COMMAND_RETRIES)
                return -EIO;

        return 0;
}
4.3 ufshc_send_uic_cmd
-
data = mmio_read_32(base + HCS);读取Host Controller Status寄存器的值,仅当UCRDY置位时才继续执行对应的ufs cmd。该位被置位表示当前ufs 主控制器已经准备好处理UIC命令。
-
mmio_write_32(base + IS,~0);使能IAGES,CQES,SQES,CEFES,SBFES,HCFES,UTPES,DFES,UCCS,UTMRCS,ULSS,ULLS,UHES,UHXS,UPMS,UTMS,UE,UDEPRI,UTRCS -
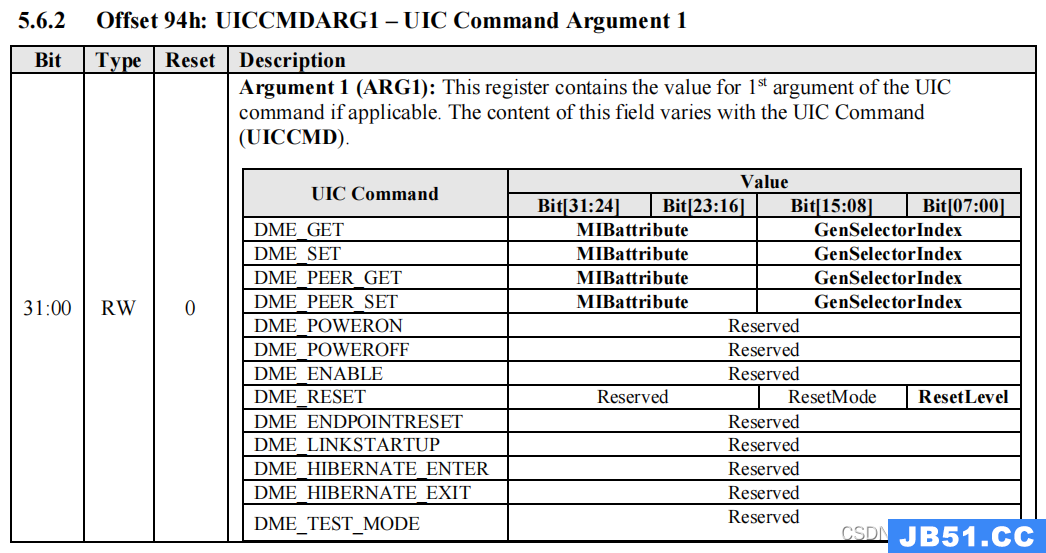
mmio_write_32(base + UCMDARG1,cmd->arg1);将arg1参数值写入UCMDARG1寄存器中。
MIBattribute: Indicates the ID of the attribute of the requested. See MIPI UniPro Specification for the details of the MIBattribute parameter.
MIBattribute: 表示请求的属性 ID。有关 MIBattribute 参数的详细信息,请参见 MIPI UniPro Specification。
GenSelectorIndex: Indicates the targeted M-PHY data lane or CPort or Test Feature when relevant. See MIPI UniPro Specification for the details of the GenSelectorIndex parameter.
GenSelectorIndex: 表示目标 M-PHY 数据通道、CPort 或测试功能(如相关)。有关 GenSelectorIndex 参数的详细信息,请参阅 MIPI UniPro 规范。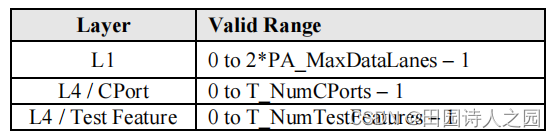
ResetMode: Indicates the link startup mode. See MIPI UniPro Specification for the details of the ResetMode parameter.
重置模式: 表示链路启动模式。有关 ResetMode 参数的详细信息,请参阅 MIPI UniPro 规范。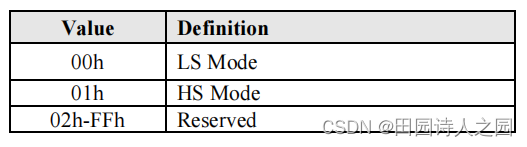
ResetLevel: Indicates the reset type. See MIPI UniPro Specification for the details of the ResetLevel parameter.
重置级别: 表示复位类型。有关 ResetLevel 参数的详细信息,请参见 MIPI UniPro Specification。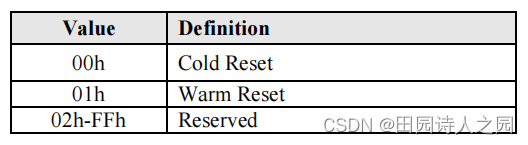
-
mmio_write_32(base + UCMDARG2,cmd->arg2);将arg2参数值写入UCMDARG2寄存器中。
AttrSetType: Indicates whether the attribute value (AttrSet = NORMAL) or the attribute non-volatile reset value (STATIC) setting is requested. See MIPI UniPro Specification for the details of the AttrSetType parameter.
AttrSetType: 表示请求设置属性值(AttrSet = NORMAL)还是属性非易失性重置值(STATIC)。有关 AttrSetType 参数的详细信息,请参阅 MIPI UniPro 规范。
ConfigResultCode: Indicates the result of the UIC configuration command request. It is valid after host controller has set the IS.UCCS bit to ’1’. See MIPI UniPro Specification for the details of the ConfigResultCode parameter.
ConfigResultCode: 表示 UIC 配置命令请求的结果。它在主机控制器将 IS.UCCS 位设置为 "1 "后有效。有关 ConfigResultCode 参数的详细信息,请参见 MIPI UniPro Specification。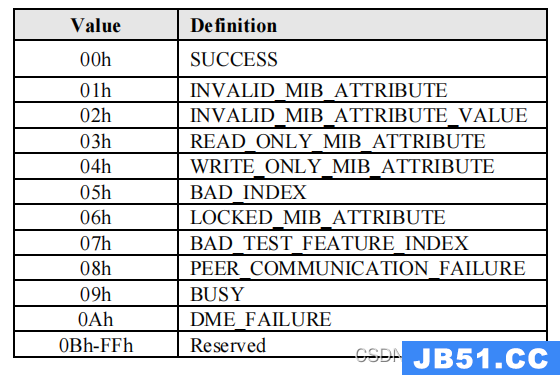
GenericErrorCode: Indicates the result of the UIC control command request. It is valid after host controller has set the IS.UCCS bit to ’1’. See MIPI UniPro Specification for the details of the GenericErrorCode parameter.
通用错误代码: 表示 UIC 控制命令请求的结果。它在主机控制器将 IS.UCCS 位设置为 "1 "后有效。有关 GenericErrorCode 参数的详细信息,请参见 MIPI UniPro Specification。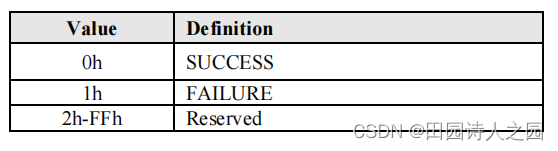
-
mmio_write_32(base + UCMDARG3,cmd->arg3);将arg3参数值写入UCMDARG3寄存器中。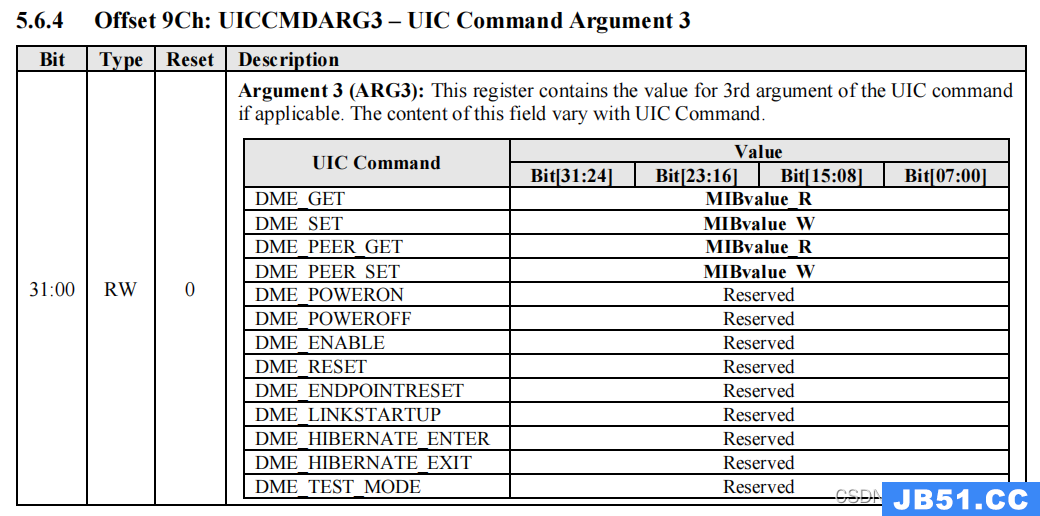
MIBvalue_R: Indicates the value of the attribute as returned by the UIC command returned. It is valid after host controller has set the IS.UCCS bit to ’1’. See MIPI UniPro Specification for the details of the MIBvalue parameter.
MIBvalue_R: 表示 UIC 命令返回的属性值。它在主机控制器将 IS.UCCS 位设置为 "1 "后有效。有关 MIBvalue 参数的详细信息,请参阅 MIPI UniPro 规范。
MIBvalue_W: Indicates the value of the attribute to be set. See MIPI UniPro Specification for details of the MIBvalue parameter.
MIBvalue_W: 表示要设置的属性值。有关 MIBvalue 参数的详细信息,请参见 MIPI UniPro Specification。 -
mmio_write_32(base + UICCMD,cmd->op);将cmd-ops写入UICCMD寄存器中,使cmd开始处理。
-
ufs_wait_for_int_status(UFS_INT_UCCS,UIC_CMD_TIMEOUT_MS,cmd->op == DME_SET);等待期待的中断状态
int ufshc_send_uic_cmd(uintptr_t base, uic_cmd_t *cmd)
{
        unsigned int data;
        int result, retries;

        if (base == 0 || cmd == NULL)
                return -EINVAL;

        for (retries = 0; retries < 100; retries++) {
                data = mmio_read_32(base + HCS);
                if ((data & HCS_UCRDY) != 0) {
                        break;
                }
                mdelay(1);
        }
        if (retries >= 100) {
                return -EBUSY;
        }

        mmio_write_32(base + IS, ~0);
        mmio_write_32(base + UCMDARG1, cmd->arg1);
        mmio_write_32(base + UCMDARG2, cmd->arg2);
        mmio_write_32(base + UCMDARG3, cmd->arg3);
        mmio_write_32(base + UICCMD, cmd->op);

        result = ufs_wait_for_int_status(UFS_INT_UCCS, UIC_CMD_TIMEOUT_MS,
                                         cmd->op == DME_SET);
        if (result != 0) {
                return result;
        }

        return mmio_read_32(base + UCMDARG2) & CONFIG_RESULT_CODE_MASK;
}
4.4 ufs_wait_for_int_status
-
interrupts_enabled = mmio_read_32(ufs_params.reg_base + IE);读取中断使能寄存器的值,该寄存器可启用或禁用向主机软件报告相应的中断。当某位被设置(‘1’)且相应的中断条件处于活动状态时,就会产生中断。被禁用(‘0’)的中断源仍会在 IS 寄存器中显示。该寄存器与 IS 寄存器对称。 -
interrupt_status = mmio_read_32(ufs_params.reg_base + IS) & interrupts_enabled;读取中断状态寄存器的值与中断使能寄存器的值与获取当前中断的状态值。
/*
 * ufs_wait_for_int_status - wait for expected interrupt status
 * @expected: expected interrupt status bit
 * @timeout_ms: timeout in milliseconds to poll for
 * @ignore_linereset: set to ignore PA_LAYER_GEN_ERR (UIC error)
 *
 * Returns
 * 0 - received expected interrupt and cleared it
 * -EIO - fatal error,needs re-init
 * -EAGAIN - non-fatal error,caller can retry
 * -ETIMEDOUT - timed out waiting for interrupt status
 */
static int ufs_wait_for_int_status(const uint32_t expected_status,
                                   unsigned int timeout_ms,
                                   bool ignore_linereset)
{
        uint32_t interrupt_status, interrupts_enabled;
        int result = 0;

        interrupts_enabled = mmio_read_32(ufs_params.reg_base + IE);
        do {
                interrupt_status = mmio_read_32(ufs_params.reg_base + IS) & interrupts_enabled;
                if (interrupt_status & UFS_INT_ERR) {
                        mmio_write_32(ufs_params.reg_base + IS, interrupt_status & UFS_INT_ERR);
                        result = ufs_error_handler(interrupt_status, ignore_linereset);
                        if (result != 0) {
                                return result;
                        }
                }

                if (interrupt_status & expected_status) {
                        break;
                }
                mdelay(1);
        } while (timeout_ms-- > 0);

        if (!(interrupt_status & expected_status)) {
                return -ETIMEDOUT;
        }

        mmio_write_32(ufs_params.reg_base + IS, expected_status);

        return result;
}
原文地址:https://blog.csdn.net/u014100559/article/details/132287337
版权声明:本文内容由互联网用户自发贡献,该文观点与技术仅代表作者本人。本站仅提供信息存储空间服务,不拥有所有权,不承担相关法律责任。如发现本站有涉嫌侵权/违法违规的内容, 请发送邮件至 dio@foxmail.com 举报,一经查实,本站将立刻删除。