

一.开通阿里云短信服务
开通步骤如下图所示


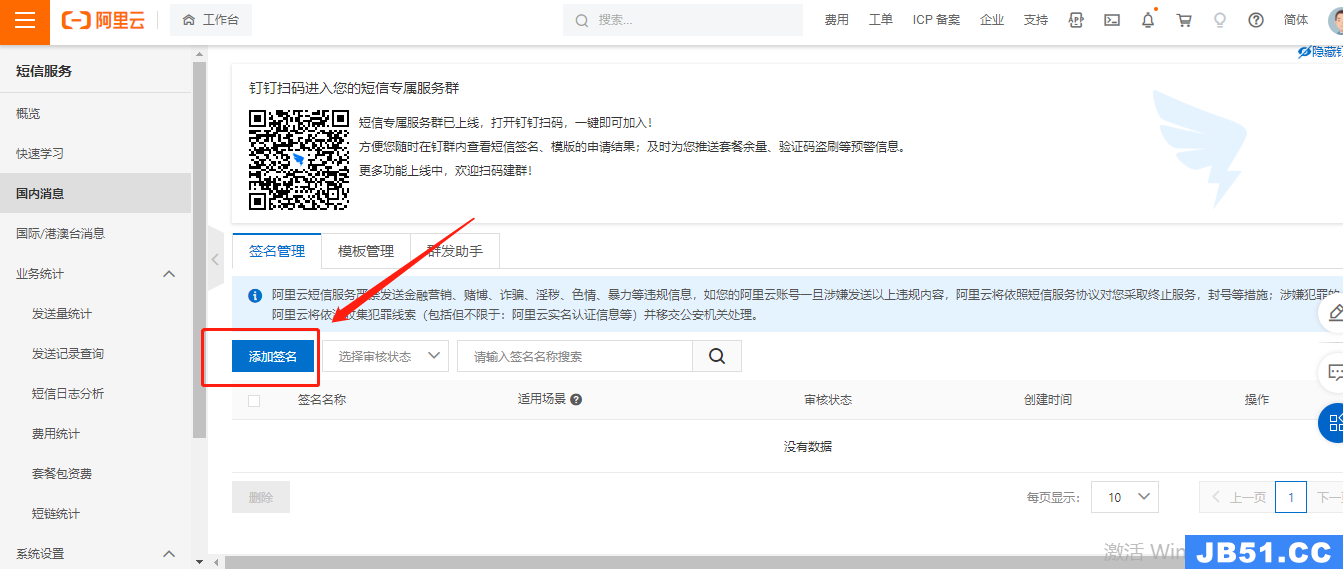
开通完成后,进入阿里云短信验证首页,点击国内消息

一般来说,在短信验证时需要签名管理和模板管理,但是签名管理需要备案或者上线服务,所以对于没有备案和上线应用的用户来说,就进行不了这一项,但是阿里云提供了免费的api测试短信验证服务(当然测试信息验证码也是收费的),具体过程如下:
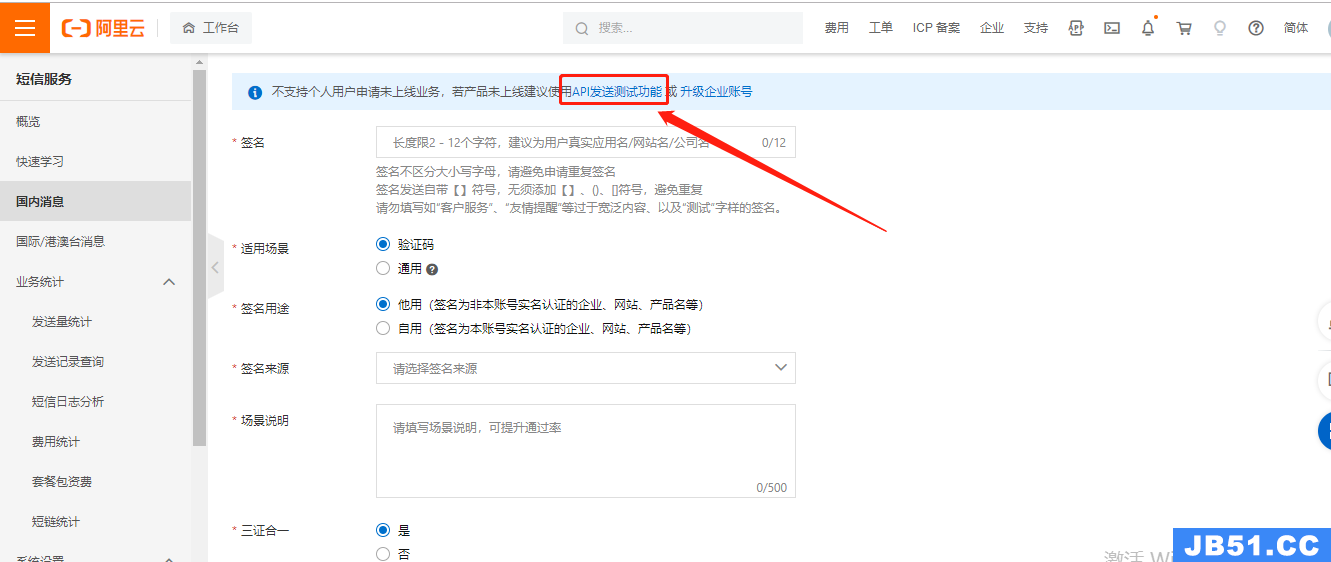
这边点击api发送测试功能,进行我们的测试验证,此时会让绑定手机号,我们剋以绑定自己的手机号即可。
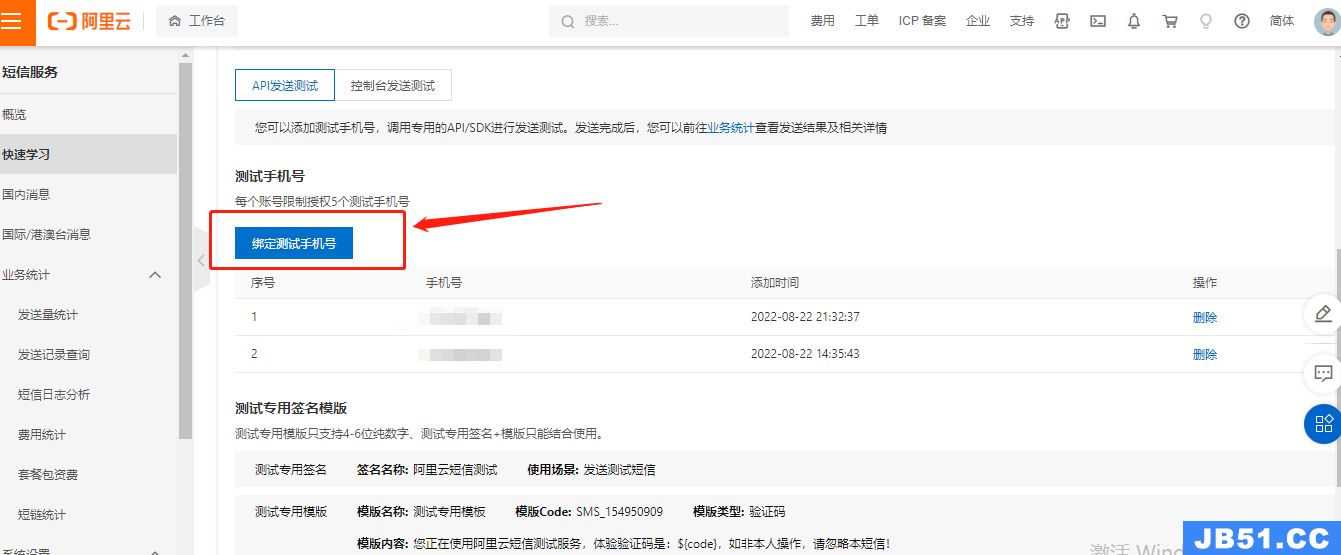
我自己测试绑定了两个,随便搞一个就行
绑定后点击调用api发短信

然后会自动生成签名名称和模板code,这个我们需要记住,后续代码中需要这两个参数。


主要参数就这几个,后面代码中使用的也就是这几个参数。阿里云短信服务开通后,进行代码分析。
二. 代码分析
首先我们需要用到
1.redis:在进行登陆注册的时候进行短信验证时,我们可以将相关的信息存到redis中,这样避免了从数据库查找,直接从缓存中查找更加方便。
2.swagger:用来进行接口测试
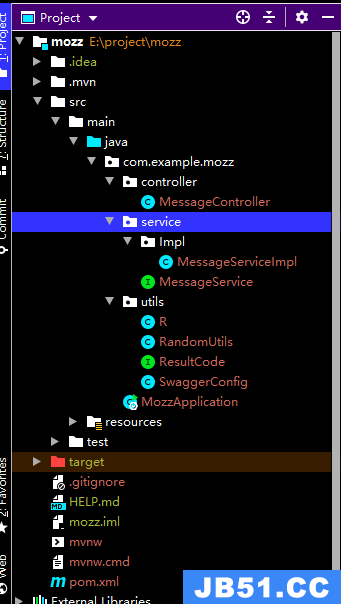
(0)首先创建一个spring initializr项目,具体的项目结构如下所示。
(1)相关的pom依赖如下所示:
<?xml version="1.0" encoding="UTF-8"?>
<project xmlns="http://maven.apache.org/POM/4.0.0" xmlns:xsi="http://www.w3.org/2001/XMLSchema-instance"
         xsi:schemaLocation="http://maven.apache.org/POM/4.0.0 https://maven.apache.org/xsd/maven-4.0.0.xsd">
    <modelVersion>4.0.0</modelVersion>
    <parent>
        <groupId>org.springframework.boot</groupId>
        <artifactId>spring-boot-starter-parent</artifactId>
        <version>2.7.0</version>
        <relativePath/> <!-- lookup parent from repository -->
    </parent>
    <groupId>com.example</groupId>
    <artifactId>mozz</artifactId>
    <version>0.0.1-SNAPSHOT</version>
    <name>mozz</name>
    <description>Demo project for Spring Boot</description>
    <properties>
        <java.version>1.8</java.version>
    </properties>
    <dependencies>
        <dependency>
            <groupId>org.springframework.boot</groupId>
            <artifactId>spring-boot-starter-web</artifactId>
        </dependency>
        <!--swagger-->
        <dependency>
            <groupId>io.springfox</groupId>
            <artifactId>springfox-swagger2</artifactId>
            <version>2.7.0</version>
        </dependency>
        <!--swagger ui-->
        <dependency>
            <groupId>io.springfox</groupId>
            <artifactId>springfox-swagger-ui</artifactId>
            <version>2.7.0</version>
        </dependency>

        <dependency>
            <groupId>org.springframework.boot</groupId>
            <artifactId>spring-boot-starter-redis</artifactId>
            <version>1.4.0.RELEASE</version>
        </dependency>

        <dependency>
            <groupId>org.springframework.boot</groupId>
            <artifactId>spring-boot-devtools</artifactId>
            <scope>runtime</scope>
            <optional>true</optional>
        </dependency>

        <dependency>
            <groupId>com.aliyun</groupId>
            <artifactId>aliyun-java-sdk-core</artifactId>
            <version>4.2.0</version>
        </dependency>

        <dependency>
            <groupId>com.alibaba</groupId>
            <artifactId>fastjson</artifactId>
            <version>2.0.10</version>
        </dependency>

        <dependency>
            <groupId>org.projectlombok</groupId>
            <artifactId>lombok</artifactId>
            <optional>true</optional>
        </dependency>
        <dependency>
            <groupId>org.springframework.boot</groupId>
            <artifactId>spring-boot-starter-test</artifactId>
            <scope>test</scope>
        </dependency>
    </dependencies>

    <build>
        <plugins>
            <plugin>
                <groupId>org.springframework.boot</groupId>
                <artifactId>spring-boot-maven-plugin</artifactId>
                <configuration>
                    <excludes>
                        <exclude>
                            <groupId>org.projectlombok</groupId>
                            <artifactId>lombok</artifactId>
                        </exclude>
                    </excludes>
                </configuration>
            </plugin>
        </plugins>
    </build>

</project>
(2)相关配置文件application.properties
# 端口号
server.port=8888

spring.redis.host=127.0.0.1
spring.redis.port=6379
spring.redis.database= 0
spring.redis.timeout=1800000

spring.redis.lettuce.pool.max-active=20
spring.redis.lettuce.pool.max-wait=-1
spring.redis.lettuce.pool.max-idle=5
spring.redis.lettuce.pool.min-idle=0

#返回json的全局时间格式
spring.jackson.date-format=yyyy-MM-dd HH:mm:ss
spring.jackson.time-zone=GMT+8

spring.mvc.pathmatch.matching-strategy=ant_path_matcher
(3)相关工具类
(3.1)统一返回值
package com.example.mozz.utils;

import io.swagger.annotations.ApiModelProperty;
import lombok.Data;

import java.util.HashMap;
import java.util.Map;

//统一返回结果的类
@Data
public class R {

    @ApiModelProperty(value = "是否成功")
    private boolean success;

    @ApiModelProperty(value = "返回码")
    private Integer code;

    @ApiModelProperty(value = "返回消息")
    private String message;

    @ApiModelProperty(value = "返回数据")
    private Map<String,Object> data = new HashMap<String,Object>();

    //构造方法私有
    private R(){};

    //成功的静态方法
    public static R ok(){
        R r = new R();
        r.setSuccess(true);
        r.setCode(ResultCode.SUCCESS);
        r.setMessage("成功");
        return r;
    }

    //失败的静态方法
    public static R error(){
        R r = new R();
        r.setSuccess(false);
        r.setCode(ResultCode.ERROR);
        r.setMessage("失败");
        return r;
    }

    public R success(Boolean success){
        this.setSuccess(success);
        return this;
    }

    public R code(Integer code){
        this.setCode(code);
        return this;
    }

    public R message(String message){
        this.setMessage(message);
        return this;
    }

    public R data(String s,Object o){
        this.data.put(s,o);
        return this;
    }

    public R data(Map<String,Object> map){
        this.setData(map);
        return this;
    }
}
package com.example.mozz.utils;

public interface ResultCode {

    public static Integer SUCCESS = 20000;
    public static Integer ERROR = 20001;

}
(3.2)验证码分为四位和六位,所以写一个工具类返回四位还是六位验证码RandomUtils
package com.example.mozz.utils;

import java.text.DecimalFormat;
import java.util.ArrayList;
import java.util.HashMap;
import java.util.List;
import java.util.Random;

/**
 * @author mozz
 * @version 1.0
 * @date 2022/8/22
 */
public class RandomUtils {

    private static final Random random = new Random();

    private static final DecimalFormat fourdf = new DecimalFormat("0000");

    private static final DecimalFormat sixdf = new DecimalFormat("000000");

    public static String getFourBitRandom() {
        return fourdf.format(random.nextInt(10000));
    }

    public static String getSixBitRandom() {
        return sixdf.format(random.nextInt(1000000));
    }

    /**
     * 给定数组,抽取n个数据
     * @param list
     * @param n
     * @return
     */
    public static ArrayList getRandom(List list,int n) {

        Random random = new Random();

        HashMap<Object,Object> hashMap = new HashMap<Object,Object>();

        // 生成随机数字并存入HashMap
        for (int i = 0; i < list.size(); i++) {

            int number = random.nextInt(100) + 1;

            hashMap.put(number,i);
        }

        // 从HashMap导入数组
        Object[] robjs = hashMap.values().toArray();

        ArrayList r = new ArrayList();

        // 遍历数组并打印数据
        for (int i = 0; i < n; i++) {
            r.add(list.get((int) robjs[i]));
            System.out.print(list.get((int) robjs[i]) + "\t");
        }
        System.out.print("\n");
        return r;
    }

}
(3.3) swagger配置类SwaggerConfig
package com.example.mozz.utils;

import com.google.common.base.Predicates;
import org.springframework.context.annotation.Bean;
import org.springframework.context.annotation.Configuration;
import springfox.documentation.builders.ApiInfoBuilder;
import springfox.documentation.builders.PathSelectors;
import springfox.documentation.service.ApiInfo;
import springfox.documentation.service.Contact;
import springfox.documentation.spi.DocumentationType;
import springfox.documentation.spring.web.plugins.Docket;
import springfox.documentation.swagger2.annotations.EnableSwagger2;

@Configuration
@EnableSwagger2
public class SwaggerConfig {

    @Bean
    public Docket webApiConfig(){
        return new Docket(DocumentationType.SWAGGER_2)
                .groupName("webApi")
                .apiInfo(webApiInfo())
                .select()
                .paths(Predicates.not(PathSelectors.regex("/admin/.*")))
                .paths(Predicates.not(PathSelectors.regex("/error.*")))
                .build();

    }
    private ApiInfo webApiInfo(){
         return new ApiInfoBuilder()
         .title("api文档")
         .description("接口定义")
         .version("1.0")
         .contact(new Contact("mozz","http://www.baidu.com","[email protected]"))
         .build();
         }
}
至此整个工具类都创建完成
(2)编写service层
(2.1)MessageService接口
package com.example.mozz.service;

import java.util.Map;

public interface MessageService {

//是否发送成功
    boolean send(Map<String,Object> map,String phone);
}
(2.2)实现类
package com.example.mozz.service.Impl;

import com.alibaba.fastjson.JSONObject;
import com.aliyuncs.CommonRequest;
import com.aliyuncs.CommonResponse;
import com.aliyuncs.DefaultAcsClient;
import com.aliyuncs.IAcsClient;
import com.aliyuncs.exceptions.ClientException;
import com.aliyuncs.exceptions.ServerException;
import com.aliyuncs.http.MethodType;
import com.aliyuncs.profile.DefaultProfile;
import com.aliyuncs.utils.StringUtils;
import com.example.mozz.service.MessageService;
import org.springframework.stereotype.Service;

import java.util.Map;

@Service
public class MessageServiceImpl implements MessageService {

    @Override
    public boolean send(Map<String,String phone) {
         if(StringUtils.isEmpty(phone)) return false;

         DefaultProfile profile =
                 DefaultProfile.getProfile("default","LTAI5tArv8Ccgp2YWX7ejmJa","5CvuGiss2sLMi5vcmI7N0UT7OjqWFC");
         IAcsClient client = new DefaultAcsClient(profile);

         CommonRequest request = new CommonRequest();
         //request.setProtocol(ProtocolType.HTTPS);
         request.setMethod(MethodType.POST);
         request.setDomain("dysmsapi.aliyuncs.com");
         request.setVersion("2017-05-25");
         request.setAction("SendSms");

         request.putQueryParameter("PhoneNumbers",phone);   //手机号
         request.putQueryParameter("SignName","阿里云短信测试");    //签名名称
         request.putQueryParameter("TemplateCode","SMS_151923909");  //模板名称
         request.putQueryParameter("TemplateParam",JSONObject.toJSONString(map));  //验证码转换json数据

         try {
             CommonResponse response = client.getCommonResponse(request);
             System.out.println(response.getData());
             return response.getHttpResponse().isSuccess();
             } catch (ServerException e) {
             e.printstacktrace();
             } catch (ClientException e) {
             e.printstacktrace();
             }
         return false;
         }
}
这边有几个注意事项:

如何获取你的accessKeyId和secret,步骤如下:

点击继续使用AccessKey,出现对应的AccessKeyId以及secret信息

查看secret时,需要手机验证码,验证一下即可。(获取到id和secret后,最好将其保存在本地,这样以后再用的话可以直接使用,不需要这样去查找了)
(3)controller层编写
package com.example.mozz.controller;

import com.example.mozz.service.MessageService;
import com.example.mozz.utils.R;
import com.example.mozz.utils.RandomUtils;
import org.springframework.beans.factory.annotation.Autowired;
import org.springframework.data.redis.core.Redistemplate;
import com.aliyuncs.utils.StringUtils;
import org.springframework.web.bind.annotation.*;

import java.util.HashMap;
import java.util.Map;
import java.util.concurrent.TimeUnit;

@RestController
@RequestMapping("/user/message")
public class MessageController {

    @Autowired
    private MessageService messageService;

    @Autowired
    private Redistemplate<String,String> redistemplate;


    @GetMapping("{phone}")
    public R sendMessage(@PathVariable String phone){

        //1.从redis中获取验证码,如果缓存中有的话直接返回,没有的话从阿里云发送获取
       String code = redistemplate.opsForValue().get(phone);

       if(!StringUtils.isEmpty(code)){
            return R.ok();
       }

       //从阿里云发送
        // 1.生成随机值,发送给阿里云
        code = RandomUtils.getSixBitRandom();   //六位验证码
        Map<String,Object> map = new HashMap<>();
        map.put("code",code);

        boolean isSend = messageService.send(map,phone);

        if(isSend){
            redistemplate.opsForValue().set(phone,code,5,TimeUnit.MINUTES);
            return R.ok();
        }else{
            return R.error().message("发送失败");
        }
    }

}
至此整个的代码就编写完成,随后进行swagger测试
启动类:需要注意注解需要加上exclude = {DataSourceAutoConfiguration.class},因为我们没有用到数据库相关信息,所以需要将数据源排除掉。
package com.example.mozz;

import org.springframework.boot.SpringApplication;
import org.springframework.boot.autoconfigure.SpringBootApplication;
import org.springframework.boot.autoconfigure.jdbc.DataSourceAutoConfiguration;

@SpringBootApplication(exclude = {DataSourceAutoConfiguration.class})
public class MozzApplication {

    public static void main(String[] args) {
        SpringApplication.run(MozzApplication.class,args);
    }

}

@H_502_178@
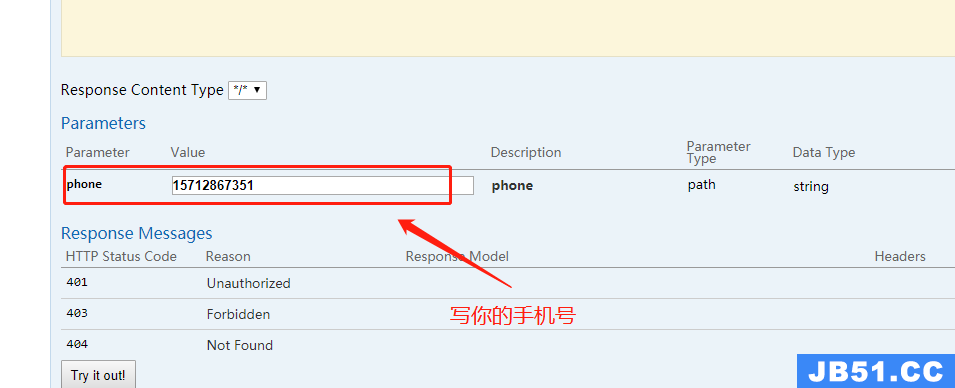

发送成功,这是你的手机上应该会收到相应的验证码:
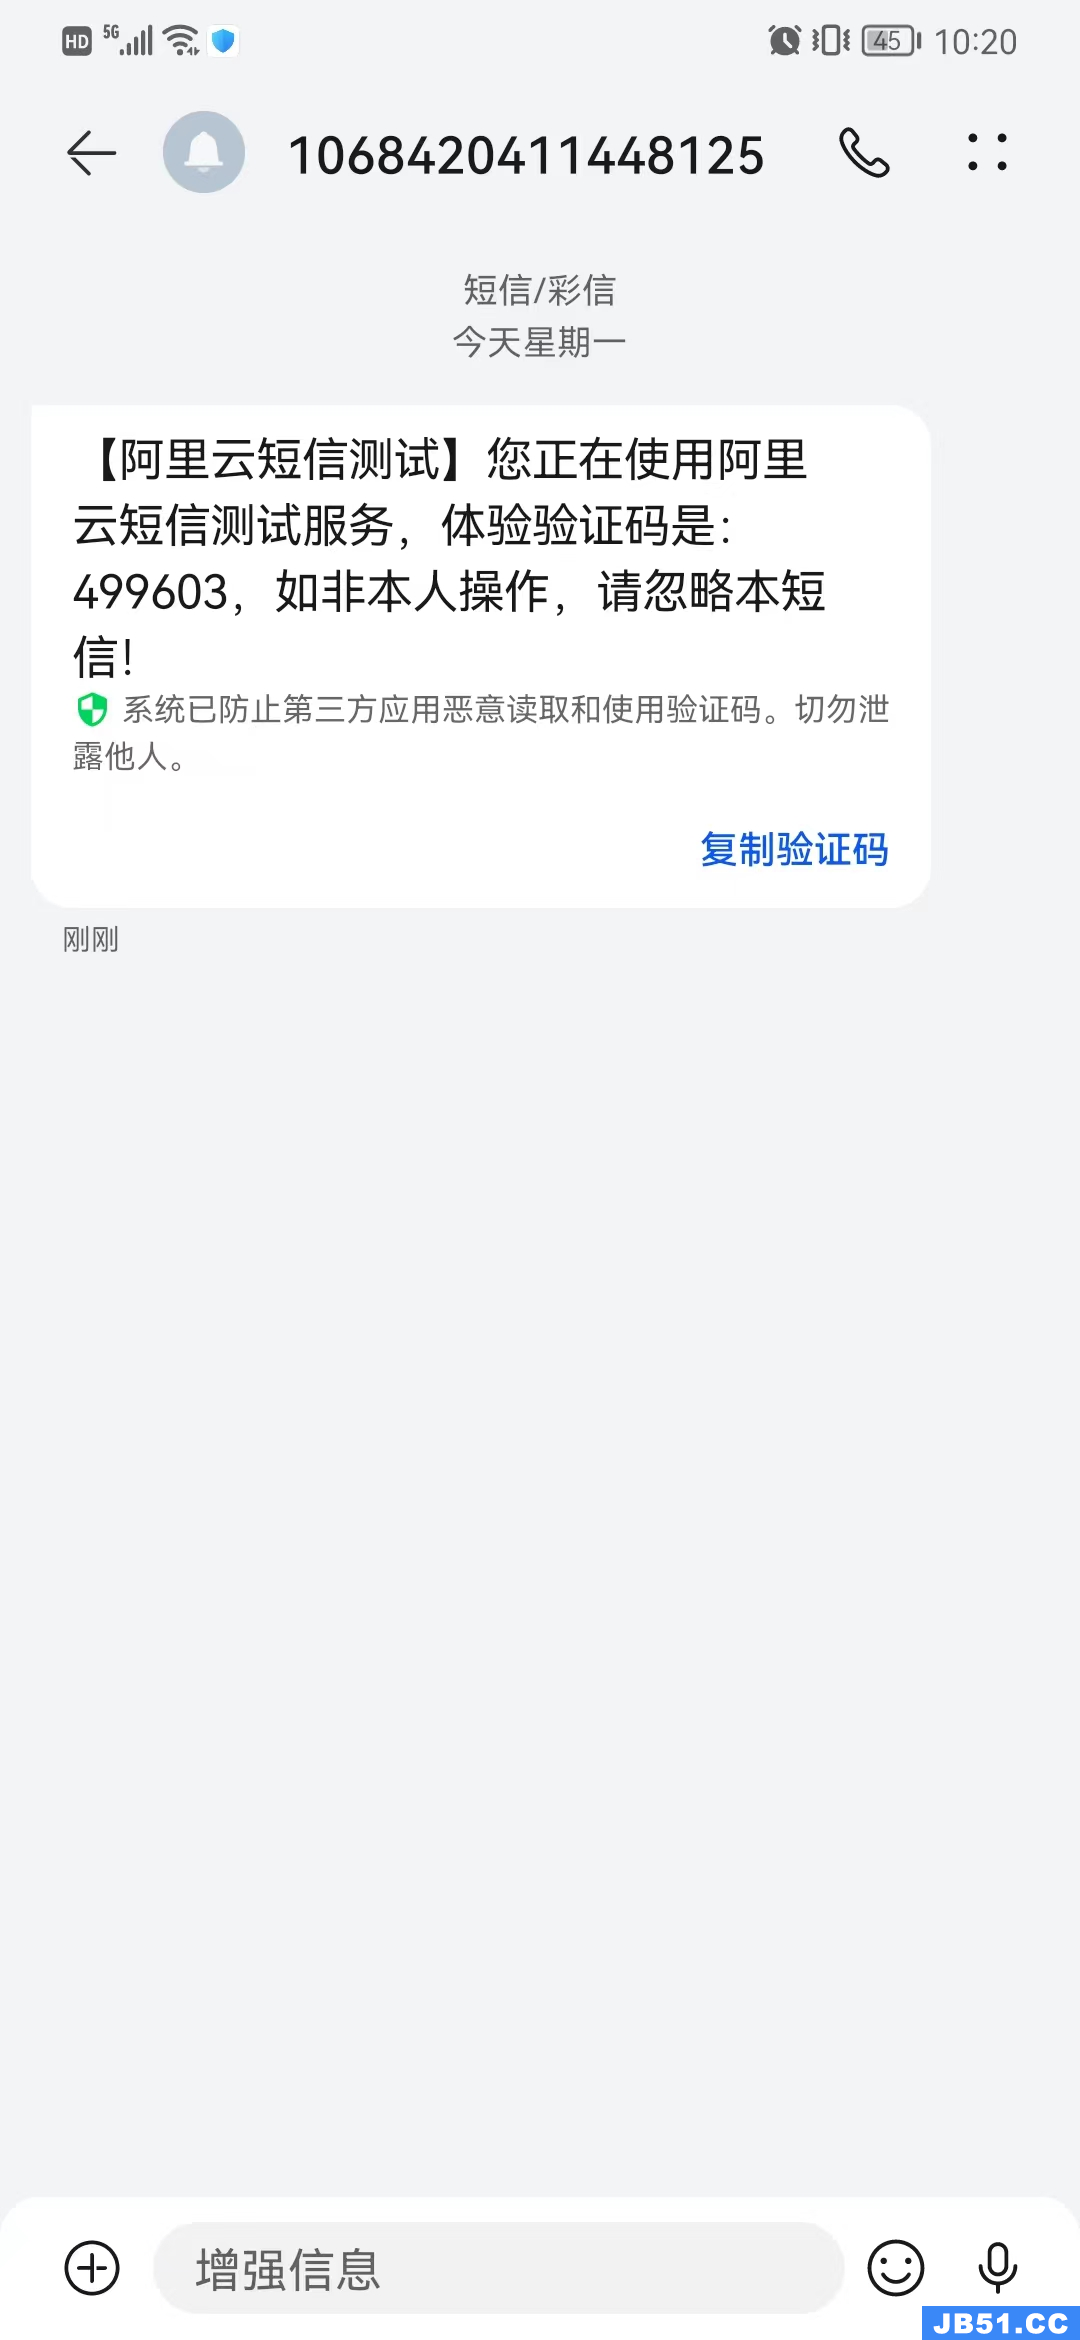
可以看到这是六位验证码,也可以改成四位验证码,在controller层里面调用getFourBitRandom方法,即发送四位验证码。

至此短信验证功能结束,后续实现完整的q前后端登陆注册短信验证功能
版权声明:本文内容由互联网用户自发贡献,该文观点与技术仅代表作者本人。本站仅提供信息存储空间服务,不拥有所有权,不承担相关法律责任。如发现本站有涉嫌侵权/违法违规的内容, 请发送邮件至 [email protected] 举报,一经查实,本站将立刻删除。
