

一、搭建开发环境
1、依赖
<dependency>
<groupId>org.springframework.boot</groupId>
<artifactId>spring-boot-starter-jdbc</artifactId>
</dependency>
<dependency>
<groupId>mysql</groupId>
<artifactId>mysql-connector-java</artifactId>
<scope>runtime</scope>
</dependency>
<dependency>
<groupId>org.mybatis.spring.boot</groupId>
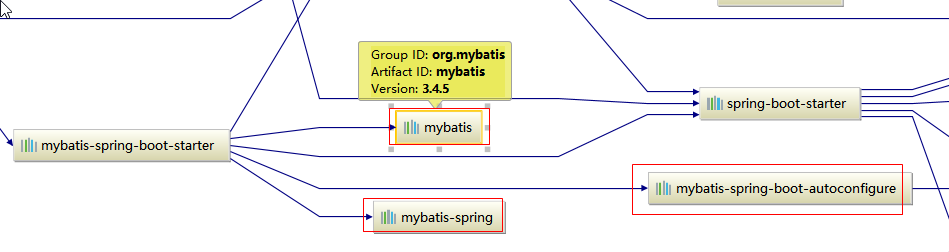
<artifactId>mybatis-spring-boot-starter</artifactId>
<version>2.2.0</version>
</dependency>
依赖关系:
2、使用 Druid 数据源
(1)添加依赖
<dependency>
    <groupId>com.alibaba</groupId>
    <artifactId>druid</artifactId>
    <version>1.1.8</version>
</dependency>
(2)配置文件
spring:
  datasource:
    username: root
    password: '123456'
    driver-class-name: com.mysql.jdbc.Driver
    url: jdbc:mysql://localhost:3306/mybatis
    type: com.alibaba.druid.pool.DruidDataSource

#   数据源其他配置
    initialSize: 5
    minIdle: 5
    maxActive: 20
    maxWait: 60000
    timeBetweenEvictionRunsMillis: 60000
    minEvictableIdleTimeMillis: 300000
    validationQuery: SELECT 1 FROM DUAL
    testWhileIdle: true
    testOnBorrow: false
    testOnReturn: false
    poolPreparedStatements: true
    #   配置监控统计拦截的filters,去掉后监控界面sql无法统计,'wall'用于防火墙
    filters: stat,wall,log4j
    maxPoolPreparedStatementPerConnectionSize: 20
    useGlobalDataSourceStat: true
    connectionProperties: druid.stat.mergeSql=true;druid.stat.slowSqlMillis=500
(3)配置类
@Configuration
public class DruidConfig {

    @ConfigurationProperties(prefix = "spring.datasource")
    @Bean
    public DataSource druid() {
        return new DruidDataSource();
    }

    //配置Druid的监控
    //1、配置一个管理后台的Servlet
    @Bean
    public ServletRegistrationBean statViewServlet() {
        ServletRegistrationBean bean = new ServletRegistrationBean(new StatViewServlet(),
                "/druid/*");
        Map<String, String> initParams = new HashMap<>();
        initParams.put("loginUsername", "admin");
        initParams.put("loginPassword", "admin");
        initParams.put("allow", "");//默认就是允许所有访问
        initParams.put("deny", "192.168.15.21");
        bean.setInitParameters(initParams);

        return bean;
    }

    //2、配置一个web监控的filter
    @Bean
    public FilterRegistrationBean webStatFilter(){
        FilterRegistrationBean bean = new FilterRegistrationBean();
        bean.setFilter(new WebStatFilter());
        Map<String,String> initParams = new HashMap<>();
        //排除的请求
        initParams.put("exclusions","*.js,*.css,/druid/*");

        bean.setInitParameters(initParams);
        bean.setUrlPatterns(Arrays.asList("/*"));

        return bean;
    }
}
3、创建表
在配置文件中指定SQL脚本位置:
spring:
  datasource:
    username: root
    password: root
    driver-class-name: com.mysql.jdbc.Driver
    url: jdbc:mysql://localhost:3306/mybatis
    type: com.alibaba.druid.pool.DruidDataSource

#   数据源其他配置
    initialSize: 5
    minIdle: 5
    maxActive: 20
    maxWait: 60000
    timeBetweenEvictionRunsMillis: 60000
    minEvictableIdleTimeMillis: 300000
    validationQuery: SELECT 1 FROM DUAL
    testWhileIdle: true
    testOnBorrow: false
    testOnReturn: false
    poolPreparedStatements: true
    #   配置监控统计拦截的filters,去掉后监控界面sql无法统计,'wall'用于防火墙
    filters: stat,wall,log4j
    maxPoolPreparedStatementPerConnectionSize: 20
    useGlobalDataSourceStat: true
    connectionProperties: druid.stat.mergeSql=true;druid.stat.slowSqlMillis=500
    schema:
      - classpath:sql/department.sql
      - classpath:sql/employee.sql

department.sql
SET FOREIGN_KEY_CHECKS=0;

-- ----------------------------
-- Table structure for department
-- ----------------------------
DROP TABLE IF EXISTS `department`;
CREATE TABLE `department` (
  `id` int(11) NOT NULL AUTO_INCREMENT,
  `departmentName` varchar(255) DEFAULT NULL,
  PRIMARY KEY (`id`)
) ENGINE=InnoDB AUTO_INCREMENT=1 DEFAULT CHARSET=utf8;

employee.sql
SET FOREIGN_KEY_CHECKS=0;

-- ----------------------------
-- Table structure for employee
-- ----------------------------
DROP TABLE IF EXISTS `employee`;
CREATE TABLE `employee` (
  `id` int(11) NOT NULL AUTO_INCREMENT,
  `lastName` varchar(255) DEFAULT NULL,
  `email` varchar(255) DEFAULT NULL,
  `gender` int(2) DEFAULT NULL,
  `d_id` int(11) DEFAULT NULL,
  PRIMARY KEY (`id`)
) ENGINE=InnoDB AUTO_INCREMENT=1 DEFAULT CHARSET=utf8;
4、创建实体类
二、注解版 MyBatis
1、创建 Mapper 接口
//指定这是一个操作数据库的mapper
@Mapper
public interface DepartmentMapper {

    @Select("select * from department where id=#{id}")
    public Department getDeptById(Integer id);

    @Delete("delete from department where id=#{id}")
    public int deleteDeptById(Integer id);

    @Options(useGeneratedKeys = true,keyProperty = "id") //使用自动生成的主键,keyProperty指定哪个属性与主键关联
    @Insert("insert into department(departmentName) values(#{departmentName})")
    public int insertDept(Department department);

    @Update("update department set departmentName=#{departmentName} where id=#{id}")
    public int updateDept(Department department);
}
使用注解版特别简单,只需要创建 Mapper 接口,使用注解写好 SQL 语句即可。
因为 SpringBoot 有 MybatisAutoConfiguration 自动配置类。
2、场景一
如果在数据库中某个字段是 last_name采用下划线方式,JavaBean 中属性是 lastName,怎么开启驼峰命名转换?
观察 MybatisAutoConfiguration 类在创建 SqlsessionFactory 是有一个 applyConfiguration方法:

会在容器中找到 configurationCustomizer 的组件,然后调用 customize() 方法。
  private void applyConfiguration(SqlSessionFactoryBean factory) {
    Configuration configuration = this.properties.getConfiguration();
    if (configuration == null && !StringUtils.hasText(this.properties.getConfigLocation())) {
      configuration = new Configuration();
    }
    if (configuration != null && !CollectionUtils.isEmpty(this.configurationCustomizers)) {
      for (ConfigurationCustomizer customizer : this.configurationCustomizers) {
        customizer.customize(configuration);
      }
    }
    factory.setConfiguration(configuration);
  }
如果想要自定义MyBatis的配置规则;给容器中添加一个ConfigurationCustomizer;
@org.springframework.context.annotation.Configuration
public class MyMybatisConfig {

    public ConfigurationCustomizer configurationCustomizer() {
        return new ConfigurationCustomizer(){

            @Override
            public void customize(Configuration configuration) {
                //MyBatis开启驼峰命名映射规则
                configuration.setMapUnderscoreToCamelCase(true);
            }
        };
    }
}
3、场景二
如果在某个包下都是 Mapper 接口,又不想在每个类上加 @Mapper 注解,可以使用包扫描规则。
在配置类上使用包扫描注解:
//使用MapperScan批量扫描所有的Mapper接口;
@MapperScan(value = "com.njf.springboot.mapper")
@SpringBootApplication
public class SpringBoot06DataMybatisApplication {

    public static void main(String[] args) {
        SpringApplication.run(SpringBoot06DataMybatisApplication.class, args);
    }

}
三、配置版 Mybatis
1、
2、
3、
4、
5、
四、
五、
六、
版权声明:本文内容由互联网用户自发贡献,该文观点与技术仅代表作者本人。本站仅提供信息存储空间服务,不拥有所有权,不承担相关法律责任。如发现本站有涉嫌侵权/违法违规的内容, 请发送邮件至 [email protected] 举报,一经查实,本站将立刻删除。