
ngx_http_proxy_module只能反向代理后端使用HTTP协议的主机。而ngx_http_fastcgi_module只能反向代理后端使用FPM或者使用FastCGI协议的客户端。
1、首先安装必要的包
[root@ELK-chaofeng07 nginx]# yum install php-fpm  php-mcrypt php-mbstring  php-mysql mariadb-server
Loaded plugins: fastestmirror
2、接下来我们还要修改php-fpm的配置文件
主要是修改以下几处
1)监听端口
; Note: This value is mandatory.
listen = 127.0.0.1:9000
此处表示监听在哪个ip的9000端口,我这里只是用在本地,并且是只有一个主机安装LNMP,所以我就监听在本地。一般上来说这个修改为IP地址比较好。
2)允许哪些客户端访问
; Default Value: any
listen.allowed_clients = 127.0.0.1
我的是本地安装LNMP,因此这个值就可以满足要求
3)修改访问用户
; RPM: apache Choosed to be able to access some dir as httpd
user = nginx
; RPM: Keep a group allowed to write in log dir.
group = nginx
4)接下来是一些调优参数
; Note: This value is mandatory.
pm.max_children = 150
; Default Value: 0
pm.max_requests = 500
需要调优的比较多,可以视情况而定
5)打开php的状态获取功能
; Default Value: not set
pm.status_path = /status
6)
ping.path = /ping

; This directive may be used to customize the response of a ping request. The
; response is formatted as text/plain with a 200 response code.
; Default Value: pong
ping.response = pong
7)会话保存的地址
; Set session path to a directory owned by process user
php_value[session.save_handler] = files
php_value[session.save_path] = /var/lib/php/session
此地址需要手动创建,并赋予权限
3、手动创建会话保存路径。确保以文件的形式保存
[root@ELK-chaofeng07 php-fpm.d]# mkdir /var/lib/php/session -pv
[root@ELK-chaofeng07 php-fpm.d]# chown nginx:nginx /var/lib/php/session
赋予的用户以及用户组是我们刚刚上面修改的那两个
4、重启php-fpm服务
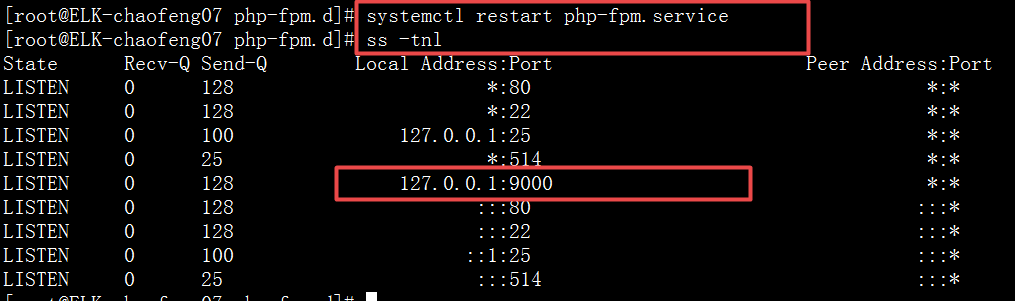
5、编写nginx的配置文件。
server{
        listen 80;
        server_name www.lnmp.io;
        index index.php index.html;
        location / {
                root /data/nginx/html;
        }
        location ~* \.php$ {
                fastcgi_pass 127.0.0.1:9000;
                fastcgi_index index.php;
                include fastcgi_params;
                fastcgi_param   SCRIPT_FILENAME /data/nginx_php/$fastcgi_script_name;
        }
}
include的目的是主要加载fastcgi_params这个文件内容。它是在/etc/nginx目录下存放的。我们使用nginx向php-fpm转发请求时,与我们平时的http代理是不相同的。从语法上就不一样。这与LAMP中的php-fpm的调用写法也是不同的。
我们最后一行的fastcgi_param的内容也是重写fastcgi_params这个文件内容中的一个参数,是SCRIPT_FILENAME参数。因为我们路径需要重新映射,这里的php-fpm的路径映射与nginx的路径映射方法是不一样的。此处需要注意一下。
详细如文章最后所示。
6、接下来是我们编写文件中路径以及index.html和index.php文件。
[root@ELK-chaofeng07 nginx]# cat /data/nginx/html/index.html
<h1>This is the html</h1>
[root@ELK-chaofeng07 nginx]# cat /data/nginx_php/index.php
<html>
 <head>
  <title>PHP </title>
 </head>
 <body>
 <?php echo '<p>Hello World</p>'; ?>
 </body>
</html>
7、重载nginx服务,我们来测试一下看看效果。
访问index.html

访问php文件

可以看看调用情况:
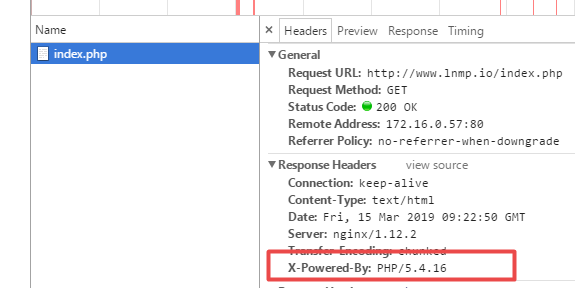
这说明nginx在处理php网页的时候调用php-fpm来处理请求。
LNMP的原理:

 第一步,浏览器发送http request请求到服务器(Nginx),服务器响应并处理web请求,将一些静态资源(CSS,图片,视频等)保存服务器上。

 第二步,将php脚本通过接口传输协议(网关协议)PHP-FCGI(fast-cgi)传输给PHP-FPM(进程管理程序),PHP-FPM不做处理,然后PHP-FPM调用PHP解析器进程,PHP解析器解析php脚本信息。PHP解析器进程可以启动多个,进行并发执行。

 第三步,将解析后的脚本返回到PHP-FPM,PHP-FPM再通过fast-cgi的形式将脚本信息传送给Nginx。

 第四步,服务器再通过Http response的形式传送给浏览器。浏览器再进行解析与渲染然后进行呈现。
nginx配置文件补充说明,背会:
ngx_http_fastcgi_module模块:

            The ngx_http_fastcgi_module module allows passing requests to a FastCGI server.

            1、fastcgi_pass address;
                address为fastcgi server的地址;    location, if in location;

                    http://www.ilinux.io/admin/index.php --> /admin/index.php (uri)
                        /data/application/admin/index.php


            2、fastcgi_index name;
                fastcgi默认的主页资源;

            3、fastcgi_param parameter value [if_not_empty];
                Sets a parameter that should be passed to the FastCGI server. The value can contain text, variables, and their combination.

            配置示例1:
                前提:配置好fpm server和mariadb-server服务;
                    location ~* \.php$ {
                        root           /usr/share/nginx/html;
                        fastcgi_pass   127.0.0.1:9000;
                        fastcgi_index  index.php;
                        fastcgi_param  SCRIPT_FILENAME  /usr/share/nginx/html$fastcgi_script_name;
                        include        fastcgi_params;
                    }

            配置示例2:通过/pm_status和/ping来获取fpm server状态信息;
                location ~* ^/(pm_status|ping)$ {
                    include        fastcgi_params;
                    fastcgi_pass 127.0.0.1:9000;
                    fastcgi_param  SCRIPT_FILENAME  $fastcgi_script_name;
                }
原文地址:https://www.cnblogs.com/FengGeBlog/p/10537421.html
版权声明:本文内容由互联网用户自发贡献,该文观点与技术仅代表作者本人。本站仅提供信息存储空间服务,不拥有所有权,不承担相关法律责任。如发现本站有涉嫌侵权/违法违规的内容, 请发送邮件至 dio@foxmail.com 举报,一经查实,本站将立刻删除。