
树莓派 LNMP
关键词: raspberry web php dns mysq1
LNMP、LAMP是指一组通常一起使用来运行动态网站或者服务器的自由软件名称首字母缩写,
分别指 Linux、Nginx/Apache、MySQL和PHP。
这里演示如何在树莓派上搭建LNMP环境并配置多个站点。
主要内容:
- 树莓派安装nginx
- 树莓派安装php
- 树莓派安装mariadb
- 树莓派配置dns
- 添加多个站点
文档参考:
- https://lnmp.org/
- https://blog.csdn.net/qq_38265137/article/details/83082389
- https://zhuanlan.zhihu.com/p/35764236
最新地址: https://taotaodiy-raspi.readthedocs.io/en/latest/raspi/helloraspi_lnmp.html
nginx
Nginx是一款轻量级的Web
服务器/反向代理服务器及电子邮件(IMAP/POP3)代理服务器,在BSD-like
协议下发行。
其特点是占有内存少,并发能力强,事实上nginx的并发能力在同类型的网页服务器中表现较好,
中国大陆使用nginx网站用户有:百度、京东、新浪、网易、腾讯、淘宝等。
安装nginx
sudo apt-get -y install nginx
nginx服务常用的命令
# 检查脚本语法
sudo nginx -t

# 查看 nginx 状态
sudo systemctl status nginx.service
# 重启 nginx
sudo systemctl restart nginx.service
# 开机运行 nginx
sudo systemctl enable nginx.service
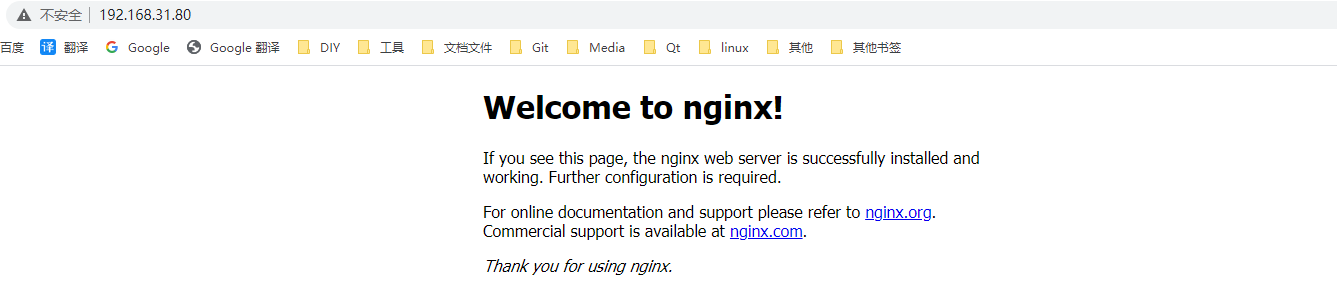
这个时候,我们就可以通过树莓派IP来访问nginx。
默认站点的相关配置及配置文件:
nginx 默认配置文件 nginx_conf 文件位置 /etc/nginx/nginx.conf
user www-data;
worker_processes auto;
pid /run/nginx.pid;
include /etc/nginx/modules-enabled/*.conf;

events {
    worker_connections 768;
    # multi_accept on;
}

http {

    ##
    # Basic Settings
    ##

    sendfile on;
    tcp_nopush on;
    tcp_nodelay on;
    keepalive_timeout 65;
    types_hash_max_size 2048;
    # server_tokens off;

    server_names_hash_bucket_size 64;
    # server_name_in_redirect off;

    include /etc/nginx/mime.types;
    default_type application/octet-stream;

    ##
    # SSL Settings
    ##

    ssl_protocols TLSv1 TLSv1.1 TLSv1.2; # Dropping SSLv3, ref: POODLE
    ssl_prefer_server_ciphers on;

    ##
    # Logging Settings
    ##

    access_log /var/log/nginx/access.log;
    error_log /var/log/nginx/error.log;

    ##
    # Gzip Settings
    ##

    gzip on;

    # gzip_vary on;
    # gzip_proxied any;
    # gzip_comp_level 6;
    # gzip_buffers 16 8k;
    # gzip_http_version 1.1;
    # gzip_types text/plain text/css application/json application/javascript text/xml application/xml application/xml+rss text/javascript;

    ##
    # Virtual Host Configs
    ##

    include /etc/nginx/conf.d/*.conf;
    include /etc/nginx/sites-enabled/*;
}


#mail {
#   # See sample authentication script at:
#   # http://wiki.nginx.org/ImapAuthenticateWithApachePhpScript
#
#   # auth_http localhost/auth.php;
#   # pop3_capabilities "TOP" "USER";
#   # imap_capabilities "IMAP4rev1" "UIDPLUS";
#
#   server {
#       listen     localhost:110;
#       protocol   pop3;
#       proxy      on;
#   }
#
#   server {
#       listen     localhost:143;
#       protocol   imap;
#       proxy      on;
#   }
#}
nginx 默认站点 default 文件位置 /etc/nginx/sites-available/default
##
# You should look at the following URL's in order to grasp a solid understanding
# of Nginx configuration files in order to fully unleash the power of Nginx.
# https://www.nginx.com/resources/wiki/start/
# https://www.nginx.com/resources/wiki/start/topics/tutorials/config_pitfalls/
# https://wiki.debian.org/Nginx/DirectoryStructure
#
# In most cases, administrators will remove this file from sites-enabled/ and
# leave it as reference inside of sites-available where it will continue to be
# updated by the nginx packaging team.
#
# This file will automatically load configuration files provided by other
# applications, such as Drupal or Wordpress. These applications will be made
# available underneath a path with that package name, such as /drupal8.
#
# Please see /usr/share/doc/nginx-doc/examples/ for more detailed examples.
##

# Default server configuration
#
server {
    listen 80 default_server;
    listen [::]:80 default_server;

    # SSL configuration
    #
    # listen 443 ssl default_server;
    # listen [::]:443 ssl default_server;
    #
    # Note: You should disable gzip for SSL traffic.
    # See: https://bugs.debian.org/773332
    #
    # Read up on ssl_ciphers to ensure a secure configuration.
    # See: https://bugs.debian.org/765782
    #
    # Self signed certs generated by the ssl-cert package
    # Don't use them in a production server!
    #
    # include snippets/snakeoil.conf;

    root /var/www/html;

    # Add index.php to the list if you are using PHP
    index index.html index.htm index.nginx-debian.html;

    server_name _;

    location / {
        # First attempt to serve request as file, then
        # as directory, then fall back to displaying a 404.
        try_files $uri $uri/ =404;
    }

    # pass PHP scripts to FastCGI server
    #
    #location ~ \.php$ {
    #   include snippets/fastcgi-php.conf;
    #
    #   # With php-fpm (or other unix sockets):
    #   fastcgi_pass unix:/run/php/php7.3-fpm.sock;
    #   # With php-cgi (or other tcp sockets):
    #   fastcgi_pass 127.0.0.1:9000;
    #}

    location ~* \.php$ {
    fastcgi_index   index.php;
    #fastcgi_pass    127.0.0.1:9000;
    fastcgi_pass unix:/run/php/php7.3-fpm.sock;
    include         fastcgi_params;
    fastcgi_param   SCRIPT_FILENAME    $document_root$fastcgi_script_name;
    fastcgi_param   SCRIPT_NAME        $fastcgi_script_name;
    }

    # deny access to .htaccess files, if Apache's document root
    # concurs with nginx's one
    #
    #location ~ /\.ht {
    #   deny all;
    #}
}


# Virtual Host configuration for example.com
#
# You can move that to a different file under sites-available/ and symlink that
# to sites-enabled/ to enable it.
#
#server {
#   listen 80;
#   listen [::]:80;
#
#   server_name example.com;
#
#   root /var/www/example.com;
#   index index.html;
#
#   location / {
#       try_files $uri $uri/ =404;
#   }
#}
在 站点配置文件(default)
中指定了监听端口、server、站点根目录以及相关文件的访问权限和规则。
在default中指定了根目录/var/www/html,该目录下就能找到,index.nginx-debian.html,也就是我们浏览器中看到的页面。
<!DOCTYPE html>
<html>
<head>
<title>Welcome to nginx!</title>
<style>
    body {
        width: 35em;
        margin: 0 auto;
        font-family: Tahoma, Verdana, Arial, sans-serif;
    }
</style>
</head>
<body>
<h1>Welcome to nginx!</h1>
<p>If you see this page, the nginx web server is successfully installed and
working. Further configuration is required.</p>

<p>For online documentation and support please refer to
<a href="http://nginx.org/">nginx.org</a>.<br/>
Commercial support is available at
<a href="http://nginx.com/">nginx.com</a>.</p>

<p><em>Thank you for using nginx.</em></p>
</body>
</html>
php
PHP(PHP: Hypertext Preprocessor)即"超文本预处理器",是在服务器端执行的脚本语言,尤其适用于Web开发并可嵌入HTML中。
PHP语法利用了C、Java和Perl,该语言的主要目标是允许web开发人员快速编写动态网页。
PHP脚本程序主要应用于Web服务端开发,命令行和编写桌面应用程序。PHP支持和所有web开发语言之间的WDDX复杂数据交换。
关于相互连接,PHP已经支持了对Java对象的即时连接,并且可以透明地将其用作PHP对象。
安装 php
sudo apt-get install -y php php-mysql php-fpm
php服务常用的命令
#重启php
sudo systemctl restart php7.3-fpm.service
#停止开始改成stop start
修改配置 /etc/nginx/sites-available/default
#添加如下内容

location ~* \.php$ {
    fastcgi_index   index.php;
    #fastcgi_pass   127.0.0.1:9000;
    fastcgi_pass    unix:/run/php/php7.3-fpm.sock;
    include         fastcgi_params;
    fastcgi_param   SCRIPT_FILENAME    $document_root$fastcgi_script_name;
    fastcgi_param   SCRIPT_NAME        $fastcgi_script_name;
}
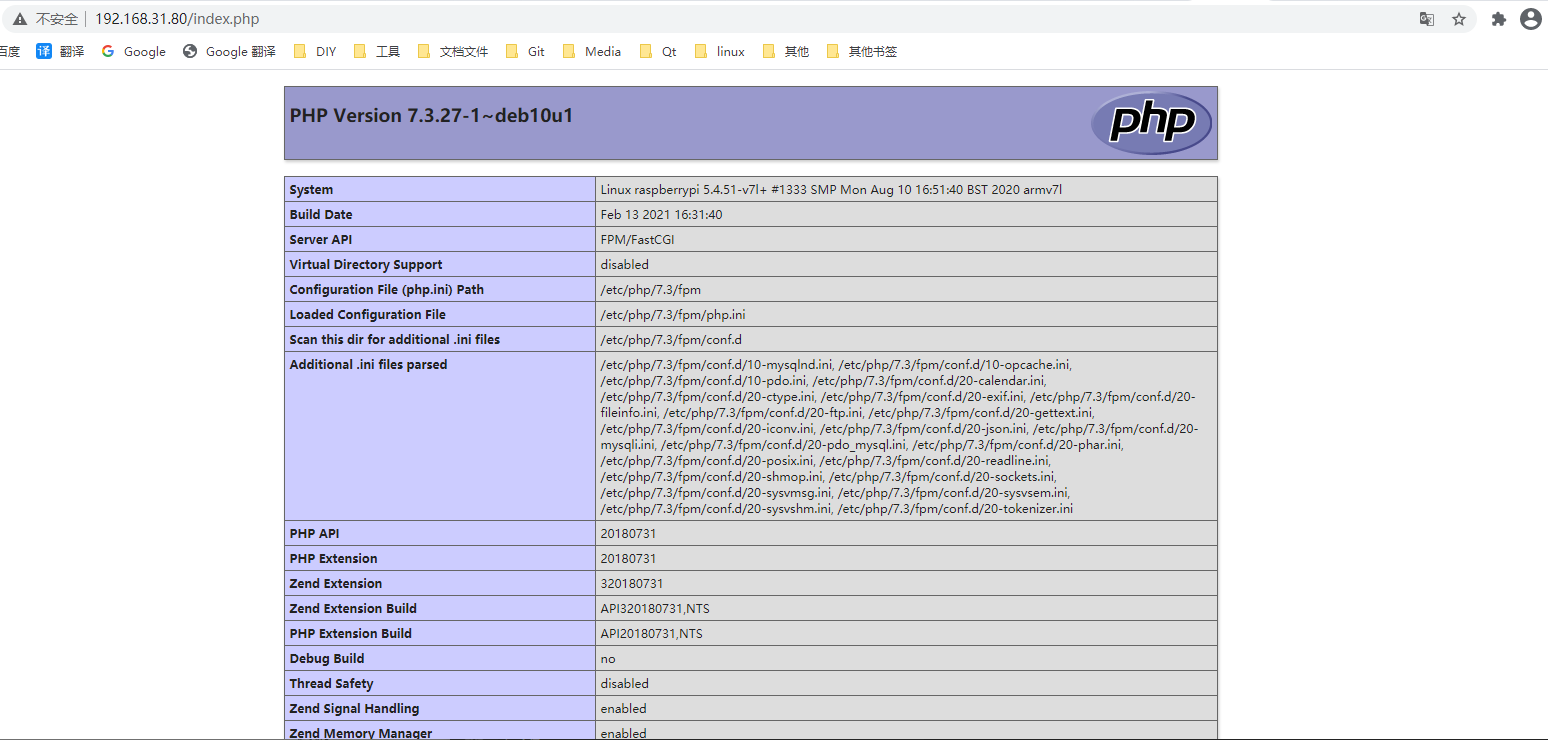
在默认站点下面添加 index.php
<?php
phpinfo();
?>
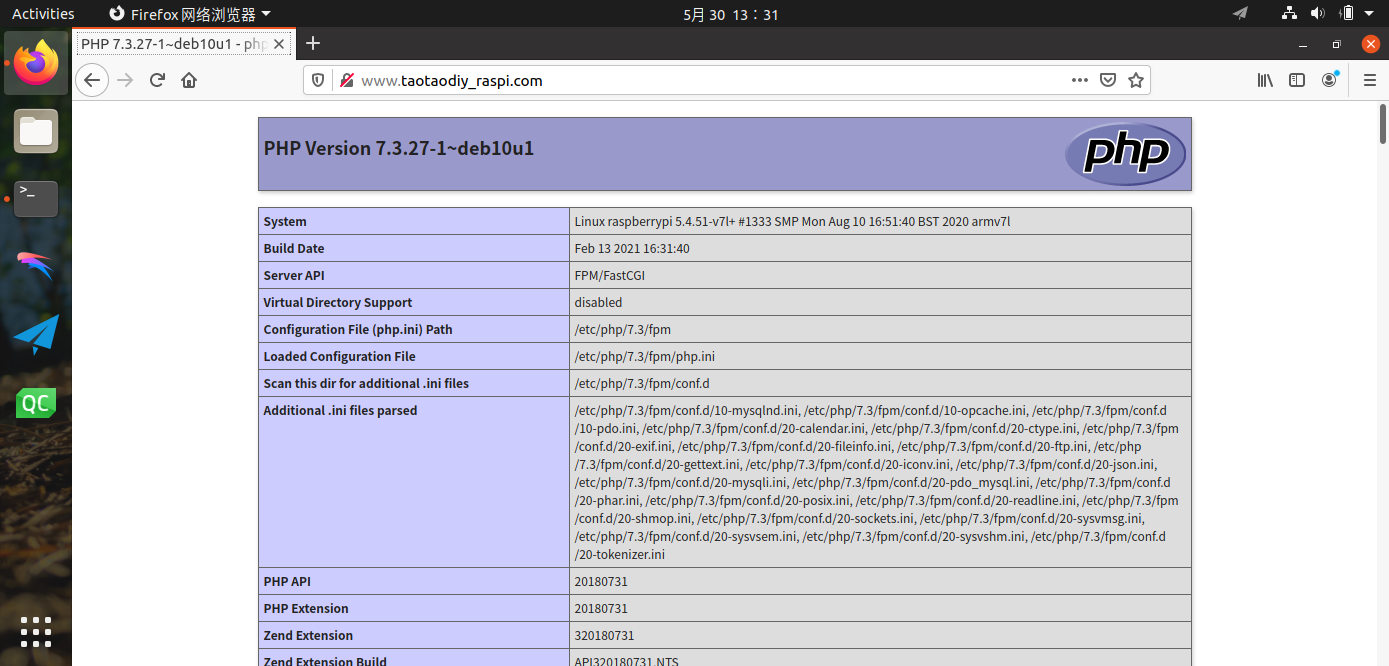
重启php服务,这时再通过IP去访问index.php就会看到下面的页面
php开启debug,修改/etc/php/7.3/cli/php.ini为如下内容
display_errors = On
display_startup_errors = On
log_errors = On
mariadb
MariaDB数据库管理系统是MySQL的一个分支,主要由开源社区在维护,采用GPL授权许可
MariaDB的目的是完全兼容MySQL,包括API和命令行,
使之能轻松成为MySQL的代替品。在存储引擎方面,使用XtraDB(英语:XtraDB)来代替MySQL的InnoDB。
MariaDB由MySQL的创始人Michael Widenius(英语:Michael
Widenius)主导开发,他早前曾以10亿美元的价格, 将自己创建的公司MySQL
AB卖给了SUN,此后,随着SUN被甲骨文收购,MySQL的所有权也落入Oracle的手中。
MariaDB名称来自Michael Widenius的女儿Maria的名字。
MariaDB基于事务的Maria存储引擎,替换了MySQL的MyISAM存储引擎,它使用了Percona的
XtraDB,InnoDB的变体, 分支的开发者希望提供访问即将到来的MySQL 5.4
InnoDB性能。这个版本还包括了 PrimeBase XT (PBXT) 和 FederatedX存储引擎。
安装 mariadb
sudo apt-get install mariadb-server mariadb-client
数据库的几个服务
#启动MariaDB
sudo systemctl start mariadb.service
#停止MariaDB
sudo systemctl stop mariadb.service
#重启MariaDB
sudo systemctl restart mariadb.service
#设置开机启动
sudo systemctl enable mariadb.service
配置 mariadb
第一次在控制台输入 sudo mariadb 即可进入数据库cmd,
设置数据库密码
#设置数据库密码
SET PASSWORD FOR 'root'@'localhost' = PASSWORD('123456');
创建数据库
# xxx 为你当前数据库
create database xxx;
# 查看数据库
show databases;
新建php测试连接数据库的测试脚本 /var/www/html/dbtest.php。
其中 用户名、密码、数据库改成你自己的。
<?php
//tpdo.php
$servername = "localhost";
$username = "root";     //用户名
$password = "123456";    //密码

try {
    $conn = new PDO("mysql:host=$servername;dbname=mariadb_test", $username, $password);
    echo "Connected successfully";
}
catch(PDOException $e)
{
    echo $e->getMessage();
}
?>
通过IP访问dbtest.php,最终提示连接连接成功。
DNS
域名系统(英文:Domain Name System,缩写:DNS)是互联网的一项服务。
它作为将域名和IP地址相互映射的一个分布式数据库,能够使人更方便地访问互联网。
DNS使用UDP端口53。
我们配置DNS的目的是为了在局域网中使用域名来访问我们的站点。
当然呢修改host也可以,但是我的路由器不支持,也为了方便后面局域网组网。
安装 dnsmasq
sudo apt-get install dnsmasq
dnsmasq 的几个服务
sudo service restart dnsmasq
sudo service status dnsmasq
相关配置文件 /etc/dnsmasq.conf
#前面省略680行
# Delays sending DHCPOFFER and proxydhcp replies for at least the specified number of seconds.
dhcp-mac=set:client_is_a_pi,B8:27:EB:*:*:*
dhcp-reply-delay=tag:client_is_a_pi,2
我们往上面的文件添加如下内容
resolv-file=/etc/mydns/mydns.conf
strict-order
cache-size=10000
listen-address=127.0.0.1,192.168.31.80
#修改A记录
address=/taotaodiy_raspi.cn/192.168.31.80
#修改mx记录
mx-host=taotaodiy_raspi.cn,m.taotaodiy_raspi.cn,10

#修改A记录
address=/taotaodiy_raspi.com/192.168.31.80
#修改mx记录
mx-host=taotaodiy_raspi.com,m.taotaodiy_raspi.com,10
其中 /etc/mydns/mydns.conf 为我们自己的配置文件, 内容为腾讯DNSPod
DNS服务器地址,内容如下,
nameserver 127.0.0.1
nameserver 119.29.29.29
nameserver 182.254.116.116
address 为我们下面要添加的两个站点的域名(随便取的名字)。
如何使用DNS,在其他主机上设置DNS即可
Windows直接设置网卡的ipv4的DNS
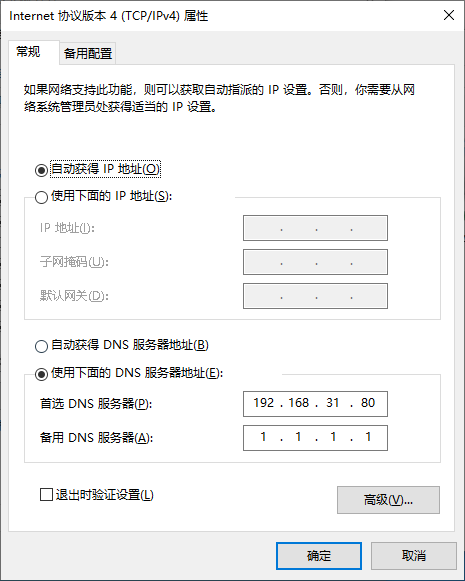
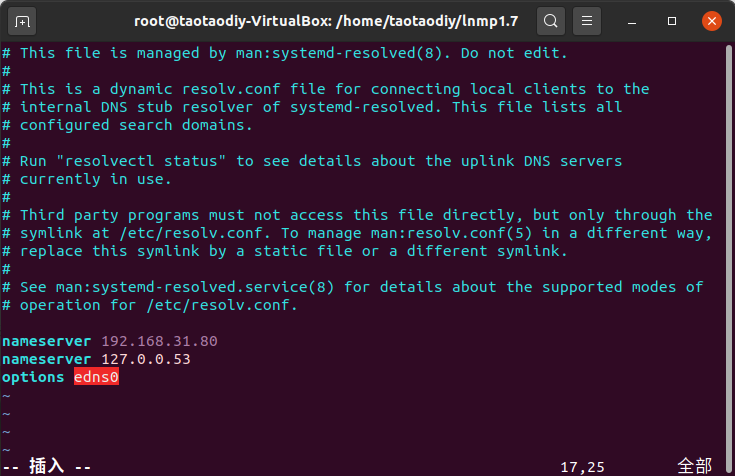
Ubuntu 则需要在 /etc/resolv.conf 中添加一行
# 后面的IP为我树莓派的IP
nameserver 192.168.31.80
安装测试软件或者直接测试
#安装 dnsutils
sudo apt-get install dnsutils
#测试
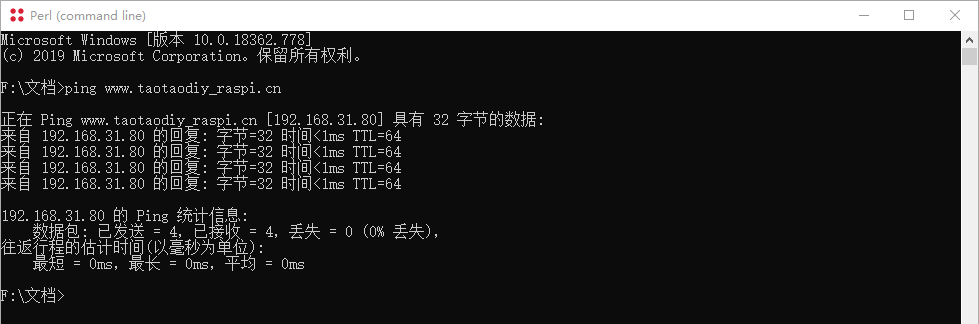
dig @192.168.31.80 taotaodiy_raspi.cn
curl -R http://www.taotaodiy_raspi.cn
ping taotaodiy_raspi.cn
# 或直接访问
新建站点
DNS设置完毕之后,我们在其他主机上 ping 我们设置的域名是没有问题的。
我们现在再来修改nginx配置多个站点,其实主要是参照default 站点来做。
像上面设置的两个站点 taotaodiy_raspi.com 和 taotaodiy_raspi.cn
首先我们先创建站点根目录,直接复制/var/www/html
#创建文件夹 www.taotaodiy_raspi.com/
cp -r /var/www/html www.taotaodiy_raspi.com
#创建文件夹 www.taotaodiy_raspi.cn/
cp -r /var/www/html www.taotaodiy_raspi.cn
接着添加站点配置文件,直接复制修改 default
server {
    listen 80;
    #listen [::]:80;
    server_name www.taotaodiy_raspi.com taotaodiy_raspi.com;

    root /var/www/www.taotaodiy_raspi.com;
    #index index.html index.htm index.nginx-debian.html;
    index index.html index.htm index.php default.html default.htm default.php;

    location / {
        # First attempt to serve request as file, then
        # as directory, then fall back to displaying a 404.
        try_files $uri $uri/ =404;
    }

    location ~* \.php$ {
    fastcgi_index   index.php;
    #fastcgi_pass    127.0.0.1:9000;
    fastcgi_pass unix:/run/php/php7.3-fpm.sock;
    include         fastcgi_params;
    fastcgi_param   SCRIPT_FILENAME    $document_root$fastcgi_script_name;
    fastcgi_param   SCRIPT_NAME        $fastcgi_script_name;
    }

}
创建链接文件,链接文件指向我们的站点配置文件,或者直接在nginx.conf中添加我们的配置文件。
ln -s /etc/nginx/sites-available/www.taotaodiy_raspi.com.conf taotaodiy_raspi.com
另外一个站点相仿,配置文件只需要修改域名即可。s
下面是我配置好的 nginx
目录,一共三个站点,均可在其他主机(同一局域网)上通过域名访问。
pi@raspberrypi:/etc/nginx $ tree .
.
├── conf.d
├── fastcgi.conf
├── fastcgi_params
├── koi-utf
├── koi-win
├── mime.types
├── modules-available
├── modules-enabled
│   ├── 50-mod-http-auth-pam.conf -> /usr/share/nginx/modules-available/mod-http-auth-pam.conf
│   ├── 50-mod-http-dav-ext.conf -> /usr/share/nginx/modules-available/mod-http-dav-ext.conf
│   ├── 50-mod-http-echo.conf -> /usr/share/nginx/modules-available/mod-http-echo.conf
│   ├── 50-mod-http-geoip.conf -> /usr/share/nginx/modules-available/mod-http-geoip.conf
│   ├── 50-mod-http-image-filter.conf -> /usr/share/nginx/modules-available/mod-http-image-filter.conf
│   ├── 50-mod-http-subs-filter.conf -> /usr/share/nginx/modules-available/mod-http-subs-filter.conf
│   ├── 50-mod-http-upstream-fair.conf -> /usr/share/nginx/modules-available/mod-http-upstream-fair.conf
│   ├── 50-mod-http-xslt-filter.conf -> /usr/share/nginx/modules-available/mod-http-xslt-filter.conf
│   ├── 50-mod-mail.conf -> /usr/share/nginx/modules-available/mod-mail.conf
│   └── 50-mod-stream.conf -> /usr/share/nginx/modules-available/mod-stream.conf
├── nginx.conf
├── nginx.conf_bak
├── proxy_params
├── scgi_params
├── sites-available
│   ├── default
│   ├── default_bak
│   ├── www.taotaodiy_raspi.cn.conf
│   └── www.taotaodiy_raspi.com.conf
├── sites-enabled
│   ├── default -> /etc/nginx/sites-available/default
│   ├── taotaodiy_raspi.cn -> /etc/nginx/sites-available/www.taotaodiy_raspi.cn.conf
│   └── taotaodiy_raspi.com -> /etc/nginx/sites-available/www.taotaodiy_raspi.com.conf
├── snippets
│   ├── fastcgi-php.conf
│   └── snakeoil.conf
├── uwsgi_params
└── win-utf
原文地址:https://blog.csdn.net/BluseLIBB/article/details/117400110
版权声明:本文内容由互联网用户自发贡献,该文观点与技术仅代表作者本人。本站仅提供信息存储空间服务,不拥有所有权,不承担相关法律责任。如发现本站有涉嫌侵权/违法违规的内容, 请发送邮件至 dio@foxmail.com 举报,一经查实,本站将立刻删除。