
文章目录
LNMP
1、拆分机器
| 机器的主机名 | 外网IP | 内网IP |
|---|---|---|
| db01 | 192.168.15.51(不需要) | 172.16.1.51 |
| web01 | 192.168.15.7 | 172.16.1.7 |
| web02 | 192.168.15.8 | 172.16.1.8 |
| web03 | 192.168.15.9 | 172.16.1.9 |
| nfs | 192.168.15.31 | 172.16.1.31 |
| backup | 192.168.15.41 | 172.16.1.41 |
2、搭建backup服务器
 # 关闭防火墙、selinux
[root@backup ~]# systemctl disable --now firewalld
[root@backup ~]# setenforce 0
setenforce: SELinux is disabled
# 安装rsync
[root@backup ~]# yum install -y rsync
# 同一用户
[root@backup ~]# useradd -u888 www
[root@backup ~]# id www
uid=1000(www) gid=1000(www) groups=1000(www)

# 编写配置文件
[root@backup ~]# vi /etc/rsyncd.conf
## 前端代码仓库、数据库备份、上传文件的备份
uid=www
gid=www
port=873
fake super=yes
use chroot=no
max connection=200
timeuot=600
ignore errors
read only=false
list=false
auth users=www
secrets file=/etc/rsync.passwd
log file=/var/log/rsyncd/log
###################################
[web]
comment="前端代码仓库"
path=/backup/web
[database]
comment="数据库备份"
path=/backup/database
[download]
comment="上传文件备份"
path=/backup/download

# 创建仓库
[root@backup ~]# mkdir /backup
[root@backup ~]# mkdir /backup/web
[root@backup ~]# mkdir /backup/database
[root@backup ~]# mkdir /backup/download
[root@backup ~]# tree /backup/
/backup/
├── database
├── download
└── web

# 授权
[root@backup ~]# chown www.www -R /backup/

# 创建密码文件
[root@backup ~]# echo "yangge:520" > /etc/rsync.passwd
[root@backup ~]# chmod 600 /etc/rsync.passwd

# 启动
[root@backup ~]# systemctl enable --now rsyncd
Created symlink from /etc/systemd/system/multi-user.target.wants/rsyncd.service to /usr/lib/systemd/system/rsyncd.service.
3、搭建NFS服务器
# 软件 nfs-utils rpcbind

# 安装软件
[root@nfs ~]# yum install nfs-utils rpcbind -y

# 创建用户
[root@nfs ~]# useradd www -u888
[root@nfs ~]# id www
uid=888(www) gid=888(www) groups=888(www)

# 创建前端代码仓库、数据库备份、上传文件的备份
[root@backup ~]# mkdir /nfs
[root@backup ~]# mkdir /nfs/web
[root@backup ~]# mkdir /nfs/database
[root@backup ~]# mkdir /nfs/download
[root@nfs ~]# tree /nfs/
/nfs/
├── database
├── download
└── web

# 授权
[root@nfs ~]# chown www.www -R /nfs/


# 设置挂载点
[root@nfs ~]# vim /etc/exports
/nfs/web      172.16.1.0/24(rw,sync,all_squash,anonuid=888,anongid=888)
/nfs/database 172.16.1.0/24(rw,sync,all_squash,anonuid=888,anongid=888)
/nfs/download 172.16.1.0/24(rw,sync,all_squash,anonuid=888,anongid=888)

# 启动
[root@nfs ~]# systemctl enable --now nfs-server.service
Created symlink from /etc/systemd/system/multi-user.target.wants/nfs-server.service to /usr/lib/systemd/system/nfs-server.service.

# 检测
[root@nfs ~]# showmount -e
Export list for nfs:
/nfs/download 172.16.1.0/24
/nfs/database 172.16.1.0/24
/nfs/web      172.16.1.0/24

[root@nfs ~]# cat /var/lib/nfs/etab
/nfs/download	172.16.1.0/24(rw,sync,wdelay,hide,nocrossmnt,secure,root_squash,all_squash,no_subtree_check,secure_locks,acl,no_pnfs,anonuid=888,anongid=888,sec=sys,rw,secure,root_squash,all_squash)
/nfs/database	172.16.1.0/24(rw,sync,wdelay,hide,nocrossmnt,secure,root_squash,all_squash,no_subtree_check,secure_locks,acl,no_pnfs,anonuid=888,anongid=888,sec=sys,rw,secure,root_squash,all_squash)
/nfs/web	172.16.1.0/24(rw,sync,wdelay,hide,nocrossmnt,secure,root_squash,all_squash,no_subtree_check,secure_locks,acl,no_pnfs,anonuid=888,anongid=888,sec=sys,rw,secure,root_squash,all_squash)
4、搭建数据库
# 软件:mariadb

# 安装
[root@db01 ~]# yum install mariadb* -y

# 启动
[root@db01 ~]# systemctl enable --now mariadb
Created symlink from /etc/systemd/system/multi-user.target.wants/mariadb.service to /usr/lib/systemd/system/mariadb.service.

# 创建密码
[root@db01 ~]# mysqladmin -uroot password '123'
[root@db01 ~]# mysql -uroot -p123
Welcome to the MariaDB monitor.  Commands end with ; or \g.
Your MariaDB connection id is 3
Server version: 5.5.68-MariaDB MariaDB Server

Copyright (c) 2000, 2018, Oracle, MariaDB Corporation Ab and others.

Type 'help;' or '\h' for help. Type '\c' to clear the current input statement.

MariaDB [(none)]> show databases;
+--------------------+
| Database           |
+--------------------+
| information_schema |
| mysql              |
| performance_schema |
| test               |
+--------------------+
4 rows in set (0.00 sec)

MariaDB [(none)]>
#查看数据库给谁用
MariaDB [(none)]> use mysql
Reading table information for completion of table and column names
You can turn off this feature to get a quicker startup with -A

Database changed
MariaDB [mysql]> select host,user from user;
+-----------+------+
| host      | user |
+-----------+------+
| 127.0.0.1 | root |
| ::1       | root |
| db01      |      |
| db01      | root |
| localhost |      |
| localhost | root |
+-----------+------+
6 rows in set (0.00 sec)

# 创建用户给予web以及其它网站使用
MariaDB [mysql]> grant all privileges on *.* to www@'%' identified by 'yangge';
Query OK, 0 rows affected (0.01 sec)

#生效
MariaDB [mysql]> flush privileges;
Query OK, 0 rows affected (0.00 sec)

#查看
MariaDB [mysql]>  select host,user from user;
+-----------+------+
| host      | user |
+-----------+------+
| %         | www  |
| 127.0.0.1 | root |
| ::1       | root |
| db01      |      |
| db01      | root |
| localhost |      |
| localhost | root |
+-----------+------+
7 rows in set (0.00 sec)

# 数据备份
5、搭建web服务器(三台一起执行)
# 安装官方源
[root@web01 ~]# > /etc/yum.repos.d/nginx.repo
[nginx-stable]
name=nginx stable repo
baseurl=http://nginx.org/packages/centos/$releasever/$basearch/
gpgcheck=1
enabled=1
gpgkey=https://nginx.org/keys/nginx_signing.key
module_hotfixes=true

[nginx-mainline]
name=nginx mainline repo
baseurl=http://nginx.org/packages/mainline/centos/$releasever/$basearch/
gpgcheck=1
enabled=0
gpgkey=https://nginx.org/keys/nginx_signing.key
module_hotfixes=true
[root@web01 ~]# vim /etc/yum.repos.d/nginx.repo
[root@web01 ~]# yum clean all

# 安装nginx
[root@web01 ~]# yum install nginx

# 启动
[root@web01 ~]# systemctl enable --now nginx
Created symlink from /etc/systemd/system/multi-user.target.wants/nginx.service to /usr/lib/systemd/system/nginx.service.
6、安装PHP
# 安装PHP
[root@web01 ~]# vim /etc/yum.repos.d/php.repo
[php-webtatic]
name = PHP Repository
baseurl = http://us-east.repo.webtatic.com/yum/el7/x86_64/
gpgcheck = 0

[root@web01 ~]# yum clean all
[root@web01 ~]# yum makecache
[root@web01 ~]# yum remove php-mysql-5.4 php php-fpm php-common
[root@web01 ~]# yum -y install php71w php71w-cli php71w-common php71w-devel php71w-embedded php71w-gd php71w-mbstring php71w-pdo php71w-xml php71w-fpm php71w-mysqlnd php71w-opcache php71w-pecl-memcached php71w-pecl-redis php71w-pecl-mongodb php71w-mcrypt

#另外一种安装方式
[root@web01 opt]# rz -E
-rw-r--r-- 1 root root 19889622 Apr 28 21:56 php.tar(2).gz
[root@web01 opt]# tar xf php.tar\(2\).gz
[root@web01 opt]# yum localinstall -y *.rpm
# 修改配置文件
[root@web01 ~]# vim /etc/php-fpm.d/www.conf
user = www
group = www
#统一用户
[root@web02 ~]#  groupadd www -g 888
[root@web02 ~]# useradd www -u 888 -g 888 -s /sbin/nologin -M

# 启动php
[root@web01 ~]# systemctl enable --now php-fpm.service
Created symlink from /etc/systemd/system/multi-user.target.wants/php-fpm.service to /usr/lib/systemd/system/php-fpm.service.


#重启配置文件
[root@web01 ~]# systemctl daemon-reload
7、将web02和web03加入集群
[root@web02 ~]# mkdir /www
[root@web02 ~]# chown -R www.www /www/
[root@web02 ~]# mount  -t nfs 172.16.1.31:/nfs/web /www
[root@web02 ~]# mount -t nfs 172.16.1.31:/nfs/conf /etc/nginx/conf.d/
[root@web02 ~]# systemctl restart nginx

[root@web03 ~]# mkdir /www
[root@web03 ~]# chown -R www.www /www/
[root@web03 ~]# mount  -t nfs 172.16.1.31:/nfs/web /www
[root@web03 ~]# mount -t nfs 172.16.1.31:/nfs/conf /etc/nginx/conf.d/
[root@web03 ~]# systemctl restart nginx
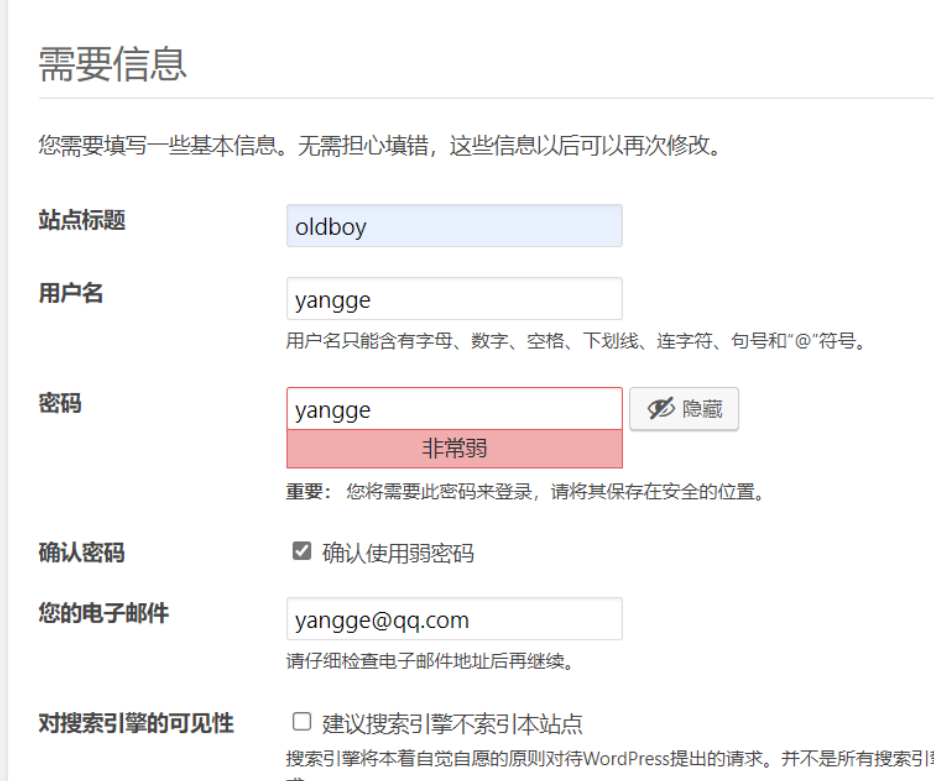
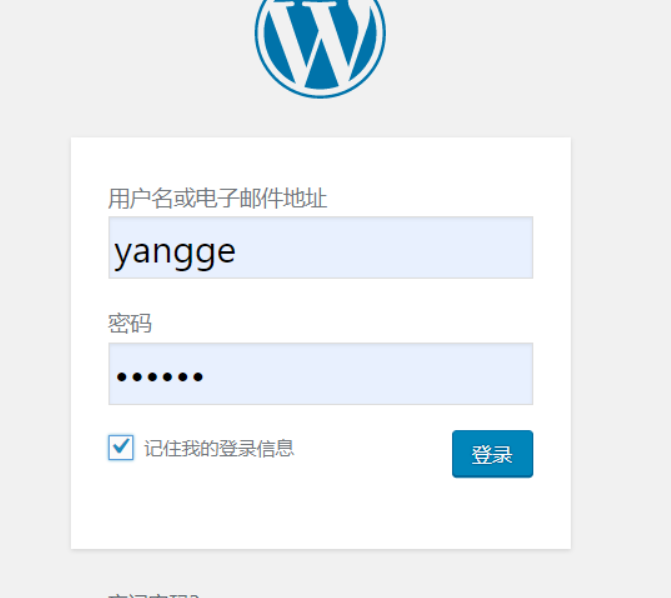
8、搭建wordpress
# 共享代码、共享数据、共享nginx配置
注:web01机器操作
[root@web01 ~]# groupadd www -g888
[root@web01 ~]# useradd www -u 888 -g 888 -s /sbin/nologin -M
[root@web01 ~]# mkdir /www
[root@web01 ~]# cd /www/
[root@web01 www]# rz -E
[root@web01 www]# ll
-rw-r--r-- 1 root root 11098483 Apr 29 11:27 wordpress.tar.gz
[root@web01 www]# tar -xf wordpress.tar.gz
drwxr-xr-x 5 1006 1006 4096 Jan 11 2019 wordpress
-rw-r--r-- 1 root root 11098483 Apr 29 11:27 wordpress.tar.gz
[root@web01 www]# chown -R www.www /www/
[root@web01 www]# cd /etc/nginx/conf.d/
[root@web01 conf.d]# ll
-rw-r--r-- 1 root root 1072 Apr 21 00:07 default.conf
[root@web01 conf.d]# rm -rf default.conf
## 在nfs服务器上创建/nfs/conf目录
[root@nfs web]# mkdir /nfs/conf
## 授权/nfs/conf
[root@nfs web]# chown www.www /nfs/conf
## 加入nfs配置文件
[root@nfs web]# vim /etc/exports
/nfs/web 172.16.1.0/24(rw,sync,all_squash,anonuid=888,anongid=888)
/nfs/database 172.16.1.0/24(rw,sync,all_squash,anonuid=888,anongid=888)
/nfs/download 172.16.1.0/24(rw,sync,all_squash,anonuid=888,anongid=888)
/nfs/conf 172.16.1.0/24(rw,sync,all_squash,anonuid=888,anongid=888)
#查看
[root@nfs web]# showmount -e
Export list for nfs:
/nfs/conf 172.16.1.0/24
/nfs/download 172.16.1.0/24
/nfs/database 172.16.1.0/24
/nfs/web 172.16.1.0/24
## 重启nfs
[root@nfs web]# systemctl restart nfs-server rpcbind
注:在web01机器执行
## 挂载到web服务器
[root@web01 conf.d]# mount -t nfs 172.16.1.31:/nfs/conf /etc/nginx/conf.d/
## 增加wordpress配置
[root@web01 conf.d]# vim wordpress.conf
server {
listen 80;
server_name linux.wps.cluster.local.com;
root /www/wordpress;
location / {
index index.php;
}
location ~* \.php$ {
fastcgi_pass 127.0.0.1:9000;
fastcgi_param SCRIPT_FILENAME $document_root$fastcgi_script_name;
include fastcgi_params;
}
}
# 重启
[root@web01 conf.d]# systemctl restart nginx
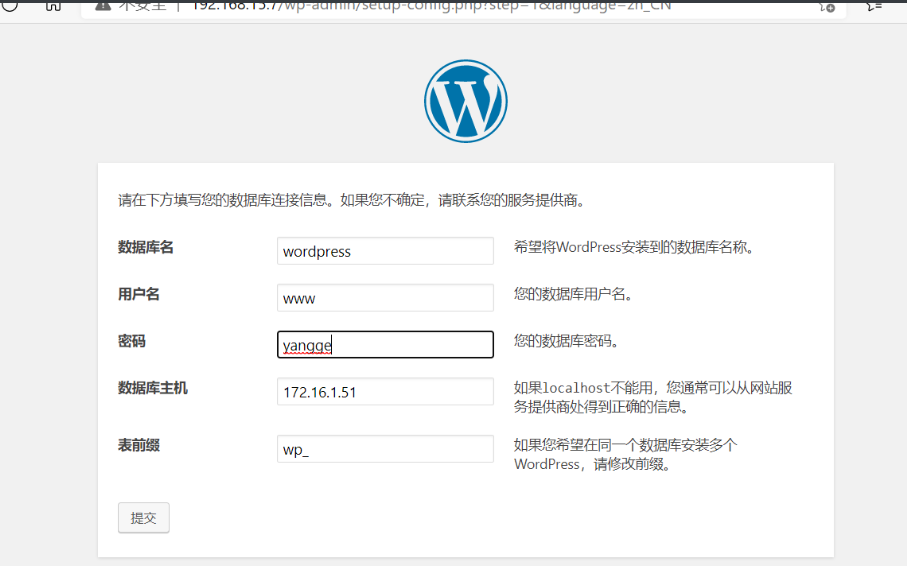
# 创建wordpress数据库
[root@db01 ~]# mysql -uroot -p123
MariaDB [(none)]> show databases;
+--------------------+
| Database |
+--------------------+
| information_schema |
| mysql |
| performance_schema |
| test |
+--------------------+
4 rows in set (0.01 sec)
MariaDB [(none)]> create database wordpress;
Query OK, 1 row affected (0.00 sec)
[root@db01 ~]# systemctl restart mariadb
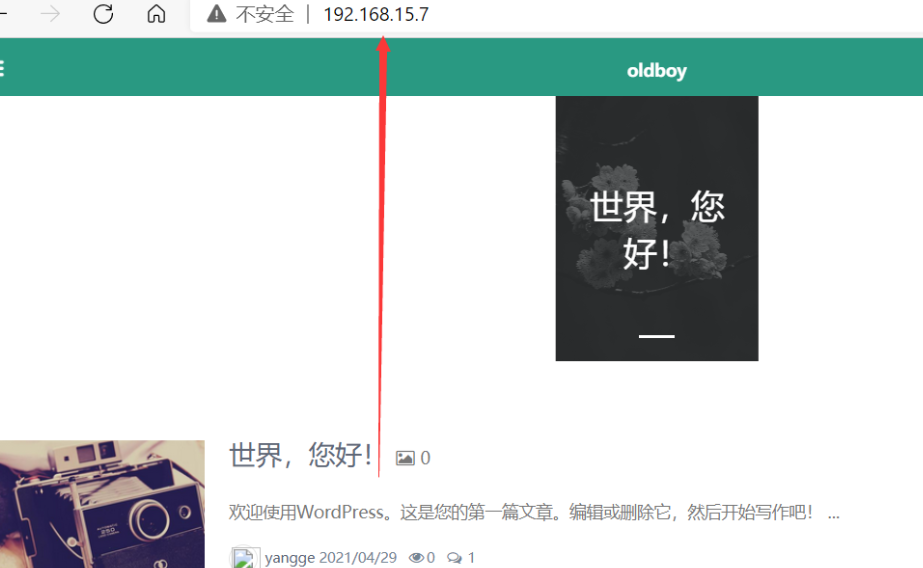
访问 可以配域名访问 加入hosts文件
172.16.1.51 linux.wps.cluster.local.com

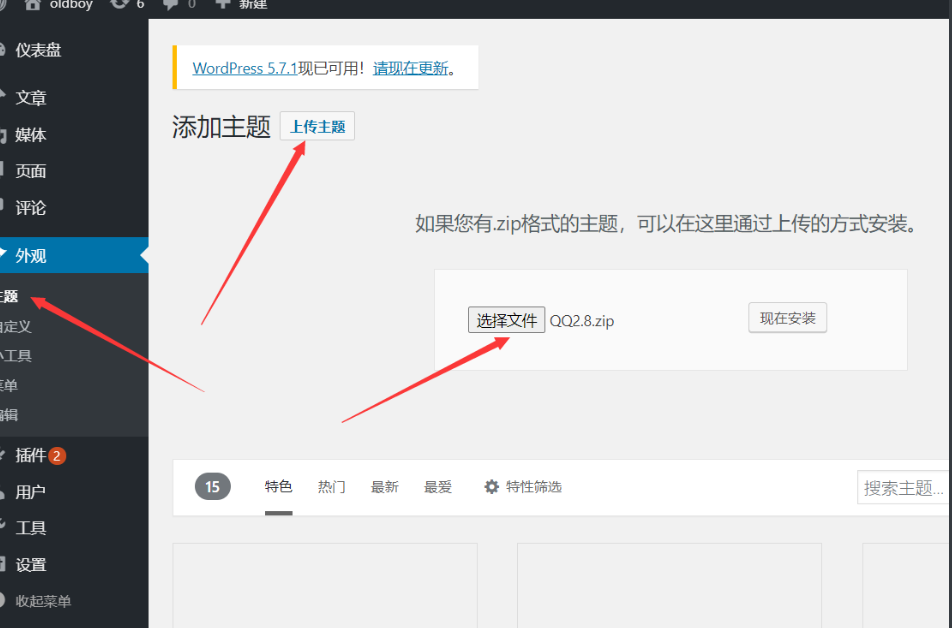
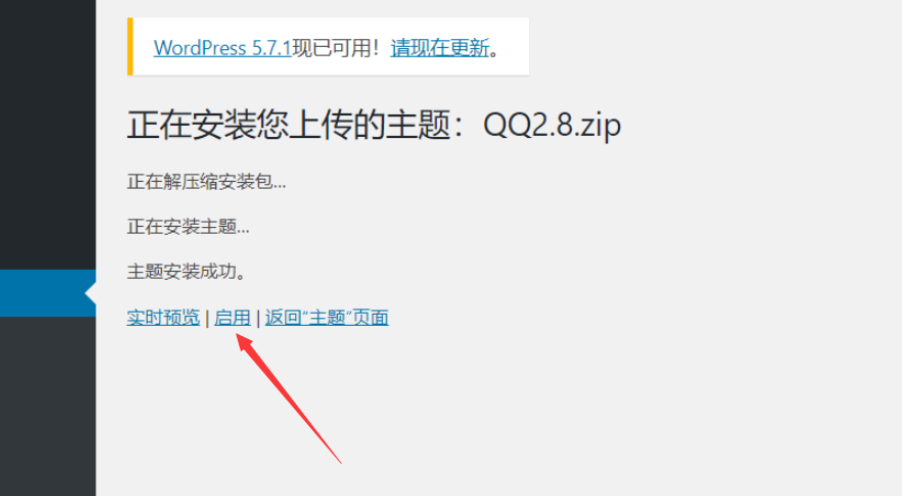
8-1上传主题
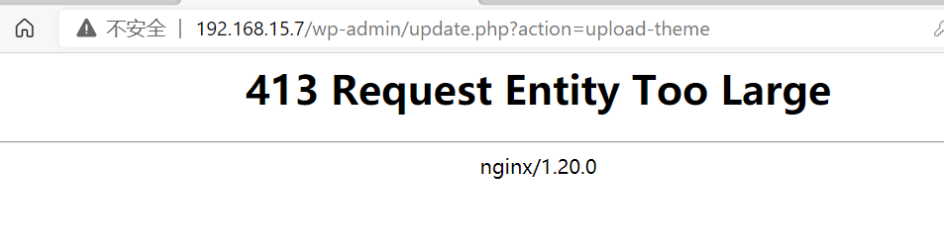
8-2报错413修改web01配置文件
[root@web01 opt]# vim /etc/nginx/conf.d/wordpress.conf
server {
        listen 80;
        server_name linux.wps.cluster.local.com;
        root /www/wordpress;

        client_max_body_size 10m;  #

        location / {
                index index.php;
        }
        location ~* \.php$ {
                fastcgi_pass 127.0.0.1:9000;
                fastcgi_param SCRIPT_FILENAME $document_root$fastcgi_script_name;
                include fastcgi_params;
        }
}

[root@web01 opt]# nginx -t
nginx: the configuration file /etc/nginx/nginx.conf syntax is ok
nginx: configuration file /etc/nginx/nginx.conf test is successful
[root@web01 opt]# systemctl restart nginx


# web02和web03重启就可以了
[root@web02~]# systemctl restart nginx
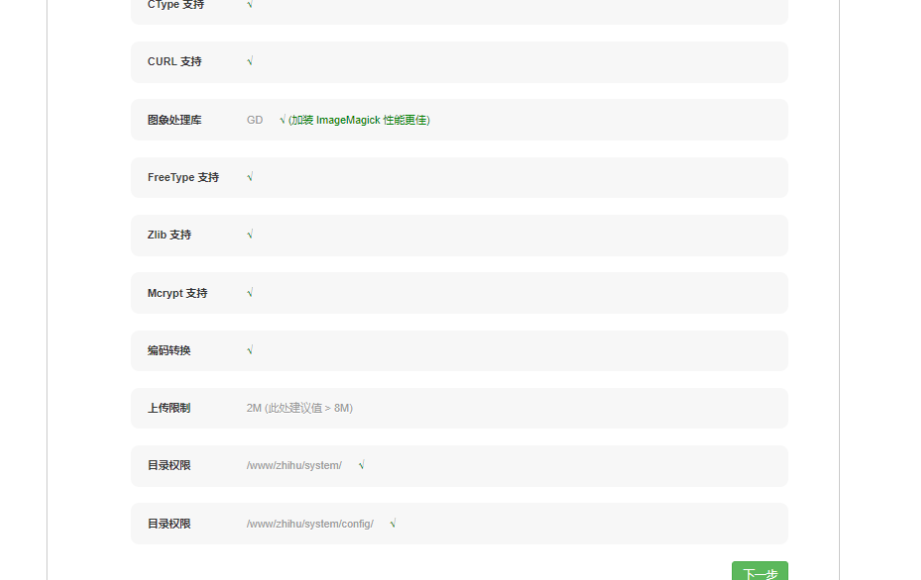
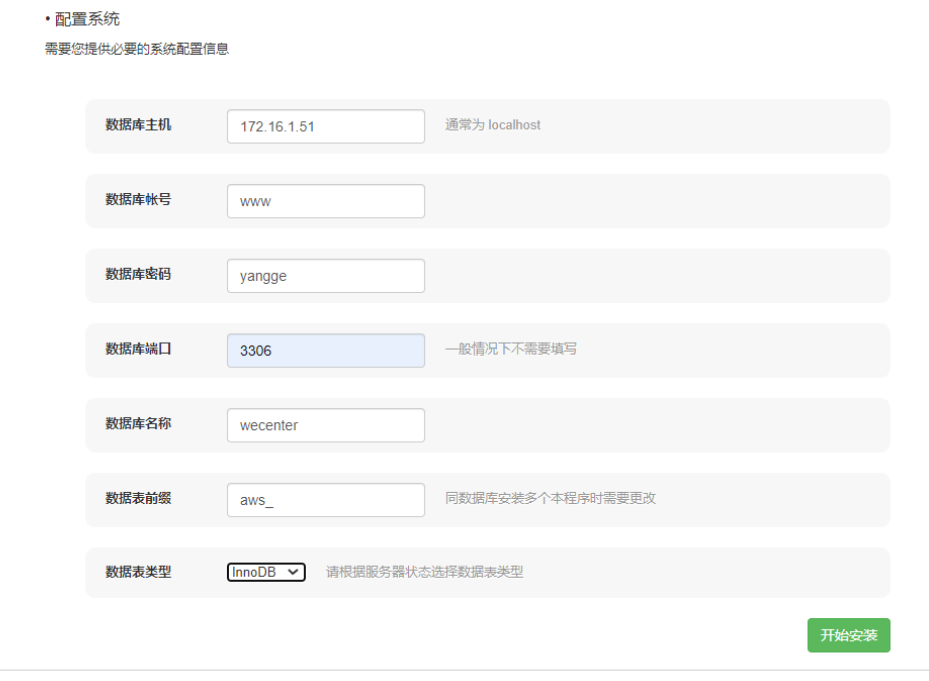
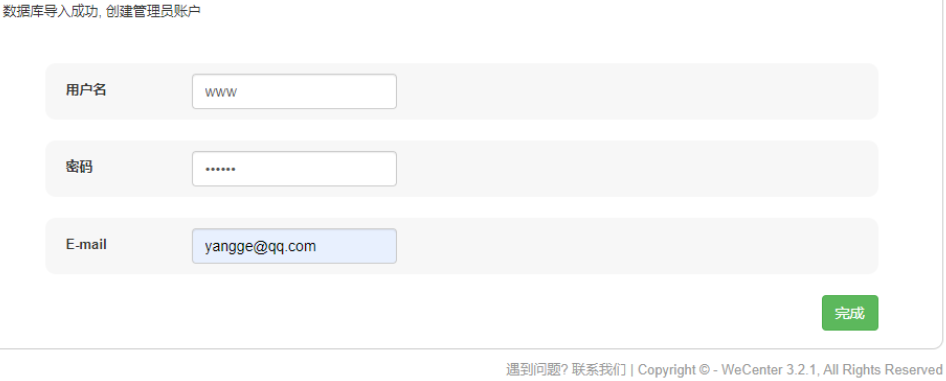
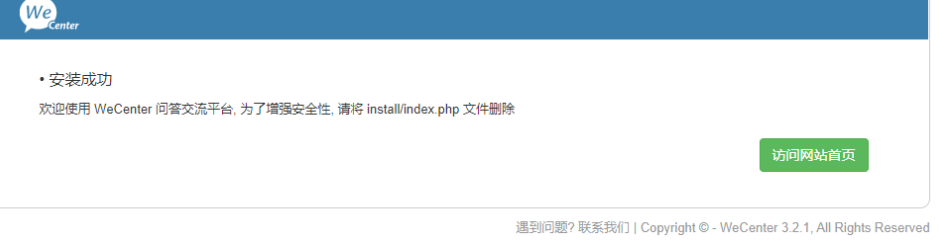
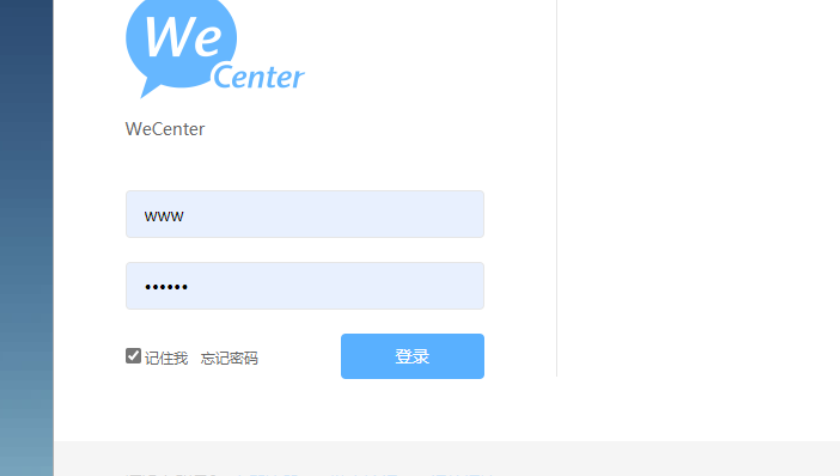
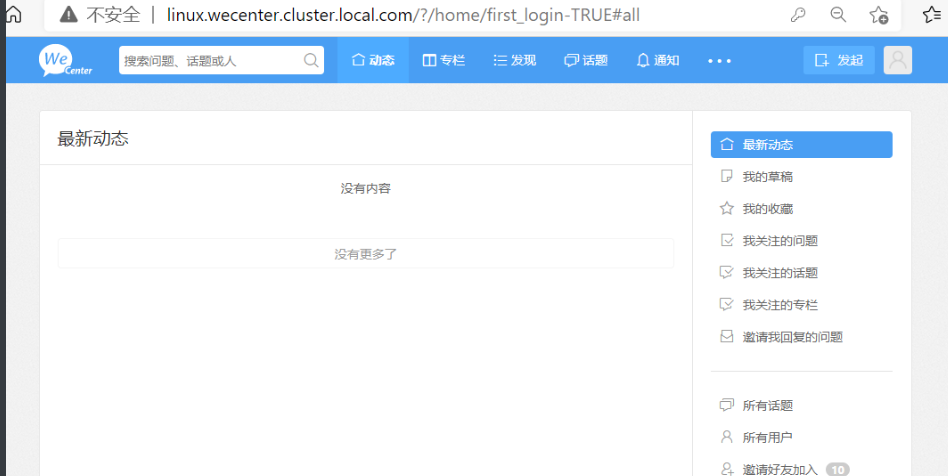
9、搭建WeCenter
[root@web01 ~]# rz -E
-rw-r--r--  1 root root 25744989 Apr 28 17:35 zhihu.zip
[root@web01 www]# unzip zhihu.zip
[root@web01 www]# mv zhihu /www/
[root@web01 www]# cd /www
[root@web01 www]# chown www.www -R zhihu/
[root@web01 www]# vim /etc/nginx/conf.d/wecenter.conf
server {
        listen 80;
        server_name linux.wecenter.cluster.local.com;
        root /www/zhihu;

        location / {
                index index.php;
        }
        location ~* \.php$ {
                fastcgi_pass 127.0.0.1:9000;
                fastcgi_param SCRIPT_FILENAME $document_root$fastcgi_script_name;
                include fastcgi_params;
        }
}

# 三台都重启
[root@web01 conf.d]# systemctl restart nginx

#解析域名
192.168.15.7 linux.wecenter.cluster.local.com

# 创建wordpress数据库
[root@db01 ~]# mysql -uroot -p123

MariaDB [(none)]> create database wecenter;
Query OK, 1 row affected (0.00 sec)

MariaDB [(none)]> show databases;
+--------------------+
| Database           |
+--------------------+
| information_schema |
| mysql              |
| performance_schema |
| test               |
| wecenter           |
| wordpress          |
+--------------------+
6 rows in set (0.00 sec)
10、数据库备份
[root@db01 databases]# groupadd www -g888
[root@db01 databases]# useradd www -u 888 -g 888 -s /sbin/nologin -M
[root@db01 databases]# chown www.www /databases/
[root@db01 databases]# mount -t nfs 172.16.1.31:/nfs/database /databases/
[root@db01 ~]# chmod +x mysql_dump.sh
[root@db01 ~]# ./mysql_dump.sh
# 编写备份脚本
[root@db01 ~]# cat mysql_dump.sh
#!/bin/bash
DATE=`date +%F`
BACKUP="/databases"
cd $BACKUP
mysqldump -uroot -p123 --all-databases --single-transaction > mysql-all-${DATE}.sql
tar -czf mysql-all-${DATE}.tar.gz mysql-all-${DATE}.sql
rm -rf mysql-all-${DATE}.sql

[root@db01 ~]# ll /databases/
total 396
-rw-r--r-- 1 www www 398455 Apr 29 22:38 mysql-all-2021-04-29.tar.gz
-rw-r--r-- 1 www www    228 Apr 29 22:36 mysql_dump.sh

# 脚本加入定时任务
[root@db01 ~]# crontab -e
01 00 * * *  /databases/mysql_dump.sh
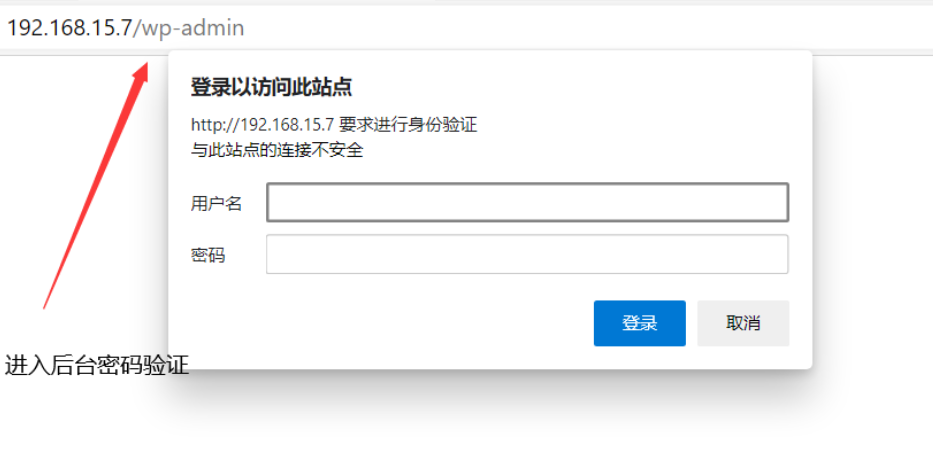
11、后台加密码
[root@web01 www]# htpasswd -c /etc/nginx/conf.d/auth_basic linux
[root@web01 conf.d]# wordpress.conf
server {
	listen 80;
	server_name linux.wps.cluster.local.com;
	root /www/wordpress;
	client_max_body_size 10m;
	location / {
		index index.php;
	}
	location ~* \.php$ {
		fastcgi_pass 127.0.0.1:9000;
		fastcgi_param SCRIPT_FILENAME $document_root$fastcgi_script_name;
		include fastcgi_params;
	}
	location =/wp-admin {
		auth_basic "please input password!";
		auth_basic_user_file /etc/nginx/conf.d/auth_basic;
		index index.php;
	}
}
12、web网站的实时备份
# sersync + innotiy + rsync
执行nfs

[root@nfs opt]# rz -E
-rw-r--r-- 1 root root 727290 Apr 22 16:03 sersync2.5.4_64bit_binary_stable_final.tar.gz
[root@nfs opt]# tar xf sersync2.5.4_64bit_binary_stable_final.tar.gz
drwxr-xr-x 2 root root     41 Oct 26  2011 GNU-Linux-x86
-rw-r--r-- 1 root root 727290 Apr 22 16:03 sersync2.5.4_64bit_binary_stable_final.tar.gz
[root@nfs opt]# cd GNU-Linux-x86/
[root@nfs opt]# mv GNU-Linux-x86 /usr/local/
[root@nfs opt]# cd /usr/local/GNU-Linux-x86
[root@nfs GNU-Linux-x86]# ll
total 1772
-rwxr-xr-x 1 root root    2214 Oct 26  2011 confxml.xml
-rwxr-xr-x 1 root root 1810128 Oct 26  2011 sersync2

[root@nfs GNU-Linux-x86]# vim confxml.xml
    <inotify>
        <delete start="true"/>
        <createFolder start="true"/>
        <createFile start="true"/>
        <closeWrite start="true"/>
        <moveFrom start="true"/>
        <moveTo start="true"/>
        <attrib start="true"/>
        <modify start="true"/>
    </inotify>

    <sersync>
        <localpath watch="/nfs/web">
            <remote ip="172.16.1.41" name="web"/>
            <!--<remote ip="192.168.8.39" name="tongbu"/>-->
            <!--<remote ip="192.168.8.40" name="tongbu"/>-->
        </localpath>
        <rsync>
            <commonParams params="-az"/>
            <auth start="true" users="www" passwordfile="/etc/rsync.passwd"/

   [root@nfs GNU-Linux-x86]# echo 123> /etc/rsync.passwd
   [root@nfs GNU-Linux-x86]# chmod 600 /etc/rsync.passwd
   [root@nfs GNU-Linux-x86]# ./sersync2 -dro confxml.xml


   [root@nfs GNU-Linux-x86]# cp confxml.xml confxml-database.xml
[root@nfs GNU-Linux-x86]# vim confxml-database.xml

    <inotify>
        <delete start="true"/>
        <createFolder start="true"/>
        <createFile start="true"/>
        <closeWrite start="true"/>
        <moveFrom start="true"/>
        <moveTo start="true"/>
        <attrib start="true"/>
        <modify start="true"/>
    </inotify>

    <sersync>
        <localpath watch="/nfs/database">
            <remote ip="172.16.1.41" name="database"/>
            <!--<remote ip="192.168.8.39" name="tongbu"/>-->
            <!--<remote ip="192.168.8.40" name="tongbu"/>-->
        </localpath>
        <rsync>
            <commonParams params="-az"/>
            <auth start="true" users="www" passwordfile="/etc/rsync.passwd"/

            [root@nfs GNU-Linux-x86]# ./sersync2 -dro confxml-database.xml


   #验证
  [root@backup web]# cd /backup/database/
[root@backup database]# ll
total 396
-rw-r--r-- 1 www www 398455 Apr 29 22:38 mysql-all-2021-04-29.tar.gz
-rw-r--r-- 1 www www    228 Apr 29 22:36 mysql_dump.sh
原文地址:https://blog.csdn.net/yangenguang/article/details/116293398
版权声明:本文内容由互联网用户自发贡献,该文观点与技术仅代表作者本人。本站仅提供信息存储空间服务,不拥有所有权,不承担相关法律责任。如发现本站有涉嫌侵权/违法违规的内容, 请发送邮件至 dio@foxmail.com 举报,一经查实,本站将立刻删除。