
目录
1. LNMP架构项目实战
1.1 LNMP架构介绍
-
什么是LNMP
LNMP是一套技术的组合
L:linux
N:nginx
M: mysql, mariadb(M):memcached
P:php, perl, python
-
LNMP工作过程:
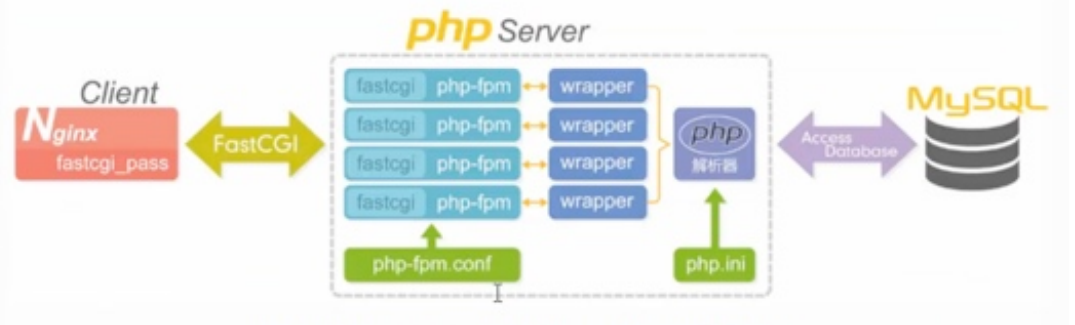
Nginx、PHP、MySQL之间是如何工作的:
-
1.用户首先通过http协议发起请求,请求会先抵达Nginx;
-
2.Nginx根据用户的请求进行Location 规则匹配;
-
3.Location如果匹配到请求是静态,则由Nginx读取本地直接返回;
-
4.Location如果匹配到请求是动态,则由Nginx将请求转发给fastcgi协议;
-
5.fastgi收到后会将请求交给php-fpm管理进程;
-
6.php-fpm管理进程接收到后会调用具体的工作进程warrap;
-
6.warrap进程会调用php解析器解析代码,php解析后直接返回;
-
7.如果有查询数据库操作,则由php连接数据库(用户密码IP)发起查询的操作;
-
8.最终数据返回流程为:mysq1->php->php-fpm->fastcgi->nginx->http->user;
1.2 LNMP架构部署wordpress
1.2.1 LNMP环境介绍
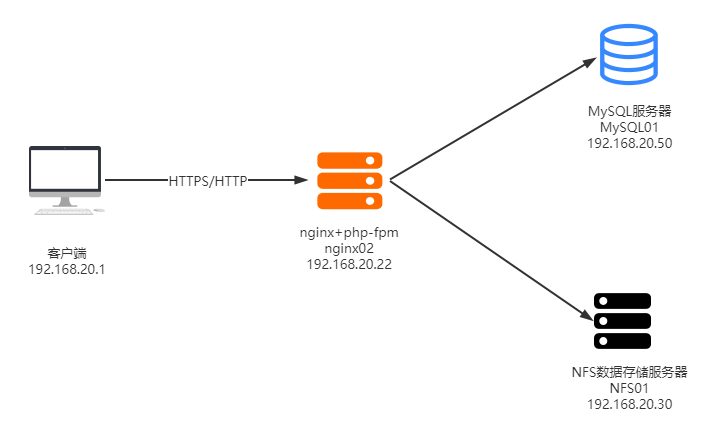
LNMP实验场景如下:
- linux系统版本:CentOS 7.8 X86_64
- 客户端:192.168.20.1
- nginx服务器:主机名:nginx02,地址:192.168.20.22,nginx版本:1.20.1
- php-fpm:和nginx共用一台主机,版本7.3.16
- mysql服务器:主机名:mysql01,地址192.168.20.50,版本:mariadb-10.5.2
- NFS服务器:主机名:NFS01,地址192.168.20.30,版本:nfs-utils-1.3.0-0.66.el7.x86_64
- wordpress版本:5.7.2
架构设计原理:
-
数据库独立部署:若单台服务器部署LNMP会导致网站访问缓慢,当系统内存满时,很容易出现oom问题,导致数据库进程被kill。独立部署数据库有如下好处:
- 缓解WEB站点的压力
- 增强数据库的读写性能
- 提高用户访问速度
-
NFS独立存储静态资源:当web服务器由多台时,会导致用户上传的图片,视频等静态资源只能上传到一台服务器,而其他的WEB节点没有这些内容,当用户被调度到该WEB服务器上时,无法访问这些图片资源。
独立部署NFS的好处:
- 保证了多台WEB节点的静态资源一致
- 有效节省了多台WEB节点的存储空间
- 统一管理静态资源,可以统一推送至CDN进行静态资源加速访问
1.2.2 二进制部署mariadb
mariadb的官方下载地址为:https://mariadb.org/download/
使用二进制方式安装mariadb
#1.解压mariadb到/usr/local/src下
[root@mysql01 local]# cd /usr/local/src/
[root@mysql01 src]# ll
total 321464
-rw-r--r-- 1 root root 329178674 Apr  4  2020 mariadb-10.5.2-linux-x86_64.tar.gz
[root@mysql01 src]# tar xf mariadb-10.5.2-linux-x86_64.tar.gz

#2.为mariadb-10.5.2-linux-x86_64创建软链接mysql
#注意:解包下载的二进制程序,解压路径必须为/usr/local,是官方编译时候指定的路径,解压后目录是带版本号的,在主机上编译目录是不带版本号的,所以需要创建一个软连接mysql,指向解压目录
[root@mysql01 src]# ln -s /usr/local/src/mariadb-10.5.2-linux-x86_64 /usr/local/mysql

#3.创建mysql用户
[root@mysql01 src]# mkdir /data/mysql
[root@mysql01 src]# useradd -r -s /sbin/nologin -M -d /data/mysql/ mysql
[root@mysql01 src]# id mysql
uid=886(mysql) gid=886(mysql) groups=886(mysql)

#4.修改目录属主属组为mysql
[root@mysql01 src]# mkdir /var/lib/mysql
[root@mysql01 src]# chown mysql.mysql -R /data/mysql/ /var/lib/mysql/

#5.创建数据库文件,基本的mysql数据库,二进制程序并不会生成,需要创建,使用解压缩后/mysql/scripts/下的脚本mysql_install_db
[root@mysql01 src]# /usr/local/mysql/scripts/mysql_install_db --user=mysql --datadir=/data/mysql --basedir=/usr/local/mysql
Installing MariaDB/MySQL system tables in '/data/mysql' ...
OK
......

#6.要管理mysql就要将其当成服务,需要准备服务脚本,并启动服务,系统提供了模板脚本供参考 /mysql/ support-files/mysql.server
[root@mysql01 src]# cp /usr/local/src/mysql/support-files/mysql.server /etc/init.d/mysqld
[root@mysql01 src]# chmod a+x /etc/init.d/mysqld
[root@mysql01 src]# chkconfig --add mysqld

#7.修改mysql的配置文件:
[root@mysql01 src]# vim /etc/my.cnf
[mysqld]
datadir=/data/mysql          <==指定数据存放路径
user=mysql                   <==指定mysqld运行的用户
innodb_file_per_table=on     <==据库的每一个表都生成独立的文件10.2后版本,默认开启
skip_name_resolve=on         <==禁止主机名解析(反向解析),可以提升访问速度,建议使用
max_connections=10000
socket=/var/lib/mysql/mysql.sock <==指定mysqld的socket文件
# Disabling symbolic-links is recommended to prevent assorted security risks
symbolic-links=0
# Settings user and group are ignored when systemd is used.
# If you need to run mysqld under a different user or group,
# customize your systemd unit file for mariadb according to the
# instructions in http://fedoraproject.org/wiki/Systemd

[client]
port=3306
socket=/var/lib/mysql/mysql.sock   <==client中需要指定socket文件,与mysqld中的socket保持一致

[mysqld_safe]
log-error=/var/log/mariadb/mariadb.log
pid-file=/var/run/mariadb/mariadb.pid

#
# include all files from the config directory
#
!includedir /etc/my.cnf.d

#8.把mysql中的命令目录加入PATH路径中
[root@mysql01 src]# echo PATH=/usr/local/mysql/bin:$PATH > /etc/profile.d/mysql.sh
[root@mysql01 src]# PATH=/usr/local/mysql/bin:$PATH

#9.启动mariadb
#以下三种方式都可以启动
[root@mysql01 src]# service mysqld start
[root@mysql01 src]# /etc/init.d/mysqld start
[root@mysql01 src]# systemctl start mysqld.service

[root@mysql01 ~]# ss -ntlp
State      Recv-Q Send-Q  Local Address:Port                 Peer Address:Port
LISTEN     0      128              [::]:3306                         [::]:*                   users:(("mysqld",pid=8920,fd=18))

#10.运行mysql安全加强脚本
#创建连接socket文件:
[root@mysql01 src]# ln -sv /var/lib/mysql/mysql.sock /tmp/mysql.sock
#否则会报错:
ERROR 2002 (HY000): Can't connect to local MySQL server through socket '/tmp/mysql.sock' (2)

[root@mysql01 src]# mysql_secure_installation

NOTE: RUNNING ALL PARTS OF THIS SCRIPT IS RECOMMENDED FOR ALL MariaDB
      SERVERS IN PRODUCTION USE!  PLEASE READ EACH STEP CAREFULLY!

In order to log into MariaDB to secure it, we'll need the current
password for the root user. If you've just installed MariaDB, and
haven't set the root password yet, you should just press enter here.

Enter current password for root (enter for none):                <==输入当前root的口令,初次登录没有,直接回车
OK, successfully used password, moving on...

Setting the root password or using the unix_socket ensures that nobody
can log into the MariaDB root user without the proper authorisation.

You already have your root account protected, so you can safely answer 'n'.

Switch to unix_socket authentication [Y/n] n
 ... skipping.

You already have your root account protected, so you can safely answer 'n'.

Change the root password? [Y/n] y           <==是否设置root的口令,y
New password:                               <==输入新口令
Re-enter new password:                      <==确认新口令
Password updated successfully!
Reloading privilege tables..
 ... Success!


By default, a MariaDB installation has an anonymous user, allowing anyone
to log into MariaDB without having to have a user account created for
them.  This is intended only for testing, and to make the installation
go a bit smoother.  You should remove them before moving into a
production environment.

Remove anonymous users? [Y/n] y             <==是否删除匿名账户,y删除n跳过
 ... Success!

Normally, root should only be allowed to connect from 'localhost'.  This
ensures that someone cannot guess at the root password from the network.

Disallow root login remotely? [Y/n] n       <==是否禁用远程root登录,y禁用,禁用后只能在本机管理
 ... skipping.

By default, MariaDB comes with a database named 'test' that anyone can
access.  This is also intended only for testing, and should be removed
before moving into a production environment.

Remove test database and access to it? [Y/n] n   <==是否删除test数据库,y删除
 ... skipping.

Reloading the privilege tables will ensure that all changes made so far
will take effect immediately.

Reload privilege tables now? [Y/n] y     <==是否将改动立即生效,y同意
 ... Success!

Cleaning up...

All done!  If you've completed all of the above steps, your MariaDB
installation should now be secure.

Thanks for using MariaDB!

#11.测试数据库连接
root@mysql01 src]# mysql -uroot -p123456
Welcome to the MariaDB monitor.  Commands end with ; or \g.
Your MariaDB connection id is 5
Server version: 10.5.2-MariaDB MariaDB Server

Copyright (c) 2000, 2018, Oracle, MariaDB Corporation Ab and others.

Type 'help;' or '\h' for help. Type '\c' to clear the current input statement.

MariaDB [(none)]> show databases;
+--------------------+
| Database           |
+--------------------+
| information_schema |
| mysql              |
| performance_schema |
| test               |
+--------------------+
4 rows in set (0.001 sec)

MariaDB [(none)]>
创建wordpress数据库并授权
#1.创建wordpress数据库并创建wordpress使用的数据库和用户信息。
#其中wordpress创建的数据库名字为wordpress,用户名为wordpress,密码为123456
[root@mysql01 src]# mysql -uroot -p123456
Welcome to the MariaDB monitor.  Commands end with ; or \g.
Your MariaDB connection id is 5
Server version: 10.5.2-MariaDB MariaDB Server

Copyright (c) 2000, 2018, Oracle, MariaDB Corporation Ab and others.

Type 'help;' or '\h' for help. Type '\c' to clear the current input statement.

MariaDB [(none)]> show databases;
+--------------------+
| Database           |
+--------------------+
| information_schema |
| mysql              |
| performance_schema |
| test               |
+--------------------+
4 rows in set (0.001 sec)

MariaDB [(none)]> CREATE DATABASE wordpress;
Query OK, 1 row affected (0.001 sec)

MariaDB [(none)]> GRANT ALL PRIVILEGES ON wordpress.* TO "wordpress"@"192.168.20.%" IDENTIFIED BY "123456";
Query OK, 0 rows affected (0.002 sec)

MariaDB [(none)]> FLUSH PRIVILEGES;
Query OK, 0 rows affected (0.002 sec)

#2.从客户端远程测试访问数据库,连接正常:
[root@nginx02 ~]# mysql -uwordpress -p123456 -h192.168.20.50
Welcome to the MariaDB monitor.  Commands end with ; or \g.
Your MariaDB connection id is 7
Server version: 10.5.2-MariaDB MariaDB Server

Copyright (c) 2000, 2018, Oracle, MariaDB Corporation Ab and others.

Type 'help;' or '\h' for help. Type '\c' to clear the current input statement.

MariaDB [(none)]> show databases;
+--------------------+
| Database           |
+--------------------+
| information_schema |
| test               |
| wordpress          |
+--------------------+
3 rows in set (0.01 sec)
1.2.3 部署php-fpm
php源码包官方下载地址为https://www.php.net/downloads
编译安装PHP-FPM
#1.安装php的依赖包
[root@nginx02 ~]# yum -y install libxml2 libxml2-devel openssl openssl-devel curl curl-devel libpng libpng-devel freetype freetype-devel libmcrypt-devel libzip-devel pcre pcre-devel bzip2-devel libicu-devel gcc gcc-c++ autoconf libjpeg libjpeg-devel zlib zlib-devel glibc glibc-devel glib2 glib2-devel ncurses ncurses-devel krb5-devel libidn libidn-devel openldap openldap-devel nss_ldap jemalloc-devel cmake boost-devel bison automake libevent libevent-devel gd gd-devel libtool* libcrypt libcrypt-devel mcrypt mhash libxslt libxslt-devel readline readline-devel gmp gmp-devel libcurl libcurl-devel openjpeg-devel

#2.解压缩
[root@nginx02 ~]# cd /usr/local/src/
[root@nginx02 src]# ll
total 11832
-rw-r--r-- 1 root root 12113688 Apr  4  2020 php-7.3.16.tar.xz
[root@nginx02 src]# tar xf php-7.3.16.tar.xz

#3.指定编译安装选项:
[root@nginx02 php-7.3.16]# ./configure --prefix=/app/php --enable-fpm --with-fpm-user=nginx --with-fpm-group=nginx --with-pear --with-mysqli=mysqlnd --with-openssl --with-pdo-mysql=mysqlnd --enable-mbstring --with-freetype-dir --with-jpeg-dir --with-png-dir --with-zlib --with-libxml-dir=/usr --enable-xml --enable-sockets --with-curl --with-freetype-dir --with-iconv --disable-debug --with-mhash --with-xmlrpc --with-xsl  --enable-soap --enable-exif --enable-wddx --enable-bcmath --enable-calendar --enable-shmop --enable-sysvsem --enable-sysvshm --enable-syssvmsg

#4.编译安装
[root@nginx02 php-7.3.16]# make
[root@nginx02 php-7.3.16]# make install

#5.把php的二进制文件路径加入到$PATH变量中
[root@nginx02 php-fpm.d]# PATH=/app/php/sbin:$PATH
[root@nginx02 php-fpm.d]# echo "PATH=/app/php/sbin:$PATH" > /etc/profile.d/php.sh

#6.为php提供配置文件,在编译目录下复制一份到etc目录下,命名为php.ini,默认设置,除时区外,通常不需要修改
[root@nginx02 php-fpm.d]# cp /usr/local/src/php-7.3.16/php
[root@nginx02 php-fpm.d]# cp www.conf.default www.conf
[root@nginx02 php-fpm.d]# cp /usr/local/src/php-7.3.16/php.ini-production /app/php/etc/php.ini
[root@nginx02 etc]# cp php-fpm.conf.default php-fpm.conf

#7.修改php-fpm.d/www.conf配置文件的内容
[root@nginx02 etc]# grep -E "^[[:alnum:]]" /app/php/etc/php-fpm.d/www.conf
user = nginx
group = nginx
listen = 127.0.0.1:9000
listen.allowed_clients = 127.0.0.1
pm = dynamic
pm.max_children = 500
pm.start_servers = 100
pm.min_spare_servers = 100
pm.max_spare_servers = 200
pm.max_requests = 500000
pm.status_path = /pm_status
ping.path = /ping
ping.response = pong
access.log = log/$pool.access.log
slowlog = log/$pool.log.slow

#8.创建日志文件目录
[root@nginx02 etc]# mkdir /app/php/log
[root@nginx02 etc]# ll -d /app/php/log
drwxr-xr-x 2 root root 6 Jun 30 21:05 /app/php/log

#9.检测配置文件语法:
[root@nginx02 php]# php-fpm -t
[30-Jun-2021 21:07:22] NOTICE: configuration file /app/php/etc/php-fpm.conf test is successful

#10.启动php-fpm
[root@nginx02 php]# php-fpm -c /app/php/etc/php.ini

[root@nginx02 php]# ps -ef | grep php-fpm
root      57915      1  0 21:07 ?        00:00:00 php-fpm: master process (/app/php/etc/php-fpm.conf)
nginx     57916  57915  0 21:07 ?        00:00:00 php-fpm: pool www
......
测试php连接mysql:
#1.php连接mysql的测试脚本
[root@nginx02 ~]# vim /data/nginx/xuzhichao/mysql_test_connect.php
<?php
	$servername = "192.168.20.50";   <==数据库的主机名
	$username = "wordpress";         <==数据库的用户名
	$password = "123456";            <==数据库的密码


	$conn = mysqli_connect($servername, $username, $password);

	if (!$conn) {
		die("连接失败:" . mysqli_connect_error());
	}

	echo "php connection mysql successfuly";
?>

#2.直接使用php程序进行测试:
[root@nginx02 ~]# php /data/nginx/xuzhichao/mysql_test_connect.php
php connection mysql successfuly   <==连接成功
也可以使用浏览器直接访问测试:https://www.xuzhichao.com/mysql_test_connect.php

1.2.4 部署nginx
-
准备编译安装的基础环境
#安装编译工具 [root@nginx02 ~]# yum groupinstall "development tools" #安装nginx的依赖包 [root@nginx02 ~]# yum install pcre-devel openssl-devel zlib-devel pcre openssl zlib 说明: pcre,pcre-devel:nginx的rewrite模块需要使用pcre正则表达式的语法 zlib,zlib-devel:nginx的压缩功能需要此模块的支持 openssl,openssl-devel:nginx使用ssl时需要此模块的支持 -
官方源码包下载并解压
官方源码包的下载地址为:https://nginx.org/en/download.html
[root@nginx02 ~]# wget https://nginx.org/download/nginx-1.20.1.tar.gz [root@nginx02 ~]# ll -h nginx-1.20.1.tar.gz -rw-r--r-- 1 root root 1.1M May 25 23:34 nginx-1.20.1.tar.gz #解压 [root@nginx02 ~]# tar xf nginx-1.20.1.tar.gz [root@nginx02 ~]# ll nginx-1.20.1 -d drwxr-xr-x 8 xu1 xu1 158 May 25 20:35 nginx-1.20.1 -
创建nginx账号
[root@nginx02 ~]# useradd -r -s /sbin/nologin nginx [root@nginx02 ~]# id nginx uid=887(nginx) gid=887(nginx) groups=887(nginx) -
创建nginx安装目录并修改属主属组
[root@nginx02 ~]# mkdir /apps/nginx [root@nginx02 ~]# chown -R nginx:nginx /apps/nginx/ -
修改源码文件,隐藏版本信息
#1. '进入解压目录' [root@nginx02 ~]# cd nginx-1.20.1/ #2. '编辑如下文件,找到所示行' [root@nginx02 nginx-1.20.1]# vim src/core/nginx.h 版本信息 #define NGINX_VERSION "1.20.1" 服务名称 #define NGINX_VER "nginx/" NGINX_VERSION <==开启server_tokens服务器版本显示此信息 #3. '修改禁用服务信息后,头部信息' [root@nginx02 nginx-1.20.1]# vim src/http/ngx_http_header_filter_module.c #配置文件中修改禁止显示版本信息后,头部显示的Server内容 static u_char ngx_http_server_string[] = "Server: momo" CRLF; <==关闭server_tokens服务器版本显示此信息 -
编译,指定安装目录和启用的功能
[root@nginx02 nginx-1.20.1]# ./configure --prefix=/apps/nginx \ > --conf-path=/etc/nginx/nginx.conf \ > --sbin-path=/usr/sbin/nginx \ > --error-log-path=/var/log/nginx/error.log \ > --http-log-path=/var/log/nginx/access.log \ > --pid-path=/var/run/nginx.pid \ > --lock-path=/var/run/nginx.lock \ > --http-client-body-temp-path=/var/cache/nginx/client_temp \ > --http-proxy-temp-path=/var/cache/nginx/proxy_temp \ > --http-fastcgi-temp-path=/var/cache/nginx/fastcgi_temp \ > --http-uwsgi-temp-path=/var/cache/nginx/uwsgi_temp \ > --http-scgi-temp-path=/var/cache/nginx/scgi_temp \ > --user=nginx \ > --group=nginx \ > --with-http_ssl_module \ > --with-http_v2_module \ > --with-http_realip_module \ > --with-http_dav_module \ > --with-http_stub_status_module \ > --with-http_gzip_static_module \ > --with-pcre \ > --with-stream \ > --with-stream_ssl_module \ > --with-stream_realip_module \ > --with-file-aio -
编译
[root@nginx02 nginx-1.20.1]# make -
创建目录,将生成的模块和文件复制到对应的目录下
[root@nginx02 nginx-1.20.1]# make install -
查看编译安装的选项
[root@nginx02 nginx-1.20.1]# nginx -V nginx version: nginx/1.20.1 built by gcc 4.8.5 20150623 (Red Hat 4.8.5-39) (GCC) built with OpenSSL 1.0.2k-fips 26 Jan 2017 TLS SNI support enabled configure arguments: --prefix=/apps/nginx --conf-path=/etc/nginx/nginx.conf --sbin-path=/usr/sbin/nginx --error-log-path=/var/log/nginx/error.log --http-log-path=/var/log/nginx/access.log --pid-path=/var/run/nginx.pid --lock-path=/var/run/nginx.lock --http-client-body-temp-path=/var/cache/nginx/client_temp --http-proxy-temp-path=/var/cache/nginx/proxy_temp --http-fastcgi-temp-path=/var/cache/nginx/fastcgi_temp --http-uwsgi-temp-path=/var/cache/nginx/uwsgi_temp --http-scgi-temp-path=/var/cache/nginx/scgi_temp --user=nginx --group=nginx --with-http_ssl_module --with-http_v2_module --with-http_realip_module --with-http_dav_module --with-http_stub_status_module --with-http_gzip_static_module --with-pcre --with-stream --with-stream_ssl_module --with-stream_realip_module --with-file-aio -
编译安装的nginx无法使用systemctl管理,如果想让systemctl管理,需要编写nginx的unit文件
[root@nginx02 nginx-1.20.1]# cat /usr/lib/systemd/system/nginx.service [Unit] Description=nginx - high performance web server Documentation=http://nginx.org/en/docs/ After=network-online.target remote-fs.target nss-lookup.target Wants=network-online.target [Service] Type=forking PIDFile=/var/run/nginx.pid ExecStartPre=/usr/sbin/nginx -t ExecStart=/usr/sbin/nginx -c /etc/nginx/nginx.conf ExecReload=/bin/sh -c "/bin/kill -s HUP $(/bin/cat /var/run/nginx.pid)" ExecStop=/bin/sh -c "/bin/kill -s TERM $(/bin/cat /var/run/nginx.pid)" [Install] WantedBy=multi-user.target -
使用systemctl管理nginx
[root@nginx02 nginx-1.20.1]# systemctl daemon-reload [root@nginx02 nginx-1.20.1]# systemctl start nginx [root@nginx02 nginx-1.20.1]# systemctl status nginx ● nginx.service - nginx - high performance web server Loaded: loaded (/usr/lib/systemd/system/nginx.service; disabled; vendor preset: disabled) Active: active (running) since Sun 2021-06-13 12:11:42 CST; 6s ago Docs: http://nginx.org/en/docs/ Process: 20143 ExecStart=/usr/sbin/nginx -c /etc/nginx/nginx.conf (code=exited, status=0/SUCCESS) Process: 20142 ExecStartPre=/usr/sbin/nginx -t (code=exited, status=0/SUCCESS) Main PID: 20146 (nginx) CGroup: /system.slice/nginx.service ├─20146 nginx: master process /usr/sbin/nginx -c /etc/nginx/nginx.conf └─20147 nginx: worker process -
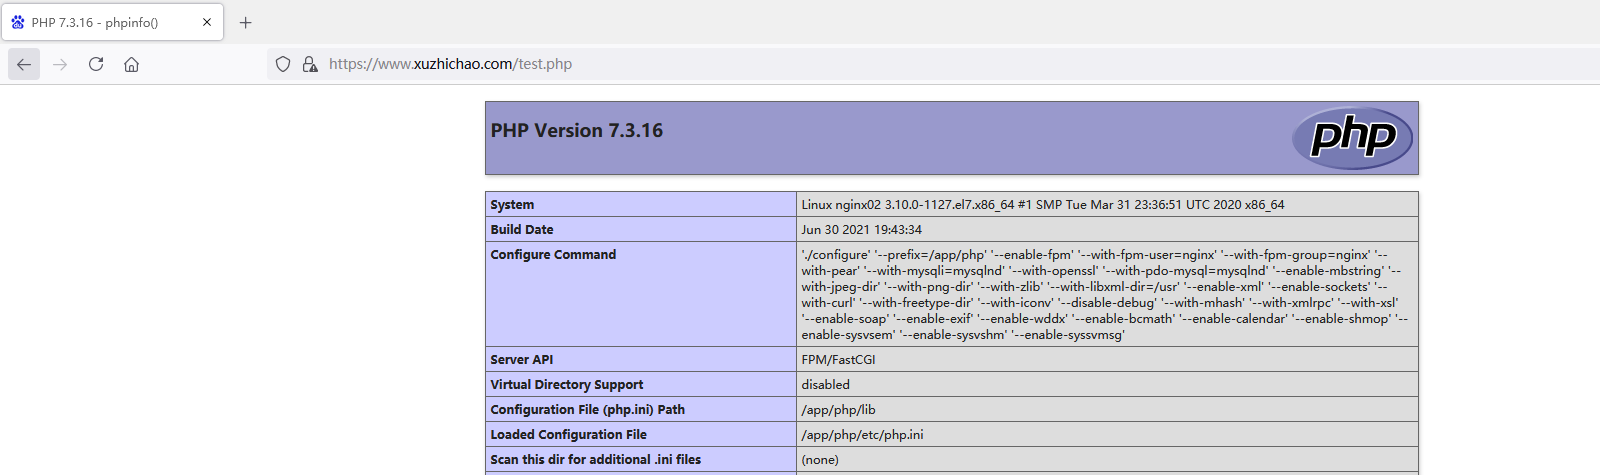
准备PHP测试页:
[root@nginx02 nginx]# vim /data/nginx/xuzhichao/test.php <?php phpinfo(); ?> -
HTTPS的自签名证书
[root@nginx02 nginx]# mkdir /apps/nginx/certs [root@nginx02 nginx]# cd /apps/nginx/certs #生成CA自签名证书 [root@nginx02 certs]# openssl req -newkey rsa:4096 -nodes -sha256 -keyout ca.key -x509 -days 3650 -out ca.crt Generating a 4096 bit RSA private key ....................................................................................................++ .................++ writing new private key to 'ca.key' ----- You are about to be asked to enter information that will be incorporated into your certificate request. What you are about to enter is what is called a Distinguished Name or a DN. There are quite a few fields but you can leave some blank For some fields there will be a default value, If you enter '.', the field will be left blank. ----- Country Name (2 letter code) [XX]:CN State or Province Name (full name) []:henan Locality Name (eg, city) [Default City]:zhengzhou Organization Name (eg, company) [Default Company Ltd]:maipu Organizational Unit Name (eg, section) []:devops Common Name (eg, your name or your server's hostname) []:xuzhichao.ca Email Address []: [root@nginx02 certs]# ll total 8 -rw-r--r-- 1 root root 2017 Jun 30 21:31 ca.crt -rw-r--r-- 1 root root 3268 Jun 30 21:31 ca.key #生成私钥和证书请求文件 [root@nginx02 certs]# openssl req -newkey rsa:4096 -nodes -sha256 -keyout www.xuzhichao.com.key -out www.xuzhichao.com.csr Generating a 4096 bit RSA private key .................++ ...++ writing new private key to 'www.xuzhichao.com.key' ----- You are about to be asked to enter information that will be incorporated into your certificate request. What you are about to enter is what is called a Distinguished Name or a DN. There are quite a few fields but you can leave some blank For some fields there will be a default value, If you enter '.', the field will be left blank. ----- Country Name (2 letter code) [XX]:CN State or Province Name (full name) []:henan Locality Name (eg, city) [Default City]:zhengzhou Organization Name (eg, company) [Default Company Ltd]:maipu Organizational Unit Name (eg, section) []:devops Common Name (eg, your name or your server's hostname) []:www.xuzhichao.com Email Address []: Please enter the following 'extra' attributes to be sent with your certificate request A challenge password []: An optional company name []: [root@nginx02 certs]# ll total 16 -rw-r--r-- 1 root root 2017 Jun 30 21:31 ca.crt -rw-r--r-- 1 root root 3268 Jun 30 21:31 ca.key -rw-r--r-- 1 root root 1708 Jun 30 21:37 www.xuzhichao.com.csr -rw-r--r-- 1 root root 3272 Jun 30 21:37 www.xuzhichao.com.key [root@nginx02 certs]# openssl x509 -req -days 3650 -in www.xuzhichao.com.csr -CA ca.crt ca.key www.xuzhichao.com.csr www.xuzhichao.com.key #CA签发证书 [root@nginx02 certs]# openssl x509 -req -days 3650 -in www.xuzhichao.com.csr -CA ca.crt -CAkey ca.key -CAcreateserial -out www.xuzhichao.com.crt Signature ok subject=/C=CN/ST=henan/L=zhengzhou/O=maipu/OU=devops/CN=www.xuzhichao.com Getting CA Private Key [root@nginx02 certs]# ll total 24 -rw-r--r-- 1 root root 2017 Jun 30 21:31 ca.crt -rw-r--r-- 1 root root 3268 Jun 30 21:31 ca.key -rw-r--r-- 1 root root 17 Jun 30 21:38 ca.srl -rw-r--r-- 1 root root 1907 Jun 30 21:38 www.xuzhichao.com.crt -rw-r--r-- 1 root root 1708 Jun 30 21:37 www.xuzhichao.com.csr -rw-r--r-- 1 root root 3272 Jun 30 21:37 www.xuzhichao.com.key -
nginx的配置文件如下:
[root@nginx02 xuzhichao]# cat /etc/nginx/nginx.conf http { include mime.types; default_type application/octet-stream; log_format access_json '{ "@timestamp": "$time_iso8601", ' '"remote_addr": "$proxy_add_x_forwarded_for", ' '"referer": "$http_referer", ' '"request": "$request", ' '"status": $status, ' '"bytes":$body_bytes_sent, ' '"agent": "$http_user_agent", ' '"x_forwarded": "$http_x_forwarded_for", ' '"upstr_addr": "$upstream_addr",' '"upstr_host": "$upstream_http_host",' '"upstreamtime": "$upstream_response_time" }'; server_tokens off; fastcgi_cache_path /data/nginx/fastcgi_cache levels=1:1:1 keys_zone=fastcgi_cache:250m inactive=10m max_size=1g; sendfile on; ...... } [root@nginx02 xuzhichao]# cat /etc/nginx/conf.d/xuzhichao.conf server { listen 80; listen 443 ssl; server_name www.xuzhichao.com; access_log /var/log/nginx/access_xuzhichao.log access_json; charset utf-8,gbk; #SSL配置 ssl_certificate_key /apps/nginx/certs/www.xuzhichao.com.key; ssl_certificate /apps/nginx/certs/www.xuzhichao.com.crt; ssl_session_cache shared:ssl_cache:20m; ssl_session_timeout 10m; ssl_protocols TLSv1 TLSv1.1 TLSv1.2; keepalive_timeout 65; #防盗链 valid_referers none blocked server_names *.b.com b.* ~\.baidu\. ~\.google\.; if ( $invalid_referer ) { return 403; } #设置上传到nginx服务器的文件的最大值为 client_max_body_size 10m; #浏览器图标 location = /favicon.ico { root /data/nginx/xuzhichao; } location / { root /data/nginx/xuzhichao; index index.html index.php; #http自动跳转https if ($scheme = http) { rewrite ^/(.*)$ https://www.xuzhichao.com/$1; } } location ~ \.php$ { root /data/nginx/xuzhichao; #http自动跳转https if ($scheme = http) { rewrite ^/(.*)\.php$ https://www.xuzhichao.com/$1.php; } #fastcgi反向代理 fastcgi_pass 127.0.0.1:9000; fastcgi_index index.php; fastcgi_param SCRIPT_FILENAME $document_root$fastcgi_script_name; fastcgi_param HTTPS on; <==fastcgi兼容HTTPS的配置 fastcgi_hide_header X-Powered-By; <==隐藏后端php版本信息。 include fastcgi_params; #fastcgi缓存 fastcgi_cache fastcgi_cache; fastcgi_cache_key $request_uri; fastcgi_cache_methods GET HEAD; fastcgi_cache_valid 200 301 302 30m; fastcgi_cache_valid any 5m; fastcgi_cache_min_uses 1; fastcgi_keep_conn on; } location ~ ^/(ping|pm_status)$ { access_log off; allow 192.168.20.0/24; deny all; fastcgi_pass 127.0.0.1:9000; fastcgi_param SCRIPT_FILENAME $fastcgi_script_name; include fastcgi_params; } location = /nginx_status { access_log off; allow 192.168.20.0/24; deny all; stub_status; } } #重启nginx [root@nginx02 xuzhichao]# systemctl reload nginx.service #下载favicon.ico文件: [root@nginx02 ~]# cd /data/nginx/xuzhichao/ [root@nginx02 xuzhichao]# wget https://www.baidu.com/favicon.ico -
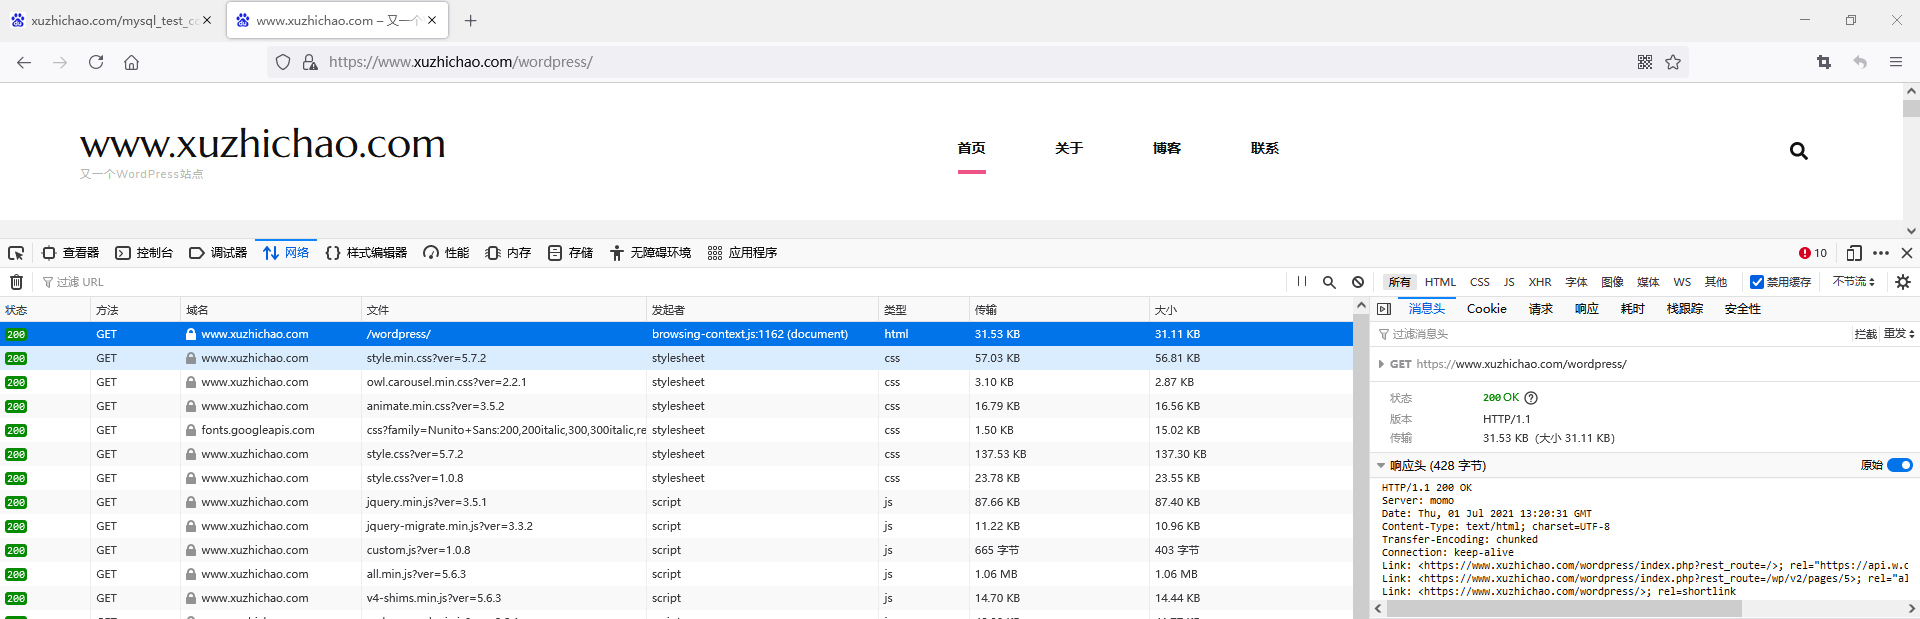
客户端访问测试:
使用http访问自动跳转到https
1.2.5 部署wordpress
#1.解压文件:
[root@nginx02 xuzhichao]# tar xf wordpress-5.7.2-zh_CN.tar.gz -C /data/nginx/xuzhichao/

#2.修改文件权限:
[root@nginx02 xuzhichao]# chown nginx.nginx /data/nginx/

#3.复制配置文件并修改连接的数据库信息,需要和上节中数据库创建的信息保持一致:
[root@nginx02 xuzhichao]# cp wordpress/wp-config-sample.php wordpress/wp-config.php
......
/** The name of the database for WordPress */
define( 'DB_NAME', 'wordpress' );   <==wordpress数据库名称

/** MySQL database username */
define( 'DB_USER', 'wordpress' );   <==wordpress连接数据库用户名

/** MySQL database password */
define( 'DB_PASSWORD', '123456' );   <==wordpress连接数据库密码

/** MySQL hostname */
define( 'DB_HOST', '192.168.20.50' );  <==wordpress数据库所在的主机地址

/** Database Charset to use in creating database tables. */
define( 'DB_CHARSET', 'utf8' );

/** The Database Collate type. Don't change this if in doubt. */
define( 'DB_COLLATE', '' );
......
客户端访问https://www.xuzhichao.com/wordpress
初始化wordpress:
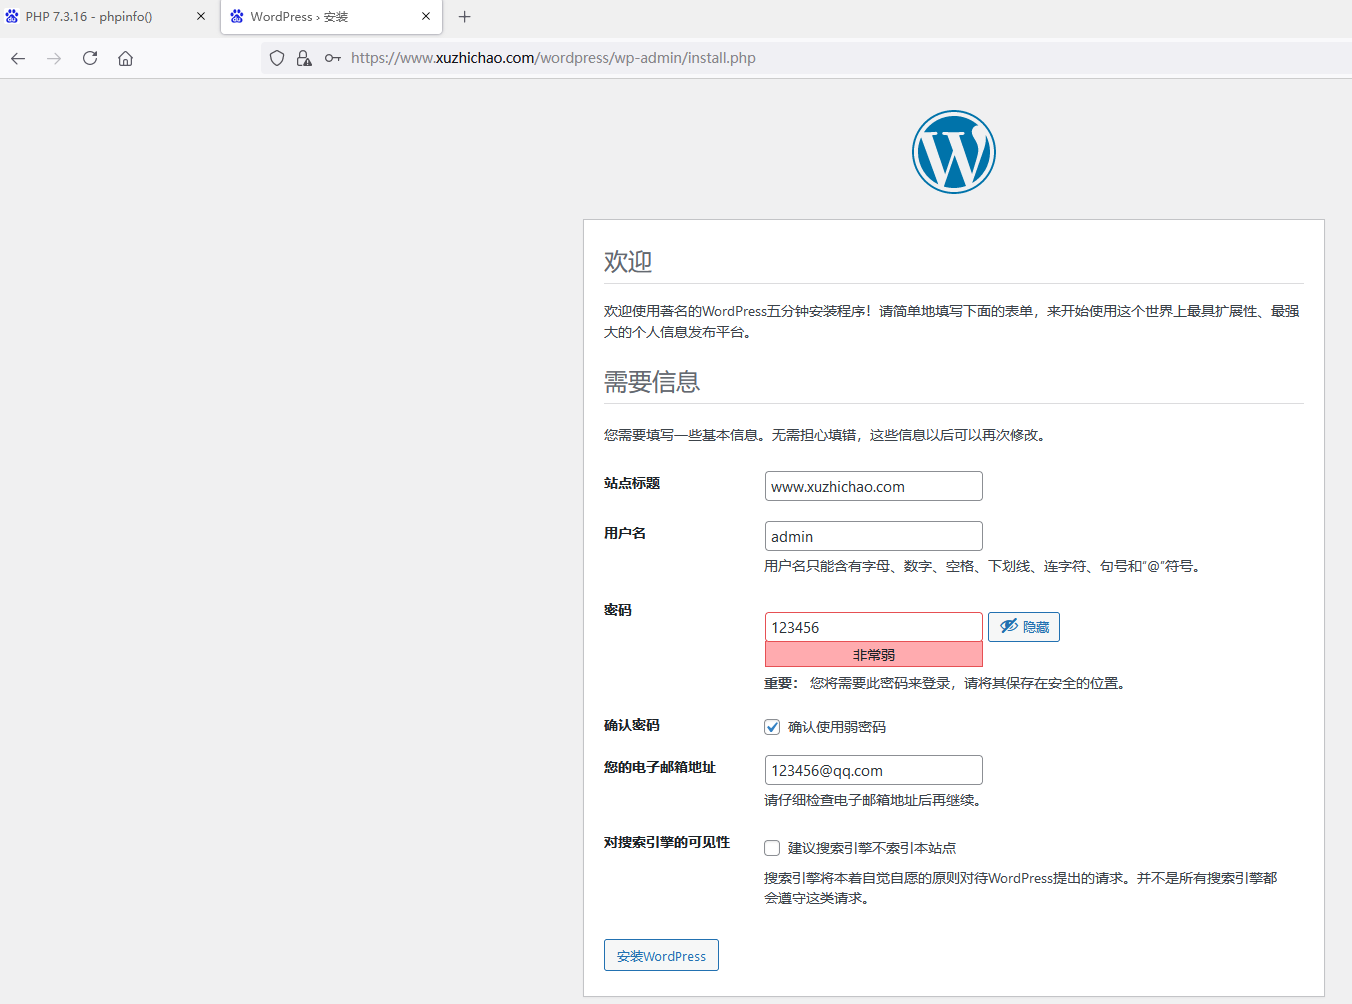
点击“安装wordpress”
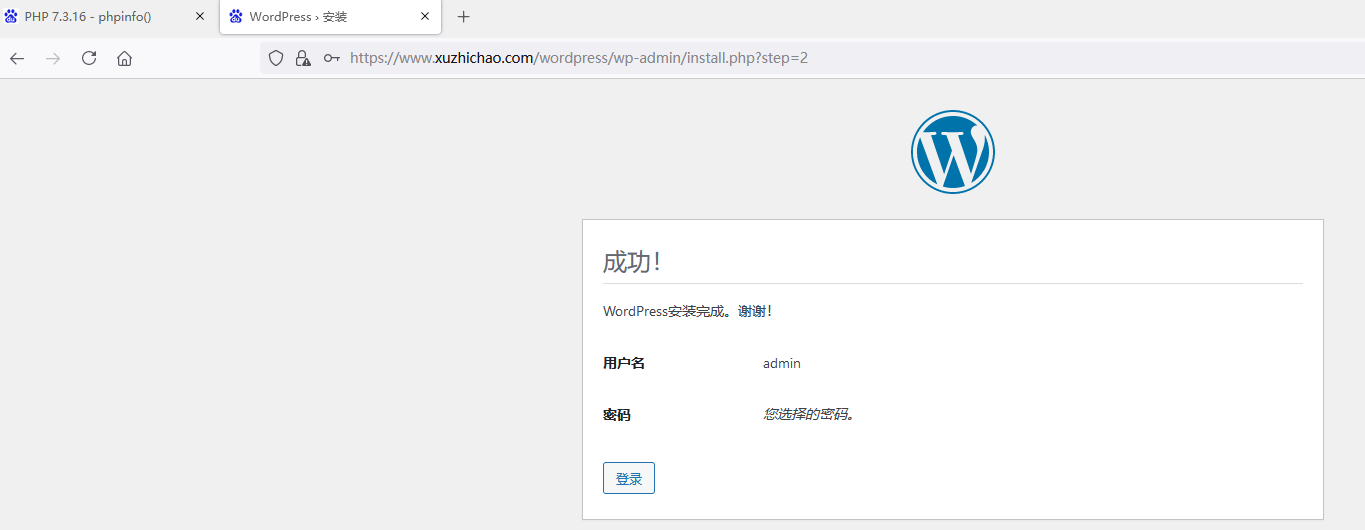
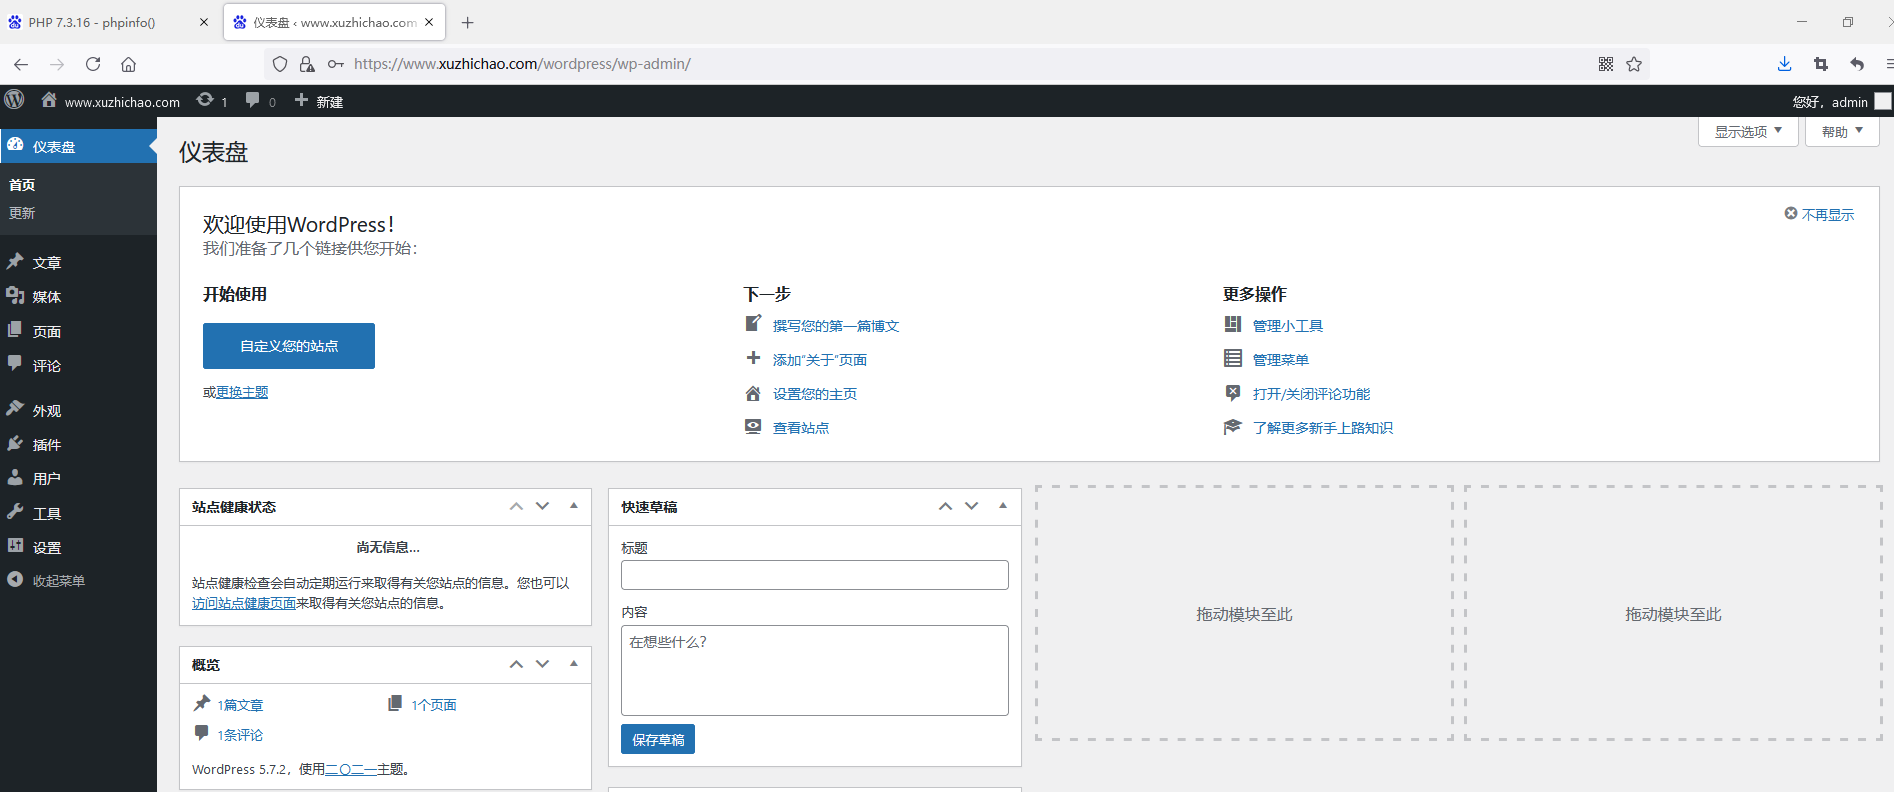
点击“登录”

输入用户名密码后,点击“登录”,进入后台页面:
查看数据库中创建的信息:
[root@mysql01 src]# mysql -uroot -p123456
Welcome to the MariaDB monitor.  Commands end with ; or \g.
Your MariaDB connection id is 87
Server version: 10.5.2-MariaDB MariaDB Server

Copyright (c) 2000, 2018, Oracle, MariaDB Corporation Ab and others.

Type 'help;' or '\h' for help. Type '\c' to clear the current input statement.

MariaDB [(none)]> use wordpress;
Reading table information for completion of table and column names
You can turn off this feature to get a quicker startup with -A

Database changed
MariaDB [wordpress]> show tables;
+-----------------------+
| Tables_in_wordpress   |
+-----------------------+
| wp_commentmeta        |
| wp_comments           |
| wp_links              |
| wp_options            |
| wp_postmeta           |
| wp_posts              |
| wp_term_relationships |
| wp_term_taxonomy      |
| wp_termmeta           |
| wp_terms              |
| wp_usermeta           |
| wp_users              |
+-----------------------+
12 rows in set (0.000 sec)
隐藏nginx和php版本:
1.2.6 NFS部署
wordpress站点中用户上传的图片都放在了wordpress/wp-content/uploads/目录下,需要对该目录挂载NFS服务器。注意:upload目录默认没有创建,只有上传完图片才会自动创建。
NFS服务相关配置如下:
#1.安装NFS软件包:
[root@nfs-30 ~]# yum install nfs-utils.x86_64 -y

#2.在NFS服务器上建立/data/wordpress目录,用于nginx主机的uploads/目录进行挂载,需要注意:nginx主机的wordpress目录属主属组为nginx用户,NFS服务器上的/data/wordpress目录的属主属组需要和nginx服务器中的nginx用户的uid保持一致,而且NFS服务器也要把nginx服务器上的用户压缩了nginx。
#查看nginx服务器中nginx用户的UID
[root@nginx02 ~]# id nginx
uid=887(nginx) gid=887(nginx) groups=887(nginx)

#在NFS服务器上创建同样uid的nginx用户
[root@nfs01 ~]# groupadd -g 887 nginx
[root@nfs01 ~]# useradd -u 887 -r -s /sbin/nologin -g 887 nginx
[root@nfs01 ~]# id nginx
uid=887(nginx) gid=887(nginx) groups=887(nginx)

#修改/data/wordpress目录的属主属组为nginx
[root@nfs01 ~]# mkdir /data/wordpress
[root@nfs01 ~]# chown -R nginx.nginx /data/wordpress/

#3.编辑NFS配置文件,允许nginx服务器以读写方式挂载目录使用,并且用户同意压缩为nginx用户
[root@nfs01 ~]# vim /etc/exports
/data/wordpress 192.168.20.0/24(rw,all_squash,anonuid=887,anongid=887)

#4.重启NFS服务:
[root@nfs01 ~]# systemctl reload nfs-server.service
在nginx02主机上进行挂载使用:
#1.在nginx02上测试NFS服务器是否可用:
[root@nginx02 ~]# showmount -e 192.168.20.30
Export list for 192.168.20.30:
/data/wordpress 192.168.20.0/24

#2.把nginx02的upload目录下的内容拷贝到NFS服务器中
[root@nginx02 ~]# scp -rp /data/nginx/xuzhichao/wordpress/wp-content/uploads/* 192.168.20.30:/data/wordpress
[root@nfs01 ~]# tree /data/wordpress/
/data/wordpress/
└── 2021
    └── 06
        └── \345\233\276\345\203\217-2021-05-15-23-28-001.png

#3.nginx02主机编写/etc/fstab文件:
[root@nginx02 ~]# cat /etc/fstab
192.168.20.30:/data/wordpress 	/data/nginx/xuzhichao/wordpress/wp-content/uploads nfs nosuid,noexec,nodev 0 0

#测试挂载:
[root@nginx02 ~]# mount -a

#查看挂载信息
[root@nginx02 ~]# df
Filesystem                    1K-blocks    Used Available Use% Mounted on
192.168.20.30:/data/wordpress 154057344   33152 154024192   1% /data/nginx/xuzhichao/wordpress/wp-content/uploads

[root@nginx02 ~]# mount
192.168.20.30:/data/wordpress on /data/nginx/xuzhichao/wordpress/wp-content/uploads type nfs4 (rw,nosuid,nodev,noexec,relatime,vers=4.1,rsize=131072,wsize=131072,namlen=255,hard,proto=tcp,timeo=600,retrans=2,sec=sys,clientaddr=192.168.20.22,local_lock=none,addr=192.168.20.30)

#4.查看目录下的内容:
[root@nginx02 ~]# tree /data/nginx/xuzhichao/wordpress/wp-content/uploads
/data/nginx/xuzhichao/wordpress/wp-content/uploads
└── 2021
    └── 06
        └── \345\233\276\345\203\217-2021-05-15-23-28-001.png
原文地址:https://www.cnblogs.com/xuwymm/p/14970165.html
版权声明:本文内容由互联网用户自发贡献,该文观点与技术仅代表作者本人。本站仅提供信息存储空间服务,不拥有所有权,不承担相关法律责任。如发现本站有涉嫌侵权/违法违规的内容, 请发送邮件至 dio@foxmail.com 举报,一经查实,本站将立刻删除。