
Websocket 和 Http
WebSocket 是 HTML5 出的东西(协议),也就是说HTTP协议没有变化,或者说没关系,但HTTP是不支持持久连接的(长连接,循环连接的不算)
首先HTTP有 1.1 和 1.0 之说,也就是所谓的 keep-alive ,把多个HTTP请求合并为一个,但是 Websocket 其实是一个新协议,跟HTTP协议基本没有关系,只是为了兼容现有浏览器的握手规范而已,也就是说它是HTTP协议上的一种补充可以通过这样一张图理解:
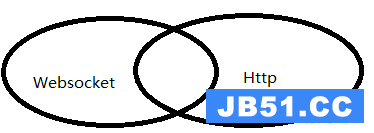
有交集,但是并不是全部
GET /chat HTTP/1.1
Host: server.example.com
Upgrade: websocket
Connection: Upgrade
Sec-WebSocket-Key: x3JJHMbDL1EzLkh9GBhXDw==
Sec-WebSocket-Protocol: chat, superchat
Sec-WebSocket-Version: 13
Origin: http://example.com
服务器端 flask_sockets
flask实现 websocket 的两种方式
第一种是 flask_sockets 方式,该方式是flask对websocket的最原始封装,功能较为单一。
第二种方式 Flask-SocketIO 对 websocket 的封装,该方式所能提供功能较多,不但实现了socket的基本通信功能,也可以结合flask相关接口,使其更加完备,因此网上对该api介绍也较多。
flask_sockets 实现介绍
@sockets.route('/echo')
def echo_socket(ws):
    print("connection start")
    while not ws.closed:
        msg = ws.receive() # 同步阻塞
        print(msg)
        now = datetime.datetime.now().isoformat()
        ws.send(now)  # 发送数据
        time.sleep(1)
客户端发送数据实现
<button onclick="send()">发送</button>


var ws = new WebSocket("ws://127.0.0.1:8080/echo")
ws.onmessage = function (event) {
    console.log(event.data)
};

function send(){
    ws.send("hello world")
}
服务器端完整代码展示
from flask import Flask
from flask_sockets import Sockets
import datetime

app = Flask(__name__)
sockets = Sockets(app)

from flask_cors import *
CORS(app, supports_credentials=True)

@sockets.route('/echo')
def echo_socket(ws):
    print("hello")
    while not ws.closed:
        msg = ws.receive()
        print(msg)
        now = datetime.datetime.now().isoformat()
        ws.send(now)  #发送数据

@app.route('/')
def hello_world():
    return 'Hello World!'

if __name__ == "__main__":
    from gevent import pywsgi
    from geventwebsocket.handler import WebSocketHandler
    server = pywsgi.WSGIServer(('0.0.0.0', 8080), app, handler_class=WebSocketHandler)
    print('server start')
    server.serve_forever()
var ws = new WebSocket("ws://127.0.0.1:8080/echo")
ws.onmessage = function (event) {
    console.log(event.data)
}
ws.onopen = function() {
    console.log("start connection")
}
ws.onclose = function(e){
    console.log("connection closed (" + e.code + ")");
}
服务器端 Flask-SocketIO
debug的好处:已经run过的程序,Ctrl+S,保存一下,自动重启,(节省时间,提高效率)
可以分为开发模式,和生产模式;在程序员自己写代码的时候,即 app.run(debug=True),写完程序,递交项目最终成果时,要将其关闭,即 app.run()
from flask import Flask, render_template
from flask_socketio import SocketIO, emit

app = Flask(__name__)
app.config['SECRET_KEY'] = 'secret_key'

socketio = SocketIO()
socketio.init_app(app, cors_allowed_origins='*')

name_space = '/echo'

@app.route('/')
def index():
    return render_template('index.html')

@app.route('/push')
def push_once():
    event_name = 'echo'
    broadcasted_data = {'data': "test message!"}
    # 设置广播数据
    socketio.emit(event_name, broadcasted_data, broadcast=False, namespace=name_space)
    return 'done!'

@socketio.on('connect', namespace=name_space)
def connected_msg():
    print('client connected.')

@socketio.on('disconnect', namespace=name_space)
def disconnect_msg():
    print('client disconnected.')

@socketio.on('my_event', namespace=name_space)
def mtest_message(message):
    print(message)
    emit('my_response', {'data': message['data'], 'count': 1})

if __name__ == '__main__':
    socketio.run(app, host='0.0.0.0', port=5000)
客户端的实现:
<div id="data_show"></div>

<script>
$(document).ready(function () {
    namespace = '/echo';
    var socket = io.connect(location.protocol + '//' + document.domain + ':' + location.port + namespace);
    socket.on('echo', function (res) {
        var data_show = res.data;
        if (data_show) {
            $("#data_show").append(data_show).append('<br/>');
        }
    });
});
</script>
socketio 中的 namespace 的概念
如果希望服务端发送的信息在所有客户端都能收到,那么使用默认的namespace / 就好了。但是如果想把发送信息的服务器作为第三方应用给不同客户端使用,就需要为每一个客户端定义一个namespace.
跨域问题的解决方案:

采用 flask_cors 进行解决跨域问题
socketio = SocketIO(app, cors_allowed_origins='*')
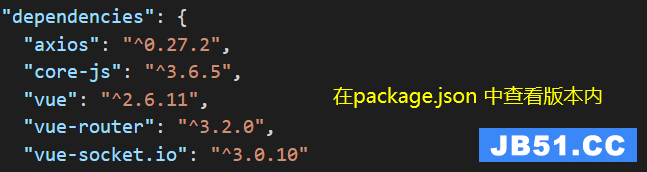
版本不兼容问题:
pip list 查看 服务器端 Flask-SocketIO 版本

查看 vue 客户端的 socketIO 版本
Vue 使用 socket.io
通过最近一系列的踩坑之后,总结出了这篇相对较为完善的关于vue-socket.io的使用文章,包含大家困扰的(socket连接、断开重连,以及当连接的地址是动态的情况下,我们应该注意的事项。
如何安装 socket.io
npm install vue-socket.io --save
第一种:引用 socket.io,在组件中直接引入
import io from 'socket.io-client'
第二种:引用 socket.io,在 main.js 中直接这样写
import VueSocketIO from 'vue-socket.io'

Vue.use(new VueSocketIO({
    debug: true,
    connection: 'ws://localhost:5000/echo',  //
}))
这里要提示的一点就是,当连接的地址是动态的,代码的执行顺序就很重要了,即 new VueSocket 在main.js中的位置
如何进行建立 socket.io 连接
在 html 中直接实现:
 <html lang="en">

<head>
    <meta charset="UTF-8">
    <meta http-equiv="X-UA-Compatible" content="IE=edge">
    <meta name="viewport" content="width=device-width,initial-scale=1.0">
    <script src="https://cdn.bootcdn.net/ajax/libs/socket.io/4.4.1/socket.io.min.js"></script>
    <title>socket.io</title>
</head>
    <button onclick="send()">发送信息</button>
<body>
    <script>
        var socket = null
        function initWebSocket() {
            socket = io.connect('ws://localhost:5000/echo', {
                timeout: 300000,
                reconnectionDelayMax: 1000,
                reconnectionDelay: 500
            })
            socket.on('connect', () => {
                console.log('建立链接')
                socket.emit('message', { 'data': 'I\'m connected!' })
            })
            socket.on('disconnect', () => {
                console.log('连接断开')
                socket.emit('message', { 'data': 'I\'m disconnected!' });
            })
            socket.on('card message', msg => {
                // 接受数据
            })
            socket.on('error message', msg => {
                console.log('error:' + msg)

            })
        }
        function send(){
            socket.emit('message', { 'data': 'I\'m disconnected!' })
        }

        initWebSocket()
    </script>
</body>

</html>
在 Vue 组件 中直接实现:
initWebSocket () {
	this.socket = null
	this.socket = io.connect('ws://localhost:5000/namespace', {
		timeout: 300000,
		reconnectionDelayMax: 1000,
		reconnectionDelay: 500
	})
	this.socket.on('connect', () => {
		console.log('建立链接')
		this.socket.emit(传参)
	})
	this.socket.on('disconnect', () => {
		console.log('连接断开')
	})
	this.socket.on('card message', msg => {
	 	// 接受数据
	})
	this.socket.on('error message', msg => {
		console.log('error:' + msg)
	})
}
网页客户端实现
首先看下四个方法
onclose: ((this: WebSocket, ev: CloseEvent) => any) | null;

onerror: ((this: WebSocket, ev: Event) => any) | null;

onmessage: ((this: WebSocket, ev: MessageEvent) => any) | null;

onopen: ((this: WebSocket, ev: Event) => any) | null;
建立 ws 对象,绑定 onmessage 方法进行接受服务器端传来的数据
var ws = new WebSocket("ws://127.0.0.1:8080/echo")

ws.onmessage = function (event) {
    console.log(event.data)
};

ws.onopen = function() {
   console.log("start connection")
};

ws.onclose = function(e){
   console.log("connection closed (" + e.code + ")");
};
BootCDN 稳定、快速、免费的前端开源项目 CDN 加速服务
https://cdn.bootcdn.net/ajax/libs/socket.io/4.4.1/socket.io.esm.min.js

<script src="https://cdn.bootcdn.net/ajax/libs/socket.io/4.4.1/socket.io.esm.min.js"></script>
常见问题报错解决方案
ImportError 无法导入 ContextVar 包
ImportError: cannot import name ‘ContextVar’
pip uninstall flask
# 卸载  你也可以省略这步,直接pip install flask==1.0
pip install flask==1.0
# 我这里改成1.0就行了,改成其他低版本应该也没问题,有兴趣自己试下
关于 Werkzeug 缺失,或者版本过低问题
werkzeug.routing.WebsocketMismatch: 400 Bad Request: The browser (or proxy) sent a request that this server could not understand.
2022-04-27T12:31:24Z { REMOTE_ADDR : 127.0.0.1,REMOTE_PORT : 63825,HTTP_HOST : 127.0.0.1:8080,(hidden keys: 30)} failed with WebsocketMismatch
pip install Werkzeug==1.0.1 -i https://mirrors.aliyun.com/pypi/simple/
flask 缺少 Werkzeug,或者 Werkzeug 版本不兼容 flask 等问题
flask 2.0.2 requires Werkzeug>=2.0,but you have werkzeug 1.0.1 which is incompatible.
关于客户端的 socket 和 flask 端的 socket 版本不兼容
The client is using an unsupported version of the Socket.IO or Engine.IO protocols (further occurrences of this error will be logged with level INFO)
版权声明:本文内容由互联网用户自发贡献,该文观点与技术仅代表作者本人。本站仅提供信息存储空间服务,不拥有所有权,不承担相关法律责任。如发现本站有涉嫌侵权/违法违规的内容, 请发送邮件至 dio@foxmail.com 举报,一经查实,本站将立刻删除。