
前言
在Path在UI体系当中不论是在自定义View还是动画,都占有举足轻重的地位。绘制Path,可以通过Android提供的API,或者是贝塞尔曲线、数学函数、图形组合等等方式,而要获取Path上每一个构成点的坐标,一般需要知道Path的函数方法,例如求解贝塞尔曲线上的点的De Casteljau算法,但对于一般的Path来说,是很难通过简单的函数方法来进行计算的,那么,今天需要了解的就是PathMeasure,关于Path测量的运用
PathMeasure
今天需要了解的API非常简单,关于Path的测量,我们首先来看一些效果


这种load效果我们经常在项目当中遇见,那么其中有一部分效果是通过测量Path来进行实现的
那么首先我们来看到PathMeasure这个类,那么具体API详细介绍我就列入到下面,今天最主要的核心是,掌握这个类的使用技巧,而不是死板的API,那么我们来首先先看下这个类当中的API
公共方法
    返回值                       方法名
    void setPath(Path path,boolean forceClosed) 关联一个Path
    boolean isClosed()       是否闭合
    float getLength()   获取Path的长度
    boolean nextContour()   跳转到下一个轮廓
    boolean getSegment(float startD,float stopD,Path dst,boolean startWithMoveTo)    截取片段
    boolean getPosTan(float distance,float[] pos,float[] tan) 获取指定长度的位置坐标及该点切线值
    boolean getMatrix(float distance,Matrix matrix,int flags) 获取指定长度的位置坐标        及该点Matrix
源码
public class PathMeasure {
private Path mPath;

/**
 * Create an empty PathMeasure object. To uses this to measure the length
 * of a path,and/or to find the position and tangent along it,call
 * setPath.
 *  创建一个空的PathMeasure
 *用这个构造函数可创建一个空的 PathMeasure,
 * 但是使用之前需要先调用 setPath 方法来与 Path 进行关联。
 * 被关联的 Path 必须是已经创建好的,
 * 如果关联之后 Path 内容进行了更改,
 * 则需要使用 setPath 方法重新关联。
 * Note that once a path is associated with the measure object,it is
 * undefined if the path is subsequently modified and the the measure object
 * is used. If the path is modified,you must call setPath with the path.
 */
public PathMeasure() {
    mPath = null;
    native_instance = native_create(0,false);
}

/**
 * Create a PathMeasure object associated with the specified path object
 * (already created and specified). The measure object can now return the
 * path's length,and the position and tangent of any position along the
 * path.
 *
 * Note that once a path is associated with the measure object,you must call setPath with the path.
 * 创建 PathMeasure 并关联一个指定的Path(Path需要已经创建完成)。
 * 用这个构造函数是创建一个 PathMeasure 并关联一个 Path,
 * 其实和创建一个空的 PathMeasure 后调用 setPath 进行关联效果是一样的,
 * 同样,被关联的 Path 也必须是已经创建好的,如果关联之后 Path 内容进行了更改,
 * 则需要使用 setPath 方法重新关联。
 *该方法有两个参数,第一个参数自然就是被关联的 Path 了,
 * 第二个参数是用来确保 Path 闭合,如果设置为 true,
 * 则不论之前Path是否闭合,都会自动闭合该 Path(如果Path可以闭合的话)。
 * 在这里有两点需要明确:
 * 1.不论 forceClosed 设置为何种状态(true 或者 false),
 * 都不会影响原有Path的状态,即 Path 与 PathMeasure 关联之后,之前的的 Path 不会有任何改变。
 * 2.forceClosed 的设置状态可能会影响测量结果,
 * 如果 Path 未闭合但在与 PathMeasure 关联的时候设置 forceClosed 为 true 时,
 * 测量结果可能会比 Path 实际长度稍长一点,获取到到是该 Path 闭合时的状态。
 * @param path The path that will be measured by this object 被关联的Path
 * @param forceClosed If true,then the path will be considered as "closed"
 *        even if its contour was not explicitly closed.
 */
public PathMeasure(Path path,boolean forceClosed) {
    // The native implementation does not copy the path,prevent it from being GC'd
    mPath = path;
    native_instance = native_create(path != null ? path.readOnlyNI() : 0,forceClosed);
}

/**
 * Assign a new path,or null to have none.
 *  关联一个Path
 */
public void setPath(Path path,boolean forceClosed) {
    mPath = path;
    native_setPath(native_instance,path != null ? path.readOnlyNI() : 0,forceClosed);
}

/**
 * Return the total length of the current contour,or 0 if no path is
 * associated with this measure object.
 * 返回当前轮廓的总长度,或者如果没有路径,则返回0。与此度量对象相关联。
 */
public float getLength() {
    return native_getLength(native_instance);
}

/**
 * Pins distance to 0 <= distance <= getLength(),and then computes the
 * corresponding position and tangent. Returns false if there is no path,* or a zero-length path was specified,in which case position and tangent
 * are unchanged.
 *  获取指定长度的位置坐标及该点切线值
 * @param distance The distance along the current contour to sample 位置
 * @param pos If not null,returns the sampled position (x==[0],y==[1]) 坐标值
 * @param tan If not null,returns the sampled tangent (x==[0],y==[1])  切线值
 * @return false if there was no path associated with this measure object
*/
public boolean getPosTan(float distance,float pos[],float tan[]) {
    if (pos != null && pos.length < 2 ||
        tan != null && tan.length < 2) {
        throw new ArrayIndexOutOfBoundsException();
    }
    return native_getPosTan(native_instance,distance,pos,tan);
}

public static final int POSITION_MATRIX_FLAG = 0x01;    // must match flags in SkPathMeasure.h
public static final int TANGENT_MATRIX_FLAG  = 0x02;    // must match flags in SkPathMeasure.h

/**
 * Pins distance to 0 <= distance <= getLength(),and then computes the
 * corresponding matrix. Returns false if there is no path,or a zero-length
 * path was specified,in which case matrix is unchanged.
 *
 * @param distance The distance along the associated path
 * @param matrix Allocated by the caller,this is set to the transformation
 *        associated with the position and tangent at the specified distance
 * @param flags Specified what aspects should be returned in the matrix.
 */
public boolean getMatrix(float distance,int flags) {
    return native_getMatrix(native_instance,matrix.native_instance,flags);
}

/**
 * Given a start and stop distance,return in dst the intervening
 * segment(s). If the segment is zero-length,return false,else return
 * true. startD and stopD are pinned to legal values (0..getLength()).
 * If startD >= stopD then return false (and leave dst untouched).
 * Begin the segment with a moveTo if startWithMoveTo is true.
 *
 * <p>On {@link android.os.Build.VERSION_CODES#KITKAT} and earlier
 * releases,the resulting path may not display on a hardware-accelerated
 * Canvas. A simple workaround is to add a single operation to this path,* such as <code>dst.rLineTo(0,0)</code>.</p>
 * 给定启动和停止距离,
 * 在DST中返回中间段。
 * 如果该段为零长度,则返回false,
 * 否则返回true。
 * StestD和Stutd被固定到合法值(0…GigLangTh())。
 * startD>=stopD,则返回false(并保持DST未被触碰)。
 * 如果有一个假设是正确的,就开始以一个模式开始。
 *
 * 早期版本,结果路径可能不会在硬件加速中显示。
 * Canvas。
 * 一个简单的解决方法是在这个路径中添加一个操作,
 * 这样的SDST. RLIN to(0,0)
 */
public boolean getSegment(float startD,boolean startWithMoveTo) {
    // Skia used to enforce this as part of it's API,but has since relaxed that restriction
    // so to maintain consistency in our API we enforce the preconditions here.
    float length = getLength();
    if (startD < 0) {
        startD = 0;
    }
    if (stopD > length) {
        stopD = length;
    }
    if (startD >= stopD) {
        return false;
    }

    return native_getSegment(native_instance,startD,stopD,dst.mutateNI(),startWithMoveTo);
}

/**
 * Return true if the current contour is closed()
 *  是否闭合
 */
public boolean isClosed() {
    return native_isClosed(native_instance);
}

/**
 * Move to the next contour in the path. Return true if one exists,or
 * false if we're done with the path.
 */
public boolean nextContour() {
    return native_nextContour(native_instance);
}

protected void finalize() throws Throwable {
    native_destroy(native_instance);
    native_instance = 0;  // Other finalizers can still call us.
}

private static native long native_create(long native_path,boolean forceClosed);
private static native void native_setPath(long native_instance,long native_path,boolean forceClosed);
private static native float native_getLength(long native_instance);
private static native boolean native_getPosTan(long native_instance,float distance,float tan[]);
private static native boolean native_getMatrix(long native_instance,long native_matrix,int flags);
private static native boolean native_getSegment(long native_instance,float startD,boolean startWithMoveTo);
private static native boolean native_isClosed(long native_instance);
private static native boolean native_nextContour(long native_instance);
private static native void native_destroy(long native_instance);

/* package */private long native_instance;
}
从源码上分析我们可以看得到其实这个类就是为了让我们测量到当前Path所在的位置 API不多,那么到底怎么运用呢?
首先我们来分析这个效果
很明显我们看到当前这里是一个圆,运用了一张图片,让这张图能够沿着当前的这个圆进行移动
那么,这个圆形是我们用Path所绘制的,那么当前Path会记录下当前圆的所有点,而我们需要将那个箭头图片绘制到我们path的点上面,并且按照圆形角度来进行操控而图形是这样的

那么这个时候我们能够反映过来,去得到当前图片进行旋转,能够做到这一点, 但是我们如何判断这旋转的角度?
而测量当中提供了
/**
 * Pins distance to 0 <= distance <= getLength(),in which case position and tangent
 * are unchanged.
 *  获取指定长度的位置坐标及该点切线值
 * @param distance The distance along the current contour to sample
                PATH起点的长度取值范围: 0 <= distance <= getLength
 * @param pos If not null,tan);
}
那么此时看到这个getPosTan方法其实我们就能够很明显了解到,通过这个方法我们可以根据path的长度值,去取得指定长度所在的XY和切线XY,见下图
那么此时能够看到所谓的切线,下面扫盲,段位高跳过 几何 上,切线指的是一条刚好触碰到 曲线 上某一点的直线。更准确地说,当切线经过曲线上的某点(即 切点 )时,切线的方向与曲线上该点的方向是相同的。平面几何 中,将和圆只有一个公共交点的直线叫做圆的切线
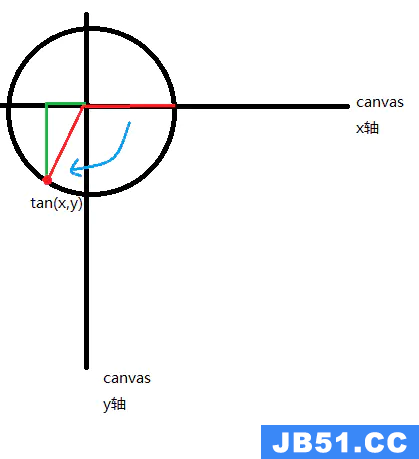
正切函数 是 直角三角形 中,对边与邻边的比值叫做正切。放在 直角坐标系 中(如图)即 tanθ=y/x 而tan就是我们的 正切值 如上图,参考上图
随机选取了一个橙点(具体位置),那么切线是和橙点相交的这条线,切线角度为垂直关系,所以如下图 实在不理解TAN的话,你们就理解为当前得到了圆心坐标,因为圆的切线是圆心《建议去复习下初中数学》

那么此时,我们拿到的getPosTan方法,能够把当前这个点,和这个点的正切值拿到,我们可以通过反正切计算取得角度,那么橙线和X轴的夹角其实实际上应该是我们到时候显示过去的角度,那么此时,看下图
红线所绘制的角度是我们当前角度,绿线绘制的是需要旋转的角度, 那么我们现在手里拥有的资源是,当前正切值,通过正切值我们运用
公式可以计算得到当前角度

Math.tan2(tan[1],tan[0]) * 180 / PI
而反切角度的话是
Math.atan2(tan[1],tan[0]) * 180 / PI
这个就是我们的要移动的角度
那么我们当前上面这个案例就能完成
  public class MyView1 extends View {
private float currentValue = 0;     // 用于纪录当前的位置,取值范围[0,1]映射Path的整个长度

private float[] pos;                // 当前点的实际位置
private float[] tan;                // 当前点的tangent值,用于计算图片所需旋转的角度
private Bitmap mBitmap;             // 箭头图片
private Matrix mMatrix;             // 矩阵,用于对图片进行一些操作
private Paint mDeafultPaint;
private int mViewWidth;
private int mViewHeight;
private Paint mPaint;

public MyView1(Context context) {
    super(context);
    init(context);
}

private void init(Context context) {
    pos = new float[2];
    tan = new float[2];
    BitmapFactory.Options options = new BitmapFactory.Options();
    options.inSampleSize = 8;       // 缩放图片
    mBitmap = BitmapFactory.decodeResource(context.getResources(),R.drawable.arrow,options);
    mMatrix = new Matrix();

    mDeafultPaint = new Paint();
    mDeafultPaint.setColor(Color.RED);
    mDeafultPaint.setStrokeWidth(5);
    mDeafultPaint.setStyle(Paint.Style.STROKE);

    mPaint = new Paint();
    mPaint.setColor(Color.DKGRAY);
    mPaint.setStrokeWidth(2);
    mPaint.setStyle(Paint.Style.STROKE);
}

@Override
protected void onSizeChanged(int w,int h,int oldw,int oldh) {
    super.onSizeChanged(w,h,oldw,oldh);
    mViewWidth = w;
    mViewHeight = h;
}

@Override
protected void onDraw(Canvas canvas) {
    super.onDraw(canvas);
    canvas.drawColor(Color.WHITE);
    // 平移坐标系
    canvas.translate(mViewWidth/2,mViewHeight/2);
    // 画坐标线
    canvas.drawLine(-canvas.getWidth(),canvas.getWidth(),mPaint);
    canvas.drawLine(0,-canvas.getHeight(),canvas.getHeight(),mPaint);

    Path path = new Path();                                 // 创建 Path

    path.addCircle(0,200,Path.Direction.CW);           // 添加一个圆形
    Log.i("barry","----------------------pos[0] = " + pos[0] + "pos[1] = " +pos[1]);
    Log.i("barry","----------------------tan[0] = " + tan[0] + "tan[1] = " +tan[1]);
    PathMeasure measure = new PathMeasure(path,false);     // 创建 PathMeasure

    currentValue += 0.005;                                  // 计算当前的位置在总长度上的比例[0,1]
    if (currentValue >= 1) {
        currentValue = 0;
    }

    // 方案一
    // 获取当前位置的坐标以及趋势
    measure.getPosTan(measure.getLength() * currentValue,tan);
    canvas.drawCircle(tan[0],tan[1],20,mDeafultPaint);

    // 重置Matrix
    mMatrix.reset();
    // 计算图片旋转角度
    float degrees = (float) (Math.atan2(tan[1],tan[0]) * 180.0 / Math.PI);
    // 旋转图片
    mMatrix.postRotate(degrees,mBitmap.getWidth() / 2,mBitmap.getHeight() / 2);
    // 将图片绘制中心调整到与当前点重合
    mMatrix.postTranslate(pos[0] - mBitmap.getWidth() / 2,pos[1] - mBitmap.getHeight() / 2);

    // 方案二
    // 获取当前位置的坐标以及趋势的矩阵
    //measure.getMatrix(measure.getLength() * currentValue,mMatrix,//PathMeasure.TANGENT_MATRIX_FLAG | PathMeasure.POSITION_MATRIX_FLAG);
    // 将图片绘制中心调整到与当前点重合(注意:此处是前乘pre)
    //mMatrix.preTranslate(-mBitmap.getWidth() / 2,-mBitmap.getHeight() / 2);
    canvas.drawPath(path,mDeafultPaint);
    canvas.drawBitmap(mBitmap,mDeafultPaint);

    invalidate();
}
}
更多Android 知识点可参考
Android 性能调优系列:https://0a.fit/dNHYY
Android 车载学习指南:https://0a.fit/jdVoy
Android Framework核心知识点笔记:https://0a.fit/acnLL
Android 八大知识体系:https://0a.fit/mieWJ
Android 中高级面试题锦:https://0a.fit/YXwVq
原文地址:https://blog.csdn.net/weixin_61845324
版权声明:本文内容由互联网用户自发贡献,该文观点与技术仅代表作者本人。本站仅提供信息存储空间服务,不拥有所有权,不承担相关法律责任。如发现本站有涉嫌侵权/违法违规的内容, 请发送邮件至 dio@foxmail.com 举报,一经查实,本站将立刻删除。