
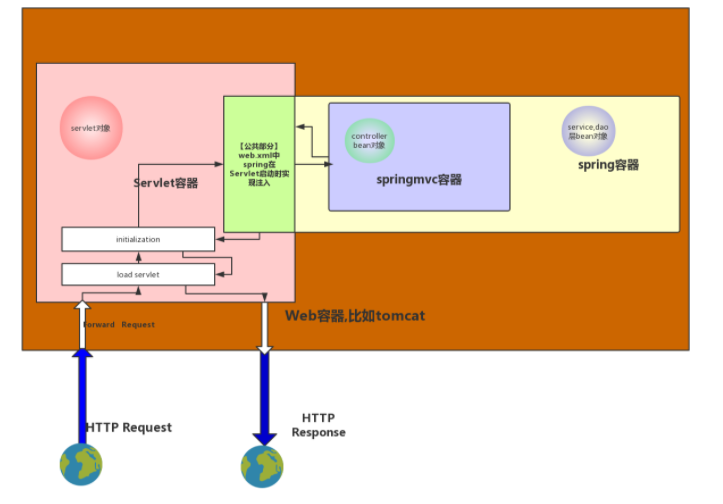
1. 整体关系
2. 源码分析(嫌长的可以拉倒最后看总结)
2.1 jre的启动
java -jar app.jar当在服务器执行该命令的时候 : 服务器去环境变量找到 "java" 对应的执行文件路径 (例如 windows中的 java.exe) --> 执行java.exe --> 按照启动参数,调用JNI 申请内存,初始化JVM ,调用类的加载器进行类的预加载(检查,校验,加载等) 将jdk自带的核心类库加载到方法区 --> 找到主类 --> 执行 main方法
2.2 springboot main方法的启动
2.1.1 主类分析
public class AppApplication {
    private static volatile boolean RUNNING = true;
    public static void main(String[] args) {
        ApplicationContext context = SpringApplication.run(AppApplication .class, args);
        System.out.println("启动成功");
        synchronized (AppApplication .class) {
            while (RUNNING) {
                try {
                    AppApplication .class.wait();
                } catch (InterruptedException e) {
                    e.printStackTrace();
                } finally {
                    SpringApplication.exit(context);
                }
            }
        }
    }
}
主要调用的是 ApplicationContext context = SpringApplication.run(AppApplication .class, args); 方法;
2.1.2 SpringApplication.run() 分析
2.1.2.1 进入 SpringApplication.run() 实现
 public static ConfigurableApplicationContext run(Class<?> primarySource, String... args) {
        return run(new Class[]{primarySource}, args);
 }
2.1.2.2 继续进入 run(new Class[]{primarySource}, args) 方法的实现
public static ConfigurableApplicationContext run(Class<?>[] primarySources, String[] args) {
	return (new SpringApplication(primarySources)).run(args);
}
2.1.2.3 继续进入 (new SpringApplication(primarySources)).run(args) 中 run()方法的实现
public ConfigurableApplicationContext run(String... args) {
        StopWatch stopWatch = new StopWatch();
        stopWatch.start();
        ConfigurableApplicationContext context = null;
        Collection<SpringBootExceptionReporter> exceptionReporters = new ArrayList();
        this.configureHeadlessProperty();
        SpringApplicationRunListeners listeners = this.getRunListeners(args);
        listeners.starting();

        Collection exceptionReporters;
        try {
            ApplicationArguments applicationArguments = new DefaultApplicationArguments(args);
            ConfigurableEnvironment environment = this.prepareEnvironment(listeners, applicationArguments);
            this.configureIgnoreBeanInfo(environment);
            Banner printedBanner = this.printBanner(environment);
            context = this.createApplicationContext();
            exceptionReporters = this.getSpringFactoriesInstances(SpringBootExceptionReporter.class, new Class[]{ConfigurableApplicationContext.class}, context);
            this.prepareContext(context, environment, listeners, applicationArguments, printedBanner);
            this.refreshContext(context);
            this.afterRefresh(context, applicationArguments);
            stopWatch.stop();
            if (this.logStartupInfo) {
                (new StartupInfoLogger(this.mainApplicationClass)).logStarted(this.getApplicationLog(), stopWatch);
            }

            listeners.started(context);
            this.callRunners(context, applicationArguments);
        } catch (Throwable var10) {
            this.handleRunFailure(context, var10, exceptionReporters, listeners);
            throw new IllegalStateException(var10);
        }

        try {
            listeners.running(context);
            return context;
        } catch (Throwable var9) {
            this.handleRunFailure(context, var9, exceptionReporters, (SpringApplicationRunListeners)null);
            throw new IllegalStateException(var9);
        }
    }
我们发现 , springboot 主类启动后,主要做了几个步骤 :
- 初始化启动监控,并启动
StopWatch stopWatch = new StopWatch(); stopWatch.start(); - 初始化容器监听,并启动
SpringApplicationRunListeners listeners = this.getRunListeners(args);listeners.starting();注意这两不一样,一个只用于watch启动过程,启动完就停止了stopWatch.stop();一个是贯穿整个springboot的进程监听; - 创建容器
context = this.createApplicationContext(); - 准备容器
this.prepareContext(...); - 刷新容器
this.refreshContext(context); - 刷新后操作
this.afterRefresh(context, applicationArguments); - 关闭启动监控
stopWatch.stop();
我们知道,启动Tomcat一定在这几个步骤中, 在上述 3. 4. 5. 6. 几个步骤都有可能,根据经验,创建和准备spring容器过程中不太合理,因为只有准备好spring,再去启动Tomcat容器,这样代码分层更加科学,固我们从刷新容器方法入手,如果找不到,我们在可以尝试从其他方法找找
2.1.2.4 继续进入 this.refreshContext(context); 方法的实现
    private void refreshContext(ConfigurableApplicationContext context) {
        this.refresh(context);
        if (this.registerShutdownHook) {
            try {
                context.registerShutdownHook();
            } catch (AccessControlException var3) {
            }
        }

    }
2.1.2.5 继续进入 this.refresh(context); 方法的实现
protected void refresh(ApplicationContext applicationContext) {
Assert.isInstanceOf(AbstractApplicationContext.class, applicationContext);
((AbstractApplicationContext)applicationContext).refresh();
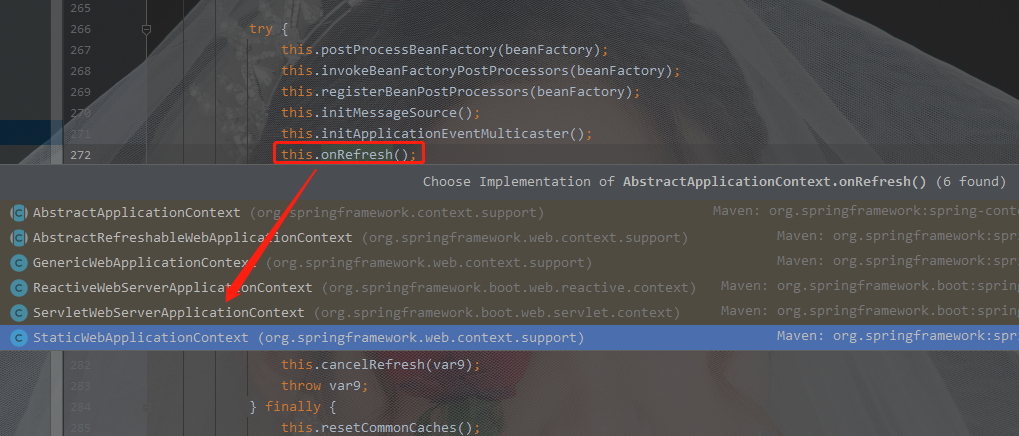
}2.1.2.6 继续进入 ((AbstractApplicationContext)applicationContext).refresh(); refresh() 方法

````
有三个实现类,很明显第一个 AbstractApplicationContext 是个抽象类,其余2个是不同的实现,看着ServletWebServerApplicationContext 比较眼熟,我们选择先看他的实现
2.1.2.7 进入 ServletWebServerApplicationContext的refresh()方法
    public final void refresh() throws BeansException, IllegalStateException {
        try {
            super.refresh();
        } catch (RuntimeException var2) {
            this.stopAndReleaseWebServer();
            throw var2;
        }
}我们可以看到,他只是调用了一下父类super.refresh();然后有异常,会停止webServer ,等等,还没启动webServer,怎么会停止呢? 应该是在 super.refresh(); 启动了webServer,终于看到了webServer的影子!! 那么赶紧进入 super.refresh();
2.1.2.7 进入ServletWebServerApplicationContext父类 AbstractApplicationContext的refresh()方法
public void refresh() throws BeansException, IllegalStateException {
        synchronized(this.startupShutdownMonitor) {
            this.prepareRefresh();
            ConfigurableListableBeanFactory beanFactory = this.obtainFreshBeanFactory();
            this.prepareBeanFactory(beanFactory);

            try {
                this.postProcessBeanFactory(beanFactory);
                this.invokeBeanFactoryPostProcessors(beanFactory);
                this.registerBeanPostProcessors(beanFactory);
                this.initMessageSource();
                this.initApplicationEventMulticaster();
                this.onRefresh();
                this.registerListeners();
                this.finishBeanFactoryInitialization(beanFactory);
                this.finishRefresh();
            } catch (BeansException var9) {
                if (this.logger.isWarnEnabled()) {
                    this.logger.warn("Exception encountered during context initialization - cancelling refresh attempt: " + var9);
                }

                this.destroyBeans();
                this.cancelRefresh(var9);
                throw var9;
            } finally {
                this.resetCommonCaches();
            }

        }
    }
没有明显创建webServer,那一定在其中某一步,根据方法名字,我们进入 this.onRefresh()方法,其他方法都是有具体意义,和创建webServer关系不大,可以后边在看
2.1.2.7 进入this.onRefresh();方法
````
有6个实现类,因为我们是从 ServletWebServerApplicationContext 进入的父类,所以调用的时候会调用该子类的 onRefresh();方法,固选择进入 ServletWebServerApplicationContext的 onRefresh() 实现
2.1.2.8 进入 ServletWebServerApplicationContext的 onRefresh() 实现
    protected void onRefresh() {
        super.onRefresh();

        try {
            this.createWebServer();
        } catch (Throwable var2) {
            throw new ApplicationContextException("Unable to start web server", var2);
        }
    }
终于 !!! this.createWebServer(); 创建webServer了,进去看看 怎么玩儿的吧
2.1.2.8 进入 this.createWebServer();方法
private void createWebServer() {
        WebServer webServer = this.webServer;
        ServletContext servletContext = this.getServletContext();
        if (webServer == null && servletContext == null) {
            ServletWebServerFactory factory = this.getWebServerFactory();
            this.webServer = factory.getWebServer(new ServletContextInitializer[]{this.getSelfInitializer()});
        } else if (servletContext != null) {
            try {
                this.getSelfInitializer().onStartup(servletContext);
            } catch (ServletException var4) {
                throw new ApplicationContextException("Cannot initialize servlet context", var4);
            }
        }

        this.initPropertySources();
    }
factory.getWebServer() 提供三种webServer工厂,当然,我们就知道 时根据配置文件指定的webServer来初始化,所以我们进入 TomcatServletWebServerFactory的getWebServer(..) 方法;
2.1.2.9 进入 TomcatServletWebServerFactory的getWebServer(..) 方法
 public WebServer getWebServer(ServletContextInitializer... initializers) {
        if (this.disableMBeanRegistry) {
            Registry.disableRegistry();
        }

        Tomcat tomcat = new Tomcat();
        File baseDir = this.baseDirectory != null ? this.baseDirectory : this.createTempDir("tomcat");
        tomcat.setBaseDir(baseDir.getAbsolutePath());
        Connector connector = new Connector(this.protocol);
        connector.setThrowOnFailure(true);
        tomcat.getService().addConnector(connector);
        this.customizeConnector(connector);
        tomcat.setConnector(connector);
        tomcat.getHost().setAutoDeploy(false);
        this.configureEngine(tomcat.getEngine());
        Iterator var5 = this.additionalTomcatConnectors.iterator();

        while(var5.hasNext()) {
            Connector additionalConnector = (Connector)var5.next();
            tomcat.getService().addConnector(additionalConnector);
        }

        this.prepareContext(tomcat.getHost(), initializers);
        return this.getTomcatWebServer(tomcat);
    }
在 Tomcat tomcat = new Tomcat(); 处,悬追一下,可以看到 Tomcat 确实是初始化的Apache的Tomcat

到这,就知道了 spring大概是怎么启动内嵌的Tomcat的~
3. 总结
我们发现 , springboot 主类启动后,主要做了几个步骤 :
- 初始化启动监控,并启动
StopWatch stopWatch = new StopWatch(); stopWatch.start(); - 初始化容器监听,并启动
SpringApplicationRunListeners listeners = this.getRunListeners(args);listeners.starting();注意这两不一样,一个只用于watch启动过程,启动完就停止了stopWatch.stop();一个是贯穿整个springboot的进程监听; - 创建容器
context = this.createApplicationContext(); - 准备容器
this.prepareContext(...); - 刷新容器
this.refreshContext(context); - 刷新后操作
this.afterRefresh(context, applicationArguments); - 关闭启动监控
stopWatch.stop();
在 步骤5. (刷新容器 this.refreshContext(context);)中, 根据配置文件中指定的webServer配置,使用webserVer工厂调用 Tomcat tomcat = new Tomcat() 进行tomcat的实例创建和启动;
后记
这是从spring启动内嵌Tomcat切入,从源码跟踪了一下,其中也涉及到了spring的启动过程,当然涉及的不全;spring启动的整体流程是什么 ? spring的二方,三方组件 是怎么自动装配的,这些还需要进一步研究,下一篇再写吧
原文地址:https://cloud.tencent.com/developer/article/2024202
版权声明:本文内容由互联网用户自发贡献,该文观点与技术仅代表作者本人。本站仅提供信息存储空间服务,不拥有所有权,不承担相关法律责任。如发现本站有涉嫌侵权/违法违规的内容, 请发送邮件至 dio@foxmail.com 举报,一经查实,本站将立刻删除。