
apache服务即为网页服务,apache服务的软件包叫httpd。
以下实验在PC1主机中完成
1、测试配置前网页服务

2、在PC1主机中安装apache软件包
[root@PC1 ~]# yum install httpd -y
Loaded plugins: langpacks, product-id, subscription-manager
This system is not registered to Red Hat Subscription Management. You can use subscription-manager to register.
Repodata is over 2 weeks old. Install yum-cron? Or run: yum makecache fast
rhel7                                                    | 4.1 kB     00:00
Resolving Dependencies
--> Running transaction check
---> Package httpd.x86_64 0:2.4.6-17.el7 will be installed
--> Processing Dependency: httpd-tools = 2.4.6-17.el7 for package: httpd-2.4.6-17.el7.x86_64
--> Processing Dependency: /etc/mime.types for package: httpd-2.4.6-17.el7.x86_64
--> Processing Dependency: libapr-1.so.0()(64bit) for package: httpd-2.4.6-17.el7.x86_64
--> Processing Dependency: libaprutil-1.so.0()(64bit) for package: httpd-2.4.6-17.el7.x86_64
--> Running transaction check
---> Package apr.x86_64 0:1.4.8-3.el7 will be installed
---> Package apr-util.x86_64 0:1.5.2-6.el7 will be installed
---> Package httpd-tools.x86_64 0:2.4.6-17.el7 will be installed
---> Package mailcap.noarch 0:2.1.41-2.el7 will be installed
--> Finished Dependency Resolution

Dependencies Resolved

================================================================================
 Package             Arch           Version                 Repository     Size
================================================================================
Installing:
 httpd               x86_64         2.4.6-17.el7            rhel7         1.2 M
Installing for dependencies:
 apr                 x86_64         1.4.8-3.el7             rhel7         103 k
 apr-util            x86_64         1.5.2-6.el7             rhel7          92 k
 httpd-tools         x86_64         2.4.6-17.el7            rhel7          77 k
 mailcap             noarch         2.1.41-2.el7            rhel7          31 k

Transaction Summary
================================================================================
Install  1 Package (+4 Dependent packages)

Total download size: 1.5 M
Installed size: 4.3 M
Downloading packages:
--------------------------------------------------------------------------------
Total                                              8.2 MB/s | 1.5 MB  00:00
Running transaction check
Running transaction test
Transaction test succeeded
Running transaction
  Installing : apr-1.4.8-3.el7.x86_64                                       1/5
  Installing : apr-util-1.5.2-6.el7.x86_64                                  2/5
  Installing : httpd-tools-2.4.6-17.el7.x86_64                              3/5
  Installing : mailcap-2.1.41-2.el7.noarch                                  4/5
  Installing : httpd-2.4.6-17.el7.x86_64                                    5/5
rhel7/productid                                          | 1.6 kB     00:00
  Verifying  : mailcap-2.1.41-2.el7.noarch                                  1/5
  Verifying  : httpd-tools-2.4.6-17.el7.x86_64                              2/5
  Verifying  : apr-1.4.8-3.el7.x86_64                                       3/5
  Verifying  : apr-util-1.5.2-6.el7.x86_64                                  4/5
  Verifying  : httpd-2.4.6-17.el7.x86_64                                    5/5

Installed:
  httpd.x86_64 0:2.4.6-17.el7

Dependency Installed:
  apr.x86_64 0:1.4.8-3.el7                 apr-util.x86_64 0:1.5.2-6.el7
  httpd-tools.x86_64 0:2.4.6-17.el7        mailcap.noarch 0:2.1.41-2.el7

Complete!
3、在PC1主机中启动Apache服务,设定为开机启动
[root@PC1 ~]# systemctl start httpd
[root@PC1 ~]# systemctl enable httpd
ln -s '/usr/lib/systemd/system/httpd.service' '/etc/systemd/system/multi-user.target.wants/httpd.service'
[root@PC1 ~]# systemctl status httpd
httpd.service - The Apache HTTP Server
   Loaded: loaded (/usr/lib/systemd/system/httpd.service; enabled)
   Active: active (running) since Wed 2020-12-16 19:40:28 CST; 20s ago
 Main PID: 31941 (httpd)
…………
4、在PC1主机中查看web服务

5、在PC1主机中查看主配置文件,查看web数据目录(web数据目录为/var/www/html)
…………
115 # DocumentRoot: The directory out of which you will serve your
116 # documents. By default, all requests are taken from this directory, but
117 # symbolic links and aliases may be used to point to other locations.
118 #
119 DocumentRoot "/var/www/html"
120
121 #
122 # Relax access to content within /var/www.
123 #
124 <Directory "/var/www">
125     AllowOverride None
126     # Allow open access:
127     Require all granted
…………
6、在PC1主机中编辑web数据首页目录
[root@PC1 ~]# cd /var/www/html/
[root@PC1 html]# ls
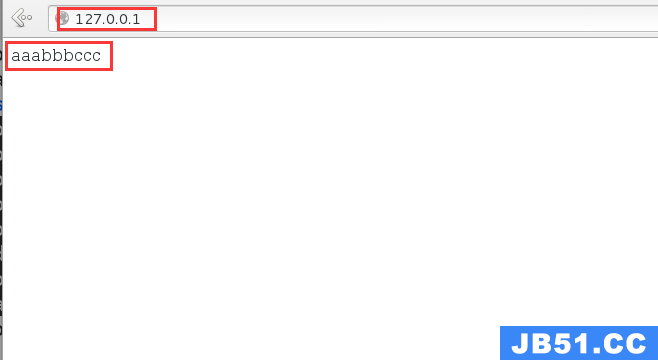
[root@PC1 html]# echo "aaabbbccc" > index.html
[root@PC1 html]# ls
index.html
[root@PC1 html]# cat index.html
aaabbbccc
7、在PC1主机中测试首页效果
8、在PC1主机中指定web首页路径,并写入首页内容
[root@PC1 html]# mkdir /home/wwwroot
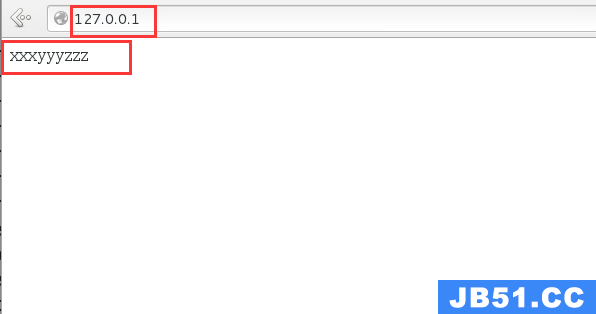
[root@PC1 html]# echo "xxxyyyzzz" > /home/wwwroot/index.html
[root@PC1 html]# vim /etc/httpd/conf/httpd.conf
117 # symbolic links and aliases may be used to point to other locations.
118 #
119 DocumentRoot "/home/wwwroot"
120
121 #
122 # Relax access to content within /var/www.
123 #
124 <Directory "/home/wwwroot">
125 AllowOverride None
126 # Allow open access:
9、在PC1主机中重启web服务
[root@PC1 html]# systemctl restart httpd
[root@PC1 html]# systemctl status httpd | head -n 5
httpd.service - The Apache HTTP Server
   Loaded: loaded (/usr/lib/systemd/system/httpd.service; enabled)
   Active: active (running) since Wed 2020-12-16 19:57:00 CST; 15s ago
  Process: 32238 ExecStop=/bin/kill -WINCH ${MAINPID} (code=exited, status=0/SUCCESS)
 Main PID: 32242 (httpd)
10、在PC1主机中测试web服务


11、在PC1中检查SELinux服务
[root@PC1 html]# getenforce ## 说明为启用状态
Enforcing
12、在PC1主机中关闭SELinux服务
[root@PC1 html]# setenforce 0
[root@PC1 html]# getenforce
Permissive
13、在PC1主机中测试web服务(此处说明SELinux服务导致web无法启用)

14、在PC1主机中启用SELinux
[root@PC1 html]# getenforce
Permissive
[root@PC1 html]# setenforce 1
[root@PC1 html]# getenforce
Enforcing
15、在PC1主机中查看web服务默认web数据目录的selinux上下文值和新设定的web数据目录的selinux上下文值
[root@PC1 html]# ll -ldZ /var/www/html/
drwxr-xr-x. root root system_u:object_r:httpd_sys_content_t:s0 /var/www/html/
[root@PC1 html]# ll -ldZ /home/wwwroot/
drwxr-xr-x. root root unconfined_u:object_r:home_root_t:s0 /home/wwwroot/
16、在PC1主机中修改新设定的web目录的selinux上下文值
[root@PC1 html]# semanage fcontext -a -t httpd_sys_content_t /home/wwwroot
[root@PC1 html]# semanage fcontext -a -t httpd_sys_content_t /home/wwwroot/*
[root@PC1 html]# restorecon -Rv /home/wwwroot/
restorecon reset /home/wwwroot context unconfined_u:object_r:home_root_t:s0->unconfined_u:object_r:httpd_sys_content_t:s0
restorecon reset /home/wwwroot/index.html context unconfined_u:object_r:home_root_t:s0->unconfined_u:object_r:httpd_sys_content_t:s0
[root@PC1 html]# ll -ldZ /home/wwwroot/
drwxr-xr-x. root root unconfined_u:object_r:httpd_sys_content_t:s0 /home/wwwroot/   ## 修改成功
17、在PC1主机中测试web服务

以上实验实现了在linux部署web服务,同时进行了web数据目录的修改,并定义了web首页的内容。
版权声明:本文内容由互联网用户自发贡献,该文观点与技术仅代表作者本人。本站仅提供信息存储空间服务,不拥有所有权,不承担相关法律责任。如发现本站有涉嫌侵权/违法违规的内容, 请发送邮件至 dio@foxmail.com 举报,一经查实,本站将立刻删除。