
大多数系统管理员习惯于处理基础、来宾或黄金映像,以 在其传统虚拟化或云环境中配置新的虚拟机(VM) 或云实例。使用这些映像的吸引力在于它们的纤薄尺寸、标准化、简单性和基本配置,从中可以执行预配或配后定制。大部分定制发生在配置后。
但是,在某些情况下,管理员必须提前自定义某些图像以遵守公司政策,例如确保某些软件包或工具在部署时可用、设置安全限制,甚至进行一些小调整以简化服务器管理。有不同范围的不同工具可以实现此目标,例如diskimage-builder、virt-customize、cloud-init等。但如果您只需要对图像进行细微调整,guestfish工具可以节省时间。
我将解释如何使用这个简单而通用的工具进行小的自定义。
设置先决条件
根据官方文档,“guestfish 是一个 shell 和命令行工具,用于检查和修改虚拟机文件系统。它使用libguestfs并公开了 guestfs API 的所有功能。”
对于本演示,我使用libguestfs-tools安装了该软件包的小型 KVM 服务器,因为它提供了以下guestfish命令:
$ rpm -qa | grep libguestfs-tools
libguestfs-tools-c-1.40.2-27.module+el8.4.0+9282+0bdec052.x86_64
libguestfs-tools-1.40.2-27.module+el8.4.0+9282+0bdec052.noarch我还将从Red Hat Customer Portal将 Red Hat Enterprise Linux 8.4 Update KVM 来宾映像下载到同一台机器上:
$ qemu-img info rhel-8.4-x86_64-kvm.qcow2
image: rhel-8.4-x86_64-kvm.qcow2
file format: qcow2
virtual size: 10 GiB (10737418240 bytes)
disk size: 694 MiB
cluster_size: 65536
Format specific information:
    compat: 0.10
    refcount bits: 16

$ qemu-img measure rhel-8.4-x86_64-kvm.qcow2
required size: 10737418240
fully allocated size: 10737418240
对于此演示,我创建了以下预配置先决条件,我希望我的映像在部署后具有这些先决条件:
- 在根用户必须具有密码123456。
- 必须有一个名为alexon的普通用户,密码为123456,具有 sudo 权限。
- 它应该有主机名custom-server.example.com。
- 它必须使用静态IP配置192.168.100.3中192.168.100.X网络,与192.168.100.1作为网关和192.168.1.3作为DNS服务器。
- 它应该在登录时显示当天的自定义消息。
-
/root目录中应该有一个自定义工具。
因此,我将进入正题并使用这些设置自定义我的图像。
进行图像自定义
Guestfish 有自己的 shell 和命令行,您可以通过运行guestfish. 您可以检查此 shell 中的可用命令并在图像中执行您想要的每个更改,或者您可以guestfish直接从操作系统的 shell 中使用所需的参数,甚至作为脚本工具使用。有关可接受的参数和命令的完整列表,请查看官方文档:
$ sudo guestfish

Welcome to guestfish,the guest filesystem shell for
editing virtual machine filesystems and disk images.

Type: 'help' for help on commands
      'man' to read the manual
      'quit' to quit the shell

><fs> help
Add disk images to examine using the '-a' or '-d' options or the 'add'
command.
Or create a new disk image using '-N',or the 'alloc' or 'sparse' commands.
Once you have done this,use the 'run' command.

For more information about a command,use 'help cmd'.

To read the manual,type 'man'.

><fs> quit
在继续自定义之前,为 root 用户创建一个加密和散列的密码以在图像中使用:
$ openssl passwd -1 123456
$1$9pskY4to$DQT/NOOjQT7E.t.NKIzJr0
接下来,编辑图像。您可以添加读写权限、启用网络和自动挂载文件系统:
$ sudo guestfish --rw --network -i -a rhel-8.4-x86_64-kvm.qcow2

Welcome to guestfish,the guest filesystem shell for
editing virtual machine filesystems and disk images.
Type: 'help' for help on commands
      'man' to read the manual
      'quit' to quit the shell
Operating system: Red Hat Enterprise Linux 8.4 (Ootpa)
/dev/sda3 mounted on /
/dev/sda2 mounted on /boot/efi
><fs> quit
但是为了更好地演示图像处理在 guestfish shell 中是如何工作的(为了好玩),请添加具有读写权限的图像,然后在其中完成其余的工作。(注意:此时任何正在运行的 VM 或实例都不能使用该映像):
$ sudo guestfish -w -a rhel-8.4-x86_64-kvm.qcow2

Welcome to guestfish,the guest filesystem shell for
editing virtual machine filesystems and disk images.
Type: 'help' for help on commands
      'man' to read the manual
      'quit' to quit the shell

><fs> set-network true
><fs> run
 100% ⟦▒▒▒▒▒▒▒▒▒▒▒▒▒▒▒▒▒▒▒▒▒⟧ 00:00
><fs> list-filesystems
/dev/sda1: unknown
/dev/sda2: vfat
/dev/sda3: xfs
><fs> mount /dev/sda3 /
还记得您为 root 用户创建的加密密码吗?是时候在/etc/shadow文件中使用它了:
><fs> vi /etc/shadow
[...]
root:$1$9pskY4to$DQT/NOOjQT7E.t.NKIzJr0:18367:0:99999:7:::
[...]编写自定义每日消息 的/etc/motd文件:
><fs> cat /etc/motd

><fs> write /etc/motd "Demo Server customized with guestfish for Enable SysAdmin"
><fs> chmod 0644 /etc/motd
><fs> cat /etc/motd
Demo Server customized with guestfish for Enable Sysadmin在/etc/hostname文件中设置主机名:
><fs> write /etc/hostname "custom-server.example.com"
><fs> cat /etc/hostname
custom-server.example.com本/etc/sysconfig/network-scripts/ifcfg-eth0应与所需的网络信息进行定义:
><fs> ls /etc/sysconfig/network-scripts/
><fs> touch /etc/sysconfig/network-scripts/ifcfg-eth0
><fs> edit /etc/sysconfig/network-scripts/ifcfg-eth0
[...]
TYPE=Ethernet
PROXY_METHOD=none
BROWSER_ONLY=no
BOOTPROTO=none
DEFROUTE=yes
IPV4_FAILURE_FATAL=no
IPV6INIT=yes
IPV6_AUTOCONF=yes
IPV6_DEFROUTE=yes
IPV6_FAILURE_FATAL=no
NAME=eth0
DEVICE=eth0
ONBOOT=yes
IPADDR=192.168.100.3
PREFIX=24
GATEWAY=192.168.100.1
DNS1=192.168.1.3
DOMAIN=example.local
IPV6_PRIVACY=no
[...]
KVM 主机中有一个带有自定义工具的 tarball。将其内容导入并解压到/root图像的目录中:
><fs> tar-in /tmp/images/mycustom-tools.tar /root/
><fs> ls /root/
.bash_logout
.bash_profile
.bashrc
.cshrc
.tcshrc
mycustom-tools
><fs> ls /root/mycustom-tools/
tool.sh
使用系统命令创建所需的普通用户,如下所示:
><fs> command "adduser -G wheel -p 123456 -c 'Alexon Oliveira' alexon"
><fs> cat /etc/passwd | grep alexon
alexon:x:1000:1000:Alexon Oliveira:/home/alexon:/bin/bash
最后,为了避免 SELinux 上下文出现问题,您必须运行重新标记并同步磁盘,以便任何写入都刷新到底层磁盘映像。之后,您可以退出图像编辑:
><fs> selinux-relabel /etc/selinux/targeted/contexts/files/file_contexts /
><fs> sync
><fs> exit
检查图像大小几乎没有变化:
$ qemu-img info rhel-8.4-x86_64-kvm.qcow2
image: rhel-8.4-x86_64-kvm.qcow2
file format: qcow2
virtual size: 10 GiB (10737418240 bytes)
disk size: 788 MiB
cluster_size: 65536
Format specific information:
    compat: 0.10
    refcount bits: 16

$ qemu-img measure rhel-8.4-x86_64-kvm.qcow2
required size: 10737418240
fully allocated size: 10737418240
测试自定义镜像
所有的努力都有结果吗?我来测试一下。我将使用Cockpit机器从自定义映像创建一个虚拟机:
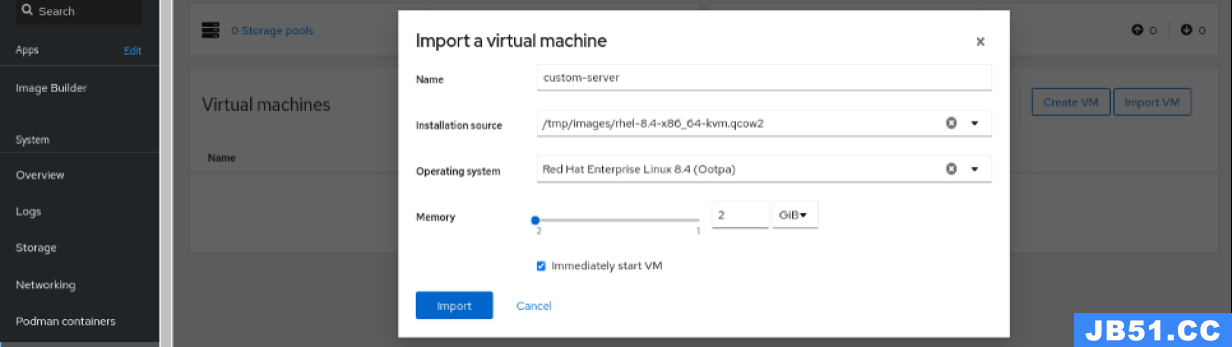
(亚历克森奥利维拉 CC BY-SA 4.0)
创建虚拟机后,检查它是否正在运行:

(亚历克森奥利维拉 CC BY-SA 4.0)
虚拟机运行正常,可以访问:
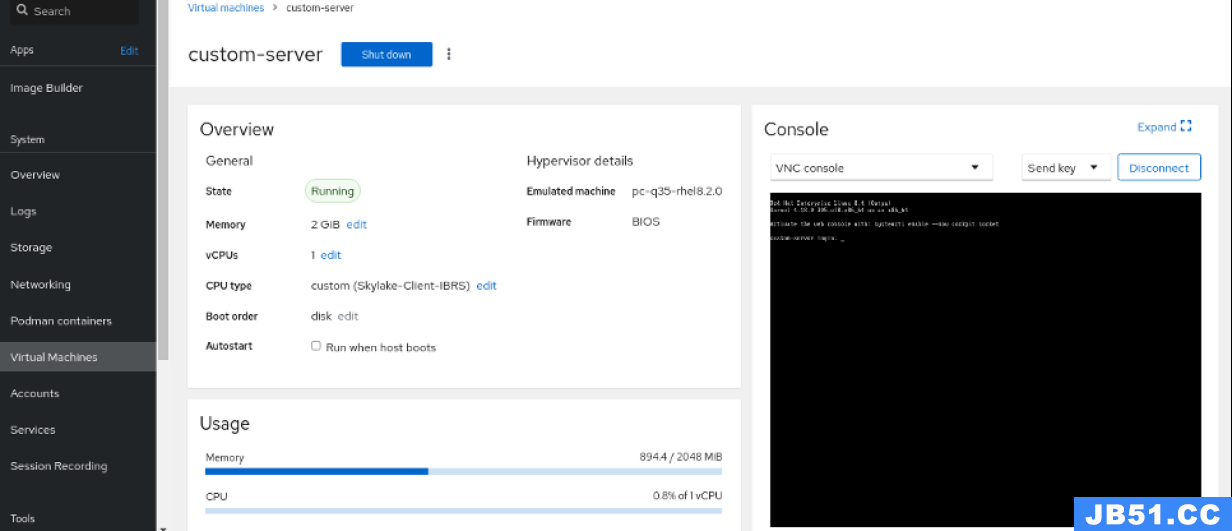
(亚历克森奥利维拉 CC BY-SA 4.0)
第一个测试是验证静态 IP 设置是否正确,以及我可以使用预先创建的普通用户及其密码访问部署的服务器:
$ ssh alexon@192.168.100.3
The authenticity of host 192.168.100.3 can't be established.
ECDSA key fingerprint is SHA256:7mBMhpf+t7Ip[...]A6R+TkIqvrDiC04wI.
Are you sure you want to continue connecting? yes
alexon@192.168.100.3's password:
Demo Server customized with guestfish for Enable SysAdmin
Activate the web console with systemctl enable --now cockpit.socket

Last login: Mon Nov 1 17:25:47 2021答对了!而且我还可以在登录时看到当天的自定义消息。自定义工具呢?这里是:
[alexon]$ sudo ls /root/
We trust you have received the usual lecture from the local System
Administrator. It usually boils down to these three things:

    #1) Respect the privacy of others.
    #2) Think before you type.
    #3) With great power comes great responsibility.

[sudo] password for alexon:
mycustom-tools
网络配置设置正确:
[alexon]$ ip a show eth0
2: eth0: <BROADCAST,MULTICAST,UP,LOWER_UP> mtu 1500 qdisc fq_codel state UP group default qlen 1000
    link/ether 52:54:00:1e:b7:89 brd ff:ff:ff:ff:ff:ff
    inet 192.168.100.3/24 brd 192.168.100.255 scope global noprefixroute eth0
       valid_lft forever preferred_lft forever
    inet6 fe80::5054:ff:fe1e:b789/64 scope link noprefixroute
       valid_lft forever preferred_lft forever
[alexon]$ ip r
default via 192.168.100.1 dev eth0 proto static metric 100
192.168.100.0/24 dev eth0 proto kernel scope link src 192.168.100.3 metric 100
DNS 服务器也设置正确:
[alexon]$ cat /etc/resolv.conf
# Generated by NetworkManager
search example.local
nameserver 192.168.1.3
此外,主机名是我之前定义的:
[alexon]$ hostnamectl
   Static hostname: custom-server.example.com
         Icon name: computer-vm
           Chassis: vm
        Machine ID: 53b979b8960b45af9ba5cdd94b14cb6b
           Boot ID: aa3622b750a64047821290e96b05126d
    Virtualization: kvm
  Operating System: Red Hat Enterprise Linux 8.4 (Ootpa)
       CPE OS Name: cpe:/o:redhat:enterprise_linux:8.4:GA
            Kernel: Linux 4.18.0-305.el8.x86_64
      Architecture: x86-64
最后但并非最不重要的一点是,我将使用上面设置的密码测试 root 访问权限:
[alexon]$ id alexon
uid=1000(alexon) gid=1000(alexon) groups=1000(alexon),10(wheel)
[alexon]$ su -
Password:
Last login: Mon Nov 1 17:35:58 EST 2021 from 192.168.100.1 on pts/0
[root]# whoami
root
在云端
就像那样,我使用了一个简单但功能强大的工具对基本映像进行了微调,并从中部署了一个新服务器,我也可以部署许多其他服务器。我可以将其他实用程序与图像一起使用以利用这些自定义。但是对于小的调整,guestfish 可以很好地为管理员服务。
总结
在虚拟化和云环境中使用基本映像进行部署时,尤其是在 KVM 和 OpenStack 中,需要进行某些自定义以满足公司政策。对于较小的定制,guestfish 工具是一个很好的盟友,可以帮助您提供量身定制的服务。既然你知道怎么做,就好好利用它吧。
原文地址:https://blog.csdn.net/allway2
版权声明:本文内容由互联网用户自发贡献,该文观点与技术仅代表作者本人。本站仅提供信息存储空间服务,不拥有所有权,不承担相关法律责任。如发现本站有涉嫌侵权/违法违规的内容, 请发送邮件至 dio@foxmail.com 举报,一经查实,本站将立刻删除。