
[TOC]
0x03 InfluxDB 操作实践
描述: 在 V2.x 版本中 influx 客户端命令已独立处理, 其与V1.x版本的 influx cli 参数与使用大不相同, 此处主要讲解V2.x相关语法参数,但也会简单提及一下V1.x版本语法及其使用。
InfluxDB V2.x 版本
描述: 在1.x版本中客户端支持SQL语句,但是在2.x版本中交互式命令行已经不支持SQL语法了,这对熟悉关系型数据库的人来说可能会不太友好。
官方文档参考: https://docs.influxdata.com/influxdb/v2.2/reference/cli/
核心概念
- Organization : 是一组用户的工作空间,一个组下用户可以创建多个bucket。
- bucket : 所有的 influxdb数据都存储在bucket中,bucket结合了数据库和保存期限(每条数据会被保留的时间)的概念,类似于RDMS的database的概念。bucket 属于一个 organization 下管理。
- Measurement :是所有 tags fields 和时间的容器,是一个数据集的容器,与RDMS的table的概念类似
- Fields : 数据属性包括field key 和 field value 分别存储在 _field和 _value当中, 并且一个measurement中必须包含至少一个filed field set 表示在同一时间内 所有fields的集合。 field key 是一个代表属性名称的字段,在示例数据中bees和ants就是field key field value 是对应 field key 的值, 在示例数据中在2019-08-18T00:00:00Z 该时间点 bees的值为23,而ants的值为30。
- Tags : 和Fields类似,Tags也有 key value。但与Fields不同的是,field key存储在_field列中 而tag key则是本身就是列。 tag key 和 tag value 在Line Protocl中有更为直观的体现
- timestamp : 所有存储在influxdb中的数据都有一个_time列用来记录时间,在磁盘中以纳秒之间戳存储,但客户端查询时返回的是格式化的更易读的 RFC3339 UTC时间格式。
演示数据如下:
_time 	_measurement 	location 	scientist 	_field 	_value
2019-08-18T00:00:00Z 	census 	klamath 	anderson 	bees 	23
2019-08-18T00:00:00Z 	census 	portland 	mullen 	  ants 	30
2019-08-18T00:06:00Z 	census 	klamath 	anderson  bees 	28
2019-08-18T00:06:00Z 	census 	portland 	mullen 	  ants 	32
温馨提示: Fields 和 Tags 简单来说他们都是一组键值对的集合。 在存储形式上 field 的 key 被存储在一个名为_field的列中, 而tag的key则是以列头的形式存在的, 该列的内容即为tag value, 另外值得注意的是 field 和 tag 都可以用来存储数据,但tag只能存储字符串类型数据(即不可以在influx查询中使用 mean()、max()等聚合函数),而filed既可以存储字符串类型又可以存储数值类型数据。
Line Protocol 语法
# 以下取自官方文档
# 语法
<measurement>[,<tag_key>=<tag_value>[,<tag_key>=<tag_value>]] <field_key>=<field_value>[,<field_key>=<field_value>] [<timestamp>]

# 示例
student,name=weiyigeek id=10001,age=20 [1654848441]
温馨提示: 一个\n代表一条数据协议的结束,所以数据内容不支持\n,如果非要使用请按照 Line Protocol 支持部分特殊字符但需要进行转义
以 Influx Client 操作 influxdb
语法参数:
NAME: influx - Influx Client
USAGE:  influx [command]
COMMANDS:
  version              Print the influx CLI version
  write                Write points to InfluxDB
  bucket               Bucket management commands
  completion           Generates completion scripts
  query                Execute a Flux query
  config               Config management commands
  org, organization    Organization management commands
  delete               Delete points from InfluxDB
  user                 User management commands
  task                 Task management commands
  telegrafs            List Telegraf configuration(s). Subcommands manage Telegraf configurations.
  dashboards           List Dashboard(s).
  export               Export existing resources as a template
  secret               Secret management commands
  v1                   InfluxDB v1 management commands # 管理 v1 管理命令接口
  auth, authorization  Authorization management commands
  apply                Apply a template to manage resources
  stacks               List stack(s) and associated templates. Subcommands manage stacks.
  template             Summarize the provided template
  bucket-schema        Bucket schema management commands
  ping                 Check the InfluxDB /health endpoint
  setup                Setup instance with initial user, org, bucket
  backup               Backup database
  restore              Restores a backup directory to InfluxDB
  remote               Remote connection management commands
  replication          Replication stream management commands
  server-config        Display server config
  help, h              Shows a list of commands or help for one command
实践案例:
初始化连接配置管理
# 0.InfluxDB 服务端启动后需使用 Influx CLI 进行初始化.
# 依次输入:用户名、密码、组织名称、桶名称、数据保存时间(过期自动删除,0表示永久保存)。
$ influx setup --host http://localhost:8080
> Welcome to InfluxDB 2.0!
? Please type your primary username admin
? Please type your password *********
? Please type your password again *********
? Please type your primary organization name test
? Please type your primary bucket name db01
? Please type your retention period in hours, or 0 for infinite 0
? Setup with these parameters?
  Username:          admin
  Organization:      test
  Bucket:            db01
  Retention Period:  infinite
 Yes
User    Organization    Bucket
admin   test            db01


# 1.避免不必要的错误以下influx命令均手动传递token, 执行过后所有需要该token的指令就不需要指定token.
$ influx config create --active -n default -t 1VreF2TZuek7V6hmnquF
$ influx config create -a -n prometheus-influxdb -t 1VreF2TZuek7V6hmnquF -o primary -u http://10.98.134.121:8086

# 2.显示创建的链接字符串、更新设置、以及删除指定名称的连接配置信息.
$ influx config ls
$ influx config set -a -n prometheus-influxdb -t <更改Token>
$ influx config rm- 用户管理
# 1.创建用户user密码为WeiyiGeek
influx user create -n user -p WeiyiGeek -o primary -t <your-token>
  # ID                      Name
  # 097f22b577ee5000        user

# 2.查看用户
influx user list
  # ID                      Name
  # 097496fcb920e000        admin
  # 097f22b577ee5000        user

# 3.更新用户
influx user update -i 097f22b577ee5000 -n weiyigeek -t <your-token>
  # ID                      Name
  # 097f22b577ee5000        weiyigeek

# 4.修改密码, 指令执行后CLI会引导密码修改
influx user password -n weiyigeek -t <your-token>
  # ? Please type new password for "weiyigeek" *********
  # ? Please type new password for "weiyigeek" again *********
  # Successfully updated password for user "weiyigeek"

# 5.删除用户
influx user delete -i 097f22b577ee5000 -t <your-token>
  # ID                      Name    Deleted
# 097f22b577ee5000 user true- Auth Token票据管理
# 1.创建 primary org下的所有权限的Token票据
influx auth create -o primary --all-access- Organization 管理 描述: 官方建议单个influxdb实例中建组不超过20个,超过该值将可能会对influxdb性能造成影响。
# 创建Organization
influx org create -n weiyigeek -d "This is demo org"
  # ID                      Name
  # a33966bd13905e7a        weiyigeek

# 查看已存在的 org
influx org list
  # ID                      Name
  # a33966bd13905e7a        weiyigeek
  # cf9b383e6da9c4a8        primary

# 更新 org 名称
influx org update -i a33966bd13905e7a -n demo
  # ID                      Name
  # a33966bd13905e7a        demo

# 删除指定 org
influx org delete -i a33966bd13905e7a
  # ID                      Name    Deleted
# a33966bd13905e7a demo true- bucket 管理
描述: 在 bucket 内的数据是有保存期限 (
retention-period-duration), 在其创建之初就会指定。
# 创建 bucket
# 在 demo 的 org 下创建一个 test-bucket 的 bucket。
influx bucket create -n test-bucket -o demo -r 72h5m -t <your-token>
  ID                      Name            Retention       Shard group duration    Organization ID         Schema Type
  b54d88b80225fc22        test-bucket     72h5m0s         24h0m0s                 08472f250ef4212e        implicit

# 更新 bucket (名称、数据保存时间)
influx bucket update -i b54d88b80225fc22 -n demo-bucket
influx bucket update -i b54d88b80225fc22 -r 64h0m0s
  ID                      Name            Retention       Shard group duration    Organization ID         Schema Type
  b54d88b80225fc22        demo-bucket     64h0m0s         24h0m0s                 08472f250ef4212e        implicit

# 查看 bucket (列出指定或者所有 buckets 信息)
influx bucket list -o primary
  ID                      Name            Retention       Shard group duration    Organization ID         Schema Type
  0db228578a8a7927        _monitoring     168h0m0s        24h0m0s                 cf9b383e6da9c4a8        implicit
  9e2442e2d584ff53        _tasks          72h0m0s         24h0m0s                 cf9b383e6da9c4a8        implicit
  e4fef2474b70834e        primary         infinite        168h0m0s                cf9b383e6da9c4a8        implicit

influx bucket list -n demo-bucket -o demo
  ID                      Name            Retention       Shard group duration    Organization ID         Schema Type
  b54d88b80225fc22        demo-bucket     64h0m0s         24h0m0s                 08472f250ef4212e        implicit

# 删除 bucket (指定ID或者指定名称)
influx bucket delete -n demo-bucket -o demo
influx bucket delete -i b54d88b80225fc22
  ID                      Name            Retention       Shard group duration    Organization ID         Schema Type      Deleted
  b54d88b80225fc22        demo-bucket     26h0m0s         24h0m0s                 08472f250ef4212e        implicit true
温馨提示: 指定数据保留时间单位如下所示:
# 数据保留时间单位在以下单位中取值:
#纳秒 (ns)
#微秒 (us or µs)
#毫秒 (ms)
#秒 (s)
#分 (m)
#时 (h)
#日 (d)
#周 (w)- measurement 管理
# 此处为了演示创建一个名为 demo  org 下的 demo_user 用户。
influx user create -n demo_user -p WeiyiGeek -o demo
influx auth create -u demo_user -o demo  --operator --description "demo_user 用户的认证Token"
  # ID                      Description             Token                                                   User Name        User ID                 Permissions
  # 097f2e5731ae5000        demo_user 用户的认证Token       nxlkweOIxTOYQhNzI4QtuBHrKQtyOLFkA2KzJsBpO71hxZT7i6rmdyIgSuexuKbda1qL9x8vjJWUUH5rzBleKA==== demo_user       097f2d6f8bee5000        [read:/authorizations write:/authorizations read:/buckets write:/buckets read:/dashboards write:/dashboards read:/orgs write:/orgs read:/sources write:/sources read:/tasks write:/tasks read:/telegrafs write:/telegrafs read:/users write:/users read:/variables write:/variables read:/scrapers write:/scrapers read:/secrets write:/secrets read:/labels write:/labels read:/views write:/views read:/documents write:/documents read:/notificationRules write:/notificationRules read:/notificationEndpoints write:/notificationEndpoints read:/checks write:/checks read:/dbrp write:/dbrp read:/notebooks write:/notebooks read:/annotations write:/annotations read:/remotes write:/remotes read:/replications write:/replications]
influx bucket update -id 2d0184d3af5ec8b2 --retention 0 # 要在bucket上设置的新保留时间,或为0表示无限

# 创建 名称为 student 的 measurement
# - dryrun 尝试写入,即写入到stdout而不是InfluxDB。
influx write dryrun -b demo-bucket -o demo 'student,std_name=weiyigeek id=10001,age=28,score=77'
  # student,name=weiyigeek,addr="中国重庆" id=10001,age=20 1654848441
# - 写入到InfluxDB (由于我们全局adminToken也可以不指定 demo_user 用户的Token),为了看到效果建议没执行1s在执行
# -p ns 指定数据插入的时间精度。
influx write -b demo-bucket -o demo 'student,std_name=weiyigeek id=10001,age=28,score=77' -p ns
influx write -b demo-bucket -o demo 'student,std_name=weiyigeek id=10001,age=29,score=88' -t 'nxlkweOIxTOYQhNzI4QtuBHrKQtyOLFkA2KzJsBpO71hxZT7i6rmdyIgSuexuKbda1qL9x8vjJWUUH5rzBleKA==' -p ns
influx write -b demo-bucket -o demo 'student,std_name=weiyigeek id=10001,age=30,score=99' -t 'nxlkweOIxTOYQhNzI4QtuBHrKQtyOLFkA2KzJsBpO71hxZT7i6rmdyIgSuexuKbda1qL9x8vjJWUUH5rzBleKA==' --compression gzip -p ns

# 查询 student 表中的数据,此处利用编写的Flux Script示例进行查询。
$ cat influx_query.sql 'from(bucket: "demo-bucket")
  |> range(start: -1d, stop: "")
  |> filter(fn: (r) => r["_measurement"] == "student")
  |> filter(fn: (r) => r["_field"] == "score")
  |> yield(name: "mean")'

$ influx query -o demo -r -f influx_query.sql
#group,false,false,true,true,false,false,true,true,true
#datatype,string,long,dateTime:RFC3339,dateTime:RFC3339,dateTime:RFC3339,double,string,string,string
#default,mean,,,,,,,,
,result,table,_start,_stop,_time,_value,_field,_measurement,std_name
,,0,2022-06-09T10:49:15.292083412Z,2022-06-10T10:49:15.292083412Z,2022-06-10T09:51:29.180459209Z,77,score,student,weiyigeek
,,0,2022-06-09T10:49:15.292083412Z,2022-06-10T10:49:15.292083412Z,2022-06-10T09:51:34.706980312Z,88,score,student,weiyigeek
,,0,2022-06-09T10:49:15.292083412Z,2022-06-10T10:49:15.292083412Z,2022-06-10T09:51:39.036913603Z,99,score,student,weiyigeek


# 删除 student 表中指定时间范围内的数据
influx delete -b demo-bucket -o demo -p std_name=weiyigeek --start '2022-06-05T08:26:39.455Z' --stop '2022-06-10T09:50:39.455Z'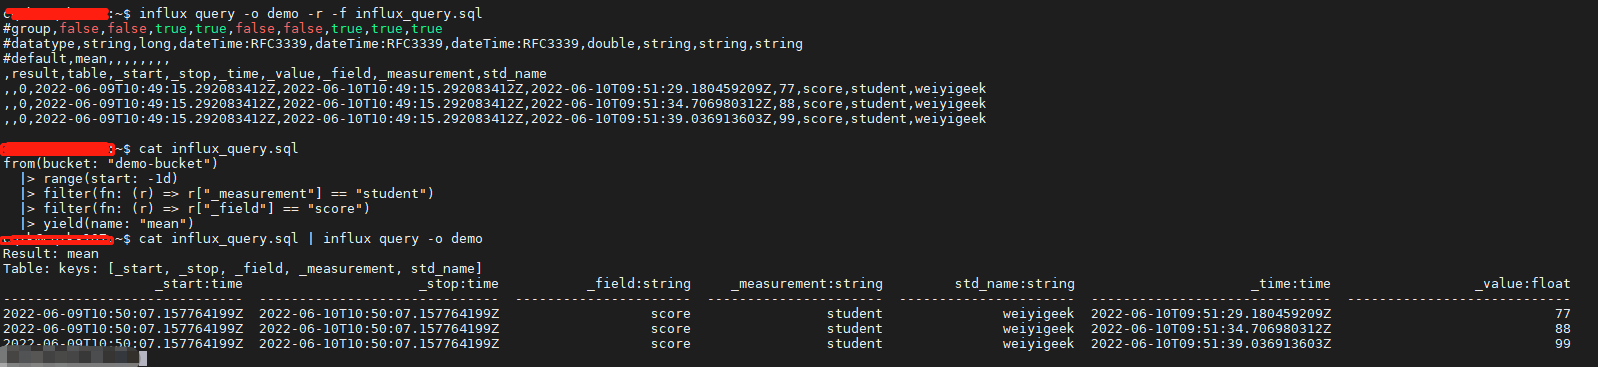
WeiyiGeek.influx-cli命令行查询
温馨提示: 除了指定FS查询文件外, 可通过 influx query打开查询管道(pipe),然后输入Flux查询语句,然后按住ctrl+d进行执行查询。
温馨提示: InfluxDB2.x 提供了很多种方式执行Flux或者InfluxQL,例如,UI的Data Explorer、Influx CLI、InfluxDB API和REPL。
- 数据备份与恢复 描述: influxdb 使用 influx 命令进行数据和元数据的备份,非常注意 1.x 和 2.x备份数据不兼容。
# V2.x 的备份方法
influx backup ./back -t 58s6gl9hD8lk-AS_i6mUaYMMCGe6N1vIfVpJUo2xJ2HkWMlWx2yp7r7IKZsyF6h8vQdTPfIpGyHtbALayLgUQw==

# V2.x 的数据恢复
influx restore ./back --bucket demo-bucket
温馨提示: 如果恢复的 bucket 名称已经在现有数据库中存在 则使用–new-bucket 为恢复的数据库指定一个新名称并将数据恢复到新名称的bucket中
以 API 请求操作 influxdb
描述: 官方文档参考 https://docs.influxdata.com/influxdb/v2.2/reference/api/
Write API - 数据写入
将org,bucket 通过url传参形式添加到参数中
添加或修改Accept请求头为 appliction/json(实测该接口不反回数据,可选填)
添加或修改Content-Type请求头为 text/plain
将Line Protocol的数据添加到请求体中
curl --request POST \
"http://10.98.134.121:8086/api/v2/write?org=demo&bucket=demo-bucket&precision=ns" \
  --header "Authorization: Token nxlkweOIxTOYQhNzI4QtuBHrKQtyOLFkA2KzJsBpO71hxZT7i6rmdyIgSuexuKbda1qL9x8vjJWUUH5rzBleKA==" \
  --header "Content-Type: text/plain; charset=utf-8" \
  --header "Accept: application/json" \
  --data-binary 'hobby,name=weiyigeek,city=ChongQing id=1002,love=computer'
Query API - 数据写入
- 将org或orgID通过url传参的形式添加到参数中
- 添加或修改Accept请求头为 appliction/csv (Postman中不需要添加)
- 添加或修改Content-Type请求头为 application/vnd.flux (可省略)
- 将查询语句放在请求体中
使用PostMan进行influxDB的API调用 描述: 在使用Postman测试时我们需要先进行鉴权设置,在进入Postman Collections 或单个请求的 Authorization 功能选项。 例如:
- Type 选择API Key
- Key 填入 Authorization
- Value 填入 Token YOUR_TOKEN
- Add to 选择Header
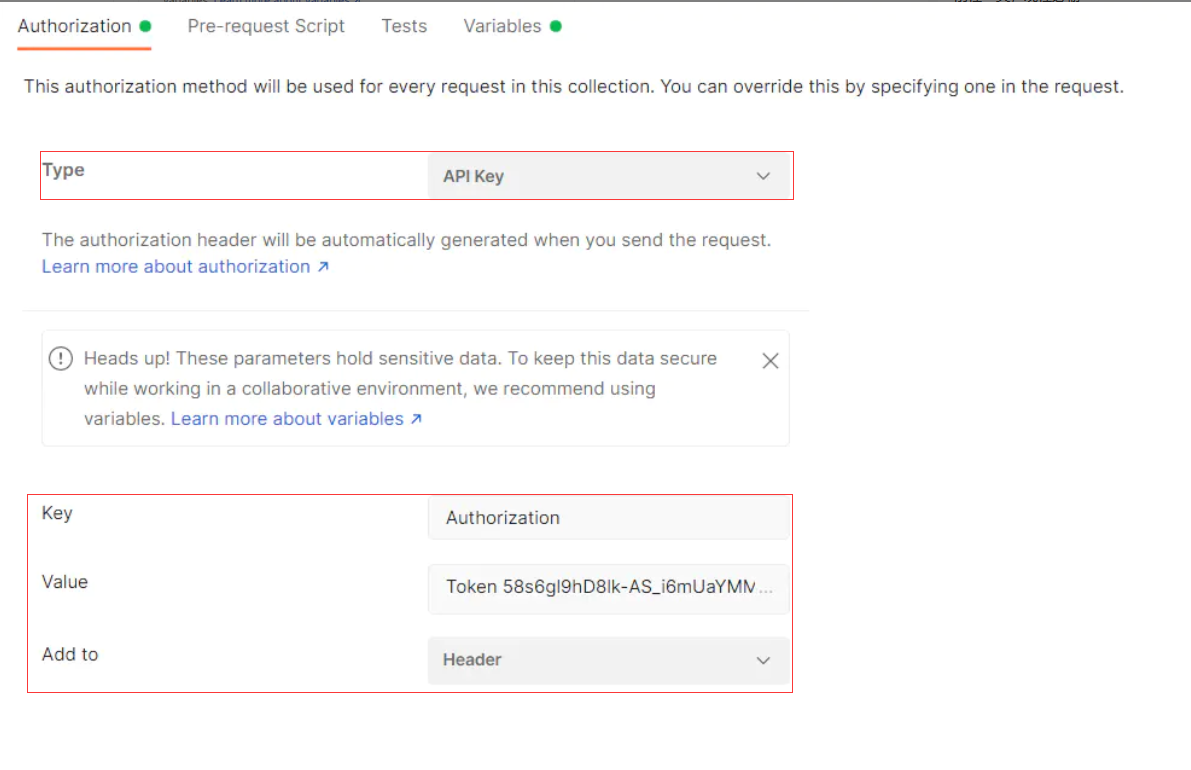
WeiyiGeek.Postman进行influxDB的API调用
0x0n 入坑出坑
InfluxDB 2.X
问题1.在执行influx write写入数据到infludb时报failure writing points to database: partial write: points beyond retention policy dropped=1错误。
- 错误信息:
influx write -b demo-bucket -o demo 'student,std_name=weiyi id=10001,age=29,score=100 1654850189241' -t 'nxlkweOIxTOYQhNzI4QtuBHrKQtyOLFkA2KzJsBpO71hxZT7i6rmdyIgSuexuKbda1qL9x8vjJWUUH5rzBleKA==' --precision ms ---http-debug
Error: failed to write data: 422 Unprocessable Entity: failure writing points to database: partial write: points beyond retention policy dropped=1- 解决办法: 将 demo-bucket 桶的新保留时间设置为0.
$ influx bucket update -id 2d0184d3af5ec8b2 --retention 0
  ID                      Name            Retention       Shard group duration    Organization ID         Schema Type
  2d0184d3af5ec8b2        demo-bucket     infinite        24h0m0s                 08472f250ef4212e        implicit
参考地址: https://www.jianshu.com/p/268fca65f10e
原文地址:https://cloud.tencent.com/developer/article/2129886
版权声明:本文内容由互联网用户自发贡献,该文观点与技术仅代表作者本人。本站仅提供信息存储空间服务,不拥有所有权,不承担相关法律责任。如发现本站有涉嫌侵权/违法违规的内容, 请发送邮件至 dio@foxmail.com 举报,一经查实,本站将立刻删除。