
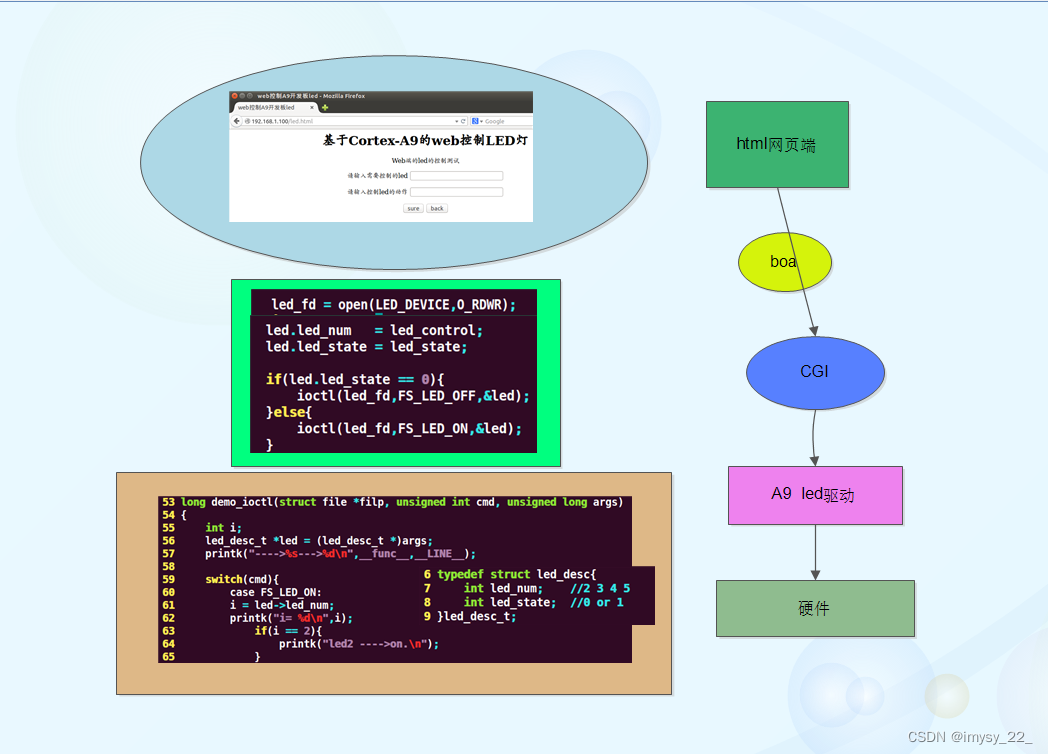
1、模拟数据传输到web
为了把硬件传感器上的数据上传到web网页,我们需要在跑linux服务器的开发板上写一个应用程序,并创建出几个线程来收集传感器检测到的数据,通过进程/线程间通信、boa与cgic库的知识来实现数据上传到web网页。
例程:
main.c
#include <stdio.h>

#include <pthread.h>

#include <errno.h>

#include <signal.h>

#include <unistd.h>

#include <sys/shm.h>

#include <sys/sem.h>

#include <sys/ipc.h>

#include "data_global.h"


void release_pthread_resource(int signo);


extern pthread_mutex_t mutex_client_request,

        		mutex_refresh,

        		mutex_sqlite,

	        	mutex_transfer,

	        	mutex_sms,

	        	mutex_buzzer,

	         	mutex_led;


extern pthread_cond_t  cond_client_request,

        		cond_refresh,

        		cond_sqlite,

	        	cond_transfer,

	        	cond_transfer,

	        	cond_sms,

	        	cond_buzzer,

	         	cond_led;


extern int msgid;

extern int shmid;

extern int semid;


pthread_t  id_client_request,

		  id_refresh,

		  id_sqlite,

		  id_transfer,

		  id_sms,

		  id_buzzer,

		  id_led;


int main(int argc, const char *argv[])

{

	//

	pthread_mutex_init(&mutex_client_request,NULL);

	pthread_mutex_init(&mutex_refresh,NULL);

	pthread_mutex_init(&mutex_sqlite,NULL);

	pthread_mutex_init(&mutex_transfer,NULL);

	pthread_mutex_init(&mutex_sms,NULL);

	pthread_mutex_init(&mutex_buzzer,NULL);

	pthread_mutex_init(&mutex_led,NULL);


	signal (SIGINT, release_pthread_resource);


	pthread_cond_init(&cond_client_request,NULL);

	pthread_cond_init(&cond_refresh,NULL);

	pthread_cond_init(&cond_sqlite,NULL);

	pthread_cond_init(&cond_transfer,NULL);

	pthread_cond_init(&cond_sms,NULL);

	pthread_cond_init(&cond_buzzer,NULL);

	pthread_cond_init(&cond_led,NULL);


	pthread_create(&id_client_request,  NULL,pthread_client_request,NULL);

	pthread_create(&id_refresh,		NULL,pthread_refresh,NULL);

	pthread_create(&id_sqlite,		NULL,pthread_sqlite,NULL);

	pthread_create(&id_transfer,	NULL,pthread_transfer,NULL);

	pthread_create(&id_sms,			NULL,pthread_sms,NULL);

	pthread_create(&id_buzzer,		NULL,pthread_buzzer,NULL);

	pthread_create(&id_led,			NULL,pthread_led,NULL);


	//

	pthread_join(id_client_request,NULL);   printf ("pthread1\n");

	pthread_join(id_refresh,NULL);          printf ("pthread2\n");

	pthread_join(id_sqlite,NULL);			printf ("pthread3\n");

	pthread_join(id_transfer,NULL);			printf ("pthread4\n");

	pthread_join(id_sms,NULL);				printf ("pthread5\n");

	pthread_join(id_buzzer,NULL);			printf ("pthread6\n");

	pthread_join(id_led,NULL);				printf ("pthread7\n");


	return 0;

}


void release_pthread_resource(int signo)

{


	pthread_mutex_destroy (&mutex_client_request);

	pthread_mutex_destroy (&mutex_refresh);

	pthread_mutex_destroy (&mutex_sqlite);

	pthread_mutex_destroy (&mutex_transfer);

	pthread_mutex_destroy (&mutex_sms);

	pthread_mutex_destroy (&mutex_buzzer);

	pthread_mutex_destroy (&mutex_led);


 	pthread_cond_destroy (&cond_client_request);

 	pthread_cond_destroy (&cond_refresh);

 	pthread_cond_destroy (&cond_sqlite);

 	pthread_cond_destroy (&cond_transfer);

 	pthread_cond_destroy (&cond_sms);

 	pthread_cond_destroy (&cond_buzzer);

 	pthread_cond_destroy (&cond_led);


	 pthread_detach(id_client_request);

	 pthread_detach(id_refresh);

	 pthread_detach(id_sqlite);

	 pthread_detach(id_transfer);

	 pthread_detach(id_sms);

	 pthread_detach(id_buzzer);

	 pthread_detach(id_led);


	 printf("all pthread is detached\n");


	 msgctl (msgid, IPC_RMID, NULL);

	 shmctl (shmid, IPC_RMID, NULL);

	 semctl (semid, 1, IPC_RMID, NULL);


	 exit(0);

}
pthread_client_request.c
#include "data_global.h"
extern int msgid;
extern key_t key;
extern pthread_mutex_t mutex_client_request,
mutex_refresh,
mutex_sqlite,
mutex_transfer,
mutex_analysis,
mutex_sms,
mutex_buzzer,
mutex_led,
mutex_camera;
extern pthread_cond_t cond_client_request,
cond_refresh,
cond_sqlite,
cond_transfer,
cond_analysis,
cond_sms,
cond_buzzer,
cond_led,
cond_camera;
extern char recive_phone[12] ;
extern char center_phone[12] ;
struct msg msgbuf;
//:澶勭悊娑堟伅闃熷垪閲岃姹傜殑绾跨▼.
void *pthread_client_request(void *arg)
{
if((key = ftok("/tmp",'g')) < 0){
perror("ftok failed .\n");
exit(-1);
}
msgid = msgget(key,IPC_CREAT|IPC_EXCL|0666);
if(msgid == -1) {
if(errno == EEXIST){
msgid = msgget(key,0777);
}else{
perror("fail to msgget");
exit(1);
}
}
printf("pthread_client_request\n");
while(1){
bzero(&msgbuf,sizeof(msgbuf));
printf("wait form client request...\n");
msgrcv (msgid, &msgbuf, sizeof (msgbuf) - sizeof (long), 1L, 0);
printf ("Get %ldL msg\n", msgbuf.msgtype);
printf ("text[0] = %#x\n", msgbuf.text[0]);
switch(msgbuf.msgtype){
case 1L:
printf("hello led\n");
break;
case 2L:
printf("hello beep\n");
break;
case 3L:
printf("hello seg\n");
break;
case 4L:
printf("hello fan\n");
break;
case 5L:
printf("set env data\n");
printf("temMAX: %d\n",*((int *)&msgbuf.text[1]));
printf("temMIN: %d\n",*((int *)&msgbuf.text[5]));
printf("humMAX: %d\n",*((int *)&msgbuf.text[9]));
printf("humMAX: %d\n",*((int *)&msgbuf.text[13]));
printf("illMAX: %d\n",*((int *)&msgbuf.text[17]));
printf("illMAX: %d\n",*((int *)&msgbuf.text[21]));
break;
case 6L:
case 7L:
case 8L:
case 9L:
printf("你可以将这些作为扩展来学习,加油.\n");
break;
case 10L:
{
int i = 0 , j = 0 ;
for(i = 0 ; i < 11; i++){
recive_phone[i] = msgbuf.text[i];
}
recive_phone[i] = '\0';
printf("recive:%s\n",recive_phone);
for(j = 0 ;msgbuf.text[i] != '\0' && j < 12; i++, j++)
{
center_phone[j] = msgbuf.text[i];
}
center_phone[j] = '\0';
printf("center:%s\n",center_phone);
#if 0
pthread_mutex_lock (&mutex_slinklist);
sqlite_InsertLinknode (ENV_UPDATE, all_info_RT, sto_no, 0);//0,0鍒嗗埆鏄粨搴撳彿鍜岃揣鐗╃绫诲彿
pthread_mutex_unlock (&mutex_slinklist);
pthread_cond_signal (&cond_sqlite);
#endif
}
break;
default:
break;
}
}
}
#if 0
long msgtype;//具体的消息类型
消息类型的分配:
1L: LED控制
2L: 蜂鸣器控制
3L: 四路LED灯模拟的数码管
4L: 风扇
5L: 温湿度最值设置
6L-7L-8L-9L,用于个人的扩展
10L: 3G通信模块-GPRS
switch(msgbuf.msgtype){
case 1L: ... break;
....
default .... break;
}
#endif
pthread_refresh.c
#include "data_global.h"

#include "sem.h"


#define N 1024  //for share memory


extern int shmid;

extern int msgid;

extern int semid;


extern key_t shm_key;

extern key_t sem_key;

extern key_t key; //msg_key


extern pthread_mutex_t mutex_client_request,

        		mutex_refresh,

        		mutex_sqlite,

	        	mutex_transfer,

	        	mutex_analysis,

	        	mutex_sms,

	        	mutex_buzzer,

	         	mutex_led,

	         	mutex_camera;


extern pthread_cond_t  cond_client_request,

        		cond_refresh,

        		cond_sqlite,

	        	cond_transfer,

	        	cond_analysis,

	        	cond_sms,

	        	cond_buzzer,

	         	cond_led,

	         	cond_camera;


extern struct env_info_client_addr  sm_all_env_info;


 struct shm_addr

 {

    char shm_status;   //shm_status可以等于home_id,用来区分共享内存数据

    struct env_info_client_addr  sm_all_env_info;

};

struct shm_addr *shm_buf;


int file_env_info_struct(struct env_info_client_addr  *rt_status,int home_id);


void *pthread_refresh(void *arg)

{

	//semaphore for access to resource limits

	if((sem_key = ftok("/tmp",'g')) < 0){

		perror("ftok failed .\n");

		exit(-1);

	}


	semid = semget(sem_key,1,IPC_CREAT|IPC_EXCL|0666);

	if(semid == -1)	{

		if(errno == EEXIST){

			semid = semget(sem_key,1,0777);

		}else{

			perror("fail to semget");

			exit(1);

		}

	}else{

		init_sem (semid, 0, 1);

	}


	//share memory for env_info refresh config

	if((shm_key = ftok("/tmp",'g')) < 0){

		perror("ftok failed .\n");

		exit(-1);

	}


	shmid = shmget(shm_key,N,IPC_CREAT|IPC_EXCL|0666);

	if(shmid == -1)	{

		if(errno == EEXIST){

			shmid = shmget(key,N,0777);

		}else{

			perror("fail to shmget");

			exit(1);

		}

	}


	//share memap

	if((shm_buf = (struct shm_addr *)shmat(shmid,NULL,0)) == (void *)-1)

	{

		perror("fail to shmat");

		exit(1);

	}


	printf("pthread_refresh ......>>>>>>>\n");


#if 1

	bzero (shm_buf, sizeof (struct shm_addr));

	while(1){

		sem_p(semid,0);

		shm_buf->shm_status = 1;

		file_env_info_struct(&shm_buf->sm_all_env_info,shm_buf->shm_status);

		sleep(1);

		sem_v(semid,0);

	}

#endif


}


int file_env_info_struct(struct env_info_client_addr *rt_status,int home_id)

{

	int  env_info_size = sizeof(struct env_info_client_addr);

	//printf("env_info_size = %d.\n",env_info_size);


	rt_status->monitor_no[home_id].zigbee_info.temperature = 10.0;

	rt_status->monitor_no[home_id].zigbee_info.tempMIN = 2.0;

	rt_status->monitor_no[home_id].zigbee_info.tempMAX = 20.0;

	rt_status->monitor_no[home_id].zigbee_info.humidity  = 20.0;

	rt_status->monitor_no[home_id].zigbee_info.humidityMIN  = 10.0;

	rt_status->monitor_no[home_id].zigbee_info.humidityMAX  = 30.0;

	rt_status->monitor_no[home_id].zigbee_info.reserved[0]  = 0.01;

	rt_status->monitor_no[home_id].zigbee_info.reserved[1]  = -0.01;


	rt_status->monitor_no[home_id].a9_info.adc  = 9.0;

	rt_status->monitor_no[home_id].a9_info.gyrox  = -14.0;

	rt_status->monitor_no[home_id].a9_info.gyroy  = 20.0;

	rt_status->monitor_no[home_id].a9_info.gyroz  = 40.0;

	rt_status->monitor_no[home_id].a9_info.aacx  = 642.0;

	rt_status->monitor_no[home_id].a9_info.aacy  = -34.0;

	rt_status->monitor_no[home_id].a9_info.aacz  = 5002.0;

	rt_status->monitor_no[home_id].a9_info.reserved[0]  = 0.01;

	rt_status->monitor_no[home_id].a9_info.reserved[1]  = -0.01;


	return 0;

}
通过Makefile 编译链接出一个可执行程序 monitor_obj
CROSS_COMPILE=arm-linux-
CC=$(CROSS_COMPILE)gcc
CFLAGS= -c -g
#LDFLAGS= -lpthread -L ./lib -lsqlite3
LDFLAGS= -lpthread

OBJS=main.o data_global.o pthread_transfer.o \
	 pthread_client_request.o pthread_buzzer.o pthread_led.o\
	 pthread_sqlite.o \
	 pthread_refresh.o pthread_sms.o

monitor_obj :$(OBJS)
	$(CC) -o $@ $^ $(LDFLAGS)
	mv *o ./obj
$(OBJS):%.o:%.c
	$(CC) $(CFLAGS) $< -o $@

install:
	sudo cp monitor_obj ~/source/rootfs/

.PHONY:clean
clean:
	rm *.o monitor_obj -rf
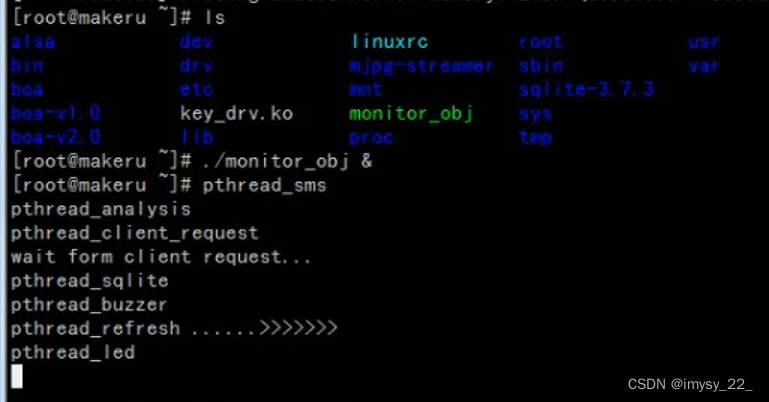
在开发板上运行此程序
(&的意义: 这里需要后台运行 如果不后台运行命令行就会一直停留在此程序)
在Ubuntu上打开制定的网页便会输出一下信息

网页的搭建很简单,主要是在HTML的<body>中添加一个<table>
<table width="1080" height="511" border="1" align="center">

	<tr>

		<td width="283" height="500" background="./images/zigee.jpg" align="left"></td>

		<td width="432"><iframe src="cgi-bin/env1.cgi" height="500" width="518" align="middle"></iframe></td>

		<td width="283" background="./images/gprs.jpg" align="right"></td>

	</tr>

</table>
而这个env1.cgi是源文件env1.c生成
#include <stdio.h>
#include <stdlib.h>
#include <sys/types.h>
#include <sys/ipc.h>
#include <sys/shm.h>
#include <string.h>
#include <errno.h>
#include <sys/sem.h>
#include <unistd.h>
#include "sem.h"
#include "cgic.h"
#include "data_global.h"

#define N 32

#define MONITOR_NUM 1

char status[2][6] = {"Close", "Open"};
char fan_status[4][6] = {"Close", "One", "Two", "Three"};

 struct shm_addr
 {
    char shm_status;
    struct env_info_client_addr  sm_all_env_info;
};

int cgiMain()
{
	key_t key;
	int shmid,semid;
	struct shm_addr *shm_buf;


	if((key = ftok("/tmp",'i')) <0)
	{
		perror("ftok");
		exit(1);
	}
	printf("key = %x\n",key);

	if((semid  = semget(key, 1, 0666)) < 0)
	{
		perror("semget");
		exit(1);
	}

	if((shmid = shmget(key, N, 0666 )) == -1)
	{
			perror("shmget");
			exit(1);
	}

	if((shm_buf = (struct shm_addr*)shmat(shmid, NULL, 0)) == (void*)-1 )
	{
		perror("shmat");
		exit(1);
	}

	sem_p(semid,0);

	cgiHeaderContentType("text/html");
	fprintf(cgiOut, "<head><meta http-equiv=\"refresh\" content=\"1\"><style><!--body{line-height:50%}--></style> </head>");
	fprintf(cgiOut, "<HTML>\n");
	fprintf(cgiOut, "<BODY bgcolor=\"#666666\">\n");
//fprintf(cgiOut, "<h1><font color=\"#FF0000\">HOME_ID #%d:</font></H2>\n ", shm_buf->shm_status);
	if (shm_buf->shm_status == 1)
	{
		fprintf(cgiOut, "<script>function show(){var date =new Date(); var now = \"\"; now = date.getFullYear()+\"年\"; now = now + (date.getMonth()+1)+\"月\"; \ now = now + date.getDate()+\"日\"; now = now + date.getHours()+\"时\"; now = now + date.getMinutes()+\"分\";now = now + date.getSeconds()+\"秒\"; document.getElementById(\"nowDiv\").innerHTML = now; setTimeout(\"show()\",1000);} </script> \n ");
		fprintf(cgiOut, "<h2><font face=\"Broadway\"><font color=\"#00FAF0\">Home1 Real-time Environment Info:</font></font></H2>\n ");
		fprintf(cgiOut, "<h2 align=center><font color=\"#cc0033\"><body onload=\"show()\"> <div id=\"nowDiv\"></div></font></h2> \n ");

		fprintf(cgiOut, "<h4>ZIGBEE数据显示部分</H4>\n ");
		fprintf(cgiOut, "<h4>Temperature:\t%0.2f</H4>\n ", shm_buf->sm_all_env_info.monitor_no[shm_buf->shm_status].zigbee_info.temperature );
		fprintf(cgiOut, "<h4>Humidity:\t%0.2f</H4>\n ", shm_buf->sm_all_env_info.monitor_no[shm_buf->shm_status].zigbee_info.humidity);

		fprintf(cgiOut, "<h4>A9数据显示部分</H4>\n ");
		fprintf(cgiOut, "<h4>Adc:\t%0.2f</H4>\n ", shm_buf->sm_all_env_info.monitor_no[shm_buf->shm_status].a9_info.adc);
		fprintf(cgiOut, "<h4>GYROX:\t%d</H4>\n ", shm_buf->sm_all_env_info.monitor_no[shm_buf->shm_status].a9_info.gyrox);
		fprintf(cgiOut, "<h4>GYROY:\t%d</H4>\n ", shm_buf->sm_all_env_info.monitor_no[shm_buf->shm_status].a9_info.gyroy);
		fprintf(cgiOut, "<h4>GYROZ:\t%d</H4>\n ", shm_buf->sm_all_env_info.monitor_no[shm_buf->shm_status].a9_info.gyroz);
		fprintf(cgiOut, "<h4>AACX :\t%d</H4>\n ", shm_buf->sm_all_env_info.monitor_no[shm_buf->shm_status].a9_info.aacx);
		fprintf(cgiOut, "<h4>AACY :\t%d</H4>\n ", shm_buf->sm_all_env_info.monitor_no[shm_buf->shm_status].a9_info.aacy);
		fprintf(cgiOut, "<h4>AACZ :\t%d</H4>\n ", shm_buf->sm_all_env_info.monitor_no[shm_buf->shm_status].a9_info.aacz);
		fprintf(cgiOut, "<h4>A9-RESERVED[0]:\t%d</H4>\n ", shm_buf->sm_all_env_info.monitor_no[shm_buf->shm_status].a9_info.reserved[0]);
		fprintf(cgiOut, "<h4>A9-RESERVED[1]:\t%d</H4>\n ", shm_buf->sm_all_env_info.monitor_no[shm_buf->shm_status].a9_info.reserved[1]);

		fprintf(cgiOut, "<h4>STM32数据显示部分</H4>\n ");
		fprintf(cgiOut, "<h4>......</H4>\n ");
	}
	else
	{
		fprintf(cgiOut, "<h2><font face=\"Broadway\"><font color=\"#FFFAF0\">Close!</font></font></H2>\n ");
	}
//	fprintf(cgiOut, "<h3>:</H3>\n ");
	fprintf(cgiOut, "</BODY></HTML>\n");
	sem_v (semid, 0);
	return 0;
}
把这个env1.html放在boa下的www目录下,env1.cgi放在cgi-bin目录下即可
2、web显示mjpeg-streamer视频图像
这部分过程比较艰难,学完后我摆烂了一天打了一整天游戏抚慰了我艰辛的心灵哈哈哈。
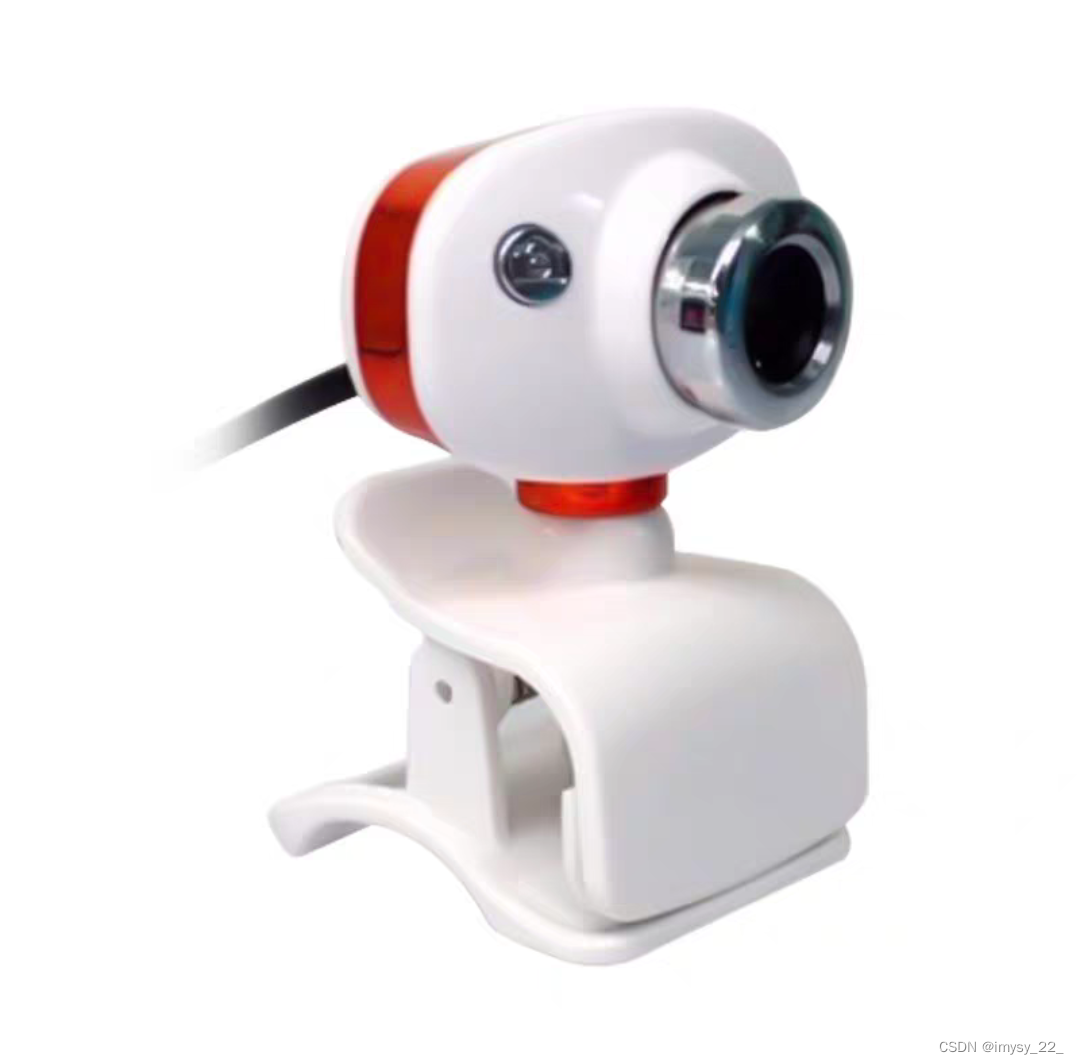
①驱动移植
因为要使用摄像头这个硬件,肯定要避免不了操作linux内核,驱动移植、以及设备树修改。
1. 修改设备树文件
vim arch/arm/boot/dts/exynos4412-fs4412.dts添加如下内容:
usbphy: usbphy@125B0000 {
#address-cells = <1>;
#size-cells = <1>;
compatible = "samsung,exynos4x12-usb2phy";
reg = <0x125B0000 0x100>;
ranges;
clocks = <&clock 2>, <&clock 305>;
clock-names = "xusbxti", "otg";
usbphy-sys {
reg = <0x10020704 0x8 0x1001021c 0x4>;
};
};
ehci@12580000 {
status = "okay";
usbphy = <&usbphy>;
};
usb3503@08 {
compatible = "smsc,usb3503";
reg = <0x08 0x4>;
connect-gpios = <&gpm3 3 1>;
intn-gpios = <&gpx2 3 1>;
reset-gpios = <&gpm2 4 1>;
initial-mode = <1>;
};
2. 配置内核
make menuconfig
3. 编译内核和设备树
$ make uImage
$ make dtbs
4. 测试:
拷贝内核和设备树文件到/tftpboot 目录下
$ cp arch/arm/boot/uImage /tftpboot
$ cp arch/arm/boot/dts/exynos4412-fs4412.dtb /tftpboot/
启动目标板并在目标板上完成如下操作:
插入U 盘显示如下
[ 72.695000] usb 1-3.2: USB disconnect, device number 3
[ 74.435000] usb 1-3.2: new high-speed USB device number 4 using exynos-ehci
[ 74.555000] usb-storage 1-3.2:1.0: USB Mass Storage device detected
[ 74.560000] scsi1 : usb-storage 1-3.2:1.0
[ 75.645000] scsi 1:0:0:0: Direct-Access Kingston DataTraveler 160 PMAP PQ: 0
ANSI: 4
[ 75.660000] sd 1:0:0:0: Attached scsi generic sg0 type 0
[ 76.695000] sd 1:0:0:0: [sda] 15556608 512-byte logical blocks: (7.96 GB/7.41 GiB)
[ 76.700000] sd 1:0:0:0: [sda] Write Protect is off
[ 76.705000] sd 1:0:0:0: [sda] No Caching mode page found
[ 76.710000] sd 1:0:0:0: [sda] Assuming drive cache: write through
[ 76.725000] sd 1:0:0:0: [sda] No Caching mode page found
[ 76.730000] sd 1:0:0:0: [sda] Assuming drive cache: write through
[ 76.760000] sda: sda1 (sda 是设备名 sda1 是分区名)
[ 76.770000] sd 1:0:0:0: [sda] No Caching mode page found
[ 76.770000] sd 1:0:0:0: [sda] Assuming drive cache: write through
[ 76.780000] sd 1:0:0:0: [sda] Attached SCSI removable disk
在终端上执行挂载的设备与上边显示相关
# mount -t vfat /dev/sda1 /mnt
# ls
可以查看到U 盘内容,即大功告成!!!
3、mjpg-stream的移植

关于mjpg-stream的资料大家可以在下面这个网址查看:http://sourceforge.net/apps/mediawiki/mjpg-streamer/index.php?title=Main_Page
source code的网址是:http://mjpg-streamer.svn.sourceforge.net/viewvc/mjpg-streamer/
mjpg-stream的移植需要jpeg的库,所以我们先移植jpeg的库
(1)jpeg库的移植
1)jpeg源码包通过下面这个网址下载
http://www.ijg.org/files/jpegsrc.v8b.tar.gz
2)解压源码包
tar xvf jpegsrc.v8b.tar.gz
3)配置源码
cd jpeg-8b
./configure --prefix=/home/fengjunhui/securitymonitor/mjpeg-streamer/video/jpegarm --host=arm-none-linux-gnueabi
(注意:--prefix表示最终生成的库和头文件等存放的目录,自己指定一个存在的路径就可以,
后面编译mjpeg-streamer的时候回用到,此处必须使用绝对路径,--host=arm-none-linux-gnueabi --host表示生成的库的运行平台,注意是两个 - ,末尾不能加- ,./configure 之后为一行命令)
比如我的路径: pwd
/home/fengjunhui/securitymonitor/mjpeg-streamer/video/jpegarm
(这个目录建议自己创建一个在mjpeg-streamer的上一级目录下)
4)编译
make
5)安装
make install
6)拷贝库到文件系统中
sudo cp /home/fengjunhui/securitymonitor/mjpeg streamer/video/jpegarm/lib/* /home/fengjunhui/source/rootfs/lib
(2)、移植mjpg-streamer
1、下载源码,在https://sourceforge.net/projects/mjpg-streamer/下载的源码(mjpg-streamer-code-182) 最新的版本使用以下命令下载,
svn cohttps://mjpg-streamer.svn.sourceforge.NET/svnroot/mjpg-streamermjpg-streamer
解压,并进入目录一共有 这么多目录
doc mjpg-streamer udp_client
mjpeg-client mjpg-streamer-experimental uvc-streamer
mjpg-streamer :目录下提供了 的执行程序和各个输入输出设备组件
uvc-streamer : 目录下提供了 uvc-streamer的可执行目录
mjpeg-client: : 分别有 linux和windows 的客户端
2、进入其目录
cd /home/mjpg/mjpg-streamer-code-182/mjpg-streamer
3、修改源码
修改
vi ./plugins/input_uvc/Makfile,
修改
CFLAGS += -O1 -DLINUX -D_GNU_SOURCE -Wall -shared -fPIC
为
CFLAGS += -O1 -DLINUX -D_GNU_SOURCE -Wall -shared -fPIC -I /home/fengjunhui/securitymonitor/mjpeg-streamer/video/jpegarm/include
修改
(CC)(CFLAGS) -o @inputuvc.cv4l2uvc.lojpegutils.lodynctrl.lo(LFLAGS)
为 (注意还是一行,不要直接复制粘贴,根据实际情况思考来做)
(CC)(CFLAGS) -L /home/fengjunhui/securitymonitor/mjpeg-streamer/video/jpegarm/lib –o @inputuvc.cv4l2uvc.lojpegutils.lodynctrl.lo(LFLAGS)
注:/home/fengjunhui/securitymonitor/mjpeg-streamer/video/jpegarm/lib就是上面移植jpeg库后生成的lib、include的目录的路径,千万不要写错了
4、在mjpg-streamer-code-182/mjpg-streamer 目录下
编译:make CC=arm-linux-gcc
在mjpg-streamer生成了
input*.so output*.so 和 mjpg_streamr 可执行文件
小问题:
make CC=arm-linux-gcc
make: svnversion: Command not found
解决方案:sudo apt-get install subversion
安装之前先更新一下软件包的源和依赖:
Sudo apt-get update 更新软件源
Sudo apt-get -f install 更新依赖
再次编译:
make
Nothing to be done for `all'.
先
make clean,
然后再
make CC=arm-linux-gcc
查看生成的库和可执行的文件:
fengjunhui@ubuntu:~/securitymonitor/mjpeg-streamer/mjpg-streamer-code-182/mjpg-streamer$ ls *.so
input_file.so input_uvc.so output_http.so
input_testpicture.so output_file.so output_udp.so
ls mjpg_streamer
mjpg_streamer
5、在开发板建立mjpg-streamer安装目录 (关键性的拷贝过程)
mkdir /home/fengjunhui/source/rootfs/mjpg-streamer (你的根文件系统目录)
cp *.so /home/fengjunhui/source/rootfs/mjpg-streamer -arf
cp mjpg_streamer /home/fengjunhui/source/rootfs/mjpg-streamer -arf
将源码目录中的start.sh和目录www拷贝到~/source/rootfs/mjpg-streamer/目录下,然后就可以测试啦
sudo cp start.sh www/ ~/source/rootfs/mjpg-streamer/ -arf
- 测试:
./start.sh (记得插上摄像头设备喔)
MJPEG格式错误,
ERROR opening V4L interface: No such file or directory
Init v4L2 failed !! exit fatal
i: init_VideoIn failed
MJPG-streamer [1296]: init_VideoIn failed
解决方案:
- 插上USB摄像头,查看设备节点: ls /dev/video0
- 如果没有设备节点,则参考《ttyUSB0设备节点不显示的解决方案.doc》
视频流格式错误:
cannot be displayed because it contains errors
修改start.sh文件,加参数-y,然后运行start.sh;
./mjpg_streamer -i “./input_uvc.so -y” -o “./output_http.so -w ./www”
在PC机打开一个网页,输入http://192.168.1.100:8080/?action=stream就可以看到图像。 (板子ip)
以上是mjpg-streamer的移植全过程,下面说说在这过程可能出现的错误以及解决方法。
1、当编译mjpg-stream-r63时出错
[root@wu mjpg-stream-r63]# make CC=arm-linux-gcc
arm-linux-gcc -O3 -DLINUX -D_GNU_SOURCE -Wall -c -o mjpg_streamer.o mjpg_streamer.c
mjpg_streamer.c:27:28: fatal error: linux/videodev.h: No such file or directory
compilation terminated.
make: * [mjpg_streamer.o] 错误 1
原因:这是因为内核2.6.38和以后的版本已经移除了对 v4l1 的支持,这个东西可能比较老旧了。新的头文件是 video4linux2.h;相比v4l1很多接口都变化 。
解决办法:可以选择以前低版本内核,或者用新版本的mjpg-streamer-code-182,下载地址在上面有链接。
3、使用摄像头出现如下信息
………………..
Init v4L2 failed !! exit fatal
init_VideoIn failed
………………..
原因:市面上大部分摄像头都是支持YUV的,而不是JPEG的。
解决方法:由于mjpg-stream支持JPEG和YUV两种格式,所以只需修改start.sh,在输入中加入 ” - y “
假如原来是./mjpg_streamer -i “./input_uvc.so ” -o “./output_http.so -w ./www”,则改为
./mjpg_streamer -i “./input_uvc.so -y” -o “./output_http.so -w ./www”即可。
总结:经过一轮的谷歌+百度后终于可以在firefox看了摄像头采集的图像
4、缺少库的支持
root@makeru :/mjpg-streamer# ./start.sh
MJPG-streamer [1308]: starting application
MJPG Streamer Version: svn rev:
MJPG-streamer [1308]: MJPG Streamer Version: svn rev:
ERROR: could not find input plugin
MJPG-streamer [1308]: ERROR: could not find input plugin
Perhaps you want to adjust the search path with:
MJPG-streamer [1308]: Perhaps you want to adjust the search path with:
# export LD_LIBRARY_PATH=/path/to/plugin/folder
MJPG-streamer [1308]: # export LD_LIBRARY_PATH=/path/to/plugin/folder
dlopen: libjpeg.so.8: cannot open shared object file: No such file or directory
MJPG-streamer [1308]: dlopen: libjpeg.so.8: cannot open shared object file: No such file or directory
忘记拷贝库(这里需要保证你拷贝的库是ARM格式的 file libjpeg.so.8 )
cp /home/fengjunhui/securitymonitor/mjpeg-streamer/video/jpegarm/lib/ /home/fengjunhui/source/rootfs/lib
cd mjpg-streamer-code-182/mjpg-streamer
cp *.so /home/fengjunhui/source/rootfs/mjpg-streamer -arf
cp mjpg-stream /home/fengjunhui/source/rootfs/mjpg-streamer -arf
将源码目录中的start.sh和目录www拷贝到~/source/rootfs/mjpg-streamer/目录下,然后就可以测试啦
sudo cp start.sh www/ ~/source/rootfs/mjpg-streamer/ -arf
7、获得帮助
获得帮助的方法在start.sh里有说明,以下举一个例子,运行./mjpg_streamer –help它会打印出以下帮助,可根据需要设置参数
The following parameters can be passed to this plugin:
[-d | –device ]…….: video device to open (your camera)
[-r | –resolution ]…: the resolution of the video device,
can be one of the following strings
QSIF QCIF CGA QVGA CIF VGA
SVGA XGA SXGA
or a custom value like the following
example: 640x480
[-f | –fps ]……….: frames per second
[-y | –yuv ]……….: enable YUYV format and disable MJPEG mode
[-q | –quality ]……: JPEG compression quality in percent
(activates YUYV format, disables MJPEG)
[-m | –minimum_size ].: drop frames smaller then this limit, useful
if the webcam produces small-sized garbage frames
may happen under low light conditions
[-n | –no_dynctrl ]…: do not initalize dynctrls of Linux-UVC driver
[-l | –led ]……….: switch the LED “on”, “off”, let it “blink” or leave
it up to the driver using the value “auto”
最后
本期实验结果我放在了bilibili中,最后别忘了在开发板上启动 boa 和 monitor_obj 程序。
把linux、web和摄像头加起来会怎么样
版权声明:本文内容由互联网用户自发贡献,该文观点与技术仅代表作者本人。本站仅提供信息存储空间服务,不拥有所有权,不承担相关法律责任。如发现本站有涉嫌侵权/违法违规的内容, 请发送邮件至 dio@foxmail.com 举报,一经查实,本站将立刻删除。