
前文传送门:
mybatis源码学习:从SqlSessionFactory到代理对象的生成
mybatis源码学习:一级缓存和二级缓存分析
mybatis源码学习:基于动态代理实现查询全过程
一、自定义插件流程
-
自定义插件,实现Interceptor接口。
-
实现intercept、plugin和setProperties方法。
-
使用@Intercepts注解完成插件签名。
-
在主配置文件注册插件。
/**
 * 自定义插件
 * Intercepts:完成插件签名,告诉mybatis当前插件拦截哪个对象的哪个方法
 *
 * @author Summerday
 */
@Intercepts({
        @Signature(type = StatementHandler.class,method = "parameterize",args = Statement.class)
})
public class MyPlugin implements Interceptor {
    /**
     * 拦截目标方法执行
     *
     * @param invocation
     * @return
     * @throws Throwable
     */
    @Override
    public Object intercept(Invocation invocation) throws Throwable {
        System.out.println("MyPlugin.intercept getMethod: "+invocation.getMethod());
        System.out.println("MyPlugin.intercept getTarget:"+invocation.getTarget());
        System.out.println("MyPlugin.intercept getArgs:"+ Arrays.toString(invocation.getArgs()));
        System.out.println("MyPlugin.intercept getClass:"+invocation.getClass());
        //执行目标方法
        Object proceed = invocation.proceed();
        //返回执行后的返回值
        return proceed;
    }

    /**
     * 包装目标对象,为目标对象创建一个代理对象
     *
     * @param target
     * @return
     */
    @Override
    public Object plugin(Object target) {
        System.out.println("MyPlugin.plugin :mybatis将要包装的对象:"+target);
        //借助Plugin类的wrap方法使用当前拦截器包装目标对象
        Object wrap = Plugin.wrap(target,this);
        //返回为当前target创建的动态代理
        return wrap;
    }

    /**
     * 将插件注册时的properties属性设置进来
     *
     * @param properties
     */
    @Override
    public void setProperties(Properties properties) {
        System.out.println("插件配置的信息:" + properties);
    }
}
xml配置注册插件
    <!--注册插件-->
    <plugins>
        <plugin interceptor="com.smday.interceptor.MyPlugin">
            <property name="username" value="root"/>
            <property name="password" value="123456"/>
        </plugin>
    </plugins>
二、测试插件
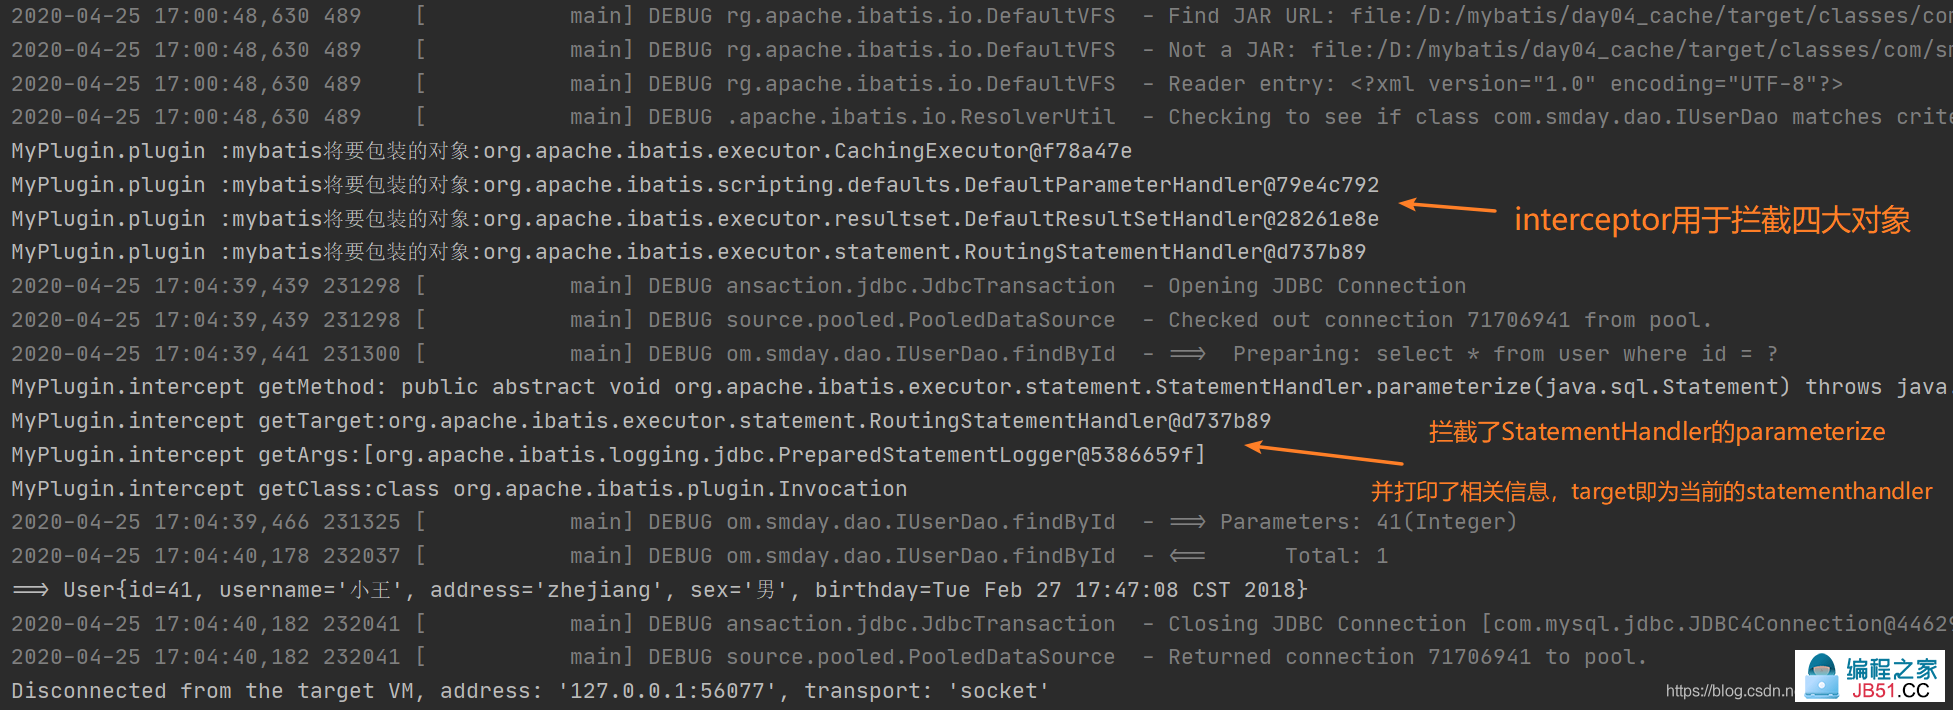
三、源码分析
1、inteceptor在Configuration中的注册
关于xml文件的解析,当然还是需要从XMLConfigBuilder中查找,我们很容易就可以发现关于插件的解析:
  private void pluginElement(XNode parent) throws Exception {
    if (parent != null) {
      for (XNode child : parent.getChildren()) {
        //获取到全类名
        String interceptor = child.getStringAttribute("interceptor");
        //获取properties属性
        Properties properties = child.getChildrenAsProperties();
        //通过反射创建实例
        Interceptor interceptorInstance = (Interceptor) resolveClass(interceptor).newInstance();
        //设置属性
        interceptorInstance.setProperties(properties);
        //在Configuration中添加插件
        configuration.addInterceptor(interceptorInstance);
      }
    }
  }

  public void addInterceptor(Interceptor interceptor) {
    //interceptorChain是一个存储interceptor的Arraylist
    interceptorChain.addInterceptor(interceptor);
  }
此时初始化成功,我们在配置文件中定义的插件,已经成功加入interceptorChain。
2、基于责任链的设计模式
我们看到chain这个词应该并不会陌生,我们之前学习过的过滤器也存在类似的玩意,什么意思呢?我们以Executor为例,当创建Executor对象的时候,并不是直接new Executor然后返回:

在返回之前,他进行了下面的操作:
executor = (Executor) interceptorChain.pluginAll(executor);
我们来看看这个方法具体干了什么:
  public Object pluginAll(Object target) {
    //遍历所有的拦截器
    for (Interceptor interceptor : interceptors) {
        //调用plugin,返回target包装后的对象
      target = interceptor.plugin(target);
    }
    return target;
  }
很明显,现在它要从chain中一一取出interceptor,并依次调用各自的plugin方法,暂且不谈plugin的方法,我们就能感受到责任链的功能:让一个对象能够被链上的任何一个角色宠幸,真好。
3、基于动态代理的plugin
那接下来,我们就成功进入我们自定义plugin的plugin方法:

  //看看wrap方法干了点啥
  public static Object wrap(Object target,Interceptor interceptor) {
    //获取获取注解的信息,拦截的对象,拦截的方法,拦截方法的参数。
    Map<Class<?>,Set<Method>> signatureMap = getSignatureMap(interceptor);
    //获取当前对象的Class
    Class<?> type = target.getClass();
    //确认该对象是否为我们需要拦截的对象
    Class<?>[] interfaces = getAllInterfaces(type,signatureMap);
    //如果是,则创建其代理对象,不是则直接将对象返回
    if (interfaces.length > 0) {
      return Proxy.newProxyInstance(
          type.getClassLoader(),interfaces,new Plugin(target,interceptor,signatureMap));
    }
    return target;
  }
getSignatureMap(interceptor)方法:其实就是获取注解的信息,拦截的对象,拦截的方法,拦截方法的参数。
  private static Map<Class<?>,Set<Method>> getSignatureMap(Interceptor interceptor) {
    //定位到interceptor上的@Intercepts注解
    Intercepts interceptsAnnotation = interceptor.getClass().getAnnotation(Intercepts.class);
	//如果注解不存在,则报错
    if (interceptsAnnotation == null) {
      throw new PluginException("No @Intercepts annotation was found in interceptor " + interceptor.getClass().getName());
    }
    //获取@Signature组成的数组
    Signature[] sigs = interceptsAnnotation.value();
    Map<Class<?>,Set<Method>> signatureMap = new HashMap<Class<?>,Set<Method>>();

    for (Signature sig : sigs) {
      //先看map里有没有methods set
      Set<Method> methods = signatureMap.get(sig.type());
      if (methods == null) {
        //没有再创建一个
        methods = new HashSet<Method>();
        //class:methods设置进去
        signatureMap.put(sig.type(),methods);
      }
      try {
        //获取拦截的方法
        Method method = sig.type().getMethod(sig.method(),sig.args());
        //加入到set中
        methods.add(method);
      } catch (NoSuchMethodException e) {
        throw new PluginException("Could not find method on " + sig.type() + " named " + sig.method() + ". Cause: " + e,e);
      }
    }
    return signatureMap;
  }
getAllInterfaces(type,signatureMap)方法:确定是否为拦截对象
  private static Class<?>[] getAllInterfaces(Class<?> type,Map<Class<?>,Set<Method>> signatureMap) {
    Set<Class<?>> interfaces = new HashSet<Class<?>>();
    while (type != null) {
      //接口类型
      for (Class<?> c : type.getInterfaces()) {
        //如果确实是拦截的对象,则加入interfaces set
        if (signatureMap.containsKey(c)) {
          interfaces.add(c);
        }
      }
      //从父接口中查看
      type = type.getSuperclass();
    }
    //最后set里面存在的元素就是要拦截的对象
    return interfaces.toArray(new Class<?>[interfaces.size()]);
  }
我们就可以猜测,插件只会对我们要求的对象和方法进行拦截。
4、拦截方法的intercept(invocation)
确实,我们一路debug,遇到了Executor、ParameterHandler、ResultHandler都没有进行拦截,然而,当StatementHandler对象出现的时候,就出现了微妙的变化,当我们调用代理的方法必然会执行其invoke方法,不妨来看看:

ok,此时进入了我们定义的intercept方法,感觉无比亲切。

  //调度被代理对象的真实方法
  public Object proceed() throws InvocationTargetException,IllegalAccessException {
    return method.invoke(target,args);
  }
如果有多个插件,每经过一次wrap都会产生上衣个对象的代理对象,此处反射调用的方法也是上衣个代理对象的方法。接着,就还是执行目标的parameterize方法,但是当我们明白这些执行流程的时候,我们就可以知道如何进行一些小操作,来自定义方法的实现了。
四、插件开发插件pagehelper
插件文档地址:https://github.com/pagehelper/Mybatis-PageHelper
这款插件使分页操作变得更加简便,来一个简单的测试如下:
1、引入相关依赖
        <dependency>
            <groupId>com.github.pagehelper</groupId>
            <artifactId>pagehelper</artifactId>
            <version>5.1.2</version>
        </dependency>
2、全局配置
    <!--注册插件-->
    <plugins>
        <plugin interceptor="com.github.pagehelper.PageInterceptor"></plugin>
    </plugins>
3、测试分页
    @Test
    public void testPlugin(){
        //查询第一页,每页3条记录
        PageHelper.startPage(1,3);
        List<User> all = userDao.findAll();
        for (User user : all) {
            System.out.println(user);
        }
    }

五、插件总结
参考:《深入浅出MyBatis技术原理与实战》
- 插件生成地是层层代理对象的责任链模式,其中设计反射技术实现动态代理,难免会对性能产生一些影响。
- 插件的定义需要明确需要拦截的对象、拦截的方法、拦截的方法参数。
- 插件将会改变MyBatis的底层设计,使用时务必谨慎。
版权声明:本文内容由互联网用户自发贡献,该文观点与技术仅代表作者本人。本站仅提供信息存储空间服务,不拥有所有权,不承担相关法律责任。如发现本站有涉嫌侵权/违法违规的内容, 请发送邮件至 dio@foxmail.com 举报,一经查实,本站将立刻删除。