
一.配置环境
1.安装jdk和tomcat并将其放至/usr/local目录下
[root@server1 ~]# ls
[root@server1 ~]# tar zxf jdk-7u79-linux-x64.tar.gz -C /usr/local
[root@server1 ~]# tar zxf apache-tomcat-7.0.37.tar.gz -C /usr/local

2.为了升级的时候只升级软链接,所以对jdk和tomcat做软链接,发现可以补齐后说明软链接建立成功
[root@server1 ~]# cd /usr/local
[root@server1 local]# ln -s /usr/local/jdk1.7.0_79/ java
[root@server1 local]# ln -s /usr/local/apache-tomcat-7.0.37/ tomcat
[root@server1 local]# java^C
[root@server1 local]# tomcat/^C

注意:
做软链接时的路径时在/usr/local下,如果软链接建立错误,重新建立即可,会覆盖掉之前做的
3.配置java的环境变量并使其生效
[root@server1 ~]# vim /etc/profile
[root@server1 ~]# source /etc/profile

在配置文件下添加以下内容:
 79 export JAVA_HOME=/usr/local/java
 80 export CLASSPATH=.:$JAVA_HOME/lib:$JAVA_HOME/jre/lib
 81 export PATH=$PATH:$JAVA_HOME/bin

4.检测jdk环境是否正确
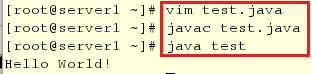
#编写java内容
[root@server1 ~]# vim test.java
#编译java脚本
[root@server1 ~]# javac test.java
#运行脚本
[root@server1 ~]# java test
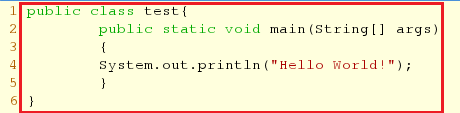
java内容如下:
  1 public class test{
  2         public static void main(String[] args)
  3         {
  4         System.out.println("Hello World!");
  5         }
  6 }
二.tomcat实现负载均衡
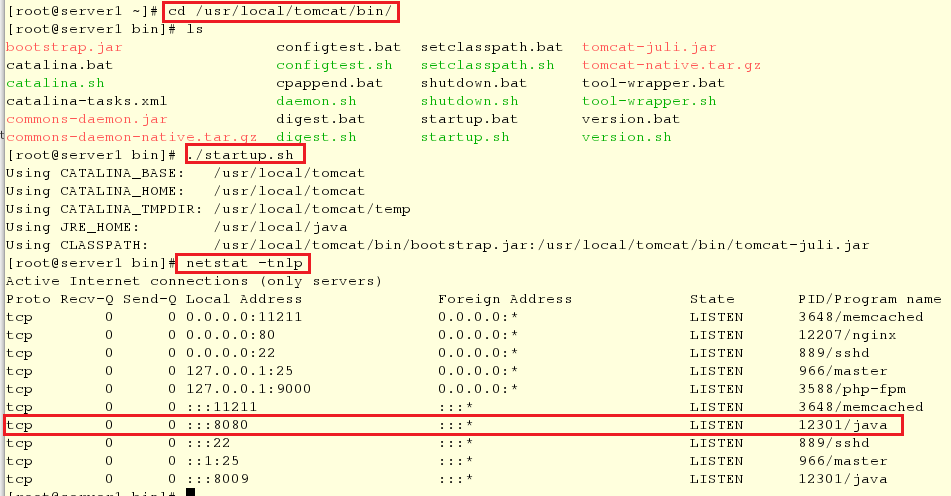
1.打开tomcat
[root@server1 ~]# cd /usr/local/tomcat/bin/
[root@server1 bin]# ls
#执行开启tomcat的脚本
[root@server1 bin]# ./startup.sh
#查看tomcat的端口(tomcat的端口默认是8080)
[root@server1 bin]# netstat -tnlp
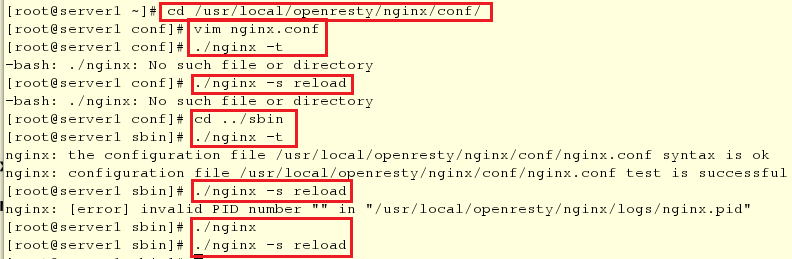
2.编辑openresty的配置文件
[root@server1 ~]# cd /usr/local/openresty/nginx/conf/
[root@server1 conf]# vim nginx.conf
#检测配文件是否有语法错误,发现不能检测,其原因是这个目录下没有检测的脚本
[root@server1 conf]# ./nginx -t
#重新启动nginx服务,发现也无法启动,其原因是这个目录下没有检测的脚本
[root@server1 conf]# ./nginx -s reload
[root@server1 conf]# cd ../sbin
[root@server1 sbin]# ./nginx -t
[root@server1 sbin]# ./nginx -s reload
[root@server1 sbin]# ./nginx
[root@server1 sbin]# ./nginx -s reload
配置文件的内容如下:
72 location ~ \.jsp$ {
73 proxy_pass http://127.0.0.1:8080;
74 }
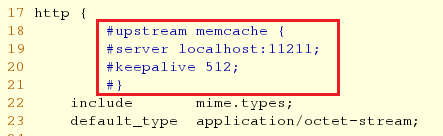
18 #upstream memcache {
19 #server localhost:11211;
20 #keepalive 512;
21 #}
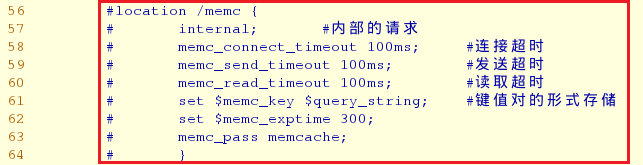
56 #location /memc {
57 # internal; #内部的请求
58 # memc_connect_timeout 100ms; #连接超时
59 # memc_send_timeout 100ms; #发送超时
60 # memc_read_timeout 100ms; #读取超时
61 # set $memc_key $query_string; #键值对的形式存储
62 # set $memc_exptime 300;
63 # memc_pass memcache;
64 # }
78 location ~ \.php$ {
79 # set $key $uri$args;
80 # srcache_fetch GET /memc $key; #读数据
81 # srcache_store PUT /memc $key; #放数据


3.进入tomcat的发布目录编写jsp内容
[root@server1 ~]# cd /usr/local/tomcat/webapps/ROOT
[root@server1 ROOT]# ls
[root@server1 ROOT]# vim test.jsp
[root@server1 ROOT]# cat test.jsp

test.jsp中的内容如下:
the time is:<%=new java.util.Date() %>

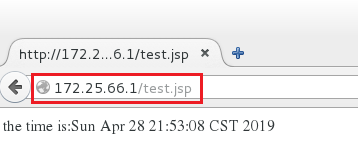
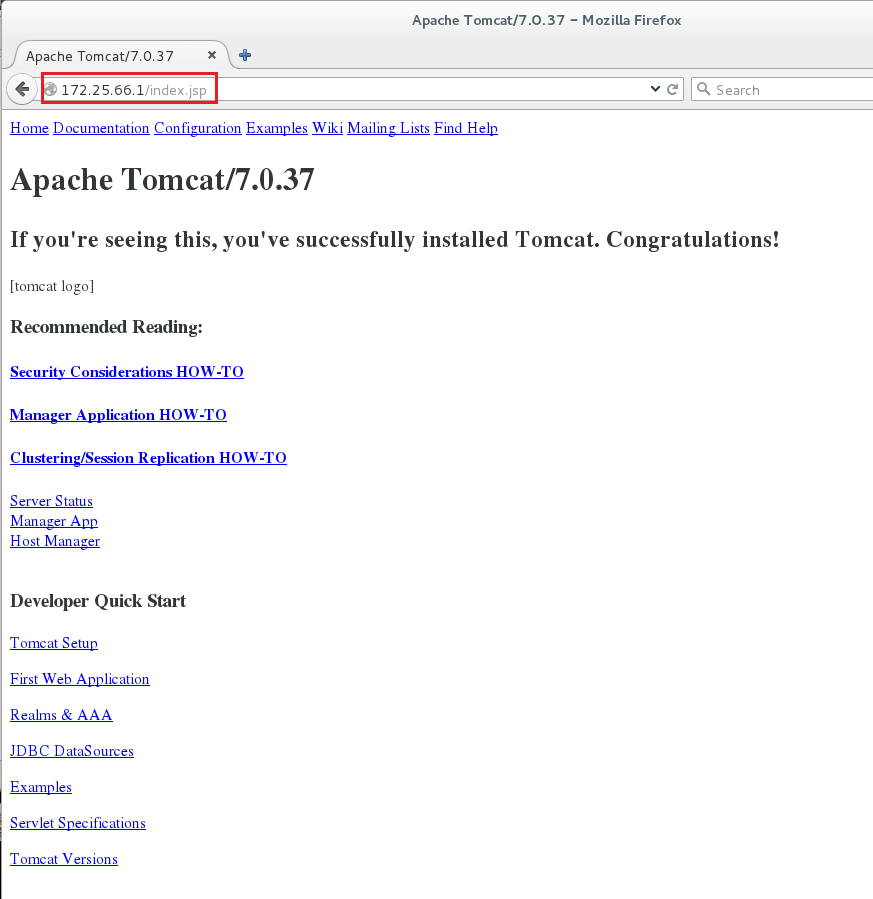
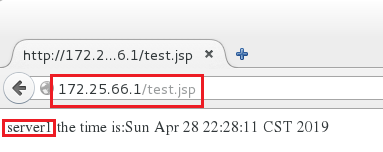
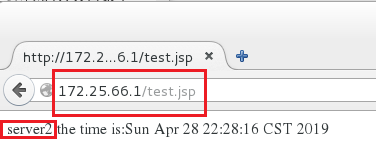
4.在浏览器中输入两个网址(index.jsp的页面是tomcat的官网,test.jsp的页面是刚才所写的显示时间的页面),查看tomcat是否安装成功,但是在查看index.jsp页面时并没有显示图像
http://172.25.66.1/test.jsp
http://172.25.66.1/index.jsp
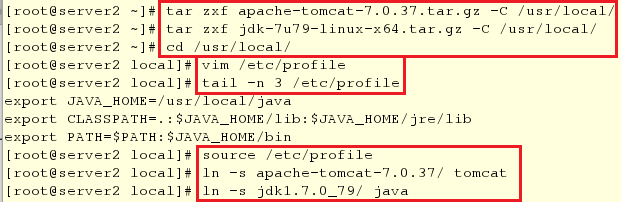
5.将server1中的jdk和tomcat发送到server2上
[root@server1 ~]# scp jdk-7u79-linux-x64.tar.gz apache-tomcat-7.0.37.tar.gz server2:

6.在server2上做以下操作(这些操作与server1中的配置相似,这里简单写写)
[root@server2 ~]# tar zxf apache-tomcat-7.0.37.tar.gz -C /usr/local/
[root@server2 ~]# tar zxf jdk-7u79-linux-x64.tar.gz -C /usr/local/
[root@server2 ~]# cd /usr/local/
[root@server2 local]# vim /etc/profile
[root@server2 local]# tail -n 3 /etc/profile
[root@server2 local]# source /etc/profile
[root@server2 local]# ln -s apache-tomcat-7.0.37/ tomcat
[root@server2 local]# ln -s jdk1.7.0_79/ java
[root@server2 ROOT]# cd /usr/local/tomcat/bin/
[root@server2 bin]# ./startup.sh

7.在server1下查看java的版本是什么
[root@server2 local]# java -version

8.在server1中编辑openresty中配置文件中的内容并检测是否有错
[root@server1 ~]# cd /usr/local/openresty/
[root@server1 openresty]# cd nginx/conf/
[root@server1 conf]# vim nginx.conf
[root@server1 conf]# cd ../sbin
[root@server1 sbin]# ./nginx -t
[root@server1 sbin]# ./nginx -s reload


更改的配置中的内容如下:
22         upstream tomcat{
	#后端服务器1
 23                 server 172.25.66.1:8080;
	#后端服务器2
 24                 server 172.25.66.2:8080;
 25                 }

 76         location ~ \.jsp$ {
#使其都可以访问tomcat
 77             proxy_pass   http://tomcat;
 78         }


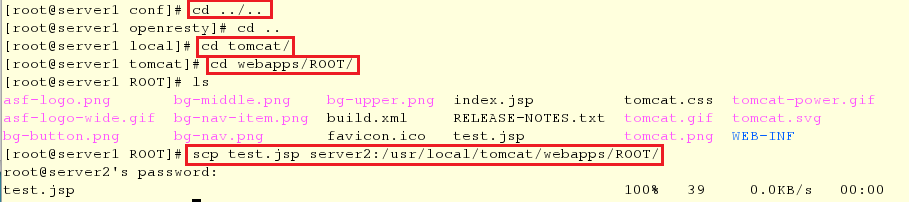
9.将server1中的公共目录下的index.jsp测试页传到server2的公共目录下
[root@server1 conf]# cd ../..
[root@server1 openresty]# cd ..
[root@server1 local]# cd tomcat/
[root@server1 tomcat]# cd webapps/ROOT/
[root@server1 ROOT]# ls
[root@server1 ROOT]# scp test.jsp server2:/usr/local/tomcat/webapps/ROOT/
10.编辑server1和server2公共目录下的test.jsp文件
在server2上的操作:
[root@server2 ~]# cd /usr/local/tomcat/webapps/ROOT/
[root@server2 ROOT]# ls
[root@server2 ROOT]# vim test.jsp
[root@server2 ROOT]# cat test.jsp

在server1上的操作:
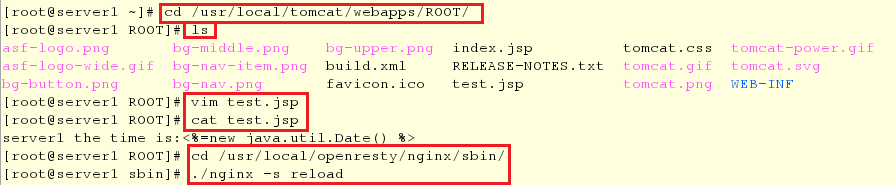
[root@server1 ~]# cd /usr/local/tomcat/webapps/ROOT/
[root@server1 ROOT]# ls
[root@server1 ROOT]# vim test.jsp
[root@server1 ROOT]# cat test.jsp
[root@server1 ROOT]# cd /usr/local/openresty/nginx/sbin/
[root@server1 sbin]# ./nginx -s reload
11.测试:
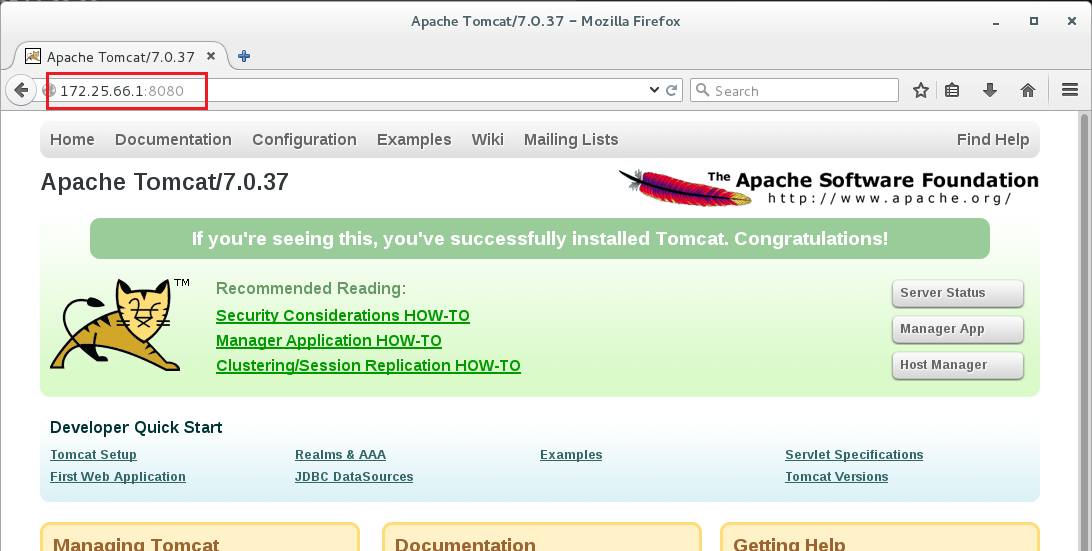
- 在浏览器中输入以下网址http://172.25.66.1:8080/,发现其可以显示tomcat官网,并显示图像
- 在浏览器中输入以下网址http://172.25.66.1/test.jsp,发现每次刷新以下,就会重新显示页面(页面在server1和server2中轮循)
三.在tomcat中实现Session共享
1.Session:在计算机中,尤其是在网络应用中,称为“会话控制”
2.Session对象存储特定用户会话所需的属性及配置信息,这样,当用户在应用程序的Web页之间跳转时,存储在Session对象中的变量将不会丢失,而是在整个用户会话中一直存在下去。当用户请求来自应用程序的Web页时,如果该用户还没有会话,则Web服务器将自动创建一个Session对象
3.当会话过期或被放其后,服务器将终止该会话
4.Session对象最常见的一个用法就是存储用户的首选项。例如:如果用户指明不喜欢查看图形,就可以将该信息存储在Session对象中。
5.为了对数据的保存更加牢靠,我们选择交叉存放Session的方法,即将访问tomcat1的数据存放在memcache2中,将访问tomcat2上的数据存放在memcache1中,这样存放,当某个tomcat服务器断了之后,访问它的客户Session并不会消失,而是存放在了对立的memcache,如果存放session的memcache坏了,那么它的数据会立即切换到了另一个memcached中
6.session共享:当一个后端挂了,依旧可以共享
配置过程
==7.Tomcat-1 (T1) 将 session ==存储在 memcached-2 (T2)上。只有当 M2 不可用时,T1 才将 session 存储在 memcached-1 上(M1 是 T1 failoverNode)。使用这种配置的好处是,当 T1 和 M1 同时崩溃时也不会丢失 session 会话,避免单点故障。
一.初步配置
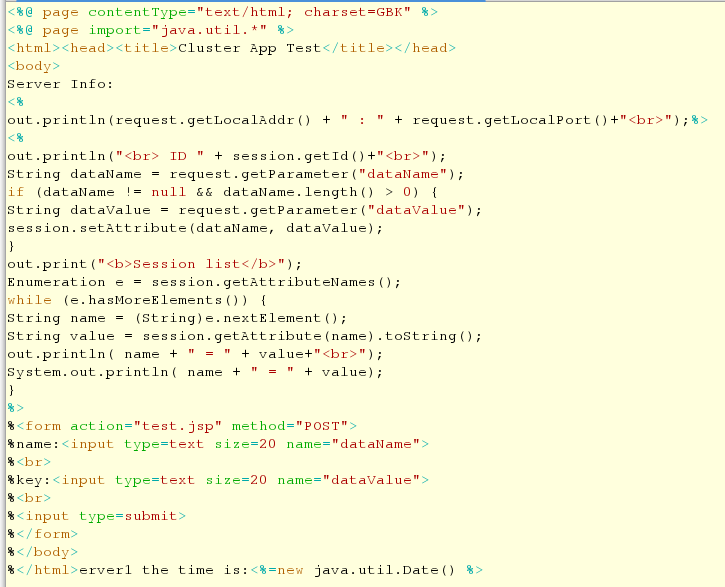
1.在server1和server2中重新编写测试页内容(信息提交页面)
[root@server1 ~]# cd /usr/local/tomcat/webapps/ROOT/
[root@server1 ROOT]# vim test.jsp
[root@server1 ROOT]# scp test.jsp root@172.25.66.2:/usr/local/tomcat/webapps/ROOT/

配置文件中的内容如下:
<%@ page contentType="text/html; charset=GBK" %>
<%@ page import="java.util.*" %>
<html><head><title>Cluster App Test</title></head>
<body>
Server Info:
<%
out.println(request.getLocalAddr() + " : " + request.getLocalPort()+"<br>");%>
<%
out.println("<br> ID " + session.getId()+"<br>");
String dataName = request.getParameter("dataName");
if (dataName != null && dataName.length() > 0) {
String dataValue = request.getParameter("dataValue");
session.setAttribute(dataName, dataValue);
}
out.print("<b>Session list</b>");
Enumeration e = session.getAttributeNames();
while (e.hasMoreElements()) {
String name = (String)e.nextElement();
String value = session.getAttribute(name).toString();
out.println( name + " = " + value+"<br>");
System.out.println( name + " = " + value);
}
%>
%<form action="test.jsp" method="POST">
%name:<input type=text size=20 name="dataName">
%<br>
%key:<input type=text size=20 name="dataValue">
%<br>
%<input type=submit>
%</form>
%</body>
%</html>erver1 the time is:<%=new java.util.Date() %>
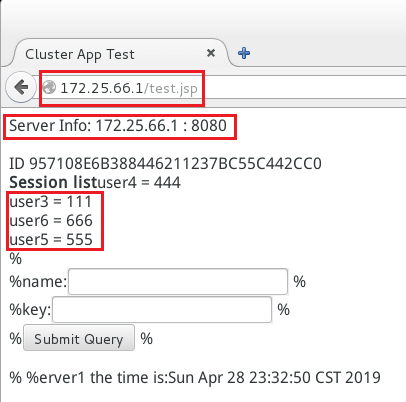
2.在浏览器中输入http://172.25.66.1/test.jsp显示新的测试页面(刷新一下,会发生轮循,即显示serve2中的新的测试页面)
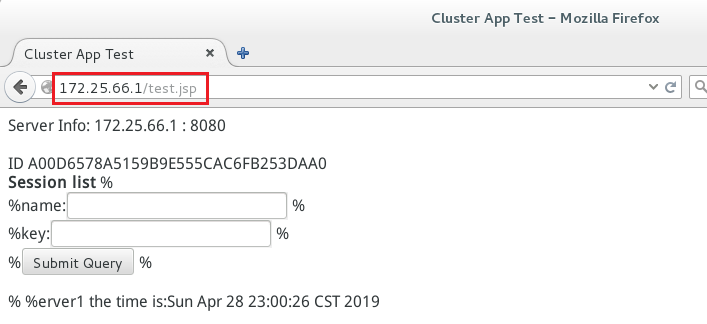
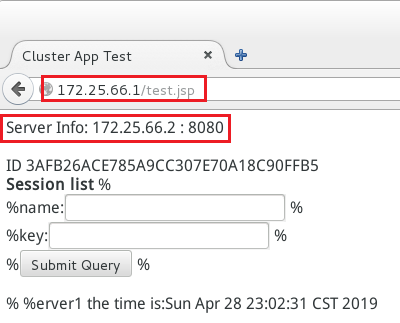
- 在server2上传数据user1

- 提交之后,数据信息会存到server1上
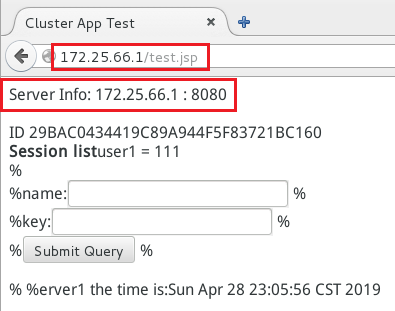
- 再次在server1上传数据user2
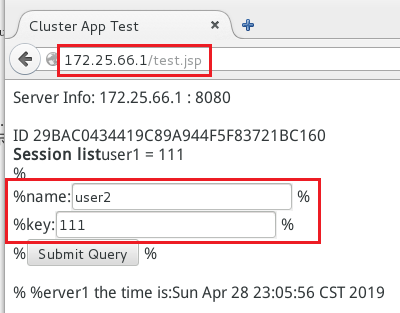
- 提交之后,数据信息又存到了server2上
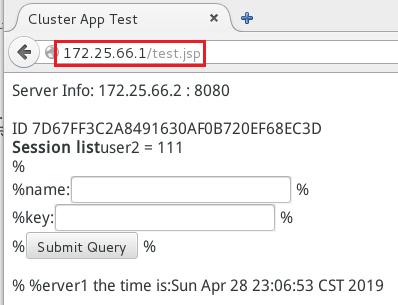
- 在server2上传数据user3
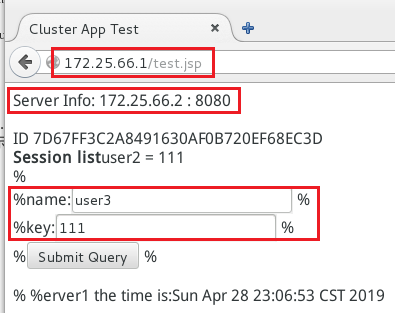
- 提交之后,数据信息会存到server1上,且覆盖掉之前的信息
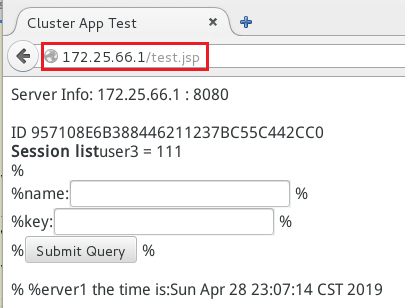
注意:
会发现每次提交后Server Info和ID都会发生改变,且新的数据会覆盖旧的数据
二.改进信息,实现数据不交换,上传信息到同一个后端服务器
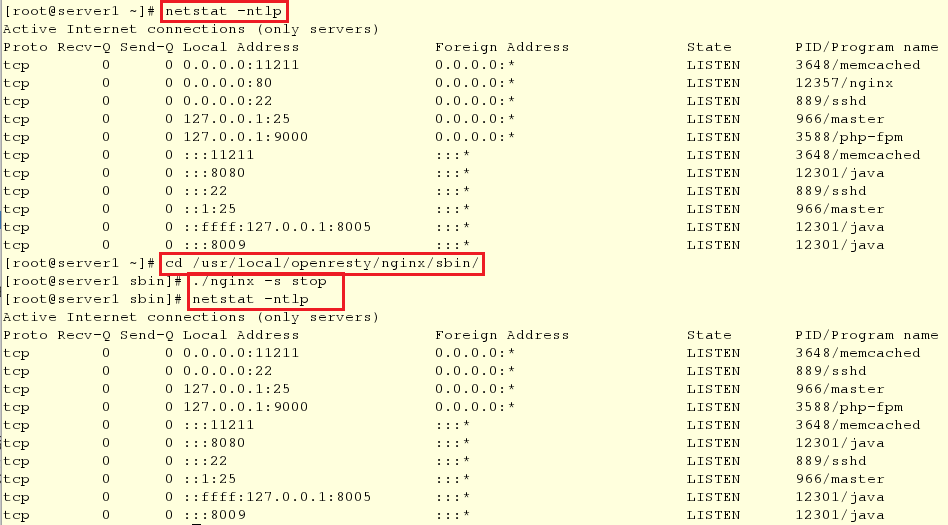
1.关闭nginx服务
[root@server1 ~]# netstat -ntlp
[root@server1 ~]# cd /usr/local/openresty/nginx/sbin/
[root@server1 sbin]# ./nginx -s stop
[root@server1 sbin]# netstat -ntlp
2.解压安装包(因为之前的nginx版本较高,所以不合适)
[root@server1 ~]# tar zxf nginx-1.10.1.tar.gz
[root@server1 ~]# tar zxf nginx-sticky-module-ng.tar.gz

3.更改nginx的配置文件
[root@server1 ~]# cd nginx-1.10.1
[root@server1 nginx-1.10.1]# vim src/core/nginx.h
[root@server1 nginx-1.10.1]# vim auto/cc/gcc

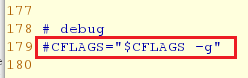
配置文件中更改的内容如下:
#去掉版本号
 14 #define NGINX_VER          "nginx/"
#去掉日志
178 # debug
179 #CFLAGS="$CFLAGS -g"

4.进入解压目录,进行编译
#和之前创建的预编译环境一样,只是这里需要增加sticky模块
[root@server1 nginx-1.10.1]# ./configure --prefix=/usr/local/lnmp/nginx/ --with-threads --with-file-aio --with-http_ssl_module --with-http_stub_status_module --user=nginx --group=nginx --add-module=/root/nginx-sticky-module-ng
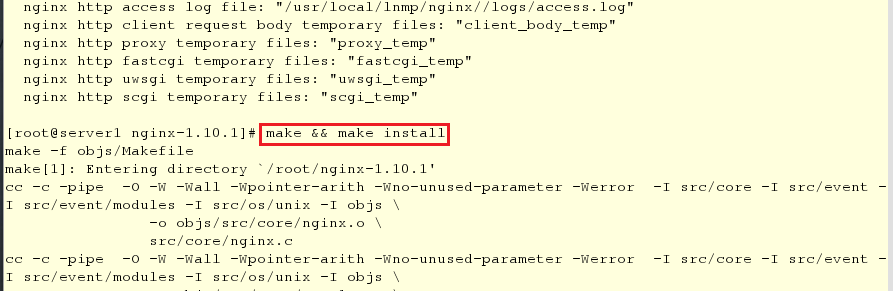
[root@server1 nginx-1.10.1]# make && make install
5.更改nginx的配置文件中的内容(为了方便,可以直接将之前配置好的配置文件拷贝即可)并检测,然后开启nginx服务
[root@server1 ~]# cd /usr/local/lnmp/nginx/conf/
[root@server1 conf]# cp /usr/local/openresty/nginx/conf/
[root@server1 conf]# vim nginx.conf
[root@server1 conf]# cd ../sbin/
[root@server1 sbin]# nginx
[root@server1 sbin]# nginx -t

配置文件下的内容如下:
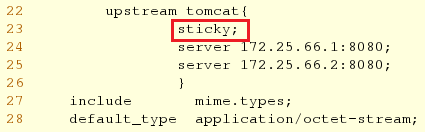
23 sticky; #添加
6.在浏览器中输入网址http://172.25.66.1/test.jsp,并依次添加内容,此时Server Info和ID都不发生改变,而添加的内容也都会添加到server1中
三.实现交叉存储(这样有利于数据的保存,而且极大的减少了宕机的概率)
问题:之前可以实现粘制功能,但是如果在一个用户已经访问了很多数据情况下,该服务器挂掉,再次访问时,处理的服务器更换为正常的服务器,但是数据都会丢失,浏览器访问172.25.14.1/test.jsp ##连续提交用户信息,挂掉服务器之后再连续提交用户信息,查看处理用户数据的服务器
1.在server1和server2中清空日志信息(为了方便查看实验效果)
在server1下的操作:
[root@server1 ~]# cd /usr/local/tomcat/logs/
[root@server1 logs]# >catalina.out

在server2下的操作:
[root@server2 ~]# cd /usr/local/tomcat/logs/
[root@server2 logs]# >catalina.out

2.在浏览器中的server1上提交两个用户信息:user8和user9

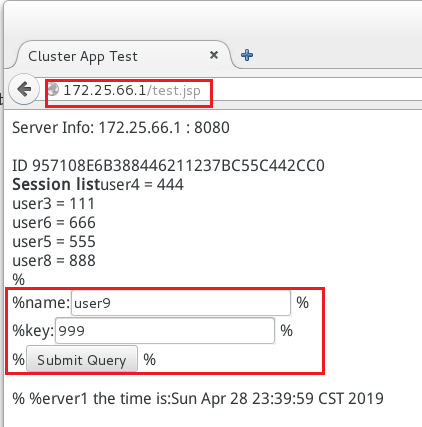
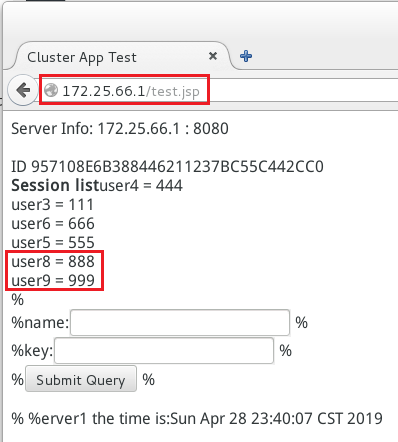
3.在server1中关闭tomcat服务,并在server2上提交信息,会发现server2中没有将之前的信息缓存过来
[root@server1 logs]# cd /usr/local/tomcat/bin/
[root@server1 bin]# ./shutdown.sh

在server2上的操作:
[root@server2 ~]# cd /usr/local/tomcat/logs/
[root@server2 logs]# tail -f catalina.out

4.配置交叉存储,在server1和server2上将tomcat开启
在server1上的操作:
[root@server1 bin]# pwd
[root@server1 bin]# ./startup.sh

在server2上的操作:
[root@server2 ~]# cd /usr/local/tomcat/bin/
[root@server2 bin]# ./startup.sh

5.在server2上安装memcached并开启该服务
#注意yum的配置
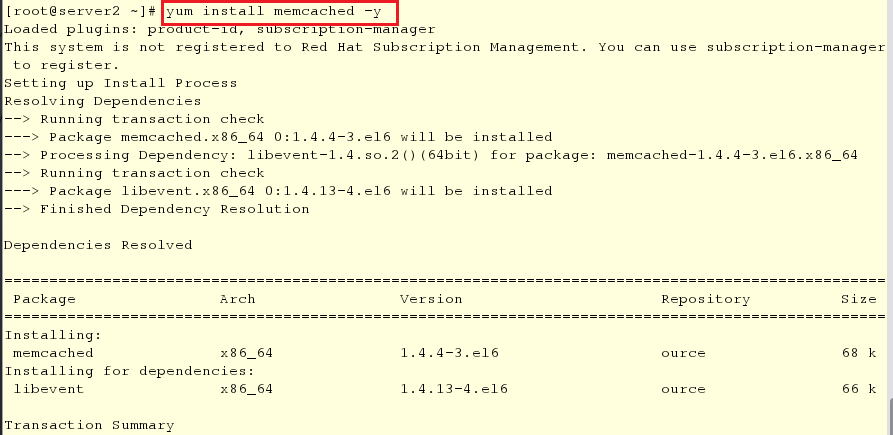
[root@server2 ~]# yum install memcached -y
[root@server2 ~]# /etc/init.d/memcached start
6.将提前下载好的安装包否放至server1和server2的目录/usr/local/tomcat/lib/下(注意查看文件,如果一个文件有两个版本,一定要删除一个)
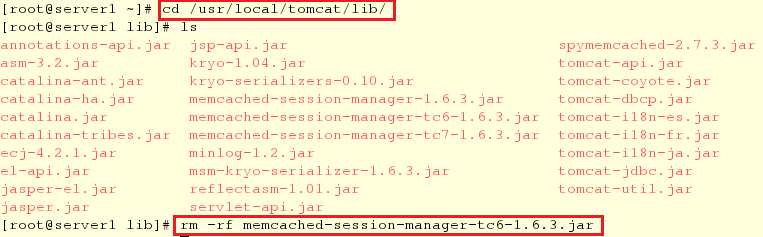
在server1上的操作:
[root@server1 ~]# cd /usr/local/tomcat/lib/
[root@server1 lib]# ls
[root@server1 lib]# rm -rf memcached-session-manager-tc6-1.6.3.jar
在server2上的操作:
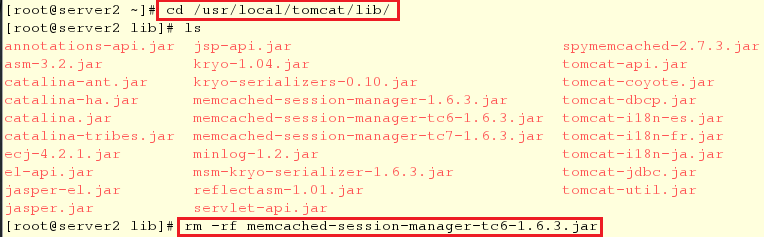
[root@server2 ~]# cd /usr/local/tomcat/lib/
[root@server2 lib]# ls
[root@server1 lib]# rm -rf memcached-session-manager-tc6-1.6.3.jar
7.在server1和server2中更改配置文件cx
在server1上的操作:
[root@server1 lib]# cd /usr/local/tomcat/conf/
[root@server1 conf]# ls
[root@server1 conf]# vim context.xml
[root@server1 conf]# scp context.xml root@172.25.66.2:/usr/local/tomcat/conf/

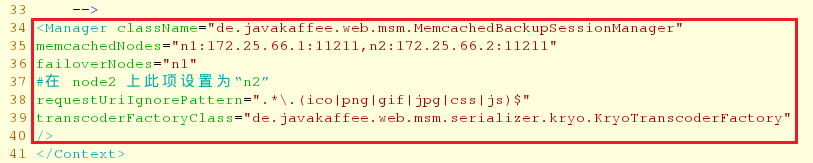
配置文件中的内容如下:
34 <Manager className="de.javakaffee.web.msm.MemcachedBackupSessionManager"
 35 memcachedNodes="n1:172.25.66.1:11211,n2:172.25.66.2:11211"
 36 failoverNodes="n1"
 37 #在 node2 上此项设置为“n2”
 38 requestUriIgnorePattern=".*\.(ico|png|gif|jpg|css|js)$"
 39 transcoderFactoryClass="de.javakaffee.web.msm.serializer.kryo.KryoTranscoderFactory"
 40 />
在server2上的操作:
[root@server2 conf]# vim context.xml
配置文件中更改的内容如下:
36 failoverNodes="n2"

8.重新开启tomcat服务
#tomcat只能关闭再开启,不能直接重启
在server1上的操作
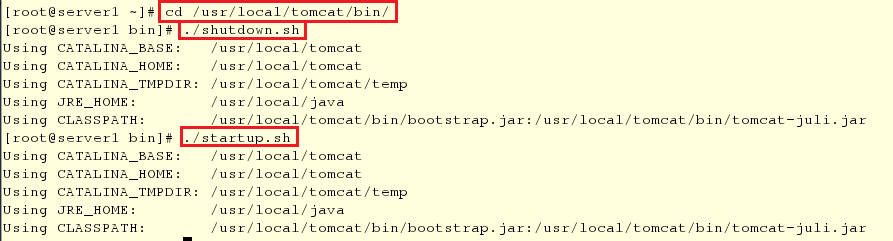
[root@server1 ~]# cd /usr/local/tomcat/bin/
[root@server1 bin]# ./shutdown.sh
[root@server1 bin]# ./startup.sh
在server2上的操作:
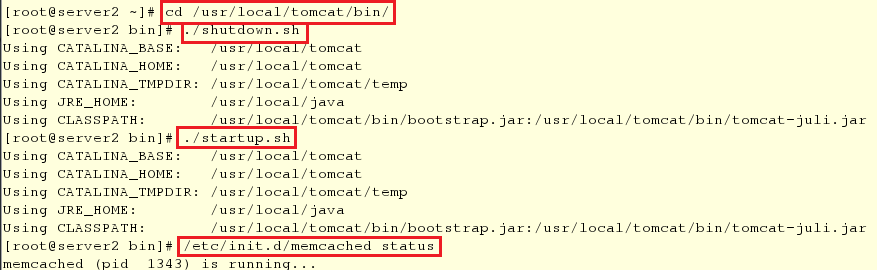
[root@server2 ~]# cd /usr/local/tomcat/bin/
[root@server2 bin]# ./shutdown.sh
[root@server2 bin]# ./startup.sh
[root@server2 bin]# /etc/init.d/memcached status
总结:client->nginx->tomcat(sticky+session共享)静态(nginx+memcache)动态(fastcgi_pass)->有缓存memcache->php(没有缓存mysql_connect()连接数据库,mysql_select)->redis + mysql/oracle
原文地址:https://blog.csdn.net/qq_39376481/article/details/89681186
版权声明:本文内容由互联网用户自发贡献,该文观点与技术仅代表作者本人。本站仅提供信息存储空间服务,不拥有所有权,不承担相关法律责任。如发现本站有涉嫌侵权/违法违规的内容, 请发送邮件至 dio@foxmail.com 举报,一经查实,本站将立刻删除。