
文章目录
Docker基本使用
参考文章:https://www.runoob.com/docker/docker-tutorial.html
参考文章:https://docs.docker.com/desktop/?_gl=11oj7pdo_gaMTY0NDQxMjgwNC4xNjgyMDY2MjM5_ga_XJWPQMJYHQ*MTY4NTQ5NjQyNi4yLjEuMTY4NTQ5NzA1Ny4zNi4wLjA.
参考文章:https://docs.docker.com/engine/
参考文章:https://cloud.tencent.com/developer/article/1885678
参考文章:https://docs.docker.com/get-started/overview/
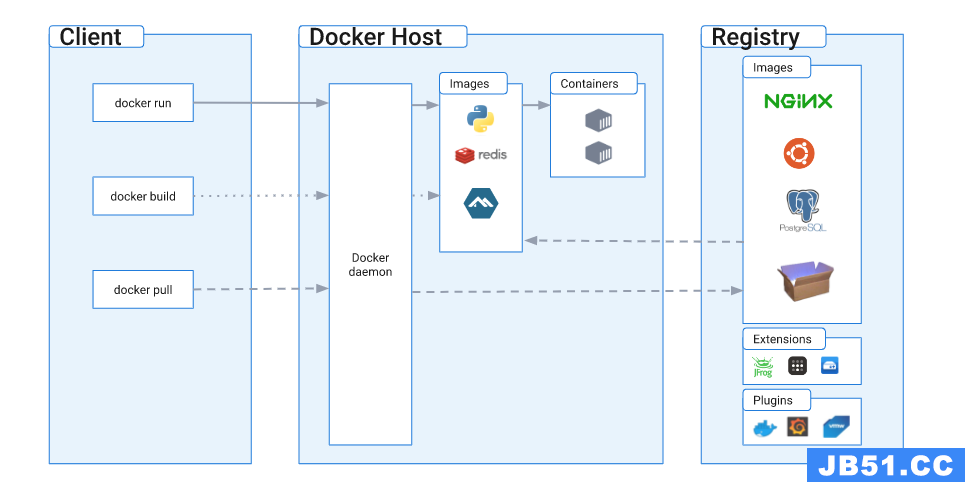
Docker 使用客户端-服务器架构。Docker客户端与 Docker守护进程对话,后者负责构建、运行和分发 Docker 容器的繁重工作。Docker 客户端和守护进程可以 在同一系统上运行,或者您可以将 Docker 客户端连接到远程 Docker 守护进程。Docker 客户端和守护进程使用 REST API 通过 UNIX 套接字或网络接口进行通信。另一个 Docker 客户端是 Docker Compose,它允许您处理由一组容器组成的应用程序。
Docker中的镜像分层
Docker 支持通过扩展现有镜像,创建新的镜像。实际上,Docker Hub 中 99% 的镜像都是通过在 base 镜像中安装和配置需要的软件构建出来的。
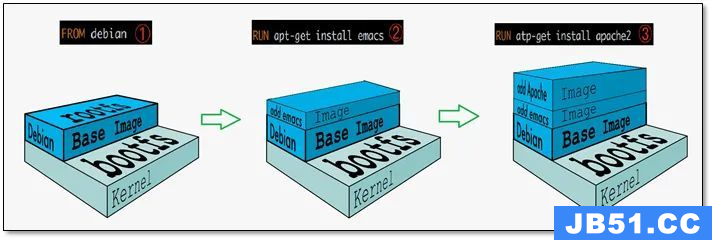
从上图可以看到,新镜像是从 base 镜像一层一层叠加生成的。每安装一个软件,就在现有镜像的基础上增加一层。
Docker 镜像为什么分层
镜像分层最大的一个好处就是共享资源。
比如说有多个镜像都从相同的 base 镜像构建而来,那么 Docker Host 只需在磁盘上保存一份 base 镜像;同时内存中也只需加载一份 base 镜像,就可以为所有容器服务了。而且镜像的每一层都可以被共享。
如果多个容器共享一份基础镜像,当某个容器修改了基础镜像的内容,比如 /etc 下的文件,这时其他容器的 /etc 是不会被修改的,修改只会被限制在单个容器内。这就是容器 Copy-on-Write 特性。
可写的容器层
当容器启动时,一个新的可写层被加载到镜像的顶部。这一层通常被称作“容器层”,“容器层”之下的都叫“镜像层”。
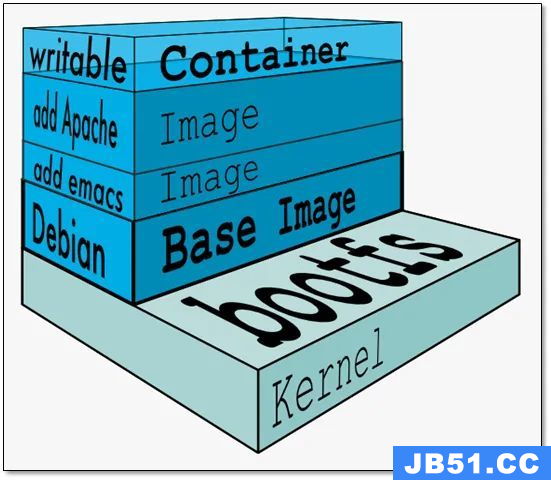
所有对容器的改动 - 无论添加、删除、还是修改文件都只会发生在容器层中。只有容器层是可写的,容器层下面的所有镜像层都是只读的。
容器层的细节说明
镜像层数量可能会很多,所有镜像层会联合在一起组成一个统一的文件系统。如果不同层中有一个相同路径的文件,比如 /a,上层的 /a 会覆盖下层的 /a,也就是说用户只能访问到上层中的文件 /a。在容器层中,用户看到的是一个叠加之后的文件系统。
| 文件操作 | 说明 |
|---|---|
| 添加文件 | 在容器中创建文件时,新文件被添加到容器层中。 |
| 读取文件 | 在容器中读取某个文件时,Docker 会从上往下依次在各镜像层中查找此文件。一旦找到,立即将其复制到容器层,然后打开并读入内存。 |
| 修改文件 | 在容器中修改已存在的文件时,Docker 会从上往下依次在各镜像层中查找此文件。一旦找到,立即将其复制到容器层,然后修改之。 |
| 删除文件 | 在容器中删除文件时,Docker 也是从上往下依次在镜像层中查找此文件。找到后,会在容器层中记录下此删除操作。(只是记录删除操作) |
只有当需要修改时才复制一份数据,这种特性被称作 Copy-on-Write。可见,容器层保存的是镜像变化的部分,不会对镜像本身进行任何修改。
这样就解释了我们前面提出的问题:容器层记录对镜像的修改,所有镜像层都是只读的,不会被容器修改,所以镜像可以被多个容器共享。
Docker配置
系统版本:Ubuntu 20.04.4 LTS (GNU/Linux 5.4.0-146-generic x86_64)
查看状态
首先,可以先检查一下系统是否已经安装过docker,使用下面指令查看docker版本号。
root@qhdata-dev:~# docker -v
Docker version 20.10.17,build 100c701

root@qhdata-dev:~# sudo docker run hello-world
Unable to find image 'hello-world:latest' locally
latest: Pulling from library/hello-world
719385e32844: Pull complete
Digest: sha256:fc6cf906cbfa013e80938cdf0bb199fbdbb86d6e3e013783e5a766f50f5dbce0
Status: Downloaded newer image for hello-world:latest

Hello from Docker!
This message shows that your installation appears to be working correctly.

To generate this message,Docker took the following steps:
 1. The Docker client contacted the Docker daemon.
 2. The Docker daemon pulled the "hello-world" image from the Docker Hub.
    (amd64)
 3. The Docker daemon created a new container from that image which runs the
    executable that produces the output you are currently reading.
 4. The Docker daemon streamed that output to the Docker client,which sent it
    to your terminal.

To try something more ambitious,you can run an Ubuntu container with:
 $ docker run -it ubuntu bash

Share images,automate workflows,and more with a free Docker ID:
 https://hub.docker.com/

For more examples and ideas,visit:
 https://docs.docker.com/get-started/
卸载
使用下列语句卸载已安装的docker
sudo apt-get purge docker-ce docker-ce-cli containerd.io docker-buildx-plugin docker-compose-plugin docker-ce-rootless-extras
主机上的图像、容器、卷或自定义配置文件不会自动删除。删除所有镜像、容器和卷:
sudo rm -rf /var/lib/docker
sudo rm -rf /var/lib/containerd
您必须手动删除任何已编辑的配置文件。
安装
- Docker Engine 与Docker Desktop for Linux捆绑在一起 。这是最简单快捷的入门方法。
- 从Docker 的apt存储库设置和安装 Docker 引擎 。
- 手动安装并手动管理升级。
- 使用方便的脚本。仅推荐用于测试和开发环境。
使用 apt 存储库安装
设置存储库
更新apt包索引并安装包以允许apt通过 HTTPS 使用存储库:
sudo apt-get update
sudo apt-get install ca-certificates curl gnupg
添加 Docker 的官方 GPG 密钥:
 sudo install -m 0755 -d /etc/apt/keyrings
 curl -fsSL https://download.docker.com/linux/ubuntu/gpg | sudo gpg --dearmor -o /etc/apt/keyrings/docker.gpg
 sudo chmod a+r /etc/apt/keyrings/docker.gpg
使用以下命令设置存储库:
echo \
  "deb [arch="$(dpkg --print-architecture)" signed-by=/etc/apt/keyrings/docker.gpg] https://download.docker.com/linux/ubuntu \
  "$(. /etc/os-release && echo "$VERSION_CODENAME")" stable" | \
  sudo tee /etc/apt/sources.list.d/docker.list > /dev/null
安装 Docker 引擎
更新apt包索引:
sudo apt-get update
要安装特定版本的 Docker Engine,首先在存储库中列出可用版本:
apt-cache madison docker-ce | awk '{ print $3 }'
选择所需版本并安装:
 VERSION_STRING=5:24.0.0-1~ubuntu.20.04~focal
 sudo apt-get install docker-ce=$VERSION_STRING docker-ce-cli=$VERSION_STRING containerd.io docker-buildx-plugin docker-compose-plugin
或者直接安装最新版本
sudo apt-get install docker-ce docker-ce-cli containerd.io docker-buildx-plugin docker-compose-plugin
通过运行hello-world映像验证 Docker 引擎安装是否成功
root@qhdata-dev:~# docker -v
Docker version 24.0.2,build cb74dfc

sudo docker run hello-world
在 Ubuntu 上安装 Docker 桌面(非必要)
参考文章:https://docs.docker.com/desktop/install/ubuntu/
先决条件
要成功安装 Docker Desktop,您必须:
- 满足系统要求
- 拥有 64 位版本的 Ubuntu Jammy Jellyfish 22.04 (LTS) 或 Ubuntu Impish Indri 21.10。x86_64Docker Desktop 在(或)架构上受支持amd64。
- 对于非 Gnome 桌面环境,gnome-terminal必须安装:
sudo apt install gnome-terminal
安装 Docker 桌面
1.设置Docker 的包存储库。
2.下载最新的DEB 包。
3.使用 apt 安装软件包,如下所示:
sudo apt-get update
sudo apt-get install ./docker-desktop-<version>-<arch>.deb
安装后脚本:
- 设置 Docker Desktop 二进制文件的功能以映射特权端口并设置资源限制。
- 将 Kubernetes 的 DNS 名称添加到/etc/hosts.
- 创建一个从/usr/bin/docker到/usr/local/bin/com.docker.cli的链接
启动 Docker 桌面
Docker实例
参考文章:https://www.quanxiaoha.com/docker/docker-look-image.html
参考文章:https://cloud.tencent.com/developer/article/1885678
参考文章:https://www.w3cschool.cn/docker/docker-image-usage.html
docker_hub地址:https://hub.docker.com/search?q=
docker构建一个基础镜像大概流程:
使用现有的镜像
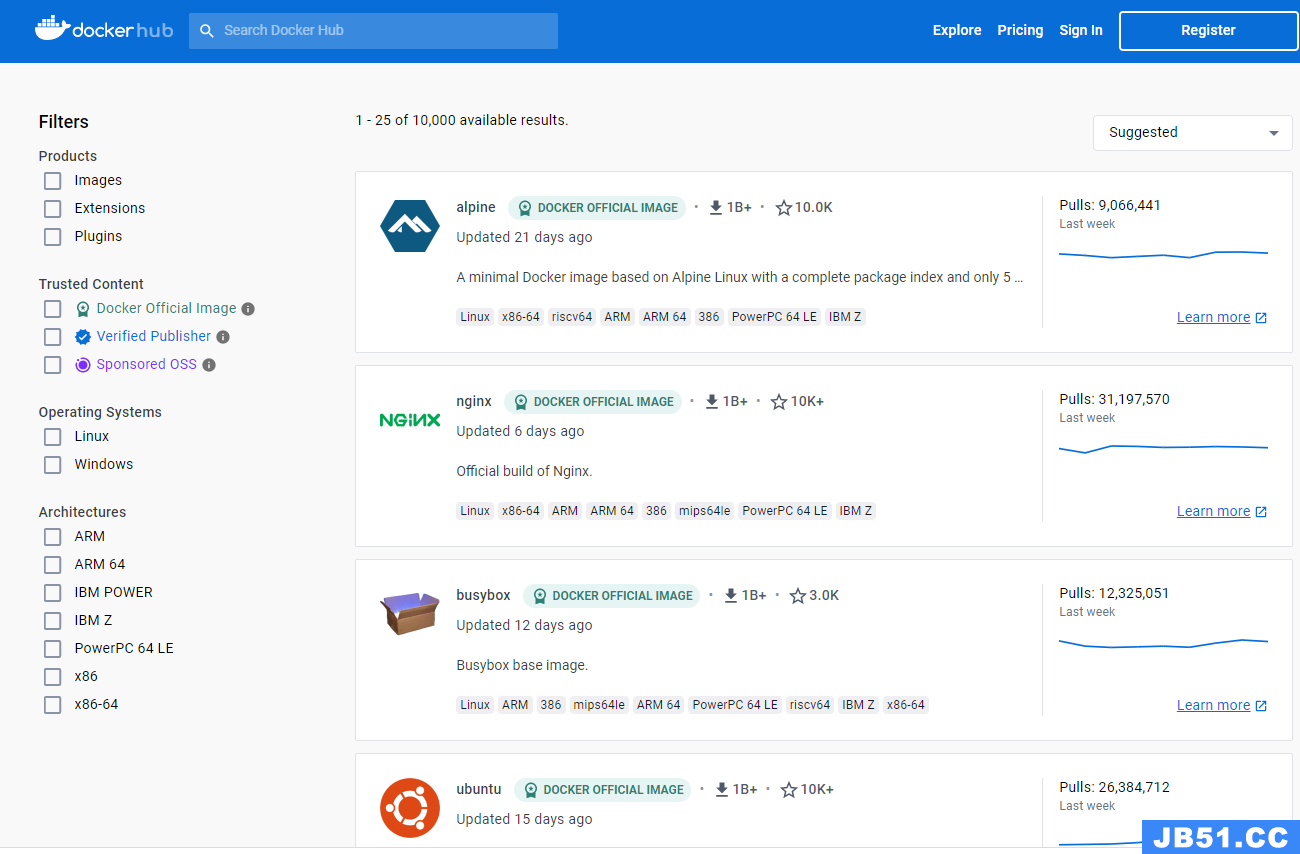
查找镜像
可以登陆Docker Hub来查找我们需要的的镜像。
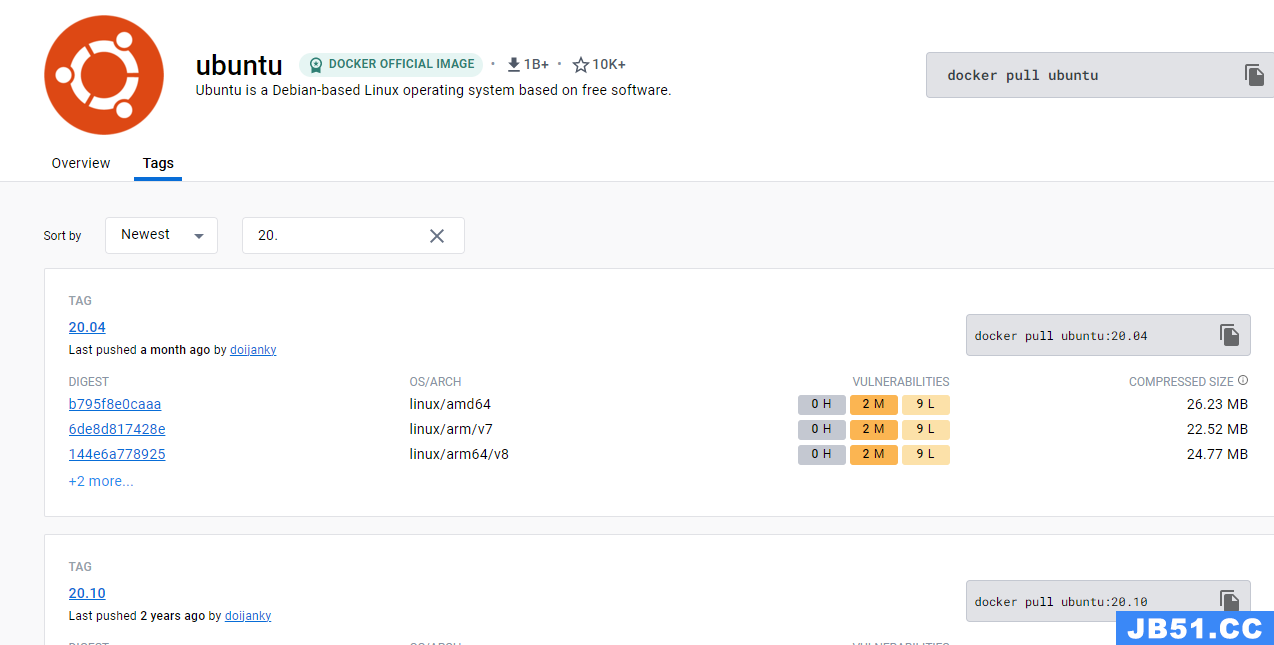
拖取镜像
使用命令 docker pull 来下载镜像
root@qhdata-dev:/home/qhdata/docker# docker pull ubuntu:20.04
20.04: Pulling from library/ubuntu
ca1778b69356: Pull complete
Digest: sha256:db8bf6f4fb351aa7a26e27ba2686cf35a6a409f65603e59d4c203e58387dc6b3
Status: Downloaded newer image for ubuntu:20.04
docker.io/library/ubuntu:20.04
root@qhdata-dev:/home/qhdata/docker#
列出镜像列表
使用 docker images 来列出本地主机上的镜像。
root@qhdata-dev:/home/qhdata/docker# docker images
REPOSITORY              TAG           IMAGE ID       CREATED         SIZE
hello-world             latest        9c7a54a9a43c   3 weeks ago     13.3kB
ubuntu                  20.04         88bd68917189   6 weeks ago     72.8MB
...
alpine                  latest        e66264b98777   12 months ago   5.53MB
root@qhdata-dev:/home/qhdata/docker#
更新镜像
更新镜像之前,我们需要使用镜像来创建一个容器。
root@qhdata-dev:/home/qhdata/docker# docker run -t -i ubuntu:20.04 /bin/bash
root@7ec56dec1d8e:/#
在运行的容器内使用 apt-get update 命令进行更新。
在完成操作之后,输入 exit命令来退出这个容器。
root@7ec56dec1d8e:/# apt-get update
Get:1 http://security.ubuntu.com/ubuntu focal-security InRelease [114 kB]
.....
Get:18 http://security.ubuntu.com/ubuntu focal-security/main amd64 Packages [2748 kB]
Fetched 26.8 MB in 15s (1767 kB/s)
Reading package lists... Done
root@7ec56dec1d8e:/# exit
exit
root@qhdata-dev:/home/qhdata/docker#
此时ID为7ec56dec1d8e的容器,是按我们的需求更改的容器。我们可以通过命令docker commit来提交容器副本。
root@qhdata-dev:/home/qhdata/docker# docker commit -m="has update" -a="qhdata" 7ec56dec1d8e qhdata/ubuntu:20.04
sha256:dd4c75bc58d43b6ae59f9afc5c528117ac317d936cfd3219fe1ade1e902c3965
各个参数说明:
-
-m:提交的描述信息 -
-a:指定镜像作者 - 7ec56dec1d8e:容器ID
- qhdata/ubuntu:20.04:指定要创建的目标镜像名
我们可以使用docker images命令来查看我们的新镜像 qhdata/ubuntu:20.04:
root@qhdata-dev:/home/qhdata/docker# docker images
REPOSITORY              TAG           IMAGE ID       CREATED         SIZE
qhdata/ubuntu           20.04         dd4c75bc58d4   2 minutes ago   116MB
hello-world             latest        9c7a54a9a43c   3 weeks ago     13.3kB
ubuntu                  20.04         88bd68917189   6 weeks ago     72.8MB
...
alpine                  latest        e66264b98777   12 months ago   5.53MB
root@qhdata-dev:/home/qhdata/docker#
导出镜像
参考文章:https://docs.docker.com/engine/reference/commandline/save/
root@qhdata-dev:/home/qhdata/docker# docker save -o qhdata_ubuntu_20_04.tar qhdata/ubuntu:20.04
root@qhdata-dev:/home/qhdata/docker# ls -r
qhdata_ubuntu_20_04.tar
root@qhdata-dev:/home/qhdata/docker#
参数说明:
-
--output,-o:写入的文件,而不是 STDOUT
删除镜像
参考文章:https://docs.docker.com/engine/reference/commandline/rmi/
参考文章:https://docs.docker.com/engine/reference/commandline/image_rm/
docker rmi [image]
docker rmi [image id]
docker image rm [image]
参数说明:
-
--force,-f:强制删除图像 -
--no-prune:不要删除未标记的父级
eg:
root@qhdata-dev:/home/qhdata/docker# docker rmi qhdata/ubuntu:20.04
Untagged: qhdata/ubuntu:20.04
Deleted: sha256:dd4c75bc58d43b6ae59f9afc5c528117ac317d936cfd3219fe1ade1e902c3965
Deleted: sha256:307a3b9484906a84d1b16735fdb6c967692fd0b065985126f54fbeb16eefdf20

root@qhdata-dev:/home/qhdata/docker# docker images
REPOSITORY              TAG           IMAGE ID       CREATED         SIZE
hello-world             latest        9c7a54a9a43c   3 weeks ago     13.3kB
ubuntu                  20.04         88bd68917189   6 weeks ago     72.8MB
...
alpine                  latest        e66264b98777   12 months ago   5.53MB
root@qhdata-dev:/home/qhdata/docker#
导入镜像
参考文章:https://docs.docker.com/engine/reference/commandline/load/
参考文章:https://docs.docker.com/engine/reference/commandline/image_load/
从 STDIN 加载图像
docker load < qhdata_ubuntu_20_04.tar
docker image load < qhdata_ubuntu_20_04.tar
从文件加载图像 (–input)
docker load -i qhdata_ubuntu_20_04.tar
docker image load -i qhdata_ubuntu_20_04.tar
参数说明:
-
--input,-i:从 tar 归档文件中读取,而不是从 STDIN 中读取 -
--quiet,-q抑制负载输出
eg:
root@qhdata-dev:/home/qhdata/docker# docker load -i qhdata_ubuntu_20_04.tar
f6ed57753c5f: Loading layer [==================================================>]  43.33MB/43.33MB
Loaded image: qhdata/ubuntu:20.04

root@qhdata-dev:/home/qhdata/docker# docker images
REPOSITORY              TAG           IMAGE ID       CREATED         SIZE
qhdata/ubuntu           20.04         dd4c75bc58d4   2 hours ago     116MB
hello-world             latest        9c7a54a9a43c   3 weeks ago     13.3kB
ubuntu                  20.04         88bd68917189   6 weeks ago     72.8MB
...
alpine                  latest        e66264b98777   12 months ago   5.53MB
root@qhdata-dev:/home/qhdata/docker#
清理镜像
参考文章:https://docs.docker.com/engine/reference/commandline/image_prune/
root@qhdata-dev:/home/qhdata/docker# docker image prune
WARNING! This will remove all dangling images.
Are you sure you want to continue? [y/N] y
Total reclaimed space: 0B
root@qhdata-dev:/home/qhdata/docker#
参数说明:
-
--all,-a:删除所有未使用的图像,而不仅仅是悬挂的图像 -
--filter:提供过滤值(例如until=<timestamp>) -
--force,-f:不提示确认
过滤(--filter)
过滤标志(–filter)格式为“key=value”。如果有多个过滤器,则传递多个标志(例如,–filter “foo=bar” --filter “bif=baz”)
目前支持的过滤器有:
- until (
<timestamp>) - 仅删除在给定时间戳之前创建的图像 - label (
label=<key>,label=<key>=<value>,label!=<key>,orlabel!=<key>=<value>) - 仅删除带有(或不带,如果label!=...使用)指定标签的图像。
查看容器
docker ps: 查看正在运行中的容器;docker ps -a: 查看所有容器,包括运行中的、已经停止运行的容器。docker container ls -a: 查看所有容器,包括运行中的、已经停止运行的容器。
root@qhdata-dev:/home/qhdata/docker# docker ps
CONTAINER ID   IMAGE             COMMAND                  CREATED         STATUS       PORTS                                       NAMES
7b651a8dfc5c   registry:latest   "/entrypoint.sh /etc…"   11 months ago   Up 7 hours   0.0.0.0:5001->5000/tcp,:::5001->5000/tcp   registry

root@qhdata-dev:/home/qhdata/docker# docker ps -a
CONTAINER ID   IMAGE                          COMMAND                  CREATED         STATUS                      PORTS                                                                            NAMES
7ec56dec1d8e   ubuntu:20.04                   "/bin/bash"              3 minutes ago   Exited (0) 2 minutes ago                                                                                     unruffled_ganguly
dea79bf486d4   hello-world                    "/hello"                 8 hours ago     Exited (0) 8 hours ago                                                                                       laughing_joliot
a67c7b72196a   owasp/modsecurity-crs:nginx    "/docker-entrypoint.…"   9 months ago    Exited (255) 5 months ago   0.0.0.0:8080->80/tcp,:::8080->80/tcp,0.0.0.0:8443->443/tcp,:::8443->443/tcp   wafdemo-waf-1
d2945582db44   bkimminich/juice-shop:latest   "/nodejs/bin/node /j…"   9 months ago    Exited (255) 5 months ago   0.0.0.0:1003->3000/tcp,:::1003->3000/tcp                                        wafdemo-webapp-1
c7f605ab3ec9   nginx:latest                   "/docker-entrypoint.…"   9 months ago    Exited (255) 5 months ago   0.0.0.0:8081->80/tcp,:::8081->80/tcp                                            nginx-webapp-1
7b651a8dfc5c   registry:latest                "/entrypoint.sh /etc…"   11 months ago   Up 7 hours                  0.0.0.0:5001->5000/tcp,:::5001->5000/tcp                                        registry
root@qhdata-dev:/home/qhdata/docker#
返回字段说明:
-
CONTAINER ID: 容器 ID; -
IMAGE: 创建容器时使用的镜像; -
COMMAND: 容器最后运行的命令; -
CREATED: 容器创建时间; -
STATUS: 容器状态; -
PORTS: 端口信息; -
NAMES: 容器名:和容器 ID 一样,可以标识容器的唯一性,同一台宿主机上不允许有同名容器存在,否则会冲突;
导出容器
参考文章:https://docs.docker.com/engine/reference/commandline/export/
docker export 7ec56dec1d8e > qhdata_ubuntu_20_04.tar
docker export --output="qhdata_ubuntu_20_04.tar" 7ec56dec1d8e
参数说明:
-
--output,-o:写入的文件,而不是 STDOUT
eg:
root@qhdata-dev:/home/qhdata/docker# docker export --output="qhdata_ubuntu_20_04.tar" 7ec56dec1d8e
root@qhdata-dev:/home/qhdata/docker# ls -r
qhdata_ubuntu_20_04.tar
root@qhdata-dev:/home/qhdata/docker#
导入容器-以镜像的方式
参考文章:https://docs.docker.com/engine/reference/commandline/import/
// 从远程位置导入
docker import https://example.com/exampleimage.tgz  // 这将创建一个新的未标记图像。
// 从本地文件导入
cat exampleimage.tgz | docker import - exampleimagelocal:new  // 通过管道导入到 docker 和STDIN.
cat exampleimage.tgz | docker import --message "New image imported from tarball" - exampleimagelocal:new  // 使用提交消息导入。
docker import /path/to/exampleimage.tgz  // 从本地存档导入到 docker。
// 从本地目录导入
sudo tar -c . | docker import - exampleimagedir
// 使用新配置从本地目录导入
sudo tar -c . | docker import --change "ENV DEBUG=true" - exampleimagedir
参数说明:
-
--change,-c:将 Dockerfile 指令应用于创建的图像 -
--message,-m:为导入的图像设置提交信息 -
--platform:如果服务器支持多平台,则设置平台
eg:
root@qhdata-dev:/home/qhdata/docker# cat qhdata_ubuntu_20_04.tar | docker import - qhdata/ubuntu:20.04
sha256:db81f58964d10ecf857bbb61777ebe3aa1318eaa71ef3ba58fb15ac87d13aed7

root@qhdata-dev:/home/qhdata/docker# docker images
REPOSITORY              TAG           IMAGE ID       CREATED          SIZE
qhdata/ubuntu           20.04         db81f58964d1   14 seconds ago   116MB
hello-world             latest        9c7a54a9a43c   3 weeks ago      13.3kB
...
alpine                  latest        e66264b98777   12 months ago    5.53MB
root@qhdata-dev:/home/qhdata/docker#
创建容器
参考文章:https://docs.docker.com/engine/reference/commandline/run/
root@qhdata-dev:/home/qhdata/docker# docker  run -v ./dm7:/dm7 -w /dm7 -i -t qhdata/ubuntu:20.04 /bin/bash
root@1867b8bbbbc8:/dm7#

root@8b5dd52725e5:/dm7# ls -r
include  drivers  bin
root@8b5dd52725e5:/dm7#

root@1867b8bbbbc8:/dm7# cd /
root@1867b8bbbbc8:/# ls -r
var  usr  tmp  sys  srv  sbin  run  root  proc  opt  mnt  media  libx32  lib64  lib32  lib  home  etc  dm7  dev  boot  bin
root@1867b8bbbbc8:/# exit
参数说明(部分):
-
--volume,-v:绑定挂载卷,从 Docker 引擎版本 23 开始,您可以在主机上使用相对路径。 -
--workdir,-w:容器内的工作目录 -
--tty,-t:分配伪 TTY -
--interactive,-i:即使未附加,也要保持 STDIN 打开 -
--env,-e:设置环境变量 -
--platform: 如果服务器支持多平台,则设置平台 -
/bin/bash:在容器中创建交互式shell。 -
/bin/echo:echo后面接需要使用的命令。
重启容器
参考文章:https://docs.docker.com/engine/reference/commandline/restart/
参考文章:https://docs.docker.com/engine/reference/commandline/container_restart/
root@qhdata-dev:/home/qhdata/docker# docker restart 8b5dd52725e5
8b5dd52725e5
root@qhdata-dev:/home/qhdata/docker# docker ps
CONTAINER ID   IMAGE                 COMMAND                  CREATED         STATUS          PORTS                                       NAMES
8b5dd52725e5   qhdata/ubuntu:20.04   "/bin/bash"              24 hours ago    Up 10 seconds                                               gracious_sanderson
7b651a8dfc5c   registry:latest       "/entrypoint.sh /etc…"   11 months ago   Up 2 days       0.0.0.0:5001->5000/tcp,:::5001->5000/tcp   registry
root@qhdata-dev:/home/qhdata/docker#
参数说明:
-
--signal,-s: 发送到容器的信号 -
--time,-t: 杀死容器前等待的秒数
进入容器
参考文章:https://docs.docker.com/engine/reference/commandline/exec/
docker exec -it [container ID or NAMES]
docker exec -it mycontainer sh  // 在容器上执行交互式shell
docker exec -it mycontainer /bin/bash  // 在容器上执行交互式shell
docker exec -it mycontainer pwd  // 在创建容器时运行命令
参数说明:
-
--detach,-d: 分离模式:在后台运行命令 -
--detach-keys: 覆盖用于分离容器的键序列 -
--env,-e: 设置环境变量 -
--env-file: 读入环境变量文件 -
--interactive,-i: 即使未附加,也要保持 STDIN 打开 -
--privileged: 赋予命令扩展权限 -
--tty,-t: 分配伪 TTY -
--user,-u: 用户名或 UID(格式<name|uid>[:<group|gid>]:) -
--workdir,-w: 容器内的工作目录
eg:
root@qhdata-dev:/home/qhdata/docker# docker exec -it 8b5dd52725e5 sh
# ls -r
include  drivers  bin
# cd /
# ls -r
var  usr  tmp  sys  srv  sbin  run  root  proc	opt  mnt  media  libx32  lib64	lib32  lib  home  etc  dm7  dev  boot  bin
# exit
root@qhdata-dev:/home/qhdata/docker#
如果进入一个未启动的容器,会报错误。
root@qhdata-dev:/home/qhdata/docker# docker exec -it 1867b8bbbbc8 sh
Error response from daemon: Container 1867b8bbbbc83c348ea1f898d6cfc6dd7208d36d3b3d926a1abcc8f94eb8fa7b is not running
停止&关闭容器
参考文章:https://docs.docker.com/engine/reference/commandline/stop/
参考文章:https://docs.docker.com/engine/reference/commandline/container_stop/
参考文章:https://docs.docker.com/engine/reference/commandline/kill/
参考文章:https://docs.docker.com/engine/reference/commandline/container_kill/
// 优雅模式
docker container stop [container ID or NAMES]
# 简写模式(可省略关键字 container )
docker stop [container ID or NAMES]
// 强制模式
docker container kill [container ID or NAMES]
# 简写模式(可省略关键字 container )
docker kill [container ID or NAMES]
参数说明:
-
--signal,-t: 杀死容器前等待的秒数
eg:
root@qhdata-dev:/home/qhdata/docker# docker ps
CONTAINER ID   IMAGE                 COMMAND                  CREATED         STATUS      PORTS                                       NAMES
8b5dd52725e5   qhdata/ubuntu:20.04   "/bin/bash"              3 days ago      Up 2 days                                               gracious_sanderson
7b651a8dfc5c   registry:latest       "/entrypoint.sh /etc…"   11 months ago   Up 5 days   0.0.0.0:5001->5000/tcp,:::5001->5000/tcp   registry
root@qhdata-dev:/home/qhdata/docker# docker container stop 8b5dd52725e5
8b5dd52725e5
root@qhdata-dev:/home/qhdata/docker# docker ps
CONTAINER ID   IMAGE             COMMAND                  CREATED         STATUS      PORTS                                       NAMES
7b651a8dfc5c   registry:latest   "/entrypoint.sh /etc…"   11 months ago   Up 5 days   0.0.0.0:5001->5000/tcp,:::5001->5000/tcp   registry
root@qhdata-dev:/home/qhdata/docker#
删除容器
参考文章:https://docs.docker.com/engine/reference/commandline/rm/
参考文章:https://docs.docker.com/engine/reference/commandline/container_rm/
docker container rm [container ID or NAMES]
# 简写模式(可省略关键字 container )
docker rm [container ID or NAMES]
参数说明:
-
--force,-f: 强制删除正在运行的容器(使用 SIGKILL) -
--link,-l: 删除指定链接 -
--volumes,-v: 删除与容器关联的匿名卷
eg:
root@qhdata-dev:/home/qhdata/docker# docker rm 8b5dd52725e5
8b5dd52725e5
root@qhdata-dev:/home/qhdata/docker# docker ps -a
CONTAINER ID   IMAGE                          COMMAND                  CREATED         STATUS                      PORTS                                                                            NAMES
1867b8bbbbc8   qhdata/ubuntu:20.04            "/bin/bash"              3 days ago      Exited (0) 3 days ago                                                                                        intelligent_feynman
7ec56dec1d8e   ubuntu:20.04                   "/bin/bash"              4 days ago      Exited (0) 4 days ago                                                                                        unruffled_ganguly
dea79bf486d4   hello-world                    "/hello"                 5 days ago      Exited (0) 5 days ago                                                                                        laughing_joliot
...
7b651a8dfc5c   registry:latest                "/entrypoint.sh /etc…"   11 months ago   Up 5 days                   0.0.0.0:5001->5000/tcp,:::5001->5000/tcp                                        registry
root@qhdata-dev:/home/qhdata/docker#
Dockerfile
参考文章:https://docs.docker.com/engine/reference/builder/
参考文章:https://www.quanxiaoha.com/docker/dockerfile-build-image.html
Dockerfile的构建
FROM --platform=linux/arm64 python:3.8.10

ADD . .

RUN apt-get update -y && \
apt-get install python-dev -y && \
apt-get install gcc* -y

ENV DM_HOME=/dm7 LD_LIBRARY_PATH=/dm7/bin:$LD_LIBRARY_PATH PATH=$PATH:$HOME/bin:/dm7/bin

RUN cd ./dm7/drivers/python/dmPython/ && python setup.py install  # 安装dmPython

RUN cd ./dm7/drivers/python/sqlalchemy1.4.6/ && python setup.py install  # sqlalchemy1.4.6

RUN pip install --upgrade scipy==1.7.3 -i https://pypi.tuna.tsinghua.edu.cn/simple && \
pip install --upgrade numpy==1.22.4 -i https://pypi.tuna.tsinghua.edu.cn/simple && \
pip install --upgrade pandas==1.2.4 -i https://pypi.tuna.tsinghua.edu.cn/simple && \
pip install --upgrade xlrd==1.2.0 -i https://pypi.tuna.tsinghua.edu.cn/simple && \
pip install --upgrade xlwt==0.7.2 -i https://pypi.tuna.tsinghua.edu.cn/simple && \
pip install --upgrade python_dateutil==2.8.2 -i https://pypi.tuna.tsinghua.edu.cn/simple && \
pip install --upgrade pymysql==0.9.3 -i https://pypi.tuna.tsinghua.edu.cn/simple && \
pip install --upgrade SQLAlchemy==1.4.18 -i https://pypi.tuna.tsinghua.edu.cn/simple && \
pip install --upgrade openpyxl==3.0.0 -i https://pypi.tuna.tsinghua.edu.cn/simple
执行生成
root@qhdata-dev:/home/qhdata/docker# docker build -t dm_base/qhdata .
但是执行失败,报下面的错误。
ERROR: failed to solve: process "/bin/sh -c apt-get update -y" did not complete successfully: exit code: 1
估计是新版问题。我切换回5:20.10.23~3-0~ubuntu-focal就不再提示上述错误。
Sending build context to Docker daemon  3.164GB
Step 1/8 : FROM --platform=linux/arm64 python:3.8.10
 ---> a369814a9797
Step 2/8 : ADD . .
 ---> 8ce022ad8be9
Step 3/8 : RUN apt-get update -y
 ---> Running in 76f670c26669
Get:1 http://security.debian.org/debian-security buster/updates InRelease [34.8 kB]
Get:2 http://deb.debian.org/debian buster InRelease [122 kB]
Get:3 http://deb.debian.org/debian buster-updates InRelease [56.6 kB]
Get:4 http://security.debian.org/debian-security buster/updates/main amd64 Packages [508 kB]
Get:5 http://deb.debian.org/debian buster/main amd64 Packages [7909 kB]
Get:6 http://deb.debian.org/debian buster-updates/main amd64 Packages [8788 B]
Fetched 8640 kB in 15s (588 kB/s)
Reading package lists...
Removing intermediate container 76f670c26669
 ---> 7b2a2534e290
Step 4/8 : RUN apt-get install gcc -y
 ---> Running in 0befdb33c623
Reading package lists...
Building dependency tree...
Reading state information...
...
Removing intermediate container da5f1a91fce3
 ---> 0d450fba1928
Successfully built 0d450fba1928
Successfully tagged dm_base/qhdata:latest
root@qhdata-dev:/home/qhdata/docker# docker images
REPOSITORY              TAG           IMAGE ID       CREATED          SIZE
dm_base/qhdata          latest        0d450fba1928   21 seconds ago   4.42GB
<none>                  <none>        926744ce4933   9 minutes ago    4.08GB
...
python                  3.8.10        a369814a9797   23 months ago    883MB
root@qhdata-dev:/home/qhdata/docker#  docker save -o dm_base.tar dm_base/qhdata:latest
但是如果是这样的话,在跨平台(linux/amd64 -> linux/arm64)还是会出现问题。提示如下
WARNING: The requested image's platform (linux/amd64) does not match the detected host platform (linux/arm64/v8) and no specific platform was requested
exec /bin/bash: exec format error
Dockerfile切换国内源
参考文章:https://blog.csdn.net/xiaowu_wu/article/details/124355694
参考文章:https://mirrors.tuna.tsinghua.edu.cn/help/debian/
参考文章:https://blog.csdn.net/karmacode/article/details/104902656
参考文章:https://blog.csdn.net/weixin_45067618/article/details/122234387
参考文章:https://stackoverflow.com/questions/70789307/how-to-fix-the-following-signatures-couldnt-be-verified-because-the-public-key
参考文章:https://blog.csdn.net/seaofbits/article/details/123647256
在切换前,需要进入你目标镜像中查看系统版本(cat /etc/os-release)。
root@qhdata-dev:/home/qhdata/docker# docker run -t -i python:3.9 /bin/bash
WARNING: The requested image's platform (linux/arm64/v8) does not match the detected host platform (linux/amd64) and no specific platform was requested
root@016143a4d2f4:/# cat /etc/os-release
PRETTY_NAME="Debian GNU/Linux 11 (bullseye)"
NAME="Debian GNU/Linux"
VERSION_ID="11"
VERSION="11 (bullseye)"
VERSION_CODENAME=bullseye
ID=debian
HOME_URL="https://www.debian.org/"
SUPPORT_URL="https://www.debian.org/support"
BUG_REPORT_URL="https://bugs.debian.org/"
root@016143a4d2f4:/#
得到目标镜像实用的PRETTY_NAME。然后到清华大学开源软件镜像站查找对应实用版本镜像。

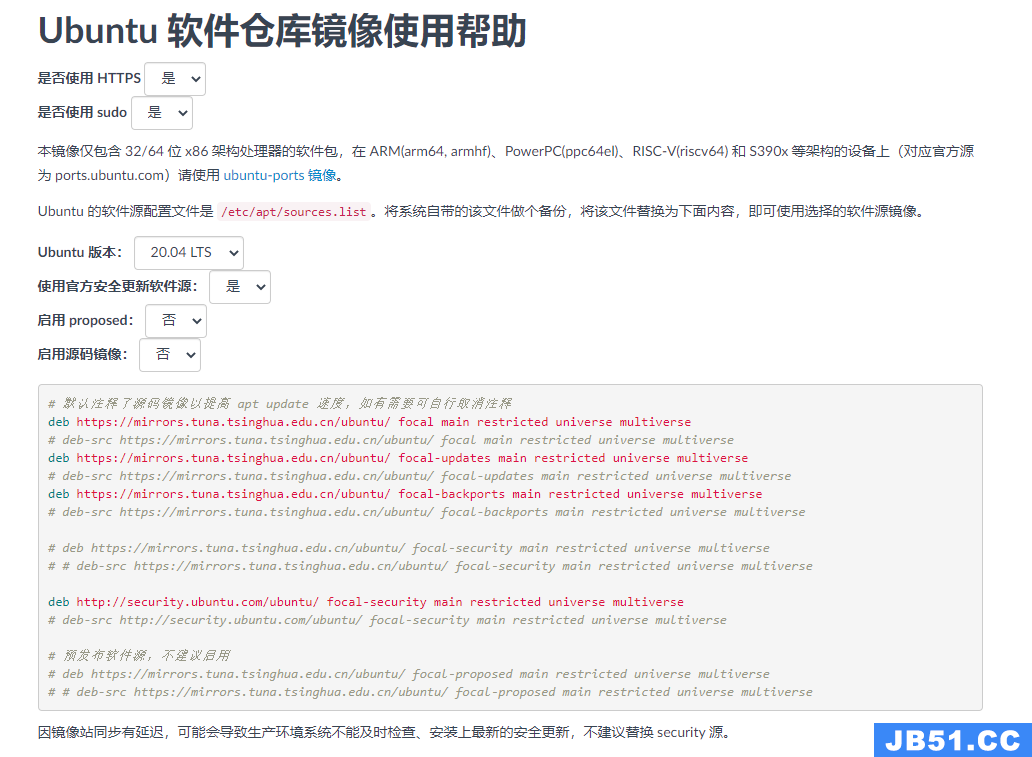
将里面的内容复制到dockerfile里面。
RUN mv /etc/apt/sources.list /etc/apt/sources_backup.list && \
echo "deb https://mirrors.tuna.tsinghua.edu.cn/ubuntu-ports/ focal main restricted universe multiverse                      " >> /etc/apt/sources.list && \
echo "deb https://mirrors.tuna.tsinghua.edu.cn/ubuntu-ports/ focal-updates main restricted universe multiverse              " >> /etc/apt/sources.list && \
echo "deb https://mirrors.tuna.tsinghua.edu.cn/ubuntu-ports/ focal-backports main restricted universe multiverse            " >> /etc/apt/sources.list && \
echo "deb https://mirrors.tuna.tsinghua.edu.cn/ubuntu-ports/ focal-security main restricted universe multiverse             " >> /etc/apt/sources.list && \
echo "deb https://mirrors.tuna.tsinghua.edu.cn/debian/ bullseye main contrib non-free                                 " >> /etc/apt/sources.list && \
echo "deb https://mirrors.tuna.tsinghua.edu.cn/debian/ bullseye-updates main contrib non-free                         " >> /etc/apt/sources.list && \
echo "deb https://mirrors.tuna.tsinghua.edu.cn/debian/ bullseye-backports main contrib non-free                       " >> /etc/apt/sources.list && \
echo "deb https://security.debian.org/debian-security bullseye-security main contrib non-free                         " >> /etc/apt/sources.list

RUN apt-key adv --keyserver keyserver.ubuntu.com --recv-keys 3B4FE6ACC0B21F32 && \
apt-key adv --keyserver keyserver.ubuntu.com --recv-keys 871920D1991BC93C
这时候运行的结果就如图瞎:

错误1:E: Failed to fetch https://mirrors.tuna.tsinghua.edu.cn/ubuntu/dists/focal-updates/main/binary-arm64/Packages 404 Not Found [IP: 101.6.15.130 443]
这是由于框架是用arm的,但是网上给的教程都是amd的。所以只需要将镜像网址中的ubuntu改成ubuntu-ports即可。
错误2:The following signatures couldn't be verified because the public key is not available: NO_PUBKEY 3B4FE6ACC0B21F32 NO_PUBKEY 871920D1991BC93C
这是镜像的key不存在,只要在dockerfile中将该key添加即可apt-key adv --keyserver keyserver.ubuntu.com --recv-keys 3B4FE6ACC0B21F32
错误3:Some packages could not be installed. This may mean that you have requested an impossible situation or if you are using the unstable distribution that some required packages have not yet been created or been moved out of Incoming.
这个错误无解,就是镜像缺少对应的包。
buildx
参考文章:https://docs.docker.com/build/building/multi-platform/
参考文章:https://docs.docker.com/build/building/multi-stage/
参考文章:https://docs.docker.com/engine/reference/commandline/buildx_build/
参考文章:https://blog.bwcxtech.com/posts/43dd6afb/
参考文章:https://waynerv.com/posts/building-multi-architecture-images-with-docker-buildx/
Docker 默认会使用不支持多 CPU 架构的构建器,我们需要手动切换。
查看现有的构建器
root@qhdata-dev:/home/qhdata/docker# docker buildx ls
NAME/NODE DRIVER/ENDPOINT STATUS  BUILDKIT PLATFORMS
default * docker
  default default         running 20.10.23 linux/amd64,linux/386
root@qhdata-dev:/home/qhdata/docker#
先创建一个新的构建器:
docker buildx create --use --name mybuilder
docker buildx use mybuilder
启动构建器:
docker buildx inspect mybuilder --bootstrap
如果发现还是像我一样不支持arm架构,则使用下面方法来安装支持。
Buildx 和 Dockerfiles 支持的三种不同策略构建多平台镜像:
- 在内核中使用 QEMU 仿真支持
- 使用相同的构建器实例在多个本机节点上构建
- 使用 Dockerfile 中的阶段交叉编译到不同的体系结构
如果您的节点已经支持 QEMU(例如,如果您正在使用 Docker Desktop),QEMU 是最简单的入门方法。它不需要更改您的 Dockerfile,并且 BuildKit 会自动检测可用的二级架构。当 BuildKit 需要为不同的体系结构运行二进制文件时,它会通过在处理程序中注册的二进制文件自动加载它binfmt_misc 。
binfmt_misc对于在主机操作系统上注册的 QEMU 二进制文件要在容器内透明地工作,它们必须静态编译并使用fix_binary标志注册。这需要内核 >= 4.8 和 binfmt-support >= 2.1.7。您可以通过检查是否 F在/proc/sys/fs/binfmt_misc/qemu-*. 虽然 Docker Desktop 预配置了binfmt_misc对其他平台的支持,但对于其他安装,它可能需要使用 tonistiigi/binfmt 图像进行安装。
docker run --privileged --rm tonistiigi/binfmt --install all
这时候重新走启动构建器这一步后,检查构建器情况。
root@qhdata-dev:/home/qhdata# docker buildx ls
NAME/NODE    DRIVER/ENDPOINT             STATUS  BUILDKIT PLATFORMS
mybuilder *  docker-container
  mybuilder0 unix:///var/run/docker.sock running v0.11.6  linux/amd64,linux/amd64/v2,linux/amd64/v3,linux/amd64/v4,linux/386,linux/arm64,linux/riscv64,linux/ppc64le,linux/s390x,linux/mips64le,linux/mips64
default      docker
  default    default                     running 20.10.23 linux/amd64,linux/arm/v7,linux/arm/v6

root@qhdata-dev:~# docker buildx inspect --bootstrap
Name:          mybuilder
Driver:        docker-container
Last Activity: 2023-06-09 06:14:55 +0000 UTC

Nodes:
Name:      mybuilder0
Endpoint:  unix:///var/run/docker.sock
Status:    running
Buildkit:  v0.11.6
Platforms: linux/amd64,linux/mips64
root@qhdata-dev:~#
这时候发现都可以支持arm架构了。
然后使用下面语句进行构建即可。
docker buildx build --platform linux/amd64,linux/arm64 --output type=tar,dest=./dm_base_python38.rar -t dm_base/python38 .
部分参数说明:
-
--load:简写为–output=type=docker,会自动将单平台构建结果加载到docker images -
--output,-o:输出目的地(格式type=local,dest=path:) -
--platform:为构建设置目标平台 -
--add-host:添加自定义主机到 IP 映射(格式host:ip:) -
--file,-f:Dockerfile 的名称(默认值PATH/Dockerfile:)
platform详细说明:
设置构建的目标平台。如果Dockerfile 中所有的FROM命令没有自己--platform标志则会使用这个参数所代表的platform作为最终platform。
docker使用样例
PostgreSQL
参考文章: https://www.jianshu.com/p/17ae7f0c3fa4
下载Docker仓库中PostgreSQL的postgres镜像
root@qhdata-dev:/home/qhdata/docker# docker pull postgres
Using default tag: latest
latest: Pulling from library/postgres
faef57eae888: Pull complete
a33c10a72186: Pull complete
d662a43776d2: Pull complete
a3ba86413420: Pull complete
a627f37e9916: Pull complete
424bade69494: Pull complete
dd8d4fcd466b: Pull complete
03d0efeea592: Pull complete
4f27e1518a67: Pull complete
0c8ac8b8eb90: Pull complete
c08e79653ad2: Pull complete
d5724e8c22af: Pull complete
3db4aa0d2013: Pull complete
Digest: sha256:362a63cb1e864195ea2bc29b5066bdb222bc9a4461bfaff2418f63a06e56bce0
Status: Downloaded newer image for postgres:latest
docker.io/library/postgres:latest
root@qhdata-dev:/home/qhdata/docker#
创建容器
docker run --name postgres-db -e TZ=PRC -e POSTGRES_USER=root -e POSTGRES_DB=database -e POSTGRES_PASSWORD=123456 -p 5432:5432 -v pgdata:/home/qhdata/postgresql/data -d postgres
部分参数说明:
-
--name: 容器名称postgres-db -
-e TZ=PRC: 时区,中国 -
-e POSTGRES_USER=root: 用户名是root(不设置默认用户名postgres) -
-e POSTGRES_DB=database: DB模式数据库模式 -
-e POSTGRES_PASSWORD: 密码 -
-p 5432:5432: 端口映射,把容器的5432端口映射到服务器的5432端口 -
-v: 将数据存到宿主服务器 -
-d: 指定使用镜像 - (时区问题:如果在启动容器时不设置时区,默认为UTC,使用now()设置默认值的时候将有时间差。)
然后启动容器启动容器即可。
python + redis
参考文章:https://cloud.tencent.com/developer/article/1670205
参考文章:https://ost.51cto.com/posts/16688
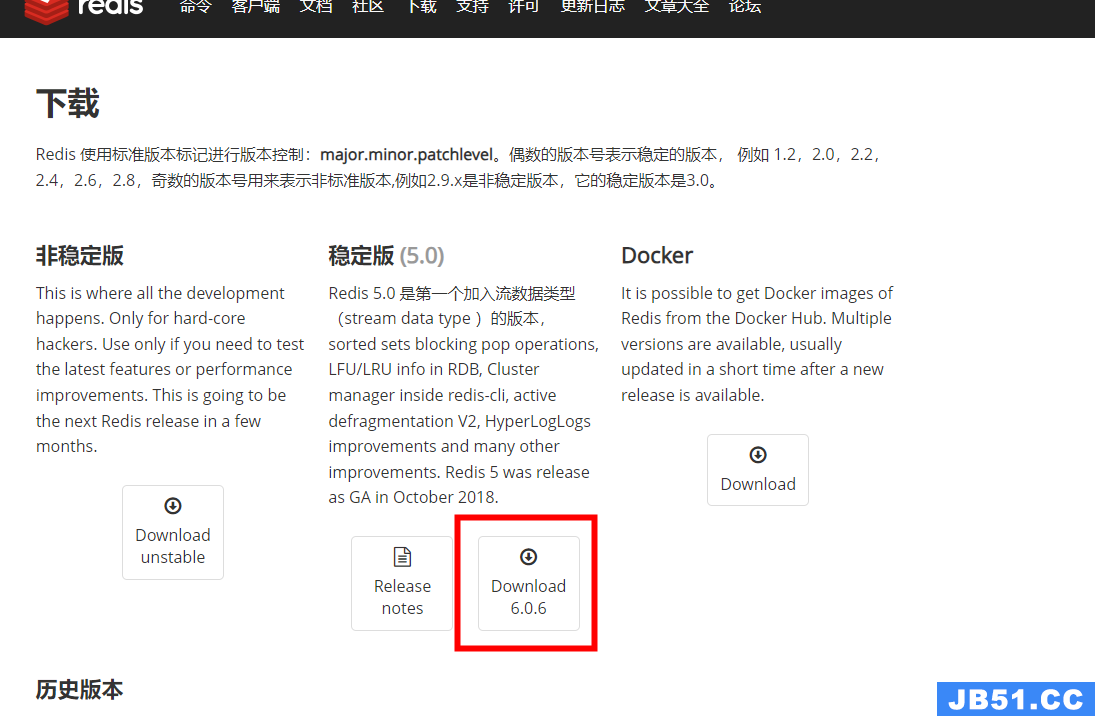
首先先在http://www.redis.cn/download.html下载一个redis,使用里面的配置文件
解压得到
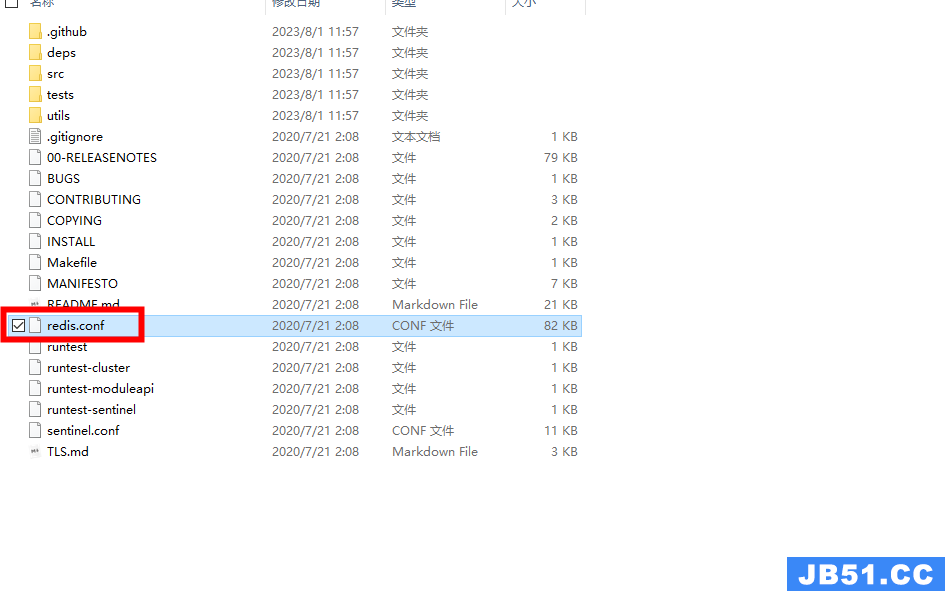
修改redis.conf里面的信息。
将
bind 127.0.0.1修改成bind 0.0.0.0,这样外网就可以访问。(或者注释掉)daemonize no#用守护线程的方式启动requirepass 你的密码#给redis设置密码appendonly yes#redis持久化 默认是notcp-keepalive 300#防止出现远程主机强迫关闭了一个现有的连接的错误 默认是300
整个docker file的构建
FROM --platform=linux/amd64 python:3.10.11

ADD ./twitter_snowflake/pkg/ ./twitter_snowflake/pkg/

RUN apt-get update -y && \
apt update -y && \
apt install freetds-dev -y  && \
apt install redis-server -y  # pymssql的依赖与reids

RUN cd /twitter_snowflake/pkg/ && \
pip install --upgrade -r requirements_api.txt # 安装包

RUN cd /twitter_snowflake/pkg/ && \
pip install --upgrade -r requirements.txt # 安装包

RUN cd /twitter_snowflake && cp -r /twitter_snowflake/pkg/人大金仓/sqlalchemy/dialects/kingbase /usr/local/lib/python3.10/site-packages/sqlalchemy/dialects/  # 替换文件

# 替换supervisor配置,supervisor版本为4.2.5;替换reids配置文件
RUN mkdir /etc/supervisor && \
cp -r /twitter_snowflake/pkg/supervisor/supervisord.conf /etc/supervisor/supervisord.conf && \
cp -r /twitter_snowflake/pkg/redis/redis.conf /etc/redis/redis.conf
构建命令
docker buildx build --platform linux/amd64 --load --file org_id.txt -t org_id/python:3.10.11 .
启动命令
docker run -v /home/qhdata/docker/twitter_snowflake:/twitter_snowflake -p 34567:9001 -p 34568:8000 -p 34569:6379 -i -t org_id/python:3.10.11 /bin/bash
进入后运行的命令
supervisord -c /etc/supervisor/supervisord.conf
原文地址:https://blog.csdn.net/yycoolsam/article/details/130962377
版权声明:本文内容由互联网用户自发贡献,该文观点与技术仅代表作者本人。本站仅提供信息存储空间服务,不拥有所有权,不承担相关法律责任。如发现本站有涉嫌侵权/违法违规的内容, 请发送邮件至 dio@foxmail.com 举报,一经查实,本站将立刻删除。