
1、基于 CentOS 7 构建 LVS-DR 群集。
DS(Director Server):DIP 192.168.231.132 & VIP 192.168.231.200
[root@132 ~]# nmcli c show
NAME   UUID                                  TYPE      DEVICE
ens33  c89f4a1a-d61b-4f24-a260-6232c8be18dc  ethernet  ens33
[root@132 ~]# nmcli c m ens33 +ipv4.addresses 192.168.231.200/24
[root@132 ~]# nmcli c up ens33
[root@132 ~]# yum install ipvsadm -y
[root@132 ~]# ipvsadm -A -t 192.168.231.200:80 -s rr
[root@132 ~]# ipvsadm -a -t 192.168.231.200:80 -r 192.168.231.136 -g -w 1
[root@132 ~]# ipvsadm -a -t 192.168.231.200:80 -r 192.168.231.137 -g -w 1
[root@132 ~]# ipvsadm -ln
IP Virtual Server version 1.2.1 (size=4096)
Prot LocalAddress:Port Scheduler Flags
  -> RemoteAddress:Port           Forward Weight ActiveConn InActConn
TCP  192.168.231.200:80 rr
  -> 192.168.231.136:80           Route   1      0          0
  -> 192.168.231.137:80           Route   1      0          0
rs1
[root@137 ~]# yum install net-tools.x86_64
[root@137 ~]# yum install httpd -y
[root@137 ~]# echo "web test pages ip is `hostname -I`" > /var/www/html/index.html
[root@137 ~]# systemctl restart httpd
[root@137 ~]# ifconfig lo:200 192.168.231.200 netmask 255.255.255.255 up
[root@137 ~]# route add -host 192.168.231.200 dev lo
[root@137 ~]# route -n
Kernel IP routing table
Destination     Gateway         Genmask         Flags Metric Ref    Use Iface
0.0.0.0         192.168.231.2   0.0.0.0         UG    100    0        0 ens33
192.168.231.0   0.0.0.0         255.255.255.0   U     100    0        0 ens33
192.168.231.200 0.0.0.0         255.255.255.255 UH    0      0        0 lo
[root@137 ~]# echo "1" > /proc/sys/net/ipv4/conf/lo/arp_ignore
[root@137 ~]# echo "2" > /proc/sys/net/ipv4/conf/lo/arp_announce
[root@137 ~]# echo "1" > /proc/sys/net/ipv4/conf/all/arp_ignore
[root@137 ~]# echo "2" > /proc/sys/net/ipv4/conf/all/arp_announce
rs2
[root@136 ~]# yum install net-tools.x86_64
[root@136 ~]# yum install httpd -y
[root@136 ~]# echo "web test pages ip is `hostname -I`" > /var/www/html/index.html
[root@136 ~]# ifconfig lo:200 192.168.231.200 netmsak 255.255.255.255 up
[root@136 ~]# ifconfig lo:200 192.168.231.200 netmask 255.255.255.255 up
[root@136 ~]# echo "1" > /proc/sys/net/ipv4/conf/lo/arp_ignore
[root@136 ~]# echo "2" > /proc/sys/net/ipv4/conf/lo/arp_announce
[root@136 ~]# echo "1" > /proc/sys/net/ipv4/conf/all/arp_ignore
[root@136 ~]# echo "2" > /proc/sys/net/ipv4/conf/all/arp_announce
测试
2、配置nginx负载均衡。
132内网服务器
yum localinstall  nginx-1.22.0-1.el7.ngx.x86_64.rpm
[root@localhost ~]# vim /etc/nginx/conf.d/vhost.conf
server {
        listen 80;
        server_name web1.yunjisuan.com;

        location / {
                root /usr/share/nginx/html/web1;
                index index.html index.htm;
        }
        access_log /usr/share/nginx/html/web1/logs/access_bbs.log main;
}
[root@localhost ~]# mkdir -p /usr/share/nginx/html/web1/logs
[root@localhost ~]# echo "`hostname -I `web1" > /usr/share/nginx/html/web1/index.html
[root@localhost ~]# nginx -t
nginx: the configuration file /etc/nginx/nginx.conf syntax is ok
nginx: configuration file /etc/nginx/nginx.conf test is successful
[root@localhost ~]# systemctl restart nginx
136内网服务器
yum localinstall  nginx-1.22.0-1.el7.ngx.x86_64.rpm
[root@localhost ~]# vim /etc/nginx/conf.d/vhost.conf
server {
        listen 80;
        server_name web1.yunjisuan.com;

        location / {
                root /usr/share/nginx/html/web1;
                index index.html index.htm;
        }
        access_log /usr/share/nginx/html/web1/logs/access_bbs.log main;
}


[root@localhost ~]# mkdir -p /usr/share/nginx/html/web1/logs
[root@localhost ~]# echo "`hostname -I `web1" > /usr/share/nginx/html/web1/index.html
[root@localhost ~]# nginx -t
nginx: the configuration file /etc/nginx/nginx.conf syntax is ok
nginx: configuration file /etc/nginx/nginx.conf test is successful
[root@localhost ~]# systemctl restart nginx
137代理服务器
yum localinstall  nginx-1.22.0-1.el7.ngx.x86_64.rpm
[root@localhost ~]# vim /etc/nginx/conf.d/lb_test.conf
upstream www_server_pools {
        server 192.168.231.132:80 weight=1;
        server 192.168.231.136:80 weight=1;
}
server {
        listen 80;
        server_name web1.haha.com;
        location / {
                proxy_pass http://www_server_pools;
                proxy_set_header Host $host;
        }
}
客户端
[root@localhost ~]# vim /etc/hosts
127.0.0.1 localhost localhost.localdomain localhost4 localhost4.localdomain4
::1 localhost localhost.localdomain localhost6 localhost6.localdomain6
192.168.231.137 web1.haha.com
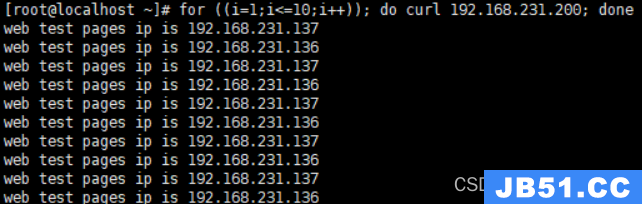
[root@localhost ~]# for ((i=1;i<=4;i++)); do curl web1.haha.com; done
192.168.231.136 web1
192.168.231.132 web1
192.168.231.136 web1
192.168.231.132 web1原文地址:https://blog.csdn.net/weixin_64747212/article/details/132483692
版权声明:本文内容由互联网用户自发贡献,该文观点与技术仅代表作者本人。本站仅提供信息存储空间服务,不拥有所有权,不承担相关法律责任。如发现本站有涉嫌侵权/违法违规的内容, 请发送邮件至 dio@foxmail.com 举报,一经查实,本站将立刻删除。