
CentOS7下安装SSHGuard阻止SSH暴力破解攻击
sshguard保护主机免受针对 SSH 和其他服务的暴力攻击。
sshguard可以从标准输入中读取日志消息(适用于管道syslog)或监视一个或多个日志文件。日志消息被逐行解析以识别模式。如果检测到攻击,例如在几秒钟内多次登录失败,则会阻止有问题的IP。
SSHGuard最初旨在为OpenSSH服务提供额外的保护层,SSHGuard还保护范围广泛的服务,例如Vsftpd和Postfix。
SSHGuard 与 Fail2ban 非常相似,只是它是用C编写的(Fail2ban是用Python 编写的),更轻巧,提供的功能更少
1、配置好EPEL源并安装sshguard
curl -o /etc/yum.repos.d/epel.repo http://mirrors.aliyun.com/repo/epel-7.repo
curl -o /etc/yum.repos.d/CentOS-Base.repo https://mirrors.aliyun.com/repo/Centos-7.repo
sed -i -e '/mirrors.cloud.aliyuncs.com/d' -e '/mirrors.aliyuncs.com/d' /etc/yum.repos.d/CentOS-Base.repo
yum install sshguard -y
(图片可点击放大查看)

(图片可点击放大查看)
2、查看sshguard相关配置文件
rpm -ql sshguard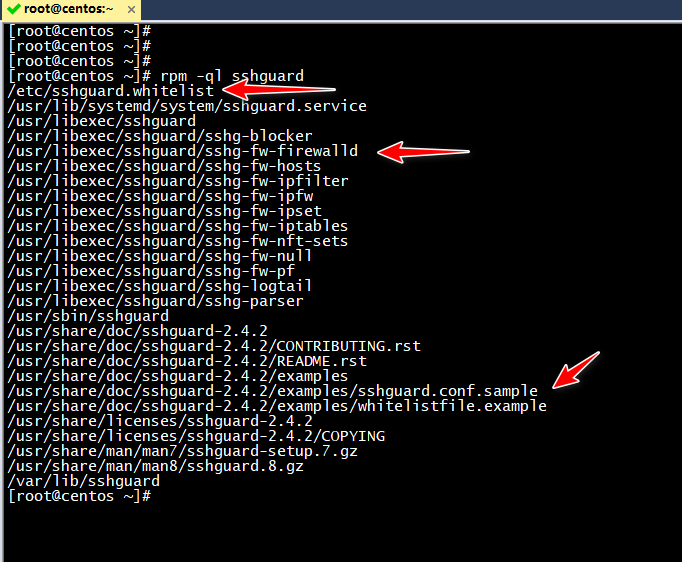
(图片可点击放大查看)
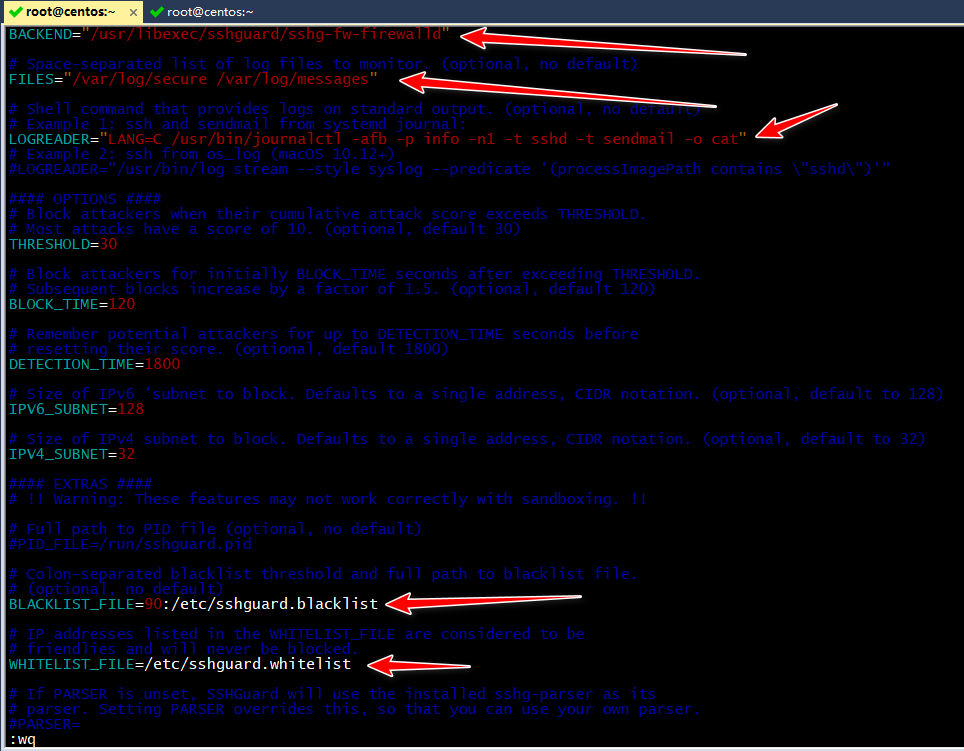
3、修改sshguard.conf配置文件
cp /usr/share/doc/sshguard-2.4.2/examples/sshguard.conf.sample /etc/sshguard.conf
vim /etc/sshguard.conf
修改如下行
BACKEND="/usr/libexec/sshguard/sshg-fw-firewalld"
FILES="/var/log/secure /var/log/messages"
LOGREADER="LANG=C /usr/bin/journalctl -afb -p info -n1 -t sshd -t sendmail -o cat"
BLACKLIST_FILE=90:/etc/sshguard.blacklist
WHITELIST_FILE=/etc/sshguard.whitelist

(图片可点击放大查看)
(图片可点击放大查看)
4、启动sshguard服务
systemctl enable sshguard
systemctl start sshguard
systemctl status sshguard

(图片可点击放大查看)
5、暴力破解测试及效果验证
例如在192.168.31.230机器上对其进行SSH暴力破解测试

(图片可点击放大查看)
可以看到很快就被阻断了

(图片可点击放大查看)
可以查看阻断的IP
firewall-cmd --permanent --info-ipset="sshguard4"
ipset list sshguard4
Tips
本文参考如下链接完成
https://www.sshguard.net/
https://www.ctrl.blog/entry/how-to-sshguard-firewalld.html
说明:
1、/etc/sshguard.blacklist文件未能生效,目前未Google到原因
2、其他SSH防暴力破解攻击的方法参考如下文章
原文地址:https://cloud.tencent.com/developer/article/2040997
版权声明:本文内容由互联网用户自发贡献,该文观点与技术仅代表作者本人。本站仅提供信息存储空间服务,不拥有所有权,不承担相关法律责任。如发现本站有涉嫌侵权/违法违规的内容, 请发送邮件至 dio@foxmail.com 举报,一经查实,本站将立刻删除。