
下文给大家带来应该如何搭建Apache+tomcat+负载均衡的环境,希望能够给大家在实际运用中带来一定的帮助,负载均衡涉及的东西比较多,理论也不多,网上有很多书籍,今天我们就用编程之家在行业内累计的经验来做一个解答。
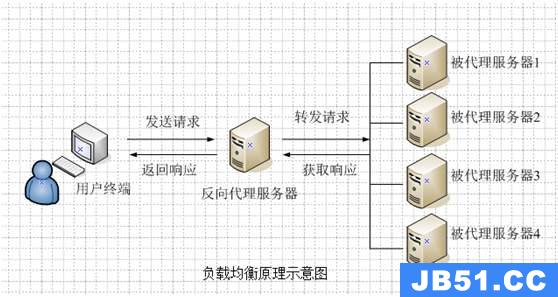
Apache2.0是一个标准兼容、快速、成熟的web云服务器,擅长提供静态内容,比如静态HTML页面和图片。Tomcat web服务器处理Java server Pages和Java servlet是很有用的、但在提供静态内容上没有Apache快。因此,如果要要构建一个快速、可伸缩的web应用程序,就需要一个Apache服务,它提供JSP和servlet请求服务给多个tomcat处理,通过使用一个Apache模块、mod_jk(通过会话关联的方式执行负载均衡,即“sticky” session)。会话关联解释道,当客户端浏览器第一次请求一个JSP页面,请求被Apache接收后,负载平衡器将请求重定向到两个tomcat服务器中的一个;来自相同规则的客户端的进一步请求将被自动转发到相同的tomcat服务器,以便检索用户的会话数据。
本文档描述如何配置Apache 2.x通过端口侦听的方式,分派JSP和servlet请求到两个Tomcat 4.x。这个设置是Linux系统上完成的,你的情况可能不同。
1. Download the required software
Apache 2.x Binaries (If you plan to use ssl, get the source)
Tomcat 4.x Binaries
The JK module
2. Compile, Install and Configure Apache
2.1 Install Apache.
Linux:
gunzipthe*.gzyou downloaded,untarand runinstall-bindist.shFor *nux, to install Apache 2.0.42 with mod_sll installed, you will need to compile from source:
I used http://httpd.apache.org/docs-2.0/install.html as a reference.
$ lynx http://www.apache.org/dist/httpd/httpd-2.0.42.tar.gz$ gzip -d httpd-2.0.42.tar.gz$ tar xvf httpd-2.0.42.tar$ ./configure --enable-mods-shared=most --enable-ssl=shared$ make$ make installThen download mod_jk-2.0.42.so and put it into your
modulesdirectory and rename itmod_jk.so.
Windows: Execute the downloaded executable and install.
2.2 Configure the JK Module in httpd.conf
Edit the Apache server's configuration file httpd.conf which is located in the /usr/local/apache2/conf directory.
2.2.1 Below "# LoadModule foo_module modules/mod_foo.so", insert the following lines:
#
# Load mod_jk
#
LoadModule jk_module modules/mod_jk.so

#
# Configure mod_jk
#
JkWorkersFile conf/workers.properties
JkLogFile logs/mod_jk.log
JkLogLevel info
NOTE: You will need to change mod_jk.so to mod_jk.dll for Windows.
2.2.2 Below the "DocumentRoot" line, insert the following two lines:
JkMount /*.jsp loadbalancer
JkMount /servlet/* loadbalancer
2.3 Create the workers.properties file
Now we will create a file called worker.properties, and we will place it under /usr/local/apache2/conf. The worker.properties file tells Apache about the various Tomcat servers that are running, and on which port they are listening.
In my setup, I installed the two Tomcat servers in different directories, on the same machine as Apache. Feel free to put your Tomcat servers on different machines.
I made the first Tomcat server's AJP13 connector listen on port 11009 instead of the default port which is 8009, and the second one listens on port 12009.
I have decided to name my tomcat servers tomcat1 and tomcat2. This is purely my choice.
Create the file exactly like this:
#
# workers.properties
#

# In Unix, we use forward slashes:
ps=/

# list the workers by name

worker.list=tomcat1, tomcat2, loadbalancer

# ------------------------
# First tomcat server
# ------------------------
worker.tomcat1.port=11009
worker.tomcat1.host=localhost
worker.tomcat1.type=ajp13

# Specify the size of the open connection cache.
#worker.tomcat1.cachesize

#
# Specifies the load balance factor when used with
# a load balancing worker.
# Note:
#  ----> lbfactor must be > 0
#  ----> Low lbfactor means less work done by the worker.
worker.tomcat1.lbfactor=100


# ------------------------
# Second tomcat server
# ------------------------
worker.tomcat2.port=12009
worker.tomcat2.host=localhost
worker.tomcat2.type=ajp13

# Specify the size of the open connection cache.
#worker.tomcat2.cachesize

#
# Specifies the load balance factor when used with
# a load balancing worker.
# Note:
#  ----> lbfactor must be > 0
#  ----> Low lbfactor means less work done by the worker.
worker.tomcat2.lbfactor=100


# ------------------------
# Load Balancer worker
# ------------------------

#
# The loadbalancer (type lb) worker performs weighted round-robin
# load balancing with sticky sessions.
# Note:
#  ----> If a worker dies, the load balancer will check its state
#        once in a while. Until then all work is redirected to peer
#        worker.
worker.loadbalancer.type=lb
worker.loadbalancer.balanced_workers=tomcat1, tomcat2

#
# END workers.properties
#
That's it, we're done with Apache.
3. Install and Configure the Tomcat Servers
Now let's suppose that Java 1.4.x is installed under /usr/local/jdk1.4.x/. Create two Tomcat 4.x servers and install them under /usr/local/:
   tar fvxz jakarta-tomcat-4.x.tar.gz
   mv jakarta-tomcat-4.x /usr/local/tomcat1
   cp -R /usr/local/tomcat1 /usr/local/tomcat2
In both /usr/local/tomcat1 and /usr/local/tomcat2, the same files will be modified. I here by present the modifications made to the files contained in the /usr/local/tomcat1 directory tree structure. You should also apply the same changes to the corresponding files located under the /usr/local/tomcat2 directory tree structure.
3.1 Modify catalina.sh
In my many years of consulting, I have learned not to rely on environment variables which can be unset by ignorant or malicious people. This is why I explicitely set the JAVA_HOME and CATALINA_HOME variables directly in the catalina.sh file.
At line 32, before the "# ----- Verify and Set Required Environment Variables " line, insert the following two lines:
    JAVA_HOME=/usr/local/jdk1.4 ; export JAVA_HOME
    CATALINA_HOME=/usr/local/tomcat1 ; export CATALINA_HOME
(Set CATALINA_HOME to /usr/local/tomcat2 in /usr/local/tomcat2/conf/catalina.sh)
3.2 Modify conf/server.xml
3.2.1 Add a unique jvmRoute to the Catalina engine
Near line 100, replace:
<Engine name="Standalone" defaultHost="localhost" debug="0">
with:
<Engine jvmRoute="tomcat1" name="Standalone" defaultHost="localhost" debug="0">
For tomcat2, put jvmRoute="tomcat2".
3.2.2 Change the control port
At line 13, replace:
<Server port="8005"
with:
<Server port="11005"
For the tomcat2 server, replace port 8005 with 12005. This will prevent the two servers from conflicting.
3.2.3 Change the AJP13 port
At line 75, in the AJP 13 connector definition, replace:
port="8009"
with:
port="11009"
For the tomcat2 server, replace port 8009 with 12009.
3.2.4 Disable the standalone HTTP port
We don't want or need our tomcat servers to directly respond to HTTP requests. So we comment out the HttpConnector section between lines and 58 in the server.xml file.
Example:
<!-- Define a non-SSL HTTP/1.1 Connector on port 8080 -->
<!--
    <Connector className="org.apache.catalina.connector.http.HttpConnector"
               port="8080" minProcessors="5" maxProcessors="75"
               enableLookups="true" redirectPort="8443"
               acceptCount="10" debug="0" connectionTimeout="60000"/>
-->
NOTE: If you don't comment this out, you will need to change the port numbers so they don't conflict between tomcat instances.
3.2.5 Disable the WARP connector
At line 314, comment out the <Connector...WarpConnector...> tag.
Example:
<Service name="Tomcat-Apache">
<!--
    <Connector className="org.apache.catalina.connector.warp.WarpConnector"
     port="8008" minProcessors="5" maxProcessors="75"
     enableLookups="true" appBase="webapps"
     acceptCount="10" debug="0"/>
-->
Do not forget to do the same thing to tomcat2's server.xml file.
NOTE: You might want to comment out the entire <Service name="Tomcat-Apache"> element. If so, make sure and remove the comments within it - XML doesn't like comments within comments.
3.3 Create test JSP pages (index.jsp)
3.3.1 Create a file named index.jsp and put it in the /usr/local/tomcat1/webapps/ROOT directory:
<html>
<body bgcolor="red">
<center>
<%= request.getSession().getId() %>
<h3>Tomcat 1</h3>
</body>
</html>
3.3.2 Create a file named index.jsp and put it in the /usr/local/tomcat2/webapps/ROOT directory:
<html>
<body bgcolor="blue">
<center>
<%= request.getSession().getId() %>
<h3>Tomcat 2</h3>
</body>
</html>
4. Start Tomcat1, Tomcat2 and Apache
    /usr/local/tomcat1/bin/startup.sh
    /usr/local/tomcat2/bin/startup.sh
    /usr/local/apache2/bin/apachectl start
5. Test your Installation
Now is the time to test your setup. First, verify that Apache serves static content.
Click on: http://localhost/. You should see the default Apache index.html page.
Now test that tomcat (either Tomcat 1 or Tomcat 2) is serving Java Server Pages.
Click on: http://localhost/index.jsp
If you get a red page, the page was served by the tomcat1 server, and if you get a blue page, it was served by the tomcat2 server.
Now test that session affinity - also known as sticky sessions - works within the load balancer. Hit the reload button of your web browser several times and verify that the index.jsp page you get is always received from the same tomcat server.
6. Configuring Private JVMs
If you don't need load-balancing, but you are interested in configuring Apache/Tomcat for private Tomcat instances, you can add one of the following near the end of httpd.conf:
6.1 Name-based (1 IP address or NIC).
NameVirtualHost *

<VirtualHost *>
ServerName localhost1
JkMount /*.jsp tomcat1
JkMount /servlet/* tomcat1
</VirtualHost>

<VirtualHost *>
ServerName localhost2
JkMount /*.jsp tomcat2
JkMount /servlet/* tomcat2
</VirtualHost>
6.2 IP-based (different IP for each site).
# First Virtual Host.
#
<VirtualHost 192.168.0.1:80>
ServerName localhost
JkMount /*.jsp tomcat1
JkMount /servlet/* tomcat1
</VirtualHost>

# Second Virtual Host.
#
<VirtualHost 192.168.0.2:80>
ServerName localhost2
JkMount /*.jsp tomcat2
JkMount /servlet/* tomcat2
</VirtualHost>
Where the serverNames are fully-qualified host names in a DNS Server. More information can be found at http://httpd.apache.org/docs-2.0/vhosts/.
NOTE: When using SSL with multiple Virtual Hosts, you must use an ip-based configuration. This is because SSL requires you to configure a specific port (443), whereas name-based specifies all ports (*). You might the following error if you try to mix name-based virtual hosts with SSL.
[error] VirtualHost _default_:443 -- mixing * ports and non-* ports with a NameVirtualHost address is not supported, proceeding with undefined results
Starting Apache and Tomcat on Startup
To start Apache and Tomcat on startup in a *nix environment, see http://www.raibledesigns.com/tomcat/boot-howto.html.
On Windows, you can install Tomcat as a service.
Supplemental Information
Question 1:
Why did you choose to use the AJP13 connector rather than the WARP connector that is recommended?
Answer:
The warp connector is used in conjunction with mod_webapp, and mod_webapp does not currently support load balancing.
Also, I found the documentation for the warp connector on the Jakarta web site to be quite lacking. See: http://jakarta.apache.org/tomcat/tomcat-4.0-doc/config/warp.html
I know that the future lies in the warp connector, but in the meantime, I needed something. The documentation did not explain to me exactly what benefits I would get from using the Warp connector as opposed to AJP13.
Question 2:
You might specify that creating two instances of the tomcat installation is not needed as you can share the main binaries and libs by specifying 2 distinct CATALINA_BASE variables.
True, but in real life the two tomcat servers are usually located on two different machines. My setup might be overkill for a single machine setup, but it's easy to tar up the "tomcat2" server and put it on a second machine; you just have to change "localhost" to the appropriate machine name in /usr/local/apache2/conf/workers.properties and you're done.
Question 3:
What does not work and what does work in load balancing?
Answer:
Load balancing works great.
1. Session affinity works
Which means that when a client browser is directed to a Tomcat server by the load balancer, then future queries from that same browser session will always be directed to the same tomcat server. This is important because sessions that are created in a specific tomcat server, say "tomcat1", do not exist in the other server "tomcat2", and thus if the client was directed to another tomcat server than the one where his session is stored, then all his session data would be lost.
Some people are working on sessions that will be replicated across all tomcat servers in the cluster, so I'll just wait for it to become available rather than make a homebrewed distributed session mechanism.
The downside of not having sessions replicated across all the tomcat servers in the cluster is that if one tomcat server dies, all the sessions that it contained are lost, which usually makes a lot of unhappy users.
2. Failover works
If one tomcat server dies, the load balancer then "rebalances" the queries to the remaining tomcat servers.
3. Failback works
When a tomcat server comes back from the dead, the load balancer automatically starts to send queries to it. So you can actually add capacity to your cluster on the fly.
4. Weighted load balancing works
In /usr/local/apache2/conf/workers.properties, I assigned a load balancing factor of 100 to both "tomcat1" and "tomcat2" servers. Then I changed the lbfactor of "tomcat1" to 101, and I saw that effectively the "tomcat1" server received more load than the "tomcat2" server, which is something you want when for example your "tomcat1" server is a faster/newer machine while your "tomcat2" server is a slower machine which cannnot take as much load as the other one.
References
For more information, you should read An Apache Load Balancing Cluster. It talks about mod_jserv, which is now mod_jk, and it uses JServ instead of Tomcat, but the concepts are still valid.
Conclusion
The list of steps that are required to obtain a scalable web application solution based on Apache 2.x and a group of distibuted Tomcat servers are well-defined and if you follow the receipe exactly, you should be able to achieve success.
I hope that this article will be helpful to you. Good Luck.
其它环境搭建:
Monitoring and Managing Tomcat Clusters Using JMX
Clustering and Load Balancing in Tomcat 5, Part 1
Clustering and Load Balancing in Tomcat 5, Part 2
看了以上关于应该如何搭建Apache+tomcat+负载均衡的环境,如果大家还有什么地方需要了解的可以在编程之家行业资讯里查找自己感兴趣的或者找我们的专业技术工程师解答的,编程之家技术工程师在行业内拥有十几年的经验了。
版权声明:本文内容由互联网用户自发贡献,该文观点与技术仅代表作者本人。本站仅提供信息存储空间服务,不拥有所有权,不承担相关法律责任。如发现本站有涉嫌侵权/违法违规的内容, 请发送邮件至 dio@foxmail.com 举报,一经查实,本站将立刻删除。