
本周作业
1、自建yum仓库,分别为网络源和本地源
2、编译安装http2.4,实现可以正常访问,并将编译步骤和结果提交。
3、利用sed 取出ifconfig命令中本机的IPv4地址
4、删除/etc/fstab文件中所有以#开头,后面至少跟一个空白字符的行的行首的#和空白字符
5、处理/etc/fstab路径,使用sed命令取出其目录名和基名
6、列出ubuntu软件管理工具apt的一些用法(自由总结)
(一)自建yum仓库,分别为网络源和本地源 学习总结: (一)yum,主要用于redhat系列,常见centos(开源社区版),redhat(企业版),基于rpm包管理功能,解决自动依赖,提升包管理效率,可以理解为高效的RPM管理集成工具。 (二)自建yum仓库,解决基础环境需求和三方依赖包需求的问题,根据包来源的不同分为网络源和本地源。 (三)对安全要求不高的环境,可以配置网络源,配置网络源相对是简单的,将对应的repo源地址,配置到repo文件中,可以wget下载现成的repo源文件到/etc/yum.repos.d/FILENAME.repo,再增加其他备用源,如清华的,网易的,搜狐的等等国内靠谱源站信息; 基于目前的网络安全环境,大一些的企业,其生产系统,即私有云,集群,都要求配置本地源。 本地源的搭建内容主要包括: (1)基础源(操作系统自带)---操作系统iso镜像带的一套repo源,可以挂载后直接使用; (2)epel.repo(三方各种功能源)---一般是网络配置,也可以通过下载到磁盘,再本地制作repo源,此repo源整体较大,下载时间较长,占用磁盘空间也较大,除非必要,可选; (3)生产系统有需要用到的软件编译安装,依赖的特定源(将rpm包都到一个目录下,自制repo源),---适用场景:公司的定制开发软件搭配开源软件使用时,开源软件需要通过源码编译安装,匹配生产流,此时在测试环境,将需要的rpm源下载后,归档到一个文件,然后在生产系统中,自制repo源(这一点具体操作在补充中) (4)其他特殊的源如elrepo.repo(kernel有关的源) 自建yum仓库,并实现内网web访问,实现网内yum源配置,环境基于centos7。 链接如下:https://www.cnblogs.com/jackwang666/p/13304825.html 需要补充的另外两点是: 1、自动挂载rpm功能包autofs: 关于本地光盘挂载的方式:可以安装一个autofs的rpm包,实现自动挂载:
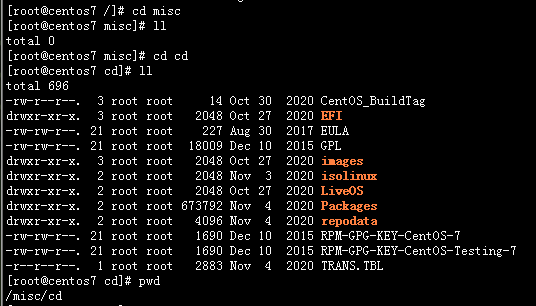
rpm -q autofs;||yum install autofs -y
systemctl enable --now autofs
ls /   ---确认一下,根目录下新生成一个misc目录
cd /misc/cd    --直接进入这个misc里面的cd目录,刚开始cd目录不可见
yum install dnf -y
dnf install 'dnf-command(reposync)'   ---安装额外的dnf 选项命令 --reposync
dnf reposync --repoid=epel --download-metadata -p /var/www/html/epel_files    ---下载epel的metadata  到 /var/www/html/epel_files目录

yum install createrepo -y
createrepo .
执行完毕,就可以将这个文件目录的全路径,作为文件目录yum源的方式写入repo文件,然后yum repolist 即可看到
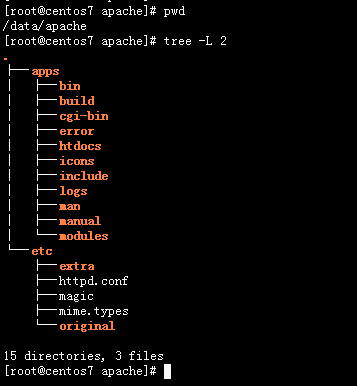
(二)编译安装http2.4,实现可以正常访问,并将编译步骤和结果提交。 (1)安装环境:centos 7.9 (2)目录安排: 安装到 /data/apache/apps 配置文件/data/apache/etc 源文件下载放入/data/source_file/ (3)最新源码版本:2.4.9,下载官网 http://httpd.apache.org/download.cgi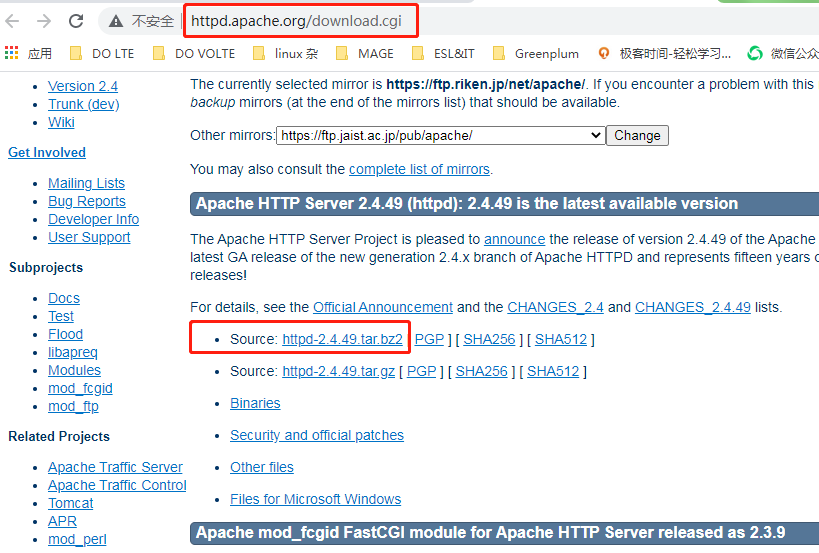
yum install gcc make autoconf apr-devel apr-util-devel pcre-devel openssl-devel redhat-rpm-config -y
(5)开始执行安装部分操作
#1 上传并解压cd /data/source_file/ rz 上传源码包 httpd-2.4.49.tar.bz2 tar -xvf httpd-2.4.49.tar.bz2
#2 配置、编译并安装(最后的结果如果不确定是否报错,调用一下内部变量$?)
cd /data/source_file/httpd-2.4.49
./configure --prefix=/data/apache/apps --sysconfdir=/data/apache/etc --enable-ssl

make -j 4 && make install

[root@centos7 apache]# echo 'PATH=/data/apache/apps/bin:$PATH' > /etc/profile.d/httpd.sh
[root@centos7 apache]# cat /etc/profile.d/httpd.sh
PATH=/data/apache/apps/bin:$PATH
[root@centos7 apache]# . /etc/profile.d/httpd.sh
[root@centos7 apache]# echo $PATH
/data/apache/apps/bin:/usr/local/sbin:/usr/local/bin:/usr/sbin:/usr/bin:/root/bin
[root@centos7 apache]#
# 4 创建用户apache,并修改配置文件中默认demon为apache

useradd -r -s /sbin/nologin -d /var/www -c Apache -u 48 apache
vim httpd.conf
#5 启动httpd服务
apachectl start[root@centos7 etc]# ps aux|grep httpd root 21710 0.0 0.1 103772 3344 ? Ss 21:05 0:00 /data/apache/apps/bin/httpd apache 21936 0.0 0.2 456136 4572 ? Sl 21:24 0:00 /data/apache/apps/bin/httpd apache 21937 0.0 0.2 456136 4916 ? Sl 21:24 0:00 /data/apache/apps/bin/httpd apache 21938 0.0 0.2 456136 4316 ? Sl 21:24 0:00 /data/apache/apps/bin/httpd apache 22021 0.0 0.2 456136 4312 ? Sl 21:25 0:00 /data/apache/apps/bin/httpd root 22064 0.0 0.0 112808 968 pts/1 S+ 21:29 0:00 grep --color=auto httpd
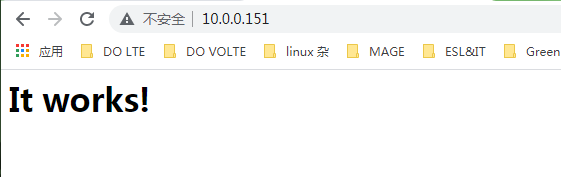
#6 浏览器打开,显示正常
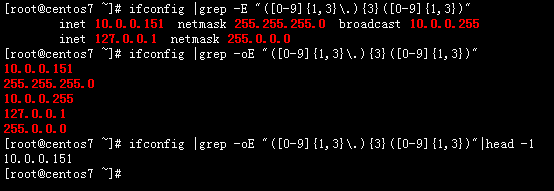
ifconfig |grep -oE "([0-9]{1,3}\.){3}([0-9]{1,3})"|head -1
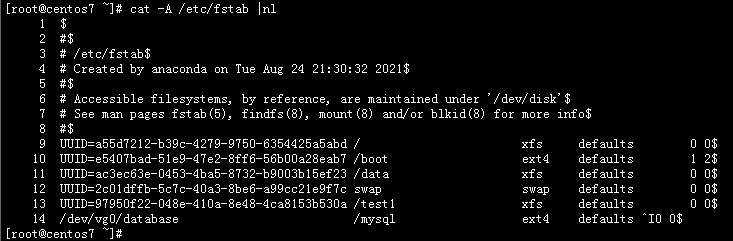
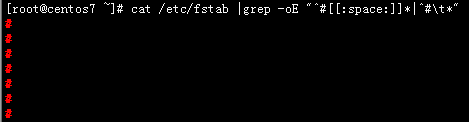
cat /etc/fstab |grep -oE "^#[[:space:]]*|^#\t*"
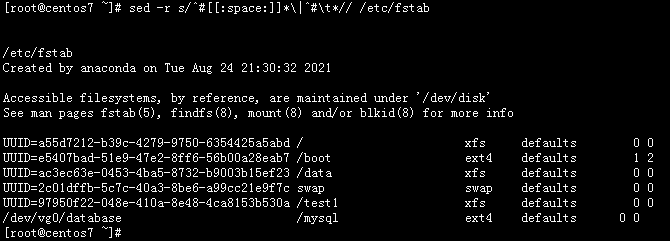
sed -ri s/^#[[:space:]]*\|^#\t*// /tmp/fstab ----i 参数需要在r后面(最后确定修改)
[root@centos7 ~]# ls /etc/fstab |sed -r 's#(.*)/([^/]+)/?#\1#'
/etc
[root@centos7 ~]# ls /etc/fstab |sed -r 's#(.*)/([^/]+)/?#\2#'
fstab
(六)列出ubuntu软件管理工具apt的一些用法(自由总结)
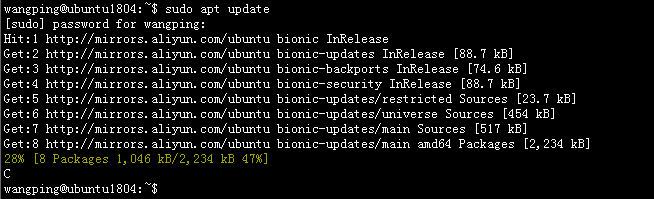
APT 用于Debian Linux,Ubuntu为目前主流的Debian分支,高级的包管理工具,用来查找和安装新软件包、升级软件包、删除软件包等。、 目前apt继承合并了 ape-get apt-cache apt-config 三套工具集。 (1)使用 apt 更新包数据库(这个只更新包的数据库,获取到有新的更新包信息,实际更新升级需要用到下面的upgrade)sudo apt update
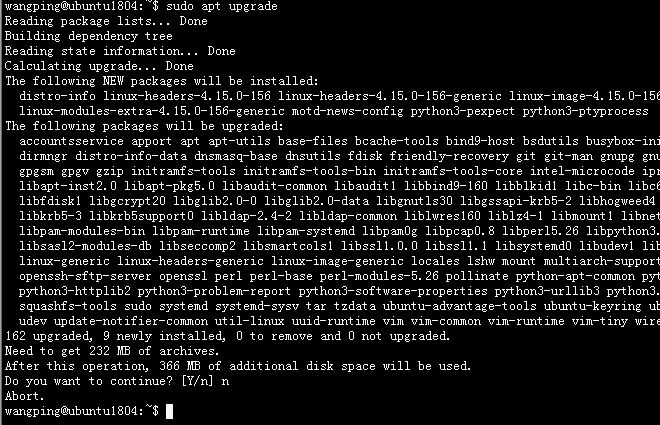
sudo apt upgrade
sudo apt update && sudo apt upgrade -y     -----没有网络带宽压力,可以一起
sudo apt install <package_name>

sudo apt install <package_name> --no-upgrade如果只是想升级,不想安装
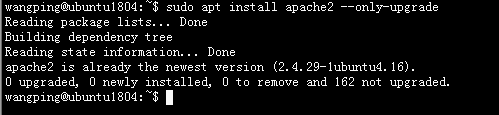
sudo apt install <package_name> --only-upgrade
sudo apt install apache2 --only-upgrade
sudo apt install <package_name1> <package_name2> <package_name3>
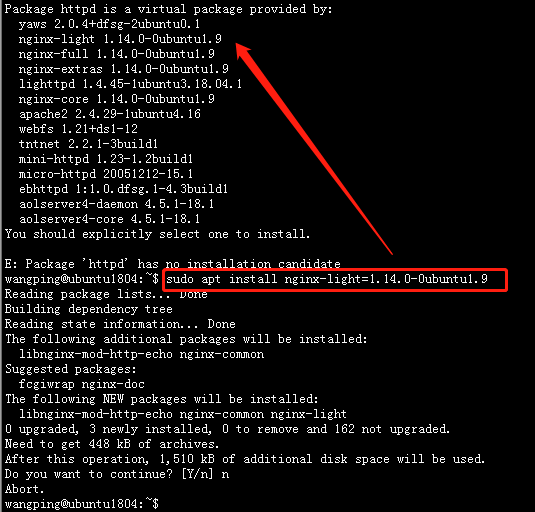
如果想安装特定的版本
sudo apt install <package_name>=<version_number>
sudo apt install nginx-light=1.14.0-0ubuntu1.9
(4)使用 apt 删除/卸载已安装的软件包 在这里,中文解释不了这两个词的差异,需要补充一段话。 remove:删除包的二进制文件,保留配置文件。 purge:删除与包相关的所有内容,不保留配置文件,一般可用于配文件错乱,无法手工恢复。
sudo apt remove <package_name>
sudo apt purge <package_name>
(五)使用 apt 搜索包组
sudo apt search nginx

wangping@ubuntu1804:~$ apt list --upgradable
Listing... Done
accountsservice/bionic-updates,bionic-security 0.6.45-1ubuntu1.3 amd64 [upgradable from: 0.6.45-1ubuntu1]
apport/bionic-updates,bionic-updates,bionic-security,bionic-security 2.20.9-0ubuntu7.26 all [upgradable from: 2.20.9-0ubuntu7.16]
apt/bionic-updates 1.6.14 amd64 [upgradable from: 1.6.12ubuntu0.1]
apt-utils/bionic-updates 1.6.14 amd64 [upgradable from: 1.6.12ubuntu0.1]
base-files/bionic-updates 10.1ubuntu2.11 amd64 [upgradable from: 10.1ubuntu2.9]
(8)清理系统,针对已删除的软件,remove后残留的包
sudo apt autoremovewangping@ubuntu1804:~$ sudo apt autoremove Reading package lists... Done Building dependency tree Reading state information... Done 0 upgraded, 0 newly installed, 0 to remove and 162 not upgraded. wangping@ubuntu1804:~$ sudo apt remove apache2 Reading package lists... Done Building dependency tree Reading state information... Done The following packages were automatically installed and are no longer required: apache2-bin apache2-data apache2-utils libapr1 libaprutil1 libaprutil1-dbd-sqlite3 libaprutil1-ldap liblua5.2-0 ssl-cert Use 'sudo apt autoremove' to remove them. The following packages will be REMOVED: apache2 0 upgraded, 0 newly installed, 1 to remove and 162 not upgraded. After this operation, 536 kB disk space will be freed. Do you want to continue? [Y/n] y (Reading database ... 67868 files and directories currently installed.) Removing apache2 (2.4.29-1ubuntu4.16) ... Processing triggers for man-db (2.8.3-2ubuntu0.1) ... Processing triggers for ufw (0.36-0ubuntu0.18.04.1) ... wangping@ubuntu1804:~$ wangping@ubuntu1804:~$ sudo apt autoremove Reading package lists... Done Building dependency tree Reading state information... Done The following packages will be REMOVED: apache2-bin apache2-data apache2-utils libapr1 libaprutil1 libaprutil1-dbd-sqlite3 libaprutil1-ldap liblua5.2-0 ssl-cert 0 upgraded, 0 newly installed, 9 to remove and 162 not upgraded. After this operation, 6,449 kB disk space will be freed. Do you want to continue? [Y/n] y (Reading database ... 67816 files and directories currently installed.) Removing apache2-bin (2.4.29-1ubuntu4.16) ... dpkg: warning: while removing apache2-bin, directory '/var/lib/apache2' not empty so not removed Removing apache2-data (2.4.29-1ubuntu4.16) ... Removing apache2-utils (2.4.29-1ubuntu4.16) ... Removing libaprutil1-dbd-sqlite3:amd64 (1.6.1-2) ... Removing libaprutil1-ldap:amd64 (1.6.1-2) ... Removing libaprutil1:amd64 (1.6.1-2) ... Removing libapr1:amd64 (1.6.3-2) ... Removing liblua5.2-0:amd64 (5.2.4-1.1build1) ... Removing ssl-cert (1.0.39) ... Processing triggers for man-db (2.8.3-2ubuntu0.1) ... Processing triggers for libc-bin (2.27-3ubuntu1.2) ... wangping@ubuntu1804:~$
原文地址:https://www.cnblogs.com/jackwang666/p/15322182.html
版权声明:本文内容由互联网用户自发贡献,该文观点与技术仅代表作者本人。本站仅提供信息存储空间服务,不拥有所有权,不承担相关法律责任。如发现本站有涉嫌侵权/违法违规的内容, 请发送邮件至 dio@foxmail.com 举报,一经查实,本站将立刻删除。