
1.playbook简介
- playbooks是 一个不同于使用Ansible命令行执行方式的模式,其功能更强大灵活。简单来说,playbook是一个非常简单的配置管理和多主机部署系统,不同于任何已经存在的模式,可作为一个适合部署复杂应用程序的基础。Playbook可以定制配置,可以按照指定的操作步骤有序执行,支持同步和异步方式。值得注意的是playbook是通过YAML格式来进行描述定义的。
- 核心元素:
Tasks:任务,由模板定义的操作列表
Variables:变量
Templates:模板,即使用模板语法的文件
Handlers:处理器 ,当某条件满足时,触发执行的操作
Roles:角色
- 在playbook中的每一个play都可以选择在哪些服务器和以什么用户完成,hosts一行可以是一个主机组、主机、多个主机,中间以冒号分隔,可使用通配模式。其中remote_user表示执行的用户账号。
- hosts: abc #指定主机组,可以是一个或多个组
remote_user: root #指定远程主机执行的用户名
- 指定远程主机sudo切换用
#vim ping.yml
—
- hosts: abc
remote_user: root
become: yes #2.6版本以后的参数,之前是sudo,意思为切换用户运行
become_user: mysql #指定sudo用户为mysql
执行playbook
# ansible-playbook ping.yml -K
- Tasks list 和action介绍
1:Play的主体部分是task列表,task列表中的各任务按次序逐个在hosts中指定的主机上执行,即在所有主机上完成第一个任务后再开始第二个任务。
在运行playbook时(从上到下执行),如果一个host执行task失败,整个tasks都会回滚,请修正playbook 中的错误,然后重新执行即可。
Task的目的是使用指定的参数执行模块,而在模块参数中可以使用变量,模块执行时幂等的,这意味着多次执行是安全的,因为其结果一致。
2:每一个task必须有一个名称name,这样在运行playbook时,从其输出的任务执行信息中可以很好的辨别出是属于哪一个task的。如果没有定义name,‘action’的值将会用作输出信息中标记特定的task。
3:定义一个task,常见的格式:”module: options” 例如:yum: name=httpd
4:ansible的自带模块中,command模块和shell模块无需使用key=value格式
- 常用命令
- ansible-playbook [yaml文件名、也可以yml结尾]
- 例如:ansible-playbook a.yml
- 参数:
-k(–ask-pass) 用来交互输入ssh密码
-K(-ask-become-pass) 用来交互输入sudo密码
-u 指定用户
#ansible-playbook a.yml --syntax-check #检查yaml文件的语法是否正确
#ansible-playbook a.yml --list-task #检查tasks任务
#ansible-playbook a.yml --list-hosts #检查生效的主机
#ansible-playbook a.yml --start-at-task=‘Copy Nginx.conf’ #指定从某个task开始运行
2、编写playbook实现自动安装服务
1、yml文件语法的要求是python语法,非常的严格,为了方便我们的使用,我们先编写一个特定的vim,一个tab等于两个空格
[devopes@server1 ansible]$ vim .vimrc
[devopes@server1 ansible]$ cat .vimrc
autocmd FileType yaml setlocal ai ts=2 sw=2 et

2、开始编写yml文件
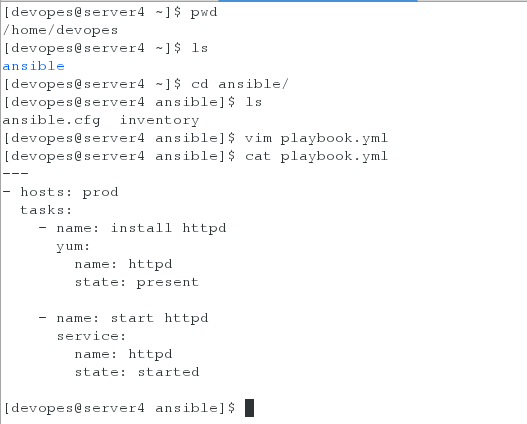
[devopes@server4 ansible]$ pwd
/home/devopes
[devopes@server4 ansible]$ ls
ansible
[devopes@server4 ansible]$ cd ansible/
[devopes@server4 ansible]$ ls
ansible.cfg inventory
[devopes@server4 ansible]$ vim playbook.yml
[devopes@server4 ansible]$ cat playbook.yml
---
- hosts: prod
  tasks:
    - name: install httpd
      yum:
        name: httpd
        state: present
    - name: start httpd
      service:
        name: httpd
        state: started
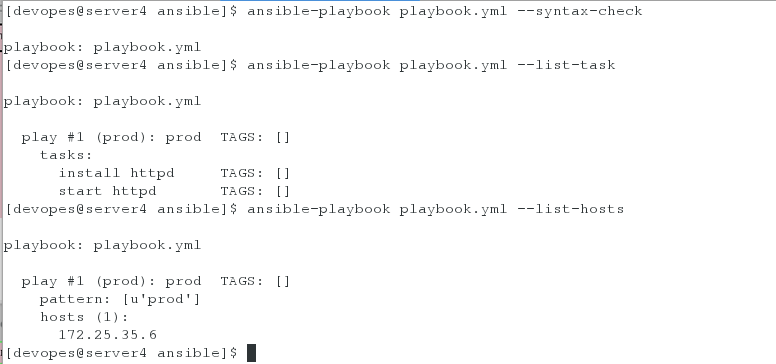
3、检测语法
[devopes@server4 ansible]$ ansible-playbook playbook.yml --syntax-check #检查yaml文件的语法是否正确
playbook: playbook.yml
[devopes@server4 ansible]$ ansible-playbook playbook.yml --list-task #检查tasks任务
playbook: playbook.yml
play #1 (prod): prod TAGS: []
tasks:
install httpd TAGS: []
start httpd TAGS: []
[devopes@server4 ansible]$ ansible-playbook playbook.yml --list-hosts #检查生效的主机
playbook: playbook.yml
play #4 (prod): prod TAGS: []
pattern: [u'prod']
hosts (1):
172.25.35.6
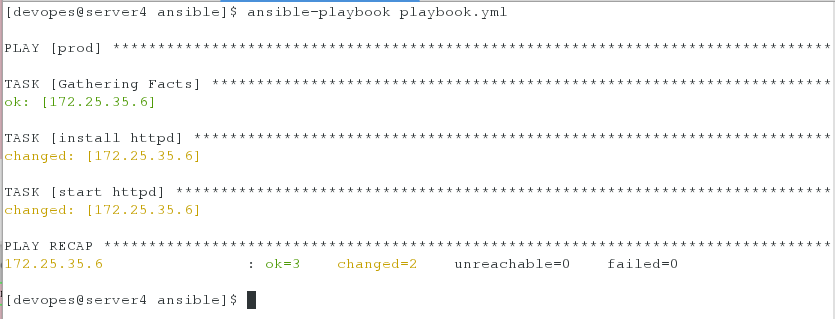
[devopes@server1 ansible]$ ansible-playbook playbook.yml
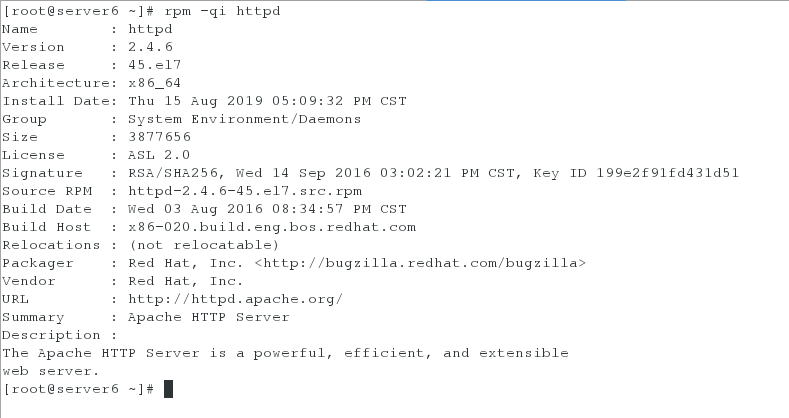
4、在server6上查看
方法一:
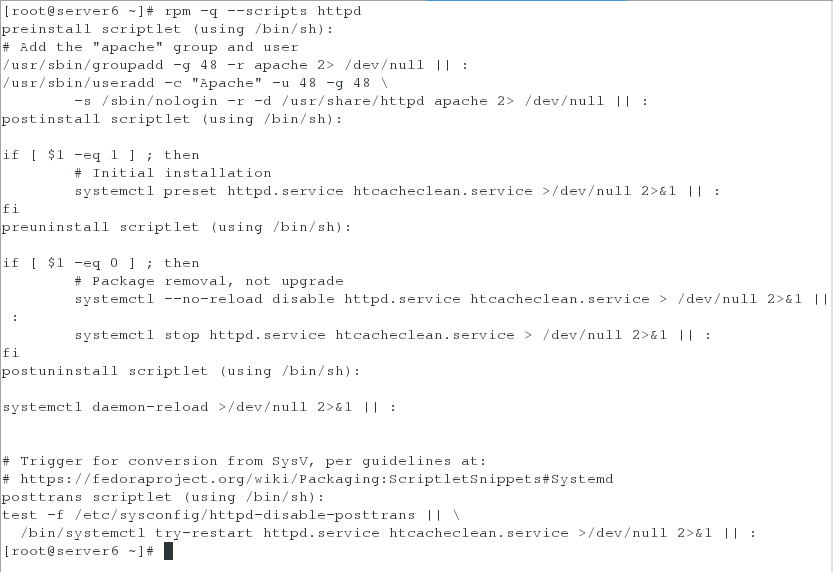
方法二:
3、编写playbook实现修改配置文件,并且加入触发器
1、编辑playbook.yml文件
[devopes@server1 ansible]$ vim playbook.yml
[devopes@server1 ansible]$ cat playbook.yml
---
- hosts: prod
  tasks:
    - name: install httpd
      yum:
        name: httpd
        state: present

    - name: configure httpd
      copy:
        src: files/httpd.conf
        dest: /etc/httpd/conf/httpd.conf
        owner: root
        group: root
        mode: 644
      notify: restart httpd

    - name: start  httpd
      service:
        name: httpd
        state: started

  handlers:
    - name: restart httpd
      service:
        name: httpd
        state: restarted
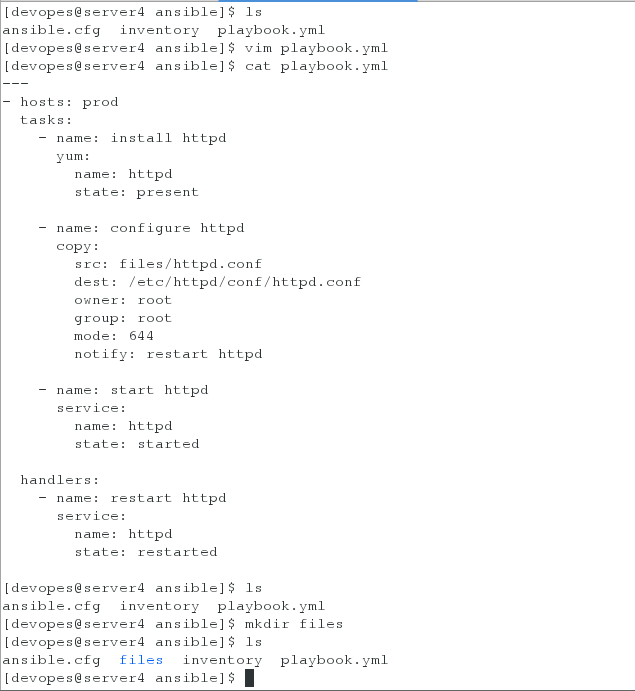
2、创建目录并拷贝.conf文件
[devopes@server1 ansible]$ ls
ansibe.cfg   inventory   playbook.yml
[devopes@server1 ansible]$ mkdir files
[devopes@server1 ansible]$ ls
[devopes@server1 ansible]$ cd files/
[devopes@server1 files]$  ls
[devopes@server1 files]$ scp server6:/etc/httpd/conf/httpd.conf .
[devopes@server1 files]$ ls
[devopes@server1 files]$ cd ..
[devopes@server1 ansible]$ ls

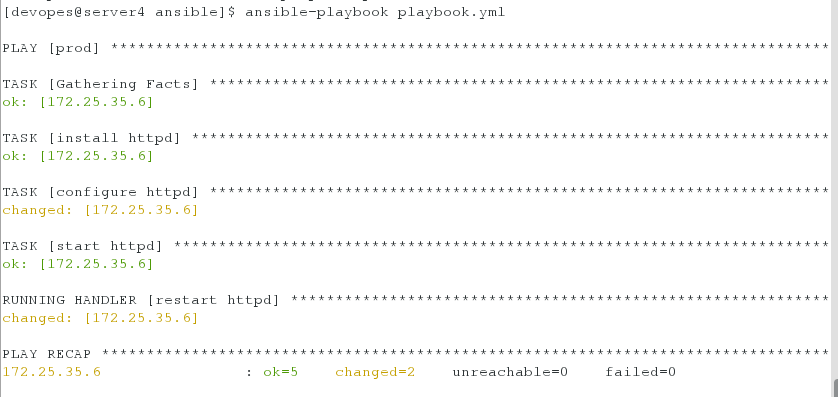
3、执行.yml文件
[devopes@server1 ansible]$ ansible-playbook playbook.yml

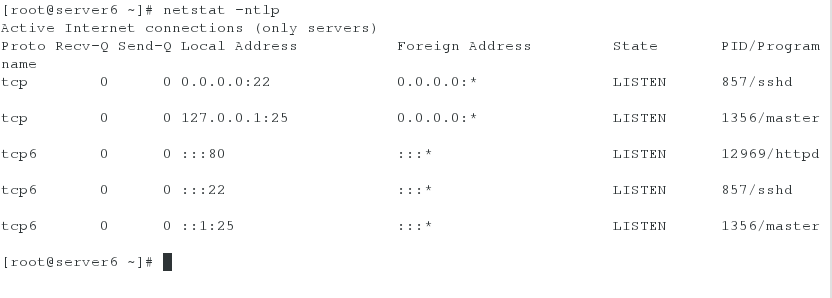
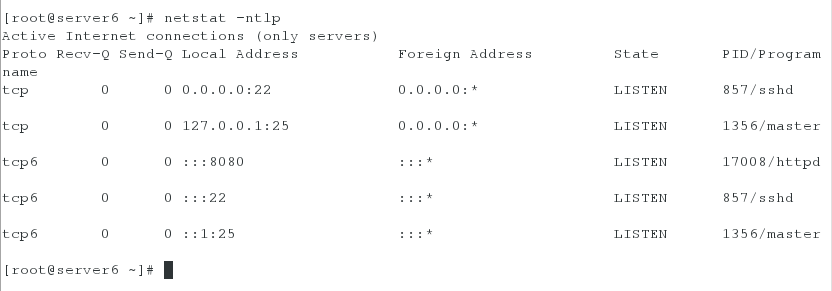
4、查看端口,发现80端口生效
[root@server6 ~]# netstat -antlp
5、为了再次验证,我们将httpd中的80端口更改为8080
[devopes@server4 ansible]$ ls
ansible.cfg  files  inventory  playbook.retry  playbook.yml
[devopes@server4 ansible]$ cd files
[devopes@server4 files]$ ls
httpd.conf
[devopes@server4 files]$ vim httpd.conf   ###改变端口为8080
[devopes@server4 files]$ cd ..
[devopes@server4 ansible]$ ansible-playbook playbook.yml


6、执行完毕再次去查看端口发现端口改变成功(已经为8080)
[root@server6 ~]# netstat -antlp ##此时端口为8080
为了后面实验的方便,更改完之后我们在将端口改回去。
4 、通过ansible给server3加入发布页面并实现给本地访问测试server6上服务
1、编辑.yml文件,在其中加入发布页面的模块
[devopes@server4 ansible]$ vim playbook.yml
[devopes@server4 ansible]$ cat playbook.yml
---
- hosts: webserver
  tasks:
    - name: install httpd
      yum:
        name: httpd
        state: present

    - name: copy index.html
      copy:
        src: files/index.html
        dest: /var/www/html/index.html

    - name: configure httpd
      copy:
        src: files/httpd.conf
        dest: /etc/httpd/conf/httpd.conf
        owner: root
        group: root
        mode: 644
      notify: restart httpd

    - name: start  httpd and firewalld
      service:
        name: "{{item}}"
        state: started
      loop:
        - httpd
        - firewalld

    - name: configure firewalld
      firewalld:
        service: http
        permanent: yes
        immediate: yes
        state: enabled

  handlers:
    - name: restart httpd
      service:
        name: httpd
        state: restarted

- hosts: localhost
  become: no
  tasks:
    - name: test httpd
      uri:
        url: http://172.25.35.6
        status_code: 200
2、此时我们去执行.yml文件,发现会报错,这是因为没有发布页面,下面我们需要给她添加
[devopes@server4 ansible]$ ansible-playbook playbook.yml   ##报错
[devopes@server4 ansible]$ ls
ansible.cfg  files  inventory  playbook.retry  playbook.yml
[devopes@server4 ansible]$ cd files
[devopes@server4 files]$ echo www.westos.org > index.html
[devopes@server4 files]$ cd -
/home/devopes/ansible
3、添加之后再次去执行发现,还是报错(此处是因为我们没有给它私钥)
[devopes@server4 ansible]$ ansible-playbook playbook.yml   ###报错
[devopes@server4 ansible]$ cd
[devopes@server4 ~]$ cd .ssh
[devopes@server4 .ssh]$ ls
id_rsa  id_rsa.pub  known_hosts
[devopes@server4 .ssh]$ ls
id_rsa  id_rsa.pub  known_hosts
[devopes@server4 .ssh]$ cp id_rsa.pub authorized_keys
[devopes@server4 .ssh]$ ll
total 16
-rw-r--r-- 1 devopes devopes  397 Aug 10 15:21 authorized_keys
-rw------- 1 devopes devopes 1675 Aug 10 09:56 id_rsa
-rw-r--r-- 1 devopes devopes  397 Aug 10 09:56 id_rsa.pub
-rw-r--r-- 1 devopes devopes  686 Aug 10 14:06 known_hosts
4、再次执行就可以发现成功
[devopes@server4 .ssh]$ cd
[devopes@server4 ~]$ cd ansible/
[devopes@server4 ansible]$ ansible-playbook playbook.yml   ##好了
5、 编写playbook实现引用变量
1、建立模板目录,创建模板文件
[devopes@server4 ansible]$ mkdir templates
[devopes@server4 ansible]$ cd templates/
[devopes@server4 templates]$ ls
[devopes@server4 templates]$ cp ../files/httpd.conf .
[devopes@server4 templates]$ ls
httpd.conf
[devopes@server4 templates]$ mv httpd.conf httpd.conf.j2
[devopes@server4 templates]$ ls
httpd.conf.j2
2、进入.conf文件修改端口
[devopes@server4 templates]$ vim httpd.conf.j2 ##修改端口为{{ http_port }}
3、编辑playbook.yml文件
[devopes@server4 ansible]$ vim playbook.yml
[devopes@server4 ansible]$ cat playbook.yml
---
- hosts: webserver
  vars:
    http_port: 80
  tasks:
    - name: install httpd
      yum:
        name: httpd
        state: present

    - name: copy index.html
      copy:
        src: files/index.html
        dest: /var/www/html/index.html

    - name: configure httpd
      template:
        src: templates/httpd.conf.j2
        dest: /etc/httpd/conf/httpd.conf
        owner: root
        group: root
        mode: 644
      notify: restart httpd

    - name: start  httpd and firewalld
      service:
        name: "{{item}}"
        state: started
      loop:
        - httpd
        - firewalld

    - name: configure firewalld
      firewalld:
        service: http
        permanent: yes
        immediate: yes
        state: enabled

  handlers:
    - name: restart httpd
      service:
        name: httpd
        state: restarted

- hosts: localhost
  become: no
  tasks:
    - name: test httpd
      uri:
        url: http://172.25.35.6
        status_code: 200
3、测试(在server5和server6上能发现httpd进程)
[devopes@server1 ansible]$ ansible-playbook playbook.yml     ###正确,没有报错
[root@server6 ~]# ps ax
[root@server5 ~]# ps ax
接下来我们再次更改端口进行验证,如下所示:
1、修改inventory文件
[devopes@server4 ansible]$ vim inventory
[devopes@server4 ansible]$ cat inventory
localhost
[test]
server5 http_host=172.25.35.5

[prod]
server6 http_host=172.25.35.6

[webserver:children]
test
prod
2、更改端口
[devopes@server1 ansible]$ vim templates/httpd.conf.j2 ###更改端口为{{ http_host }}:{{ http_port }]
3、检查语法并执行.yml文件
[devopes@server1 ansible]$ ansible-playbook playbook.yml --syntax-check

playbook: playbook.yml
[devopes@server1 ansible]$ ansible-playbook playbook.yml    ###成功
4、分别在server5和server6上查看变量是否生效
[root@server5 tmp]$ cat /etc/httpd/conf/httpd.conf | grep Listen
# Listen: Allows you to bind Apache to specific IP addresses and/or
# Change this to Listen on specific IP addresses as shown below to
#Listen 12.34.56.78:80
Listen 172.25.35.5:80

[root@server6 tmp]$ cat /etc/httpd/conf/httpd.conf | grep Listen
# Listen: Allows you to bind Apache to specific IP addresses and/or
# Change this to Listen on specific IP addresses as shown below to
#Listen 12.34.56.78:80
Listen 172.25.35.6:80
6、编写playbook实现采集远程主机的信息
1、编写file.yml文件
[devopes@server4 ansible]$ vim file.yml
[devopes@server4 ansible]$ cat file.yml
---
- hosts: all
  tasks:
    - name: create file
      template:
        src: templates/file.j2
        dest: /tmp/file
2、创建模板
[devopes@server4 ansible]$ vim templates/file.j2
[devopes@server4 ansible]$ cat templates/file.j2
主机名: {{ ansible_facts['hostname'] }}
主机IP: {{ ansible_facts['default_ipv4']['address'] }}
主机DNS: {{ ansible_facts['dns']['nameservers'] }}
boot分区: {{ ansible_facts['devices']['sda']['partitions']['sda1']['size'] }}
内核: {{ ansible_facts['kernel'] }}
内存空闲: {{ ansible_facts['memfree_mb'] }}
3、编写inventory文件(将上一步的localhost注释或者删除)
[devopes@server6 ansible]$ vim inventory
[devopes@server6 ansible]$ cat inventory
[test]
server5 http_host=172.25.35.5

[prod]
server6 http_host=172.25.35.6

[webserver:children]
test
prod
4、执行yml文件,发现正确
[devopes@server4 ansible]$ ansible-playbook file.yml ###正确
5、分别在server5和server6上进行查看,发现可以正确查看
[root@server5 ~]# cat /tmp/file
主机名: server5
主机IP: 172.25.35.5
主机DNS: [u'114.114.114.114']
boot分区: 1.00 GB
内核: 3.10.0-514.el7.x86_64
内存空闲: 408

[root@server6 ~]# cat /tmp/file
主机名: server6
主机IP: 172.25.35.6
主机DNS: [u'114.114.114.114']
boot分区: 1.00 GB
内核: 3.10.0-514.el7.x86_64
内存空闲: 629
上面的DNS部分看起来不那么美观,要想美观我们可以在templates/file.j2文件中修改以下:
主机DNS: {{ ansible_facts['dns']['nameservers'] }}
修改完之后再次去执行.yml文件,再查看就OK了
7、编写playbook实现haproxy负载均衡
1、在server4上面进行授权
[root@server4 ansible]# vim /etc/sudoers
devopes   ALL=(ALL)       NOPASSWD: ALL
2、编辑playbook.yml文件
[devopes@server1 ansible]$ vim playbook.yml
[devopes@server1 ansible]$ cat playbook.yml
---
- hosts: webserver
  vars:
    http_port: 80
  tasks:
    - name: install httpd
      yum:
        name: httpd
        state: present

    - name: copy index.html
      copy:
        content: "{{ ansible_facts['hostname'] }}"
        dest: /var/www/html/index.html

    - name: configure httpd
      template:
        src: templates/httpd.conf.j2
        dest: /etc/httpd/conf/httpd.conf
        owner: root
        group: root
        mode: 644
      notify: restart httpd

    - name: start  httpd and firewalld
      service:
        name: "{{item}}"
        state: started
      loop:
        - httpd
        - firewalld

    - name: configure firewalld
      firewalld:
        service: http
        permanent: yes
        immediate: yes
        state: enabled

  handlers:
    - name: restart httpd
      service:
        name: httpd
        state: restarted

- hosts: localhost
  tasks:
    - name: install haproxy
      yum:
        name: haproxy
        state: present

    - name: configure haproxy
      template:
        src: templates/haproxy.cfg.j2
        dest: /etc/haproxy/haproxy.cfg
      notify: restart haproxy

    - name: start haproxy
      service:
        name: haproxy
        state: started

  handlers:
    - name: restart haproxy
      service:
        name: haproxy
        state: restarted
3、在server4上安装haproxy服务,复制模板
[devope@server4 ansible]# yum list haproxy
Loaded plugins: product-id, search-disabled-repos, subscription-manager
This system is not registered to Red Hat Subscription Management. You can use subscription-manager to register.
Available Packages
haproxy.x86_64                        1.5.18-3.el7                        westos

[devopes@server4 ansible]# sudo yum install haproxy -y
[devopes@server4 ansible]# cp /etc/haproxy/haproxy.cfg  templates/haproxy.cfg.j2
4、编辑模板,实验sever5和server6上的负载均衡
[devopes@server4 ansible]$ vim templates/haproxy.cfg.j2
 55     timeout server          1m
 56     timeout http-keep-alive 10s
 57     timeout check           10s
 58     maxconn                 3000
 59     stats     uri    /status
 60 #---------------------------------------------------------------------
 61 # main frontend which proxys to the backends
 62 #---------------------------------------------------------------------
 63 frontend  main *:80
 64     acl url_static       path_beg       -i /static /images /javascript /styl    esheets
 65     acl url_static       path_end       -i .jpg .gif .png .css .js
 66
 67 #    use_backend static          if url_static
 68     default_backend             app
 69
 70 #---------------------------------------------------------------------
 71 # static backend for serving up images, stylesheets and such
 72 #---------------------------------------------------------------------
 73 backend app
 74          balance     roundrobin
 75          server  app1 172.25.35.5:80 check
 76          server  app2 172.25.35.6:80 check
5、执行.yml文件
[devopes@server1 ansible]$ ansible-playbook playbook.yml
6、浏览器监控测试(输入172.25.35.4/status)
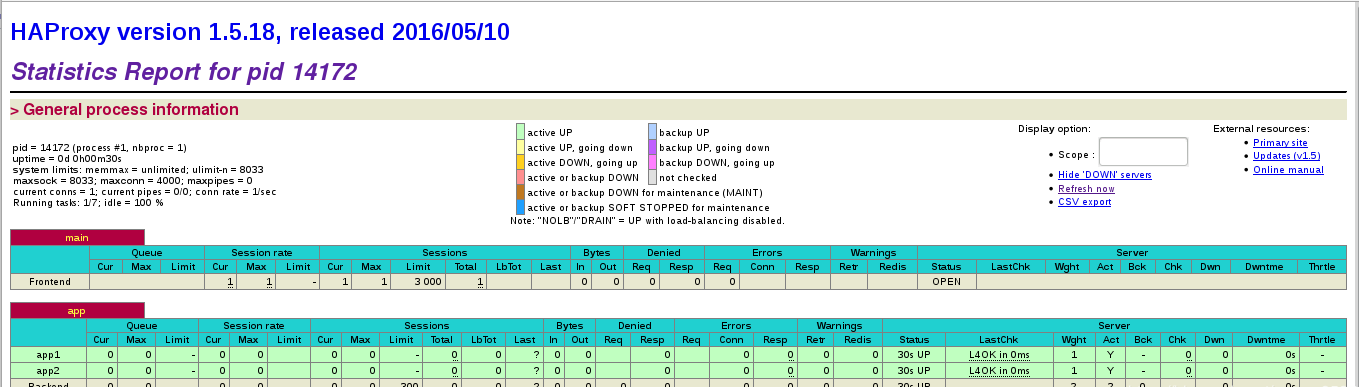
7、浏览器轮循测试(输入172.25.35.4)


8、编写playbook实现将server7自动加入到负载均衡的集群中
1、创建用户并授权
[root@server7 ~]# useradd devopes
[root@server7 ~]# passwd devopes
[root@server7 ~]# vim /etc/sudoers
devopes ALL=(ALL)       NOPASSWD: ALL
2、在server4上ssh给sever7做免密
[devopes@server4 ansible]$ ssh-copy-id server7
3、在server4上编辑inventory文件
[devopes@server4 ansible]$ vim inventory
[devopes@server4 ansible]$ cat inventory
[test]
server5 http_host=172.25.35.5

[prod]
server6 http_host=172.25.35.6
server7 http_host=172.25.35.7

[webserver:children]
test
prod
4、编辑haproxy.cfg.j2的文件
[devopes@server4 ansible]$ vim templates/haproxy.cfg.j2
 55     timeout server          1m
 56     timeout http-keep-alive 10s
 57     timeout check           10s
 58     maxconn                 3000
 59     stats     uri    /status
 60 #---------------------------------------------------------------------
 61 # main frontend which proxys to the backends
 62 #---------------------------------------------------------------------
 63 frontend  main *:80
 64     acl url_static       path_beg       -i /static /images /javascript /styl    esheets
 65     acl url_static       path_end       -i .jpg .gif .png .css .js
 66
 67 #    use_backend static          if url_static
 68     default_backend             app
 69
 70 #---------------------------------------------------------------------
 71 # static backend for serving up images, stylesheets and such
 72 #---------------------------------------------------------------------
 73  backend app
 74      balance     roundrobin
 75  {% for host in groups['webserver'] %}
    server {{ hostvars[host]['ansible_facts']['hostname'] }} {{ hostvars[host]['ansible_facts']['eth0']['ipv4']['address'] }}:80 check }}
 76 {% endfor %}
5、执行.yml文件,发现正确
[devopes@server4 ansible]$ ansible-playbook playbook.yml ###正确
6、浏览器监控测试(输入172.25.35.4/status)
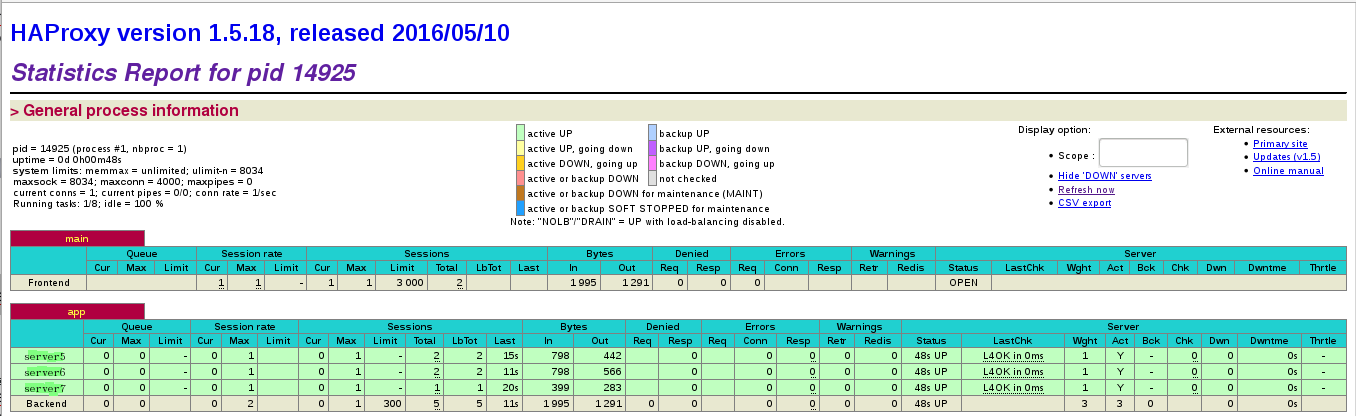
7、浏览器轮循测试(输入172.25.35.4)

原文地址:https://blog.csdn.net/weixin_42566251/article/details/99704124
版权声明:本文内容由互联网用户自发贡献,该文观点与技术仅代表作者本人。本站仅提供信息存储空间服务,不拥有所有权,不承担相关法律责任。如发现本站有涉嫌侵权/违法违规的内容, 请发送邮件至 dio@foxmail.com 举报,一经查实,本站将立刻删除。