

这篇文章讲解的是使用Tensorflow实现残差网络resnet-50. 侧重点不在于理论部分,而是在于代码实现部分。在github上面已经有其他的开源实现,如果希望直接使用代码运行自己的数据,不建议使用本人的代码。但是如果希望学习resnet的代码实现思路,那么阅读本文将是一个不错的选择,因为本文的代码的思路是很清晰的。如果你刚刚阅读完resnet的那篇论文,非常建议你进一步学习如何使用代码实现resnet。本文包含源码的数据集。
resnet只是在CNN上面增加了shortcut,所以,resnet和CNN是很相似的。
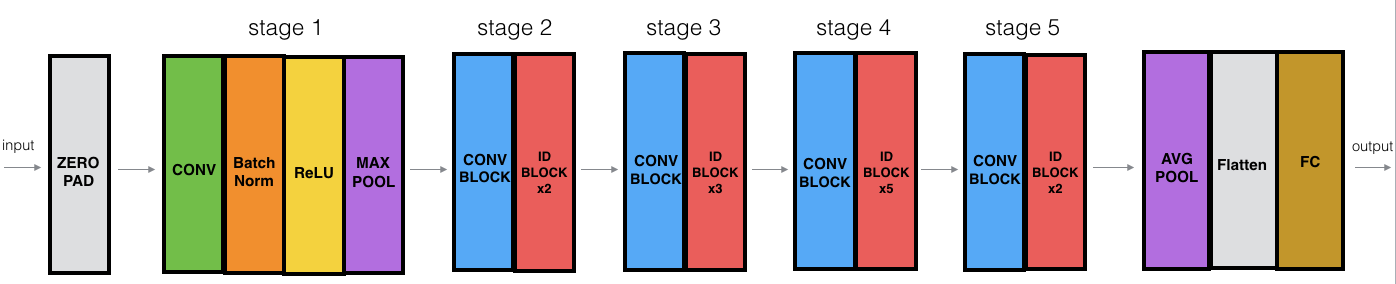
##1. model
下面将要实现的是resnet-50。下面是网络模型的整体模型图。其中的CONV表示卷积层,Batch Norm表示Batch 归一化层,ID BLOCK表示Identity块,由多个层构成,具体见第二个图。Conv BLOCK表示卷积块,由多个层构成。为了使得model个结构更加清晰,才提取出了conv block 和id block两个‘块’,分别把它们封装成函数。
如果不了解batch norm,可以暂时滤过这部分的内容,可以把它看作是一个特殊的层,它不会改变数据的维度。这将不影响对resnet实现的理解。
具体见第三个图。
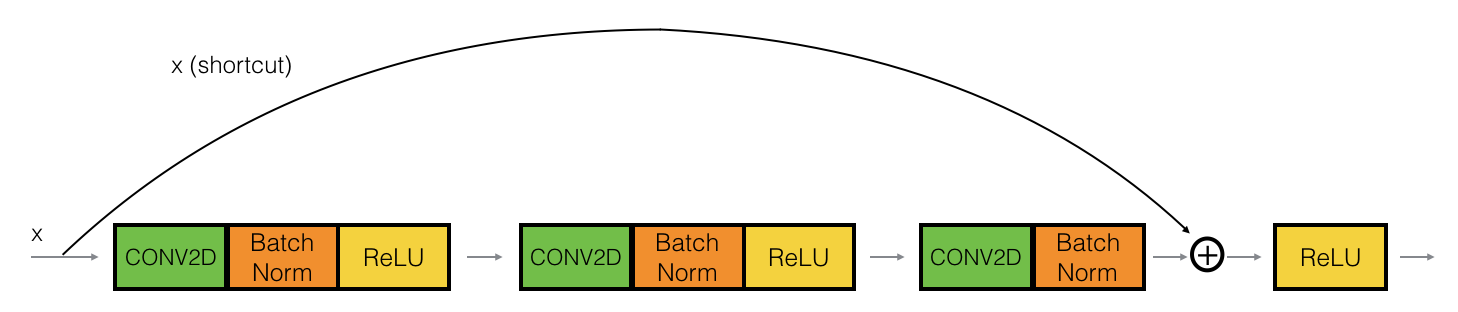
上图表示ID block
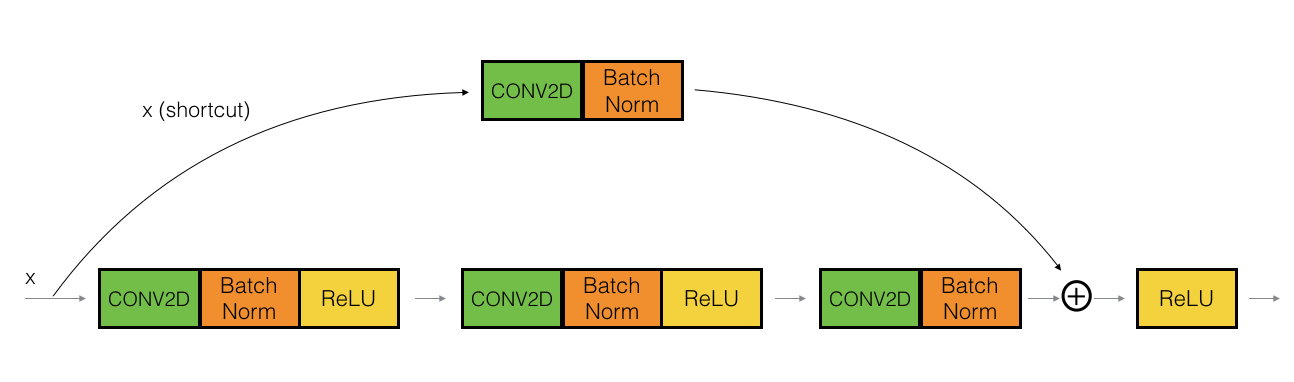
上图表示conv block
##2. 数据
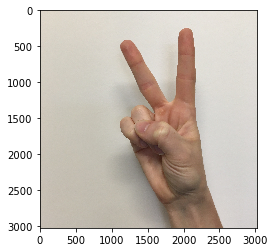
输入的是类似上图所示的手势图片数据,总共有6个类。所给的数据已经加工过,是‘.h5’格式的数据。有1080张图片,120张测试数据。每一张图片是一个64x64的RGB图片。具体的数据格式为:
number of training examples = 1080
number of test examples = 120
X_train shape: (1080, 64, 64, 3)
Y_train shape: (1080, 6)
X_test shape: (120, 64, 64, 3)
Y_test shape: (120, 6)
x train max,  0.956; x train min,  0.015
x test max,  0.94; x test min,  0.011
- 1
- 2
- 3
- 4
- 5
- 6
- 7
- 8
3. 目标
训练一个模型,使之能够判别图片中的手指所代表的数字。实质上这个是属于多分类问题。所以,模型的输入是一个64x64x3的图片;模型的输出层为6个节点,每一个节点表示一种分类。
4. 模型实现
identity block的实现,对于上图2。需要注意的是,X_shortcut一开始就保存了所传入的数据,然后在函数的末尾部分再加上X_shortcut。除了这一点,其他点跟CNN是一样的。
    def identity_block(self, X_input, kernel_size, in_filter, out_filters, stage, block, training):
        """
        Implementation of the identity block as defined in Figure 3

        Arguments:
        X -- input tensor of shape (m, n_H_prev, n_W_prev, n_C_prev)
        kernel_size -- integer, specifying the shape of the middle CONV's window for the main path
        filters -- python list of integers, defining the number of filters in the CONV layers of the main path
        stage -- integer, used to name the layers, depending on their position in the network
        block -- string/character, used to name the layers, depending on their position in the network
        training -- train or test

        Returns:
        X -- output of the identity block, tensor of shape (n_H, n_W, n_C)
        """

        # defining name basis
        block_name = 'res' + str(stage) + block
        f1, f2, f3 = out_filters
        with tf.variable_scope(block_name):
            X_shortcut = X_input

            #first
            W_conv1 = self.weight_variable([1, 1, in_filter, f1])
            X = tf.nn.conv2d(X_input, W_conv1, strides=[1, 1, 1, 1], padding='SAME')
            X = tf.layers.batch_normalization(X, axis=3, training=training)
            X = tf.nn.relu(X)

            #second
            W_conv2 = self.weight_variable([kernel_size, kernel_size, f1, f2])
            X = tf.nn.conv2d(X, W_conv2, strides=[1, 1, 1, 1], padding='SAME')
            X = tf.layers.batch_normalization(X, axis=3, training=training)
            X = tf.nn.relu(X)

            #third

            W_conv3 = self.weight_variable([1, 1, f2, f3])
            X = tf.nn.conv2d(X, W_conv3, strides=[1, 1, 1, 1], padding='VALID')
            X = tf.layers.batch_normalization(X, axis=3, training=training)

            #final step
            add = tf.add(X, X_shortcut)
            add_result = tf.nn.relu(add)

        return add_result
- 1
- 2
- 3
- 4
- 5
- 6
- 7
- 8
- 9
- 10
- 11
- 12
- 13
- 14
- 15
- 16
- 17
- 18
- 19
- 20
- 21
- 22
- 23
- 24
- 25
- 26
- 27
- 28
- 29
- 30
- 31
- 32
- 33
- 34
- 35
- 36
- 37
- 38
- 39
- 40
- 41
- 42
- 43
- 44
- 45
下面是conv block,对应于上面图片3.
    def convolutional_block(self, X_input, kernel_size, in_filter,
                            out_filters, stage, block, training, stride=2):
        """
        Implementation of the convolutional block as defined in Figure 4

        Arguments:
        X -- input tensor of shape (m, n_H_prev, n_W_prev, n_C_prev)
        kernel_size -- integer, specifying the shape of the middle CONV's window for the main path
        filters -- python list of integers, defining the number of filters in the CONV layers of the main path
        stage -- integer, used to name the layers, depending on their position in the network
        block -- string/character, used to name the layers, depending on their position in the network
        training -- train or test
        stride -- Integer, specifying the stride to be used

        Returns:
        X -- output of the convolutional block, tensor of shape (n_H, n_W, n_C)
        """

        # defining name basis
        block_name = 'res' + str(stage) + block
        with tf.variable_scope(block_name):
            f1, f2, f3 = out_filters

            x_shortcut = X_input
            #first
            W_conv1 = self.weight_variable([1, 1, in_filter, f1])
            X = tf.nn.conv2d(X_input, W_conv1,strides=[1, stride, stride, 1],padding='VALID')
            X = tf.layers.batch_normalization(X, axis=3, training=training)
            X = tf.nn.relu(X)

            #second
            W_conv2 = self.weight_variable([kernel_size, kernel_size, f1, f2])
            X = tf.nn.conv2d(X, W_conv2, strides=[1,1,1,1], padding='SAME')
            X = tf.layers.batch_normalization(X, axis=3, training=training)
            X = tf.nn.relu(X)

            #third
            W_conv3 = self.weight_variable([1,1, f2,f3])
            X = tf.nn.conv2d(X, W_conv3, strides=[1, 1, 1,1], padding='VALID')
            X = tf.layers.batch_normalization(X, axis=3, training=training)

            #shortcut path
            W_shortcut = self.weight_variable([1, 1, in_filter, f3])
            x_shortcut = tf.nn.conv2d(x_shortcut, W_shortcut, strides=[1, stride, stride, 1], padding='VALID')

            #final
            add = tf.add(x_shortcut, X)
            add_result = tf.nn.relu(add)

        return add_result
- 1
- 2
- 3
- 4
- 5
- 6
- 7
- 8
- 9
- 10
- 11
- 12
- 13
- 14
- 15
- 16
- 17
- 18
- 19
- 20
- 21
- 22
- 23
- 24
- 25
- 26
- 27
- 28
- 29
- 30
- 31
- 32
- 33
- 34
- 35
- 36
- 37
- 38
- 39
- 40
- 41
- 42
- 43
- 44
- 45
- 46
- 47
- 48
- 49
- 50
下面是模型的整合,对应于上图1。
    def deepnn(self, x_input, classes=6):
        """
        Implementation of the popular ResNet50 the following architecture:
        CONV2D -> BATCHNORM -> RELU -> MAXPOOL -> CONVBLOCK -> IDBLOCK*2 -> CONVBLOCK -> IDBLOCK*3
        -> CONVBLOCK -> IDBLOCK*5 -> CONVBLOCK -> IDBLOCK*2 -> AVGPOOL -> TOPLAYER

        Arguments:

        Returns:
        """
        x = tf.pad(x_input, tf.constant([[0, 0], [3, 3, ], [3, 3], [0, 0]]), "CONSTANT")
        with tf.variable_scope('reference') :
            training = tf.placeholder(tf.bool, name='training')

            #stage 1
            w_conv1 = self.weight_variable([7, 7, 3, 64])
            x = tf.nn.conv2d(x, w_conv1, strides=[1, 2, 2, 1], padding='VALID')
            x = tf.layers.batch_normalization(x, axis=3, training=training)
            x = tf.nn.relu(x)
            x = tf.nn.max_pool(x, ksize=[1, 3, 3, 1],
                           strides=[1, 2, 2, 1], padding='VALID')
            assert (x.get_shape() == (x.get_shape()[0], 15, 15, 64))

            #stage 2
            x = self.convolutional_block(x, 3, 64, [64, 64, 256], 2, 'a', training, stride=1)
            x = self.identity_block(x, 3, 256, [64, 64, 256], stage=2, block='b', training=training)
            x = self.identity_block(x, 3, 256, [64, 64, 256], stage=2, block='c', training=training)

            #stage 3
            x = self.convolutional_block(x, 3, 256, [128,128,512], 3, 'a', training)
            x = self.identity_block(x, 3, 512, [128,128,512], 3, 'b', training=training)
            x = self.identity_block(x, 3, 512, [128,128,512], 3, 'c', training=training)
            x = self.identity_block(x, 3, 512, [128,128,512], 3, 'd', training=training)

            #stage 4
            x = self.convolutional_block(x, 3, 512, [256, 256, 1024], 4, 'a', training)
            x = self.identity_block(x, 3, 1024, [256, 256, 1024], 4, 'b', training=training)
            x = self.identity_block(x, 3, 1024, [256, 256, 1024], 4, 'c', training=training)
            x = self.identity_block(x, 3, 1024, [256, 256, 1024], 4, 'd', training=training)
            x = self.identity_block (x, 3, 1024, [256, 256, 1024], 4, 'e', training=training)
            x = self.identity_block(x, 3, 1024, [256, 256, 1024], 4, 'f', training=training)

            #stage 5
            x = self.convolutional_block(x, 3, 1024, [512, 512, 2048], 5, 'a', training)
            x = self.identity_block(x, 3, 2048, [512, 512, 2048], 5, 'b', training=training)
            x = self.identity_block(x, 3, 2048, [512, 512, 2048], 5, 'c', training=training)

            x = tf.nn.avg_pool(x, [1, 2, 2, 1], strides=[1,1,1,1], padding='VALID')

            flatten = tf.layers.flatten(x)
            x = tf.layers.dense(flatten, units=50, activation=tf.nn.relu)
            # Dropout - controls the complexity of the model, prevents co-adaptation of
            # features.
            with tf.name_scope('dropout'):
                keep_prob = tf.placeholder(tf.float32)
                x = tf.nn.dropout(x, keep_prob)

            logits = tf.layers.dense(x, units=6, activation=tf.nn.softmax)

        return logits, keep_prob, training
- 1
- 2
- 3
- 4
- 5
- 6
- 7
- 8
- 9
- 10
- 11
- 12
- 13
- 14
- 15
- 16
- 17
- 18
- 19
- 20
- 21
- 22
- 23
- 24
- 25
- 26
- 27
- 28
- 29
- 30
- 31
- 32
- 33
- 34
- 35
- 36
- 37
- 38
- 39
- 40
- 41
- 42
- 43
- 44
- 45
- 46
- 47
- 48
- 49
- 50
- 51
- 52
- 53
- 54
- 55
- 56
- 57
- 58
- 59
- 60
5. 代价函数
使用交叉熵来计算损失函数和代价函数。这里没有使用L2正则化。
    def cost(self, logits, labels):
        with tf.name_scope('loss'):
            # cross_entropy = tf.losses.sparse_softmax_cross_entropy(labels=y_, logits=y_conv)
            cross_entropy = tf.losses.softmax_cross_entropy(onehot_labels=labels, logits=logits)
        cross_entropy_cost = tf.reduce_mean(cross_entropy)
        return cross_entropy_cost
- 1
- 2
- 3
- 4
- 5
- 6
在训练模型的时候,应该控制迭代的次数,以避免过度的过拟合。刚开始的时候,所打印出来的cost值会上下浮动,这个是正常的(一开始本人以为是模型有问题,后来才知道这是正常的)耐心等待便好。训练的模型将保存在硬盘中,在预测的时候可直接读取这些数据。
    def train(self, X_train, Y_train):
        features = tf.placeholder(tf.float32, [None, 64, 64, 3])
        labels = tf.placeholder(tf.int64, [None, 6])

        logits, keep_prob, train_mode = self.deepnn(features)

        cross_entropy = self.cost(logits, labels)

        with tf.name_scope('adam_optimizer'):
            update_ops = tf.get_collection(tf.GraphKeys.UPDATE_OPS)
            with tf.control_dependencies(update_ops):
                train_step = tf.train.AdamOptimizer(1e-4).minimize(cross_entropy)

        graph_location = tempfile.mkdtemp()
        print('Saving graph to: %s' % graph_location)
        train_writer = tf.summary.FileWriter(graph_location)
        train_writer.add_graph(tf.get_default_graph())

        mini_batches = random_mini_batches(X_train, Y_train, mini_batch_size=32, seed=None)

        saver = tf.train.Saver()
        with tf.Session() as sess:
            sess.run(tf.global_variables_initializer())
            for i in range(1000):
                X_mini_batch, Y_mini_batch = mini_batches[np.random.randint(0, len(mini_batches))]
                train_step.run(feed_dict={features: X_mini_batch, labels: Y_mini_batch, keep_prob: 0.5, train_mode: True})

                if i % 20 == 0:
                    train_cost = sess.run(cross_entropy, feed_dict={features: X_mini_batch,
                                          labels: Y_mini_batch, keep_prob: 1.0, train_mode: False})
                    print('step %d, training cost %g' % (i, train_cost))

            saver.save(sess, self.model_save_path)
- 1
- 2
- 3
- 4
- 5
- 6
- 7
- 8
- 9
- 10
- 11
- 12
- 13
- 14
- 15
- 16
- 17
- 18
- 19
- 20
- 21
- 22
- 23
- 24
- 25
- 26
- 27
- 28
- 29
- 30
- 31
- 32
- 33
模型预测。先初始化graph,然后读取硬盘中模型参数数据。
    def evaluate(self, test_features, test_labels, name='test '):
        tf.reset_default_graph()

        x = tf.placeholder(tf.float32, [None, 64, 64, 3])
        y_ = tf.placeholder(tf.int64, [None, 6])

        logits, keep_prob, train_mode = self.deepnn(x)
        accuracy = self.accuracy(logits, y_)

        saver = tf.train.Saver()
        with tf.Session() as sess:
            saver.restore(sess, self.model_save_path)
            accu = sess.run(accuracy, feed_dict={x: test_features, y_: test_labels,keep_prob: 1.0, train_mode: False})
            print('%s accuracy %g' % (name, accu))
- 1
- 2
- 3
- 4
- 5
- 6
- 7
- 8
- 9
- 10
- 11
- 12
- 13
- 14
这个本人测试的结果

本算法只是单纯地实现和演示ResNet-50神经网络模型,所以在运行地时候出现结果时好时坏地现象,也就是结果不稳定。如果加上滑动平均模型,就会稳定很多。
本文的思路来自吴恩达老师关于深度学习第四课的课程。
数据集下载:https://pan.baidu.com/s/1mj6Xj0c
完整源码下载:https://github.com/liangyihuai/my_tensorflow/blob/master/com/huai/converlution/resnets/hand_classifier_with_resnet.py
版权声明:本文内容由互联网用户自发贡献,该文观点与技术仅代表作者本人。本站仅提供信息存储空间服务,不拥有所有权,不承担相关法律责任。如发现本站有涉嫌侵权/违法违规的内容, 请发送邮件至 [email protected] 举报,一经查实,本站将立刻删除。