
零、前言
本文基于《基于SpringBoot搭建应用开发框架(一)——基础架构》,通过该文,熟悉了SpringBoot的用法,完成了应用框架底层的搭建。
在开始本文之前,底层这块已经有了很大的调整,主要是SpringBoot由之前的 1.5.9.RELEASE 升级至 2.1.0.RELEASE 版本,其它依赖的三方包基本也都升级到目前最新版了。
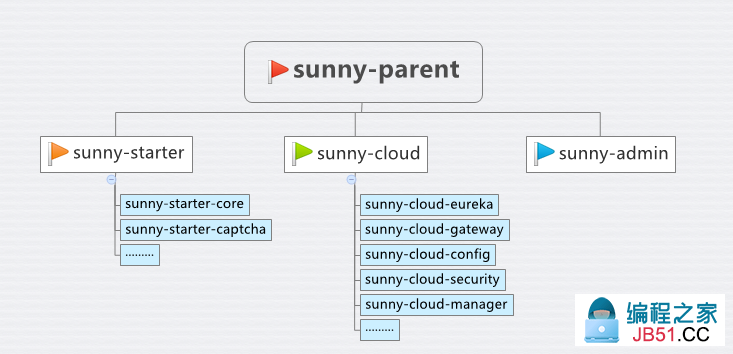
其次是整体架构上也做了调整:
sunny-parent:sunny 项目的顶级父类,sunny-parent 又继承自 spring-boot-starter-parent ,为所有项目统一 spring 及 springboot 版本。同时,管理项目中将用到的大部分的第三方包,统一管理版本号。
sunny-starter:项目中开发的组件以 starter 的方式进行集成,按需引入 starter 即可。sunny-starter 下以 module 的形式组织,便于管理、批量打包部署。
sunny-starter-core:核心包,定义基础的操作类、异常封装、工具类等,集成了 mybatis-mapper、druid 数据源、redis 等。
sunny-starter-captcha:验证码封装。
sunny-cloud:spring-cloud 系列服务,微服务基础框架,本篇文章主要集中在 sunny-cloud-security上,其它的以后再说。
sunny-cloud-security:认证服务和授权服务。
sunny-admin:管理端服务,业务中心。
本篇将会一步步完成系统的登录认证,包括常规的用户名+密码登录、以及社交方式登录,如QQ、微信授权登录等,一步步分析 spring-security 及 oauth 相关的源码。
一、SpringSecurity 简介
SpringSecurity 是专门针对基于Spring项目的安全框架,充分利用了AOP和Filter来实现安全功能。它提供全面的安全性解决方案,同时在 Web 请求级和方法调用级处理身份确认和授权。他提供了强大的企业安全服务,如:认证授权机制、Web资源访问控制、业务方法调用访问控制、领域对象访问控制Access Control List(ACL)、单点登录(SSO)等等。
核心功能:认证(你是谁)、授权(你能干什么)、攻击防护(防止伪造身份)。
基本原理:SpringSecurity的核心实质是一个过滤器链,即一组Filter,所有的请求都会经过这些过滤器,然后响应返回。每个过滤器都有特定的职责,可通过配置添加、删除过滤器。过滤器的排序很重要,因为它们之间有依赖关系。有些过滤器也不能删除,如处在过滤器链最后几环的ExceptionTranslationFilter(处理后者抛出的异常),FilterSecurityInterceptor(最后一环,根据配置决定请求能不能访问服务)。
二、标准登录
使用 用户名+密码 的方式来登录,用户名、密码存储在数据库,并且支持密码输入错误三次后开启验证码,通过这样一个过程来熟悉 spring security 的认证流程,掌握 spring security 的原理。
1、基础环境
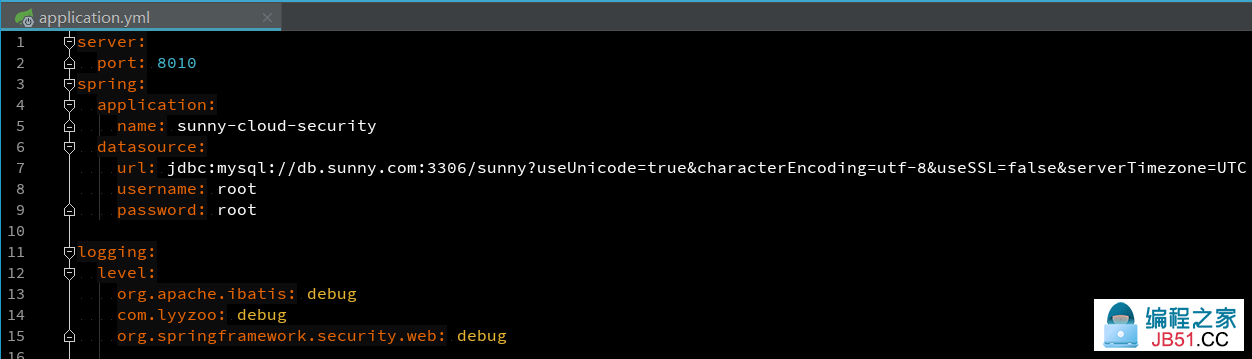
① 创建 sunny-cloud-security 模块,端口号设置为 8010,在sunny-cloud-security模块引入security支持以及sunny-starter-core:

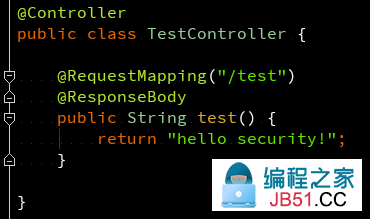
② 开发一个TestController
③ 不做任何配置,启动系统,然后访问 localhost:8010/test 时,会自动跳转到SpringSecurity默认的登录页面去进行认证。那这登录的用户名和密码从哪来呢?
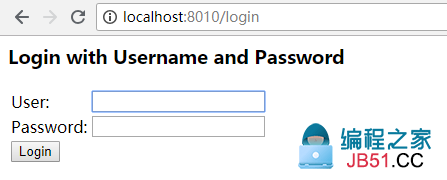
启动项目时,从控制台输出中可以找到生成的 security 密码,从 UserDetailsServiceAutoConfiguration 可以得知,使用的是基于内存的用户管理器,默认的用户名为 user,密码是随机生成的UUID。

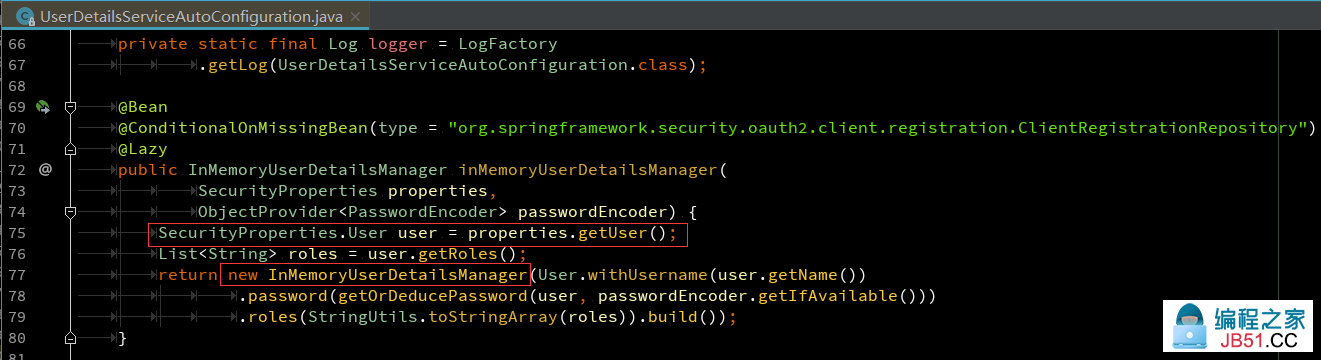
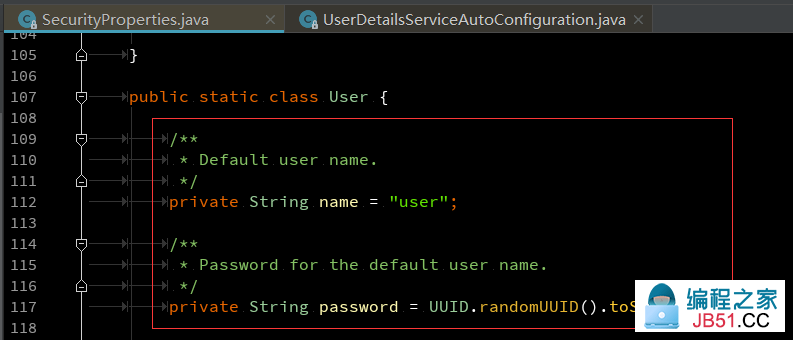
我们也可以修改默认的用户名和密码。

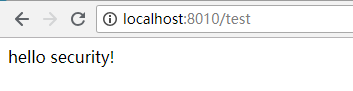
④ 使用 user 和生成的UUID密码登录成功后即可访问 /test 资源,最简单的一个认证就完成了。
在不做任何配置的情况下,security会把服务内所有资源的访问都保护起来,需要先进行身份证认证才可访问, 使用默认的表单登录或http basic认证方式。
不过这种默认方式肯定无法满足我们的需求,我们的用户名和密码都是存在数据库的。下面我们就来看看在 spring boot 中我们如何去配置自己的登录页面以及从数据库获取用户数据来完成用户登录。
2、自定义登录页面
① 首先开发一个登录页面,由于页面中会使用到一些动态数据,决定使用 thymeleaf 模板引擎,只需在 pom 中引入如下依赖,使用默认配置即可,具体有哪些配置可从 ThymeleafProperties 中了解到。

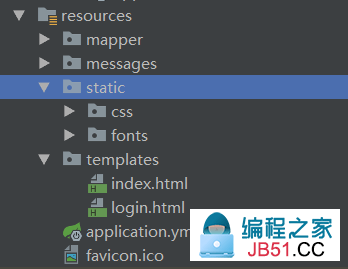
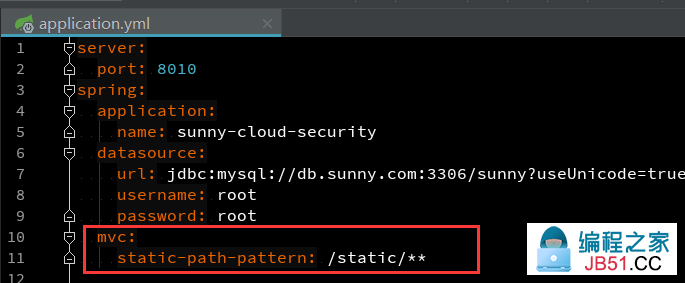
② 同时,在 resources 目录下,建 static 和 templates 两个目录,static 目录用于存放静态资源,templates 用于存放 thymeleaf 模板页面,同时配置MVC的静态资源映射。
③ 开发后台首页、登录页面的跳转地址,/login 接口用于向登录页面传递登录相关的数据,如用户名、是否启用验证码、错误消息等。


 1 package com.lyyzoo.sunny.security.controller;
 2
 3 import javax.servlet.http.HttpServletResponse;
 4  javax.servlet.http.HttpSession;
 5
 6  org.apache.commons.lang3.StringUtils;
 7  org.springframework.beans.factory.annotation.Autowired;
 8  org.springframework.security.web.WebAttributes;
 9  org.springframework.stereotype.Controller;
10  org.springframework.ui.Model;
11  org.springframework.web.bind.annotation.GetMapping;
12  org.springframework.web.bind.annotation.RequestMapping;
13  org.springframework.web.bind.annotation.ResponseBody;
14
15  com.lyyzoo.sunny.captcha.CaptchaImageHelper;
16  com.lyyzoo.sunny.core.base.Result;
17  com.lyyzoo.sunny.core.message.MessageAccessor;
18  com.lyyzoo.sunny.core.userdetails.CustomUserDetails;
19  com.lyyzoo.sunny.core.userdetails.DetailsHelper;
20  com.lyyzoo.sunny.core.util.Results;
21  com.lyyzoo.sunny.security.constant.SecurityConstants;
22  com.lyyzoo.sunny.security.domain.entity.User;
23  com.lyyzoo.sunny.security.domain.service.ConfigService;
24  com.lyyzoo.sunny.security.domain.service.UserService;
25
26 /**
27  *
28  * @author bojiangzhou 2018/03/28
29  */
30 @Controller
31 public class SecurityController {
32
33     private static final String LOGIN_PAGE = "login";
34
35     final String INDEX_PAGE = "index"36
37     final String FIELD_ERROR_MSG = "errorMsg"38     final String FIELD_ENABLE_CAPTCHA = "enableCaptcha"39
40     @Autowired
41     private CaptchaImageHelper captchaImageHelper;
42 43      UserService userService;
44 45      ConfigService configService;
46
47     @RequestMapping("/index")
48     public String index() {
49         return INDEX_PAGE;
50     }
51
52     @GetMapping("/login"53      String login(HttpSession session,Model model) {
54         String errorMsg = (String) session.getAttribute(WebAttributes.AUTHENTICATION_EXCEPTION);
55         String username = (String) session.getAttribute(User.FIELD_USERNAME);
56         if (StringUtils.isNotBlank(errorMsg)) {
57             model.addAttribute(FIELD_ERROR_MSG,errorMsg);
58         }
59          (StringUtils.isNotBlank(username)) {
60             model.addAttribute(User.FIELD_USERNAME,username);
61             User user = userService.getUserByUsername(username);
62             if (user == null) {
63                 model.addAttribute(FIELD_ERROR_MSG,MessageAccessor.getMessage("login.username-or-password.error"));
64             } else {
65                  (configService.isEnableCaptcha(user.getPasswordErrorTime())) {
66                     model.addAttribute(FIELD_ENABLE_CAPTCHA,true);
67                 }
68             }
69 70         session.removeAttribute(WebAttributes.AUTHENTICATION_EXCEPTION);
71
72          LOGIN_PAGE;
73 74
75     @GetMapping("/public/captcha.jpg"76     void captcha(HttpServletResponse response) {
77         captchaImageHelper.generateAndWriteCaptchaImage(response,SecurityConstants.SECURITY_KEY);
78 79
80     @GetMapping("/user/self"81     @ResponseBody
82      Result test() {
83         CustomUserDetails details = DetailsHelper.getUserDetails();
84
85          Results.successWithData(details);
86 87
88 }
④ 从 spring boot 官方文档可以得知,spring security 的核心配置都在 WebSecurityConfigurerAdapter 里,我们只需继承该适配器覆盖默认配置即可。首先来看看默认的登录页面以及如何配置登录页面。
通过 HttpSecurity 配置安全策略,首先开放了允许匿名访问的地址,除此之外都需要认证,通过 formLogin() 来启用表单登录,并配置了默认的登录页面,以及登录成功后的首页地址。

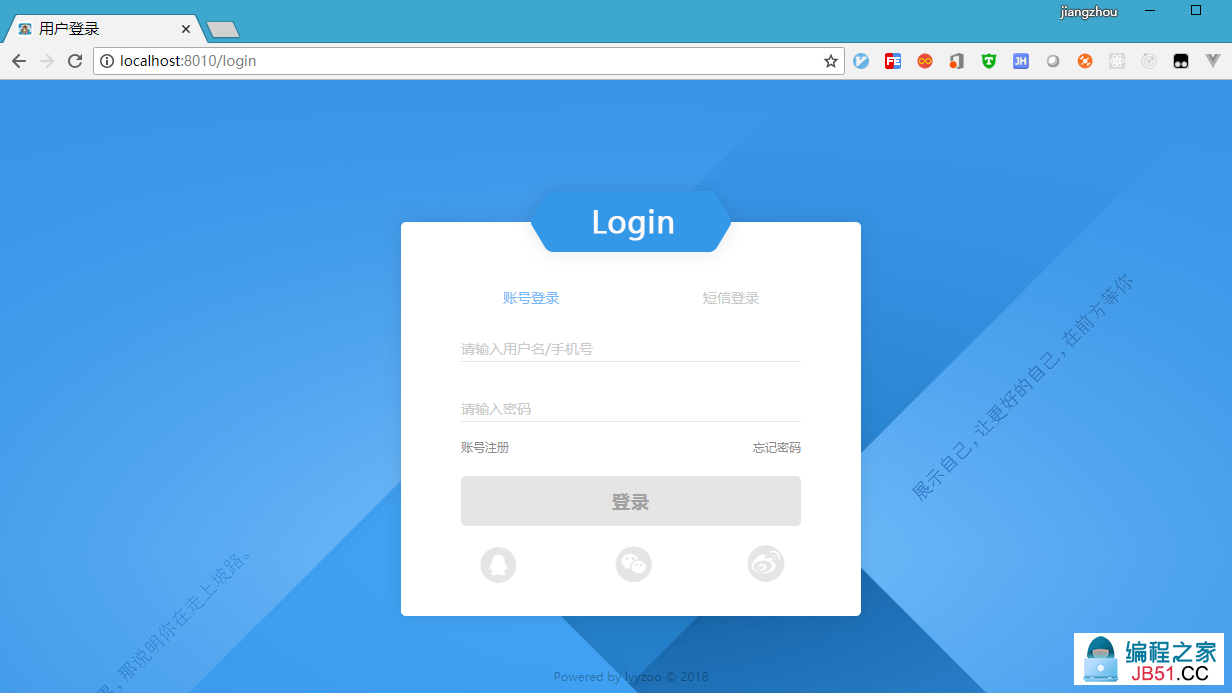
启动系统,访问资源跳转到自定义的登录页面了:
⑤ 那么默认的登录页面是怎么来的呢,以及做了哪些默认配置?
从 formLogin() 可以看出,启用表单登录即启用了表单登录的配置 FormLoginConfigurer:

从 FormLoginConfigurer 的构造函数中可以看出,表单登录用户名和密码的参数默认配置为 username 和 password,所以,我们的登录页面中需和这两个参数配置成一样,当然了,我们也可以在 formLogin() 后自定义这两个参数。
同时,可以看出开启了 UsernamePasswordAuthenticationFilter 过滤器,用于 用户名+密码 登录方式的认证,这个之后再说明。

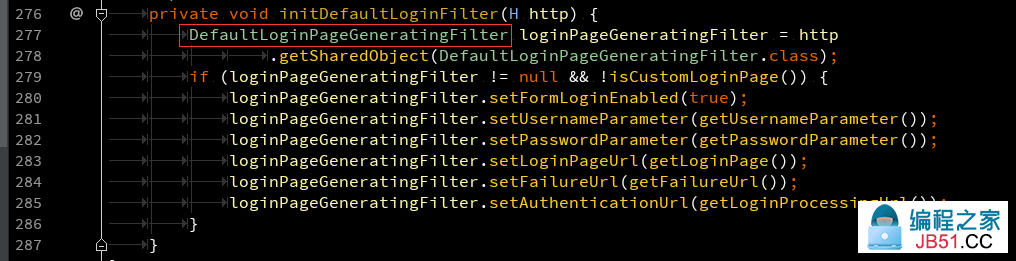
从初始化配置中可以看出,默认创建了 DefaultLoginPageGeneratingFilter 过滤器用于生成默认的登录页面,从该过滤器的初始化方法中我们也可以了解到一些默认的配置。这个过滤器只有在未配置自定义登录页面时才会生效。
3、SpringSecurity基本原理
在进行后面的开发前,先来了解下 spring security 的基本原理。
spring security 的核心是过滤器链,即一组 Filter。所有服务资源的请求都会经过 spring security 的过滤器链,并响应返回。
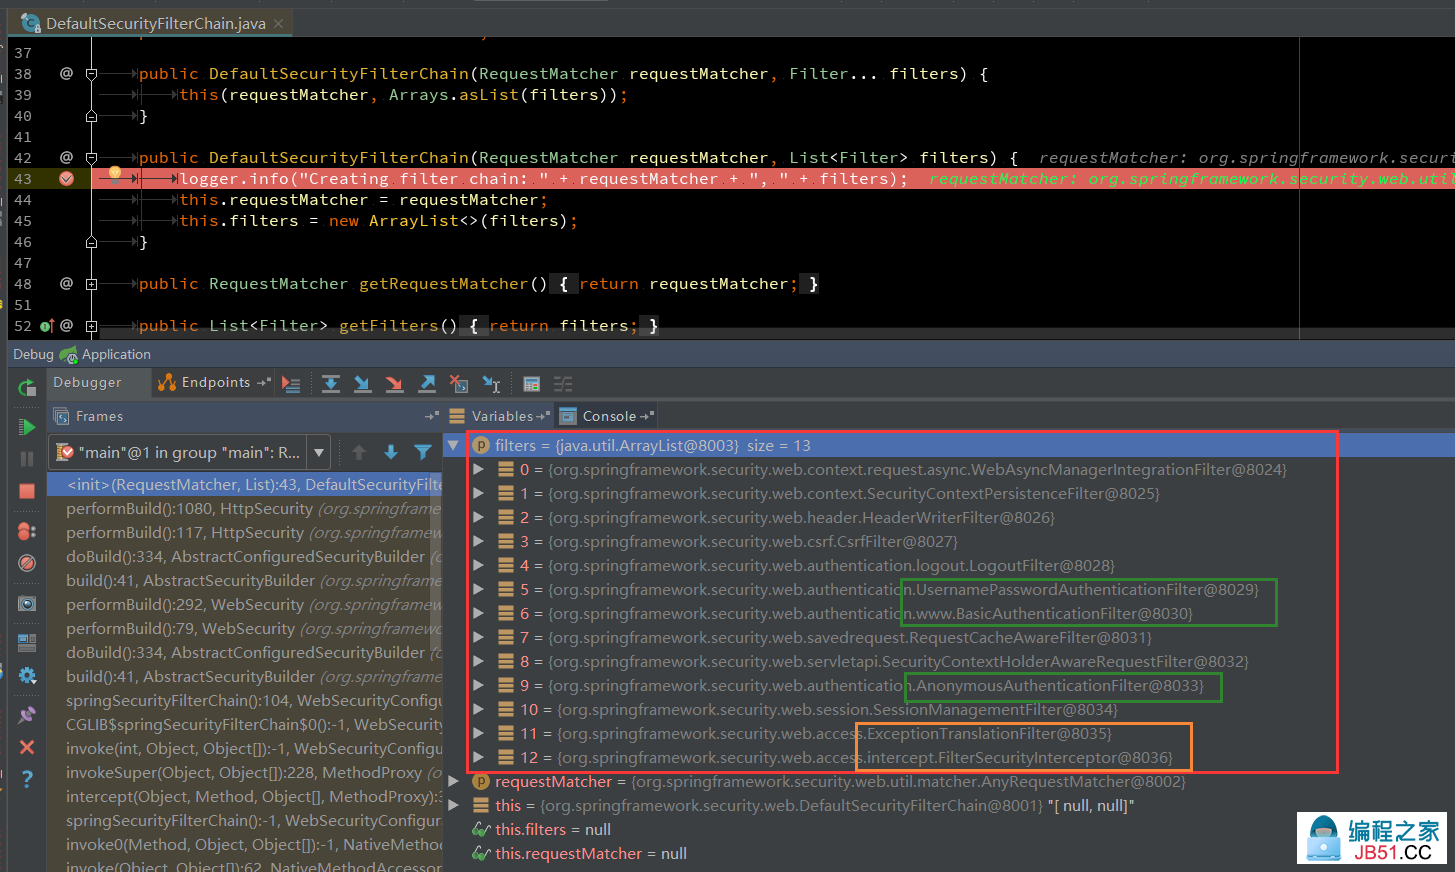
我们从控制台中可以找到输出过滤器链的类 DefaultSecurityFilterChain,在现有的配置上,可以看到当前过滤器链共有13个过滤器。
每个过滤器主要做什么可以参考:Spring Security 核心过滤器链分析
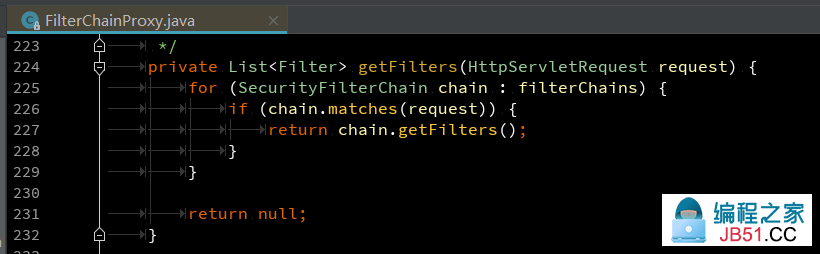
过滤器链的创建是通过 HttpSecurity 的配置而来,实际上,每个 HttpSecurity 的配置都会创建相应的过滤器链来处理对应的请求,每个请求都会进入 FilterChainProxy 过滤器,根据请求选择一个合适的过滤器链来处理该请求。
过滤器的顺序我们可以从 FilterComparator 中得知,并且可以看出 spring security 默认有25个过滤器(自行查看):

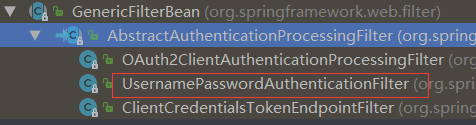
不难发现,几乎所有的过滤器都直接或间接继承自 GenericFilterBean,通过这个基础过滤器可以看到都有哪些过滤器,通过每个过滤器的名称我们能大概了解到 spring security 为我们提供了哪些功能,要启用这些功能,只需通过配置加入相应的过滤器即可,比如 oauth 认证。

过滤器链中,绿色框出的这类过滤器主要用于用户认证,这些过滤器会根据当前的请求检查是否有这个过滤器所需的信息,如果有则进入该过滤器,没有则不会进入下一个过滤器。
比如这里,如果是表单登录,要求必须是[POST /login],则进入 UsernamePasswordAuthenticationFilter 过滤器,使用用户名和密码进行认证,不会再进入BasicAuthenticationFilter;

如果使用 http basic 的方式进行认证,要求请求头必须包含 Authorization,且值以 basic 打头,则进入 BasicAuthenticationFilter 进行认证。

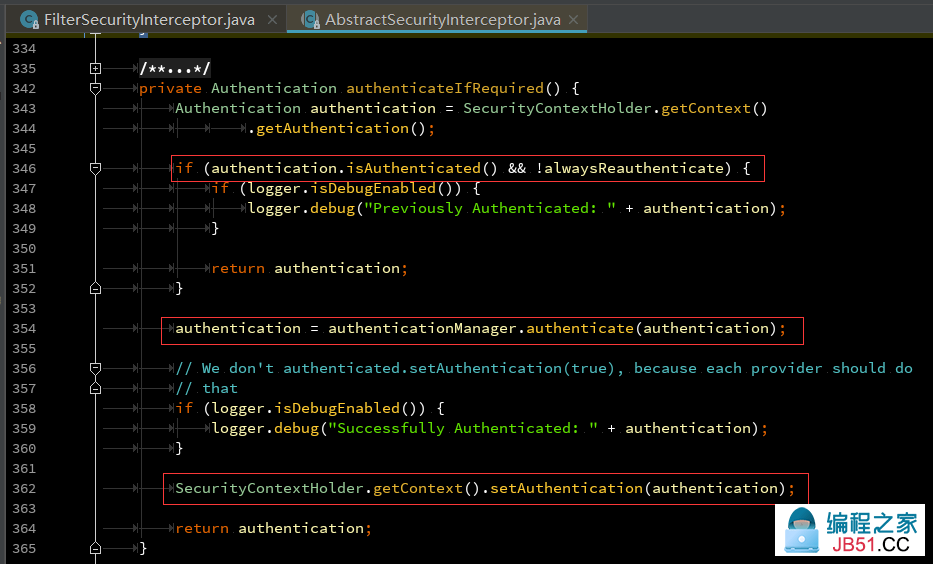
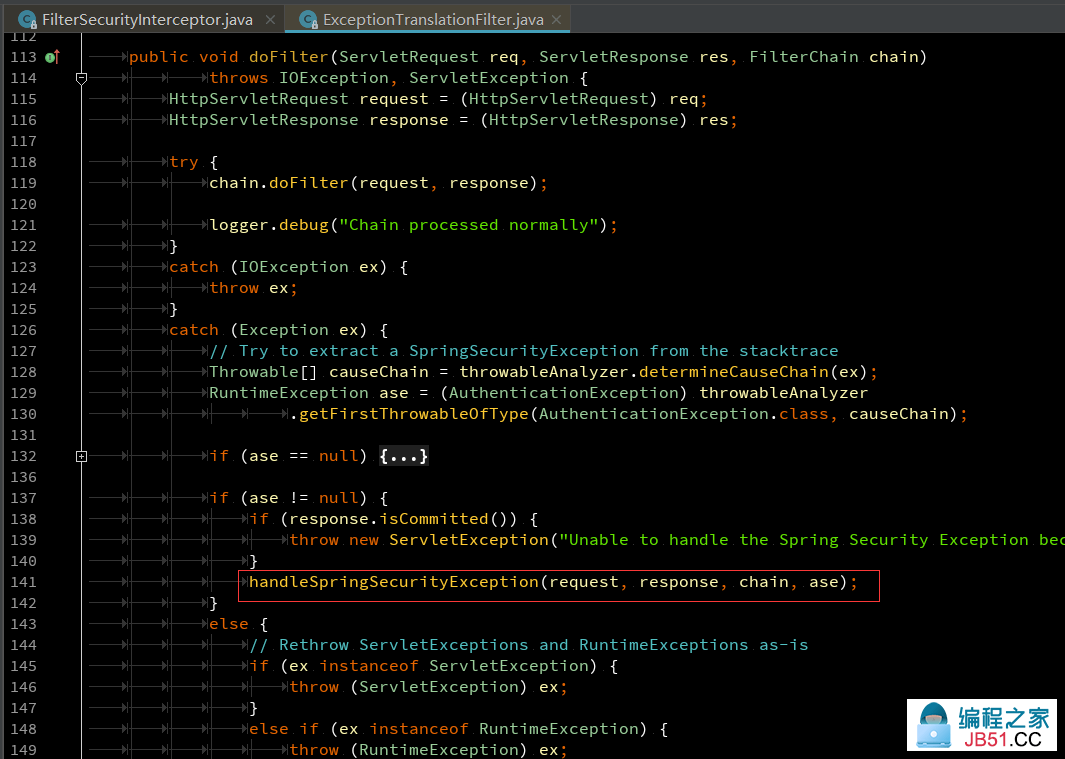
经过前面的过滤器后,最后会进入到 FilterSecurityInterceptor,这是整个 spring security 过滤器链的最后一环,在它身后就是服务的API。
这个过滤器会去根据配置决定当前的请求能不能访问真正的资源,主要一些实现功能在其父类AbstractSecurityInterceptor中。
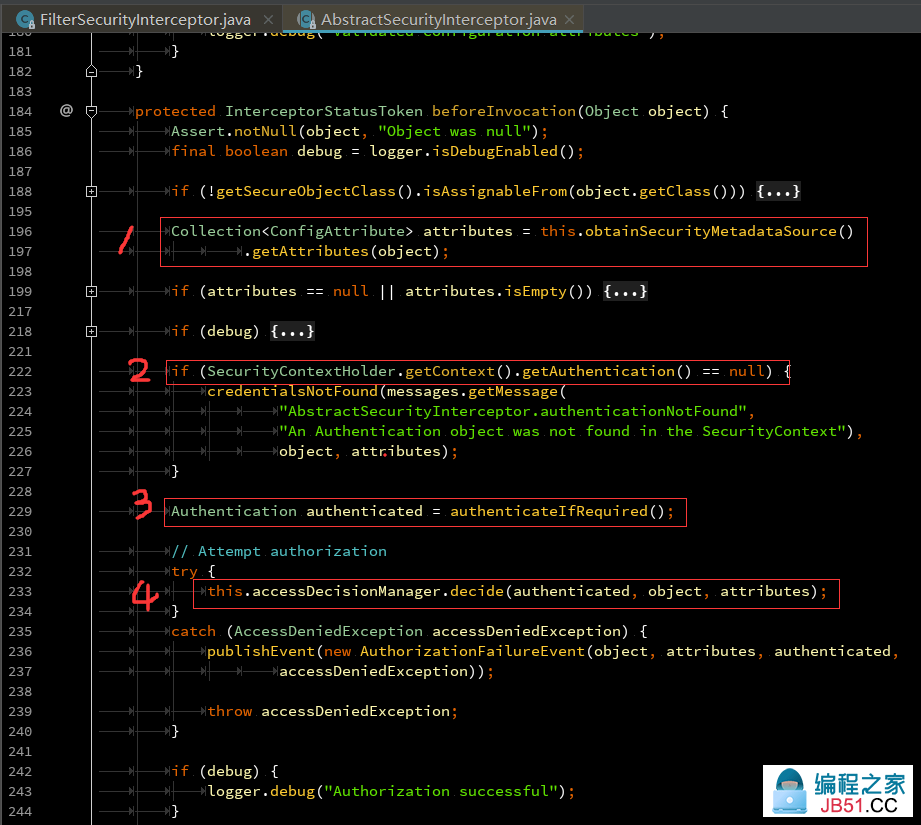
[1] 拿到的是权限配置,会根据这些配置决定访问的API能否通过。
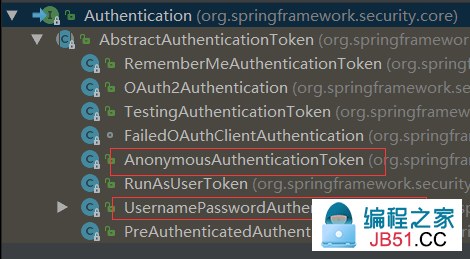
[2] 当前上下文必须有用户认证信息 Authentication,就算是匿名访问也会有相应的过滤器来生成 Authentication。不难发现,不同类型的认证过滤器对应了不同的 Authentication。使用用户名和密码登录时,就会生成 UsernamePasswordAuthenticationToken。
[3] 用户认证,首先判断用户是否已认证通过,认证通过则直接返回 Authentication,否则调用认证器进行认证。认证通过之后将 Authentication 放到 Security 的上下文,这就是为何我们能从 SecurityContextHolder 中取到 Authentication 的源头。
认证管理器是默认配置的 ProviderManager,ProviderManager 则管理者多个 AuthenticationProvider 认证器 ,认证的时候,只要其中一个认证器认证通过,则标识认证通过。
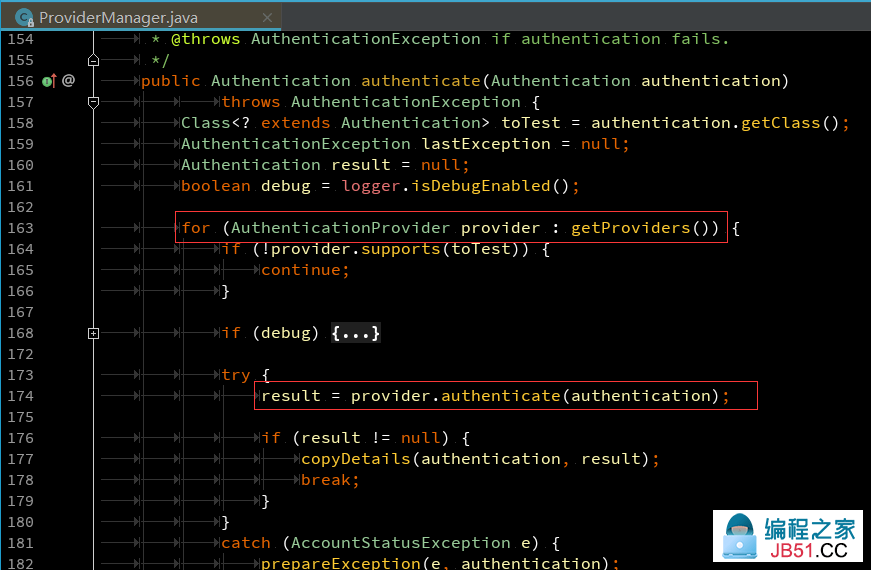
认证器:表单登录默认使用 DaoAuthenticationProvider,我们想要实现从数据库获取用户名和密码就得从这里入手。
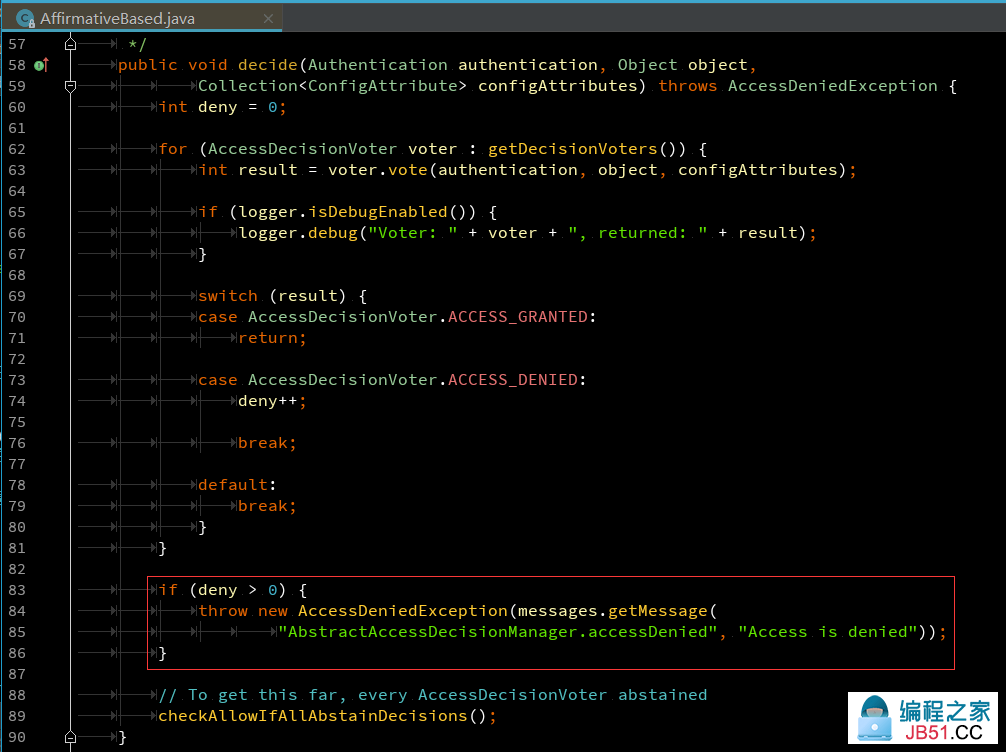
[4] 认证通过后,使用权限决定管理器 AccessDecisionManager 判断是否有权限,管理器则管理者多个 权限投票器 AccessDecisionVoter,通过投票器来决定是否有权限访问资源。因此,我们也可以自定义投票器来判断用户是否有权限访问某个API。
最后,如果未认证通过或没有权限,FilterSecurityInterceptor 则抛出相应的异常,异常会被 ExceptionTranslationFilter 捕捉到,进行统一的异常处理分流,比如未登录时,重定向到登录页面;没有权限的时候抛出403异常等。
4、用户认证流程
从 spring security 基本原理的分析中不难发现,用户的认证过程涉及到三个主要的组件:
AbstractAuthenticationProcessingFilter:它在基于web的认证请求中用于处理包含认证信息的请求,创建一个部分完整的Authentication对象以在链中传递凭证信息。
AuthenticationManager:它用来校验用户的凭证信息,或者会抛出一个特定的异常(校验失败的情况)或者完整填充Authentication对象,将会包含了权限信息。
AuthenticationProvider:它为AuthenticationManager提供凭证校验。一些AuthenticationProvider的实现基于凭证信息的存储,如数据库,来判定凭证信息是否可以被认可。
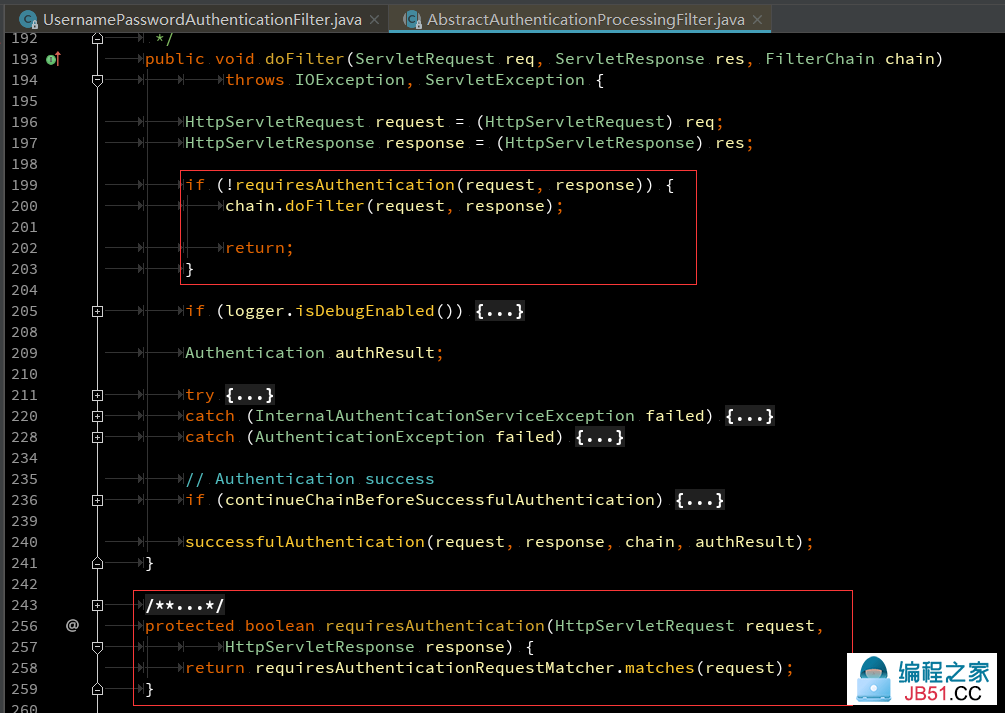
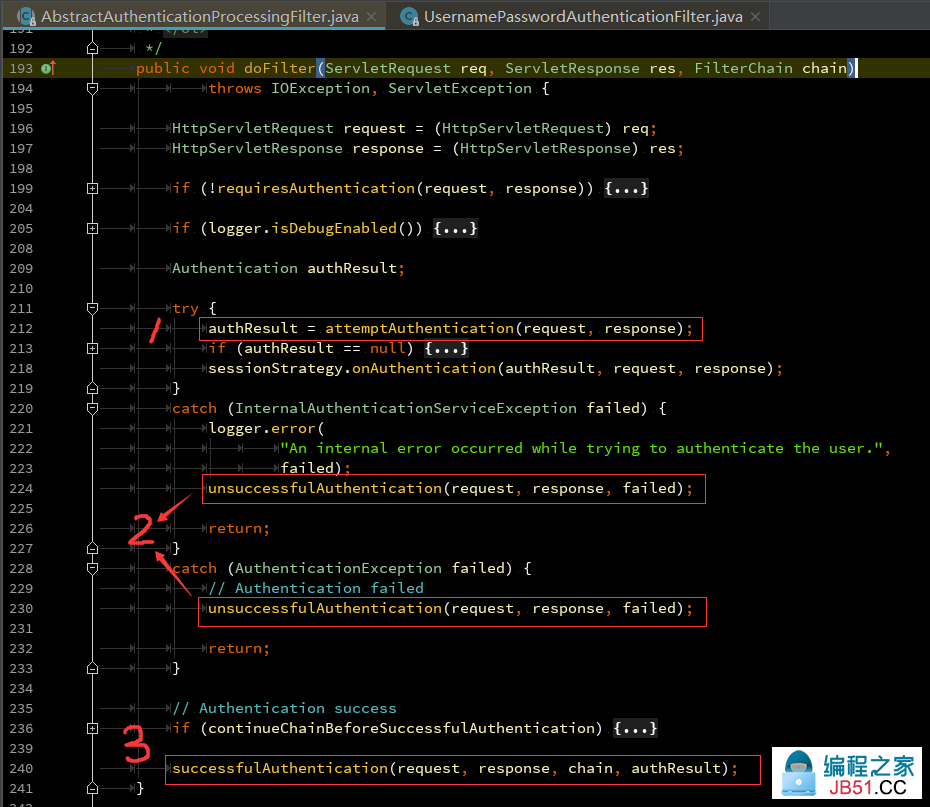
我们从核心的 AbstractAuthenticationProcessingFilter 入手,来分析下用户认证的流程。
[1] 可以看到,首先会调用 attemptAuthentication 来获取认证后的 Authentication。attemptAuthentication 是一个抽象方法,在其子类中实现。
前面提到过,启用表单登录时,就会创建 UsernamePasswordAuthenticationFilter 用于处理表单登录。后面开发 oauth2 认证的时候则会用到 OAuth2 相关的过滤器。
从 attemptAuthentication 的实现中可以看出,主要是将 username 和 password 封装到 UsernamePasswordAuthenticationToken。
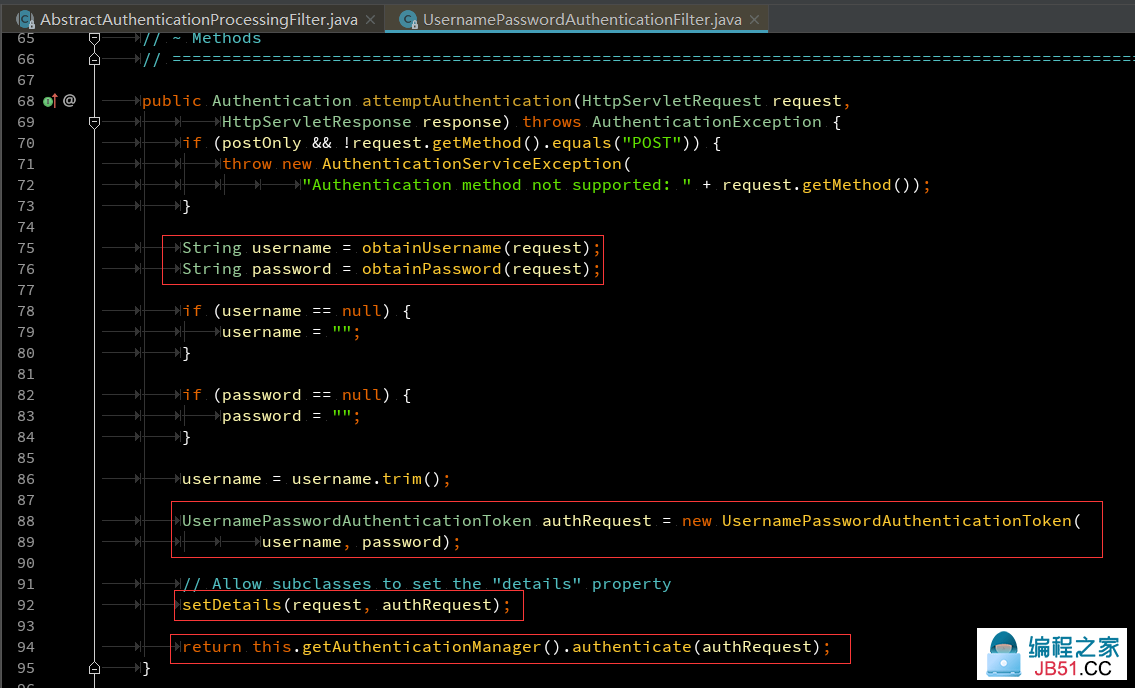
从当前 UsernamePasswordAuthenticationToken 的构造方法中可以看出,此时的 Authentication 设置了未认证状态。
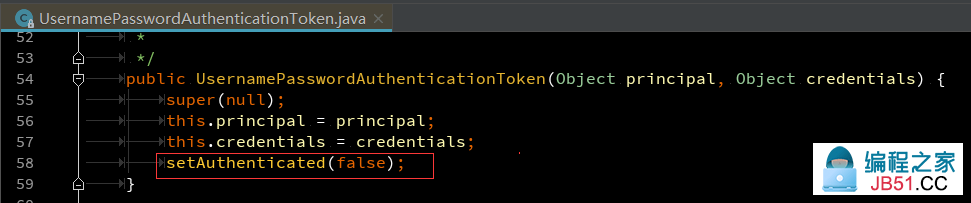
【#】通过 setDetails 可以向 UsernamePasswordAuthenticationToken 中加入 Details 用于后续流程的处理,稍后我会实现AuthenticationDetailsSource 将验证码放进去用于后面的认证。

之后,通过 AuthenticationManager 进行认证,实际是 ProviderManager 管理着一些认证器,这些配置都可以通过 setter 方法找到相应配置的位置,这里就不赘述了。
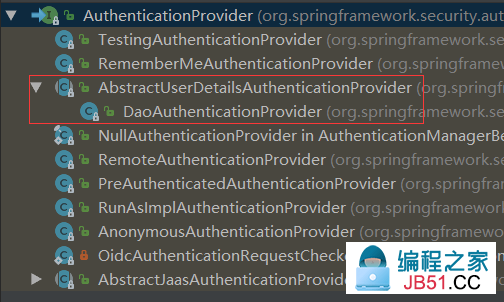
不难发现,用户认证器使用的是 AbstractUserDetailsAuthenticationProvider,流程主要涉及到 retrieveUser 和 additionalAuthenticationChecks 两个抽象方法。
【#】AbstractUserDetailsAuthenticationProvider 默认只有一个实现类 DaoAuthenticationProvider,获取用户信息、用户密码校验都是在这个实现类里,因此我们也可以实现自己的 AbstractUserDetailsAuthenticationProvider 来处理相关业务。

【#】从 retrieveUser 中可以发现,主要使用 UserDetailsService 来获取用户信息,该接口只有一个方法 loadUserByUsername,我们也会实现该接口来从数据库获取用户信息。如果有复杂的业务逻辑,比如锁定用户等,还可以覆盖 retrieveUser 方法。


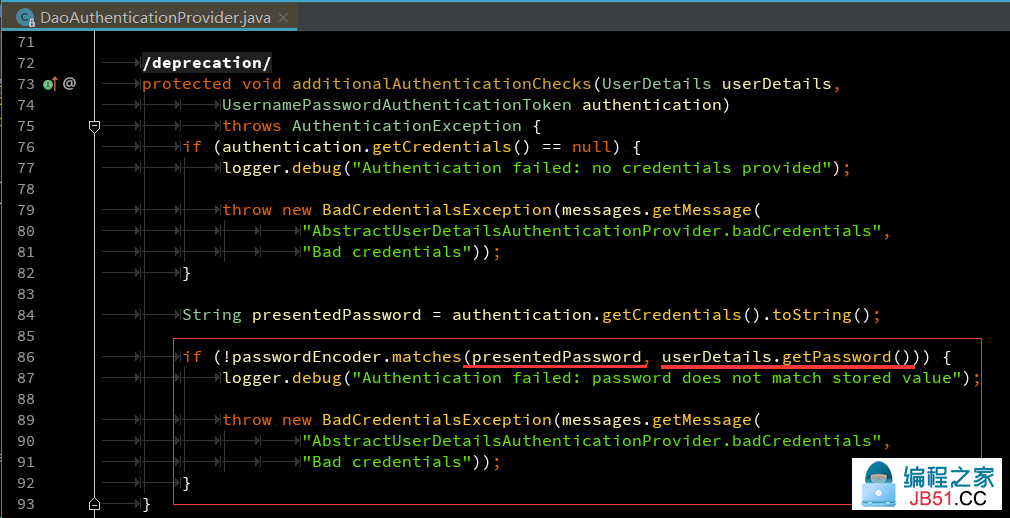
用户返回成功后,就会通过 PasswordEncoder 来校验用户输入的密码和数据库密码是否匹配。注意数据库存入的密码是加密后的密码,且不可逆。
用户、密码都校验通过后,就会创建已认证的 Authentication,从此时 UsernamePasswordAuthenticationToken 的构造方法可以看出,构造的是一个已认证的 Authentication。


[2] 如果用户认证失败,会调用 AuthenticationFailureHandler 的 onAuthenticationFailure 方法进行认证失败后的处理,我们也会实现这个接口来做一些失败后逻辑处理。

[3] 用户认证成功,将 Authentication 放入 security 上下文,调用 AuthenticationSuccessHandler 做认证成功的一些后续逻辑处理,我们也会实现这个接口。

5、用户认证代码实现
通过 spring security 基本原理分析和用户认证流程分析,我们已经能够梳理出完成认证需要做哪些工作了。
① 首先设计并创建系统用户表:

② CustomUserDetails
自定义 UserDetails,根据自己的需求将一些常用的用户信息封装到 UserDetails 中,便于快速获取用户信息,比如用户ID、昵称等。
 com.lyyzoo.sunny.core.userdetails;
 java.util.Collection;
 java.util.Objects;
 org.springframework.security.core.GrantedAuthority;
 org.springframework.security.core.userdetails.User;
 8
 9
 * 定制的UserDetail对象
 bojiangzhou 2018/09/02
14  class CustomUserDetails extends User {
16     final long serialVersionUID = -4461471539260584625L17
18      Long userId;
19
20      String nickname;
21
22      String language;
23
24      CustomUserDetails(String username,String password,Long userId,String nickname,String language,25                              Collection<? extends GrantedAuthority> authorities) {
26         super(username,password,authorities);
27         this.userId = userId;
28         this.nickname = nickname;
29         this.language = language;
31
32      Long getUserId() {
33         34 35
36      setUserId(Long userId) {
37         38 40      String getNickname() {
41         43
44      setNickname(String nickname) {
45         46 47
 String getLanguage() {
52      setLanguage(String language) {
53         54 55
56     @Override
57     boolean equals(Object o) {
58         if (this == o) {
59             return 61         if (!(o instanceof CustomUserDetails)) {
false63 64         if (!.equals(o)) {
65             66 67
68         CustomUserDetails that = (CustomUserDetails) o;
69
70         Objects.equals(userId,that.userId)) {
71             72 73         74 75
76 77     int hashCode() {
78         int result = .hashCode();
79         result = 31 * result + userId.hashCode();
80         result = 31 * result + nickname.hashCode();
81         result = 31 * result + language.hashCode();
82          result;
83 85 }
③ CustomUserDetailsService
自定义 UserDetailsService 来从数据库获取用户信息,并将用户信息封装到 CustomUserDetails
 com.lyyzoo.sunny.security.core;
 java.util.ArrayList;
 org.springframework.security.core.authority.SimpleGrantedAuthority;
 org.springframework.security.core.userdetails.UserDetails;
 org.springframework.security.core.userdetails.UserDetailsService;
 org.springframework.security.core.userdetails.UsernameNotFoundException;
 org.springframework.stereotype.Component;
13
14 18
 * 加载用户信息实现类
 bojiangzhou 2018/03/25
23  @Component
25 class CustomUserDetailsService implements UserDetailsService {
26
28     29
31     public UserDetails loadUserByUsername(String username) throws UsernameNotFoundException {
32         User user =34             throw new UsernameNotFoundException(MessageAccessor.getMessage("login.username-or-password.error"35 37         Collection<GrantedAuthority> authorities = new ArrayList<>();
38         authorities.add(new SimpleGrantedAuthority("ROLE_USER"40         new CustomUserDetails(username,user.getPassword(),user.getId(),1)">41                 user.getNickname(),user.getLanguage(),1)">44 }
④ CustomWebAuthenticationDetails
自定义 WebAuthenticationDetails 用于封装传入的验证码以及缓存的验证码,用于后续校验。
  1   2
  3  javax.servlet.http.HttpServletRequest;
  4
  5  com.lyyzoo.sunny.captcha.CaptchaResult;
  6  org.springframework.security.web.authentication.WebAuthenticationDetails;
  7
  8   9  * 封装验证码
 10  11  bojiangzhou 2018/09/18
 12   13 class CustomWebAuthenticationDetails  WebAuthenticationDetails {
 14
 15     final String FIELD_CACHE_CAPTCHA = "cacheCaptcha" 16
 17      String inputCaptcha;
 18      String cacheCaptcha;
 19
 20      CustomWebAuthenticationDetails(HttpServletRequest request) {
 21         (request);
 22         cacheCaptcha = (String) request.getAttribute(FIELD_CACHE_CAPTCHA);
 23         inputCaptcha = request.getParameter(CaptchaResult.FIELD_CAPTCHA);
 24  25
 26      String getInputCaptcha() {
 27          inputCaptcha;
 28  29
 30      String getCacheCaptcha() {
 31          cacheCaptcha;
 32  33
 34  35      equals(Object object) {
 36          object) {
 37              38  39         if (object == null || getClass() != object.getClass()) {
 40              41  42         .equals(object)) {
 43              44  45
 46         CustomWebAuthenticationDetails that = (CustomWebAuthenticationDetails) object;
 47
 48         return inputCaptcha != null ? inputCaptcha.equals(that.inputCaptcha) : that.inputCaptcha ==  49  50
 51  52      53          54         result = 31 * result + (inputCaptcha != null ? inputCaptcha.hashCode() : 0 55          56  57 }
 58  59
 60  61
 62  63  64
 65  66  67  68  69   70  71
 72      73
 74      75      76
 77      78          79         cacheCaptcha = 80         inputCaptcha = 81  82
 83      84          85  86
 87      88          89  90
 91  92      93          94              95  96          97              98  99         100             101 102
103         CustomWebAuthenticationDetails that =104
105         106 107
108 109     110         111         result = 31 * result + (inputCaptcha != 112         113 114 }
⑤ CustomAuthenticationDetailsSource
当然了,还需要一个构造验证码的 AuthenticationDetailsSource
 4
 5  org.springframework.security.authentication.AuthenticationDetailsSource;
12
 * 自定义获取AuthenticationDetails 用于封装传进来的验证码
17  class CustomAuthenticationDetailsSource implements AuthenticationDetailsSource<HttpServletRequest,WebAuthenticationDetails>20
25      WebAuthenticationDetails buildDetails(HttpServletRequest request) {
26         String cacheCaptcha = captchaImageHelper.getCaptcha(request,1)">        request.setAttribute(CustomWebAuthenticationDetails.FIELD_CACHE_CAPTCHA,cacheCaptcha);
 CustomWebAuthenticationDetails(request);
29 30
31 }
⑥ CustomAuthenticationProvider
自定义认证处理器,主要加入了验证码的检查,如果用户密码输入错误三次以上,则需要验证码。
 org.springframework.security.authentication.AuthenticationServiceException;
 org.springframework.security.authentication.BadCredentialsException;
 org.springframework.security.authentication.UsernamePasswordAuthenticationToken;
 org.springframework.security.authentication.dao.AbstractUserDetailsAuthenticationProvider;
 org.springframework.security.core.AuthenticationException;
 org.springframework.security.crypto.password.PasswordEncoder;
 * 自定义认证器
 bojiangzhou 2018/09/09
22  class CustomAuthenticationProvider  AbstractUserDetailsAuthenticationProvider {
27     29      CustomUserDetailsService detailsService;
 PasswordEncoder passwordEncoder;
32 36 protected UserDetails retrieveUser(String username,UsernamePasswordAuthenticationToken authentication)  AuthenticationException {
38         // 如有其它逻辑处理,可在此处进行逻辑处理...
39          detailsService.loadUserByUsername(username);
41
protected void additionalAuthenticationChecks(UserDetails userDetails,1)">44         String username = userDetails.getUsername();
45         User user =47          检查验证码
48         if (authentication.getDetails()  CustomWebAuthenticationDetails) {
49             50                 CustomWebAuthenticationDetails details = (CustomWebAuthenticationDetails) authentication.getDetails();
51                 String inputCaptcha = details.getInputCaptcha();
52                 String cacheCaptcha = details.getCacheCaptcha();
53                 if (StringUtils.isEmpty(inputCaptcha) || !StringUtils.equalsIgnoreCase(inputCaptcha,cacheCaptcha)) {
54                     new AuthenticationServiceException("login.captcha.error"55 56                 authentication.setDetails(59
60          检查密码是否正确
61         String password = userDetails.getPassword();
62         String rawPassword = authentication.getCredentials().toString();
63
boolean match = passwordEncoder.matches(rawPassword,password);
65         match) {
66             new BadCredentialsException("login.username-or-password.error"69 }
⑦ CustomAuthenticationSuccessHandler
自定义认证成功处理器,用户认证成功,将密码错误次数置零。
 java.io.IOException;
 javax.servlet.ServletException;
 org.springframework.security.core.Authentication;
 org.springframework.security.web.authentication.SavedRequestAwareAuthenticationSuccessHandler;
16
 * 登录认证成功处理器
 *
 bojiangzhou 2018/03/29
21  class CustomAuthenticationSuccessHandler  SavedRequestAwareAuthenticationSuccessHandler {
24
26     27
 onAuthenticationSuccess(HttpServletRequest request,HttpServletResponse response,1)">30                     Authentication authentication)  IOException,ServletException {
31         String username = request.getParameter("username"33         userService.loginSuccess(user.getId());
34         .onAuthenticationSuccess(request,response,authentication);
36 }
⑧ CustomAuthenticationFailureHandler
用户认证失败,记录密码错误次数,并重定向到登录页面。
 org.springframework.security.web.DefaultRedirectStrategy;
 org.springframework.security.web.RedirectStrategy;
 org.springframework.security.web.authentication.AuthenticationFailureHandler;
 com.lyyzoo.sunny.security.config.SecurityProperties;
 * 登录失败处理器
28  class CustomAuthenticationFailureHandler  AuthenticationFailureHandler {
 SecurityProperties securityProperties;
private RedirectStrategy redirectStrategy =  DefaultRedirectStrategy();
38
39  onAuthenticationFailure(HttpServletRequest request,1)">41                     AuthenticationException exception) 42         String username = request.getParameter("username"43         HttpSession session = request.getSession(44
if (session != 46             session.setAttribute("username",1)">47             session.setAttribute(WebAttributes.AUTHENTICATION_EXCEPTION,1)">48                             MessageAccessor.getMessage(exception.getMessage(),exception.getMessage()));
49 50         if (exception  BadCredentialsException) {
51             User user =52             userService.loginFail(user.getId());
53 54
55         redirectStrategy.sendRedirect(request,securityProperties.getLoginPage() + "?username=" + username);
57 }
⑨ 配置
前面的开发完成当然还需做配置,通过 formLogin() 来配置认证成功/失败处理器等。
通过 AuthenticationManagerBuilder 配置自定义的认证器。
SpringSecurity提供了一个 PasswordEncoder 接口用于处理加密解密。该接口有两个方法 encode 和 matches 。encode 对密码加密,matches 判断用户输入的密码和加密的密码(数据库密码)是否匹配。
 com.lyyzoo.sunny.security.config;
import com.lyyzoo.sunny.security.core.* org.springframework.boot.context.properties.EnableConfigurationProperties;
 org.springframework.context.annotation.Bean;
 org.springframework.context.annotation.Configuration;
 org.springframework.security.config.annotation.authentication.builders.AuthenticationManagerBuilder;
 org.springframework.security.config.annotation.web.builders.HttpSecurity;
 org.springframework.security.config.annotation.web.configuration.WebSecurityConfigurerAdapter;
 org.springframework.security.crypto.bcrypt.BCryptPasswordEncoder;
 * Security 主配置器
 bojiangzhou
18  @Configuration
20 @EnableConfigurationProperties(SecurityProperties.class SecurityConfiguration  WebSecurityConfigurerAdapter {
22
 SecurityProperties properties;
 CustomAuthenticationDetailsSource authenticationDetailsSource;
 CustomAuthenticationProvider authenticationProvider;
30      CustomAuthenticationSuccessHandler authenticationSuccessHandler;
 CustomAuthenticationFailureHandler authenticationFailureHandler;
33
void configure(HttpSecurity http)  Exception {
        http
37             .authorizeRequests()
38             .antMatchers("/static/**","/webjars/**","/public/**","/login","/favicon.ico"39             .permitAll()  允许匿名访问的地址
40             .and()  使用and()方法相当于XML标签的关闭,这样允许我们继续配置父类节点。
            .anyRequest()
43             .authenticated()  其它地址都需进行认证
            .and()
45             .formLogin()  启用表单登录
46             .loginPage(properties.getLoginPage())  登录页面
47             .defaultSuccessUrl("/index")  默认的登录成功后的跳转地址
            .authenticationDetailsSource(authenticationDetailsSource)
            .successHandler(authenticationSuccessHandler)
            .failureHandler(authenticationFailureHandler)
51             .csrf()
            .disable()
        ;
57
58     59      * 设置认证处理器
60      61 62     void configure(AuthenticationManagerBuilder auth)         auth.authenticationProvider(authenticationProvider);
.configure(auth);
65 66
67          * 密码处理器
69          @Bean
71      PasswordEncoder passwordEncoder() {
 BCryptPasswordEncoder();
75 }
⑩ 登录页面

三、手机短信登录
经过前面用户名+密码的登录流程分析后,现在再来开发手机号+短信验证码的方式登录。手机短信登录无法直接使用标准登录的流程,所以需要模拟标准登录流程开发。
1、流程分析
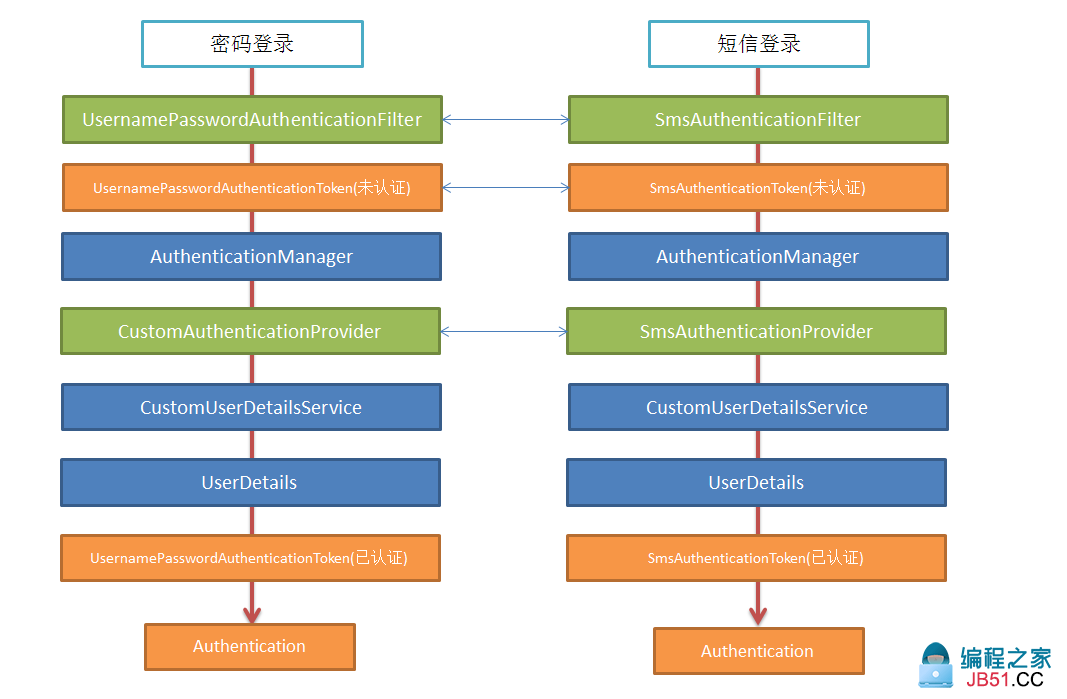
类比标准登录流程:
① 登录请求 [POST /login] 在 UsernamePasswordAuthenticationFilter 过滤器中封装未认证的 UsernamePasswordAuthenticationToken;
短信登录时,请求 [POST /authentication/mobile] 进行登录认证,自定义 SmsAuthenticationFilter 短信认证过滤器,生成未认证的 SmsAuthenticationToken;
② 调用 AuthenticationManager 进行认证;
③ 认证时,使用自定义的 CustomAuthenticationProvider 进行用户信息认证;短信登录则自定义短信认证器 SmsAuthenticationProvider ;
④ 认证器使用自定义的 CustomUserDetailsService 来获取用户信息;
⑤ 认证成功后,生成已认证的 UsernamePasswordAuthenticationToken;短信登录时则生成已认证的 SmsAuthenticationToken;
2、代码实现
① 短信登录专用 Authentication
参照 UsernamePasswordAuthenticationToken,两个构造方法,认证前,放入手机号;认证成功之后,放入用户信息。
 com.lyyzoo.sunny.security.sms;
 org.springframework.security.authentication.AbstractAuthenticationToken;
 * 短信认证用到的 Authentication,封装登录信息。 认证前,放入手机号;认证成功之后,放入用户信息。
 * <p>
 * 参考 {@link UsernamePasswordAuthenticationToken}
 bojiangzhou 2018/09/22
15  class SmsAuthenticationToken  AbstractAuthenticationToken {
 手机号
19     final Object principal;
21      SmsAuthenticationToken(Object principal) {
22         super(23         this.principal = principal;
24         setAuthenticated(public SmsAuthenticationToken(Object principal,Collection<? (authorities);
30         super.setAuthenticated(34      Object getCredentials() {
35         37
 Object getPrincipal() {
this.principal;
42     void setAuthenticated(boolean isAuthenticated)  IllegalArgumentException {
43          (isAuthenticated) {
44              IllegalArgumentException(
45                             "Cannot set this token to trusted - use constructor which takes a GrantedAuthority list instead"49
51      eraseCredentials() {
52         .eraseCredentials();
54 }
② 短信登录认证过滤器
参照 UsernamePasswordAuthenticationFilter,注意在构造方法中配置短信登录的地址 [POST /authentication/mobile],只有与这个地址匹配的才会进入这个过滤器。
同时,定义 SmsAuthenticationDetails 封装用户输入的手机验证码,在认证器里校验验证码正确性。
 org.springframework.security.web.authentication.AbstractAuthenticationProcessingFilter;
 org.springframework.security.web.authentication.UsernamePasswordAuthenticationFilter;
 org.springframework.security.web.util.matcher.AntPathRequestMatcher;
 org.springframework.util.Assert;
 * 短信登录认证过滤器
 UsernamePasswordAuthenticationFilter}
20  class SmsAuthenticationFilter  AbstractAuthenticationProcessingFilter {
23     final String SUNNY_SMS_MOBILE_KEY = "mobile"private String mobileParameter = SUNNY_SMS_MOBILE_KEY;
boolean postOnly =      * 仅匹配 [POST /authentication/mobile]
30       SmsAuthenticationFilter() {
32         new AntPathRequestMatcher("/authentication/mobile","POST" Authentication attemptAuthentication(HttpServletRequest request,1)">36                                                 HttpServletResponse response) if (postOnly && !request.getMethod().equals("POST")) {
38              AuthenticationServiceException(
39                     "Authentication method not supported: " + request.getMethod());
41         String mobile = obtainMobile(request);
42
if (mobile == 44             mobile = ""45 47         mobile = mobile.trim();
48
49         SmsAuthenticationToken authRequest =  SmsAuthenticationToken(mobile);
50
51          Allow subclasses to set the "details" property
        setDetails(request,authRequest);
53
54         .getAuthenticationManager().authenticate(authRequest);
56
protected String obtainMobile(HttpServletRequest request) {
 request.getParameter(mobileParameter);
60
61      setDetails(HttpServletRequest request,SmsAuthenticationToken authRequest) {
62         authRequest.setDetails(authenticationDetailsSource.buildDetails(request));
64
65      setMobileParameter(String mobileParameter) {
66         Assert.hasText(mobileParameter,"Mobile parameter must not be empty or null"67         this.mobileParameter = mobileParameter;
70     void setPostOnly( postOnly) {
71         this.postOnly = postOnly;
73
74      String getMobileParameter() {
75         77
78 }
③ 短信登录认证器
参考 DaoAuthenticationProvider,覆盖父类的 authenticate 方法,根据手机号获取用户信息,校验用户输入的验证码是否正确。
覆盖 supports 方法,只有 {@link SmsAuthenticationToken} 类型才使用该认证器,ProviderManager 里将会调用该方法寻找合适的认证器来认证。
 com.lyyzoo.sunny.captcha.CaptchaMessageHelper;
  4  com.lyyzoo.sunny.security.exception.CaptchaException;
  7  org.slf4j.Logger;
 org.slf4j.LoggerFactory;
 org.springframework.security.authentication.AuthenticationProvider;
 12  org.springframework.security.authentication.dao.DaoAuthenticationProvider;
 14  15  org.springframework.security.core.authority.mapping.GrantedAuthoritiesMapper;
 16  org.springframework.security.core.authority.mapping.NullAuthoritiesMapper;
 17  18  19  20
 21  22  * 短信登录认证器
 23  AbstractUserDetailsAuthenticationProvider},{ DaoAuthenticationProvider}
 25  26  27  class SmsAuthenticationProvider  AuthenticationProvider {
 29     final Logger LOGGER = LoggerFactory.getLogger(SmsAuthenticationProvider. 30
 31      UserDetailsService userDetailsService;
 32
 33     private GrantedAuthoritiesMapper authoritiesMapper =  NullAuthoritiesMapper();
 34
 CaptchaMessageHelper captchaMessageHelper;
 36
 37      SmsAuthenticationProvider(UserDetailsService userDetailsService,CaptchaMessageHelper captchaMessageHelper) {
 38         this.userDetailsService = userDetailsService;
this.captchaMessageHelper = captchaMessageHelper;
 40  41
 42  43     public Authentication authenticate(Authentication authentication)  44         Assert.isInstanceOf(SmsAuthenticationToken. 45                         "Only SmsAuthenticationToken is supported" 46
 47         String mobile = (authentication.getPrincipal() == null) ? "NONE_PROVIDED" : authentication.getName();
 48
 49         UserDetails user = retrieveUser(mobile,(SmsAuthenticationToken) authentication);
 50         Assert.notNull(user,"retrieveUser returned null - a violation of the interface contract" 51
 52         additionalAuthenticationChecks(user,1)"> 53
 54          createSuccessAuthentication(user,user);
 55  56
 57      UserDetails retrieveUser(String mobile,SmsAuthenticationToken authentication)
 58                      60          getUserDetailsService().loadUserByUsername(mobile);
 61  62
 63      additionalAuthenticationChecks(UserDetails userDetails,1)"> 64                      65         Assert.isInstanceOf(SmsAuthenticationDetails. 66         SmsAuthenticationDetails details = (SmsAuthenticationDetails) authentication.getDetails();
 67         String mobile = (authentication.getPrincipal() ==  68          69         String inputCaptcha = 70         String captchaKey = details.getCaptchaKey();
 71          (StringUtils.isAnyEmpty(inputCaptcha,captchaKey)) {
 72             new CaptchaException("login.mobile-captcha.null" 73  74         CaptchaResult captchaResult = captchaMessageHelper.checkCaptcha(captchaKey,inputCaptcha,mobile,1)"> 75                         SecurityConstants.SECURITY_KEY,1)"> 76         authentication.setDetails( 77
captchaResult.isSuccess()) {
 79              CaptchaException(captchaResult.getMessage());
 80  Authentication createSuccessAuthentication(Object principal,Authentication authentication,1)"> 84                     UserDetails user) {
 85         SmsAuthenticationToken result =
 86                          SmsAuthenticationToken(principal,authoritiesMapper.mapAuthorities(user.getAuthorities()));
 87         result.setDetails(authentication.getDetails());
 88
 89          90  91
 93      * 只有 { SmsAuthenticationToken} 类型才使用该认证器
 94       96     boolean supports(Class<?> authentication) {
 97         return (SmsAuthenticationToken..isAssignableFrom(authentication));
 99
100      UserDetailsService getUserDetailsService() {
101         102 103
104      setUserDetailsService(UserDetailsService userDetailsService) {
108      CaptchaMessageHelper getCaptchaMessageHelper() {
109         110 111
112      setCaptchaMessageHelper(CaptchaMessageHelper captchaMessageHelper) {
113         114 115
116 }
3、短信登录配置
短信登录的配置可以参考表单登录的配置 FormLoginConfigurer,在使用 formLogin() 时就会启用该配置。
定义 SmsLoginConfigurer,创建短信登录配置时,创建短信认证过滤器,在 configure 中配置该过滤器的认证成功/失败处理器。最重要的一点,将短信认证过滤器加到 UsernamePasswordAuthenticationFilter 之后。
 org.springframework.security.authentication.AuthenticationManager;
 org.springframework.security.config.annotation.SecurityConfigurerAdapter;
 org.springframework.security.web.DefaultSecurityFilterChain;
 org.springframework.security.web.authentication.AuthenticationSuccessHandler;
 org.springframework.security.web.util.matcher.RequestMatcher;
 * 短信登录配置
 bojiangzhou 2018/09/23
 SmsLoginConfigurer
24         extends SecurityConfigurerAdapter<DefaultSecurityFilterChain,HttpSecurity>final String SMS_DEFAULT_LOGIN_PROCESS_URL = "/authentication/mobile" SmsAuthenticationFilter authFilter;
private AuthenticationDetailsSource<HttpServletRequest,?> authenticationDetailsSource;
private AuthenticationSuccessHandler successHandler =  SavedRequestAwareAuthenticationSuccessHandler();
 AuthenticationFailureHandler failureHandler;
     * 默认手机+短信验证码 登录处理地址 [POST "/authentication/mobile"]. 默认手机参数 - mobile
38      39      SmsLoginConfigurer() {
40         authFilter =  SmsAuthenticationFilter();
        loginProcessingUrl(SMS_DEFAULT_LOGIN_PROCESS_URL);
42         mobileParameter("mobile"43  SmsLoginConfigurer mobileParameter(String mobileParameter) {
        authFilter.setMobileParameter(mobileParameter);
50      SmsLoginConfigurer loginProcessingUrl(String loginProcessingUrl) {
        authFilter.setRequiresAuthenticationRequestMatcher(createLoginProcessingUrlMatcher(loginProcessingUrl));
55      SmsLoginConfigurer authenticationDetailsSource(
56                     AuthenticationDetailsSource<HttpServletRequest,1)"> authenticationDetailsSource) {
57         this.authenticationDetailsSource = SmsLoginConfigurer successHandler(AuthenticationSuccessHandler successHandler) {
62         this.successHandler = successHandler;
63         64 65
66      SmsLoginConfigurer failureHandler(AuthenticationFailureHandler failureHandler) {
this.failureHandler = failureHandler;
68         70
 RequestMatcher createLoginProcessingUrlMatcher(String loginProcessingUrl) {
new AntPathRequestMatcher(loginProcessingUrl,1)">75 77         Assert.notNull(successHandler,"successHandler should not be null."78         Assert.notNull(failureHandler,"failureHandler should not be null."79         authFilter.setAuthenticationManager(http.getSharedObject(AuthenticationManager.80         authFilter.setAuthenticationSuccessHandler(successHandler);
        authFilter.setAuthenticationFailureHandler(failureHandler);
if (authenticationDetailsSource !=             authFilter.setAuthenticationDetailsSource(authenticationDetailsSource);
84  将短信认证过滤器加到 UsernamePasswordAuthenticationFilter 之后
86         http.addFilterAfter(authFilter,UsernamePasswordAuthenticationFilter.87 88
89 }
之后,需要在 WebSecurityConfigurerAdapter 中调用 HttpSecurity.apply() 应用该配置。
 org.springframework.boot.autoconfigure.condition.ConditionalOnProperty;
 12
 com.lyyzoo.sunny.security.sms.SmsAuthenticationDetailsSource;
 com.lyyzoo.sunny.security.sms.SmsAuthenticationFailureHandler;
 com.lyyzoo.sunny.security.sms.SmsAuthenticationProvider;
 com.lyyzoo.sunny.security.sms.SmsLoginConfigurer;
 20  24   26 @EnableConfigurationProperties(SecurityProperties. 27  28
 29  31  32      33  34      35  36      37  38      39  40      CustomUserDetailsService userDetailsService;
 42      43
 45     @SuppressWarnings("unchecked" 46      47  48  49             .antMatchers("/static/**","/favicon.ico","/authentication/**","/*.html" 50             .permitAll()  51             .and()  53  54             .authenticated()  56             .formLogin()  57             .loginPage(properties.getLoginPage())  58             .defaultSuccessUrl("/index")  59             .authenticationProvider(authenticationProvider)
 64  67
 (properties.isEnableSmsLogin()) {
 69              配置短信登录
 70             SmsLoginConfigurer smsLoginConfigurer =  SmsLoginConfigurer();
 71             smsLoginConfigurer
 72                     .authenticationDetailsSource(smsAuthenticationDetailsSource())
                    .successHandler(authenticationSuccessHandler)
 74                     .failureHandler(smsAuthenticationFailureHandler())
 75             ;
 76             http.apply(smsLoginConfigurer);
 77             http.authenticationProvider(smsAuthenticationProvider());
 78  79  80
 81      82  83       85      86          90     @ConditionalOnProperty(prefix = SecurityProperties.PREFIX,name = "enable-sms-login",havingValue = "true" 91                 matchIfMissing =  SmsAuthenticationFailureHandler smsAuthenticationFailureHandler() {
 SmsAuthenticationFailureHandler();
 94  95
 96  97     @ConditionalOnProperty(prefix = SecurityProperties.PREFIX,1)"> 98             matchIfMissing =  99      SmsAuthenticationDetailsSource smsAuthenticationDetailsSource() {
100          SmsAuthenticationDetailsSource();
103 104     @ConditionalOnProperty(prefix = SecurityProperties.PREFIX,1)">105             matchIfMissing = 106      SmsAuthenticationProvider smsAuthenticationProvider() {
107          SmsAuthenticationProvider(userDetailsService,captchaMessageHelper);
109
110 }
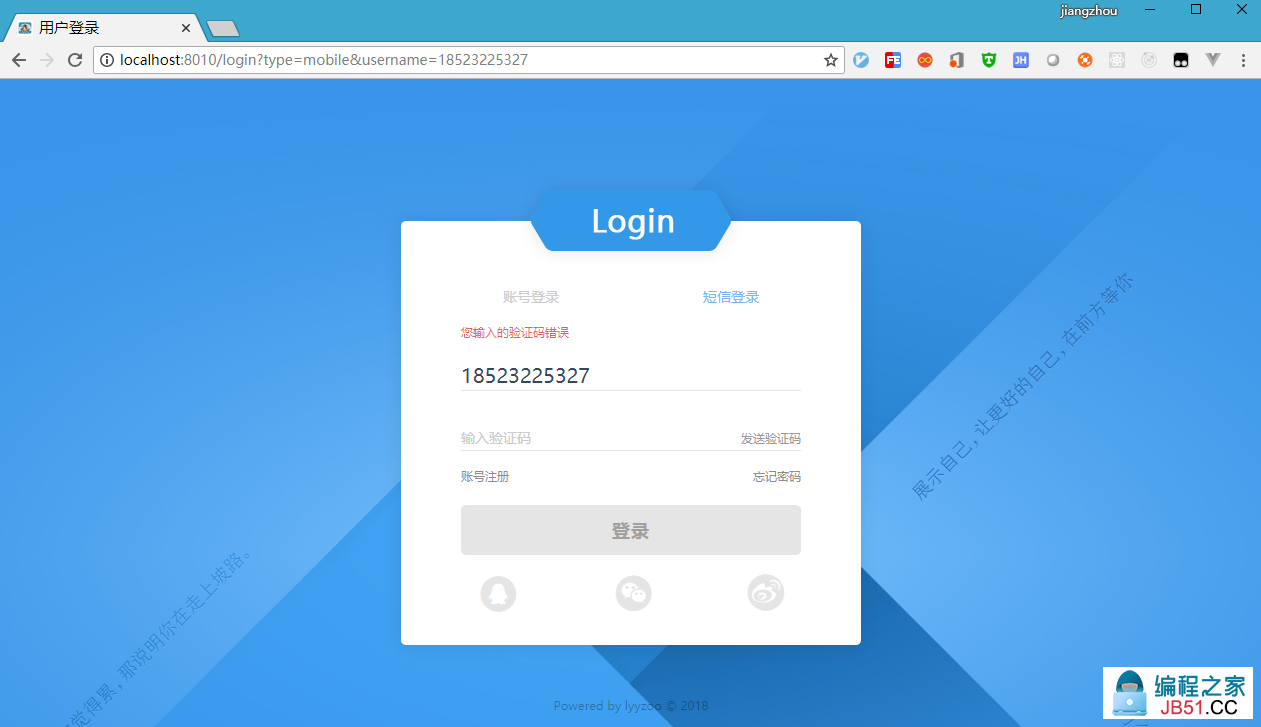
短信登录页面:
四、三方QQ登录
1、OAuth协议
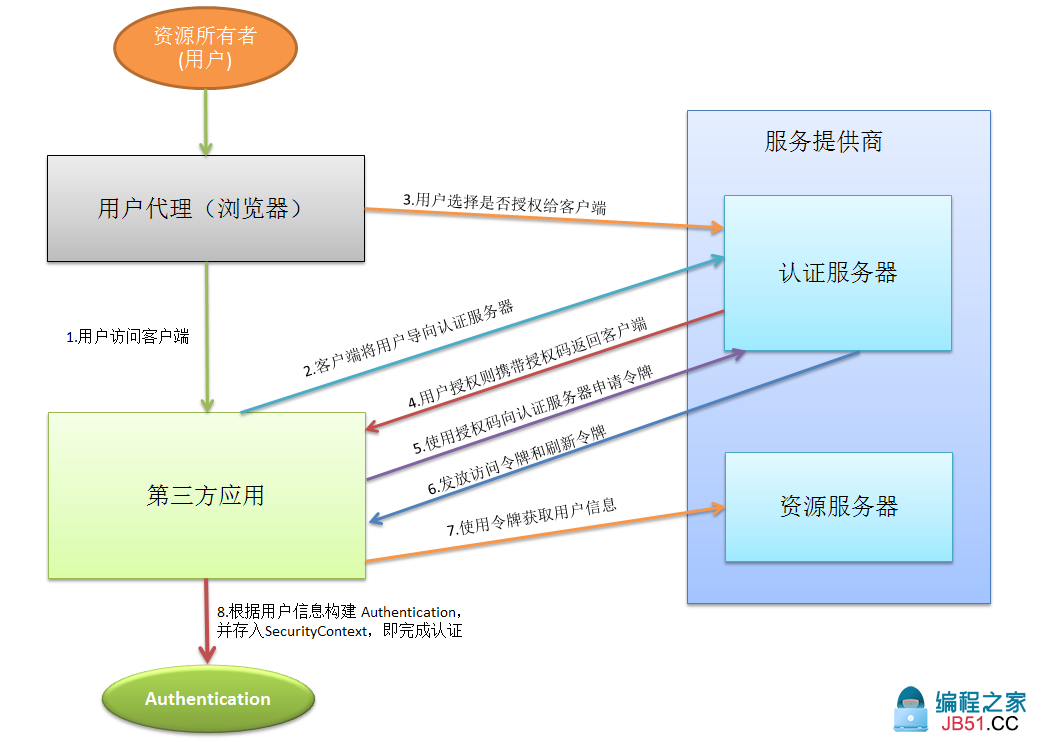
OAuth 是一个授权协议,它的目的是让用户不用给客户端应用提供服务提供商(如QQ、微信)的账号和密码的情况下,让客户端应用可以有权限去访问用户在服务提供商的资源。
关于 OAuth 介绍建议直接看《阮一峰 - 理解OAuth 2.0》,深入浅出,容易理解,这里就不赘述了。我这里主要看下源码及流程实现。
OAuth协议中的各种角色:
服务提供商(Provider):谁提供令牌谁就是服务提供商,比如微信、QQ。
资源所有者(Resource Owner):即用户,我们要获取的即用户的资源。
第三方应用(Client):指获取授权的应用,一般就是我们自己开发的应用。
认证服务器(Authorization Server):即服务提供商专门用来处理认证的服务器,认证用户的身份并产生令牌。
资源服务器(Resource Server):即服务提供商存放用户生成的资源的服务器。认证服务器和资源服务器虽然是两个角色,但他们一般也可以在同一个应用,同一台机器上。
各种角色联系在一起构成 OAuth 的认证流程(授权码模式):
2、Spring Social
spring social 将 OAuth 认证的整个流程封装并实现,它已经提供了对主流社交网站的支持,只需要简单配置即可。针对上面的流程,来看下spring social 相关源码。
在 pom 中引入 spring-social 的依赖,版本使用 2.0.0.M4:
 1 <dependency>
 2     <groupId>org.springframework.social</groupId>
 3     <artifactId>spring-social-core</artifactId>
 4 </dependency>
 5 <dependency>
 6     <groupId>org.springframework.social</groupId>
 7     <artifactId>spring-social-config</artifactId>
 8 </dependency>
 9 <dependency>
10     <groupId>org.springframework.social</groupId>
11     <artifactId>spring-social-security</artifactId>
12 </dependency>
13 <dependency>
14     <groupId>org.springframework.social</groupId>
15     <artifactId>spring-social-web</artifactId>
16 </dependency>
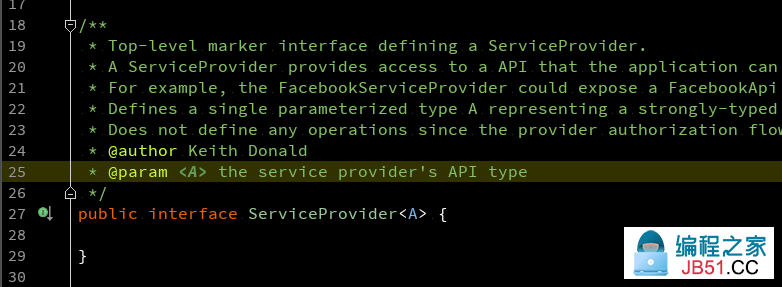
① 首先是服务提供商,对应 ServiceProvider ,这是一个顶层的接口定义。默认使用 AbstractOAuth2ServiceProvider。
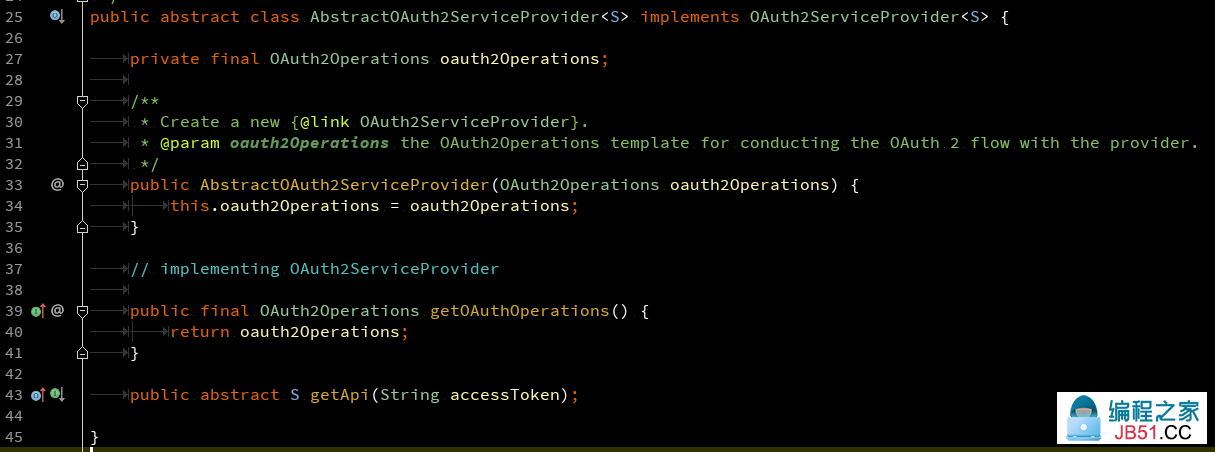
② 从 AbstractOAuth2ServiceProvider 不难看出,需要提供 OAuth2Operations,OAuth2Operations 接口封装了 OAuth2 认证的整个标准流程,默认实现为 OAuth2Template。

③ AbstractOAuth2ServiceProvider 还需要提供一个 Api 接口,因为每个服务提供商返回的用户信息都是有差别的,这需要我们自己定义相关接口来获取用户信息。
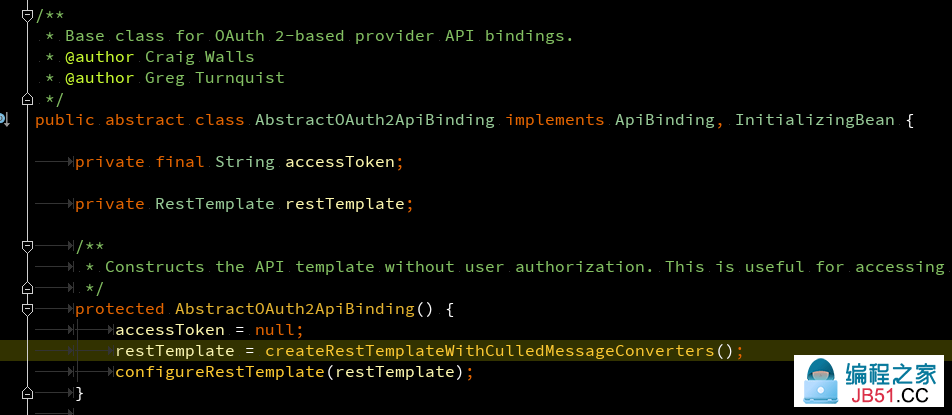
spring social 提供了一个默认的抽象类 AbstractOAuth2ApiBinding,从其定义可以看出我们可以使用第6步中获取的服务提供商的令牌,使用 RestTemplate 发送请求来获取数据。
④ 使用 Api 获取到用户信息后,就需要使用 Connection 来封装用户信息,默认实现为 OAuth2Connection。
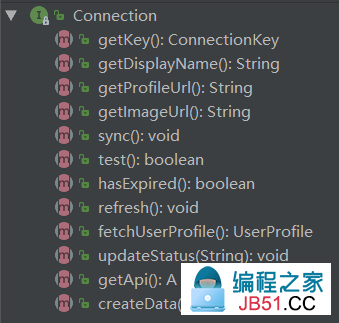
⑤ Connection 又是由 ConnectionFactory 创建出来的,默认使用 OAuth2ConnectionFactory。
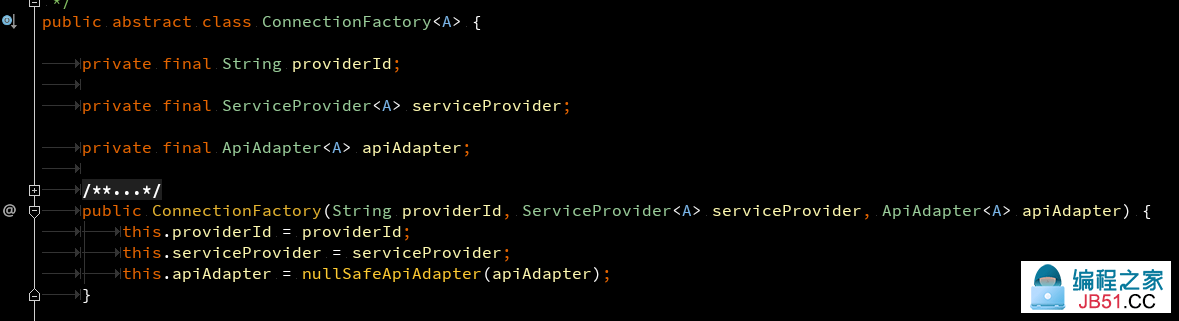
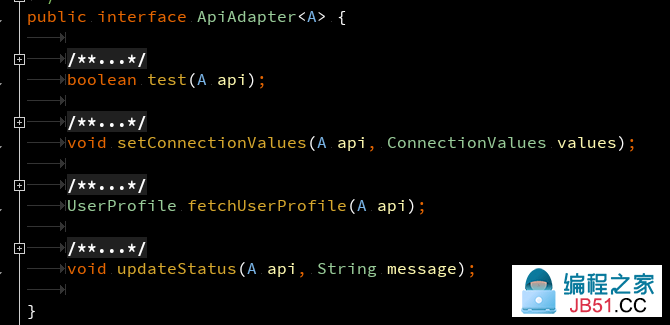
⑥ ConnectionFactory 又需要 ServiceProvider 和 ApiAdapter:ServiceProvider 用来走认证流程,获取用户信息;ApiAdapter 则用来适配不同服务提供商返回来的用户数据,将其转换成标准的 Connection。最终,ConnectionFactory 就可以构建出 Connection。
⑦ 获取到三方应用的用户信息后,就需要和客户端应用的用户进行关联,获取客户端应用中用户的接口即为 UsersConnectionRepository。

3、流程分析
Social 认证是通过向 spring security 过滤器链加入 SocialAuthenticationFilter 过滤器来完成的,通过这个过滤器来了解下 spring-social 的认证流程。
① 通过判断是否需要认证的方法 requiresAuthentication 可以看出,认证的地址必须是 **/{filterProcessesUrl}/{providerId} 的形式,比如 www.lyyzoo.com/auth/qq。这里的 qq 即为 providerId,auth 为过滤器处理地址 filterProcessesUrl,这个值默认为 auth。

② 再看看认证的方法 attemptAuthentication,首先会检测用户是否拒绝授权,如果用户拒绝授权则直接抛出异常。然后获取 providerId 及对应的认证服务类,用于处理认证。认证失败,则重定向到一个地址去。

通过 detectRejection 可以看出,我们在请求登录时,不要随意设置参数,否则会被错误认为是用户拒绝授权的。

③ 认证方法中,从注释也可以了解到,第一次请求时,会抛出 AuthenticationRedirectException 异常,重定向到服务提供商的认证地址去。用户确认授权后,重定向回来时,就是第二次请求,就会拿着授权码去服务提供商那获取令牌。
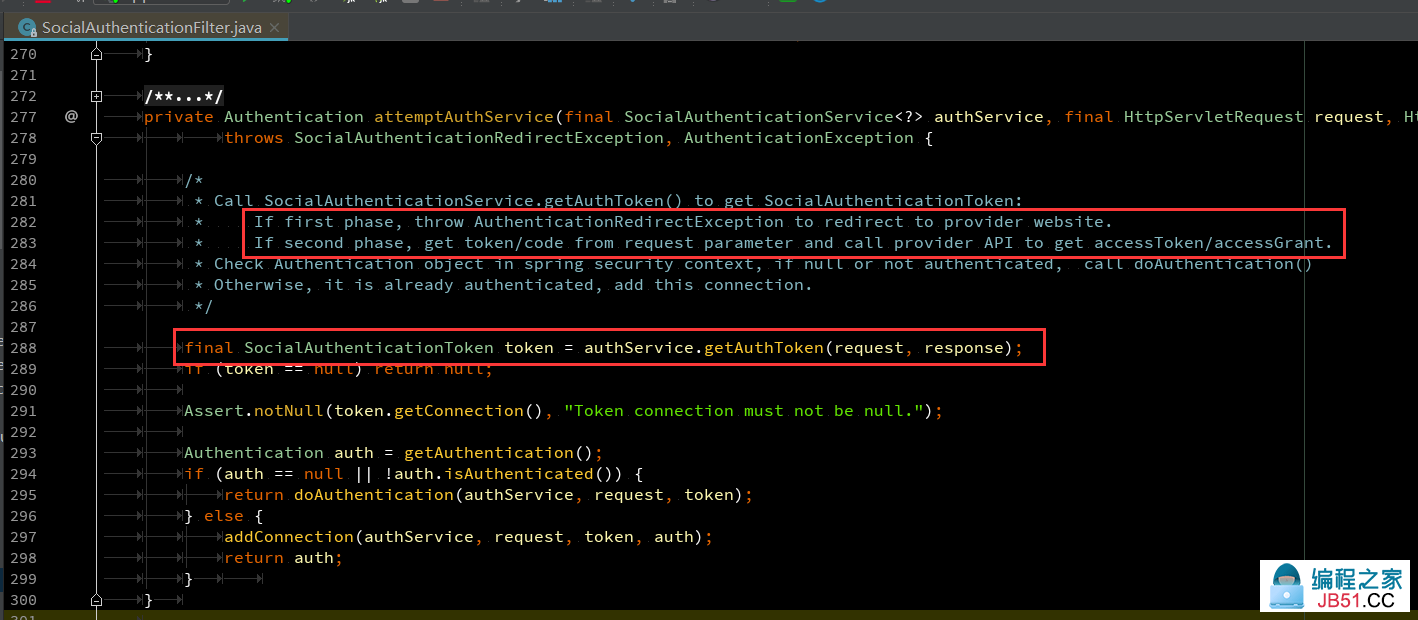
在获取 SocialAuthenticationToken 的方法中可以看到,如果请求的参数中没有 code(授权码),则重定向到服务提供商那。通过 buildReturnToUrl 和 buildAuthenticateUrl 可以看出,会自动帮我们构造回调地址以及重定向到认证服务器的地址。
buildReturnToUrl 会构造回调地址,所以本地测试要使用域名访问,可以在 hosts 中配置域名映射。否则你访问 localhost 是重定向不回来的,而且域名必须与QQ互联上配置的域名保持一致。
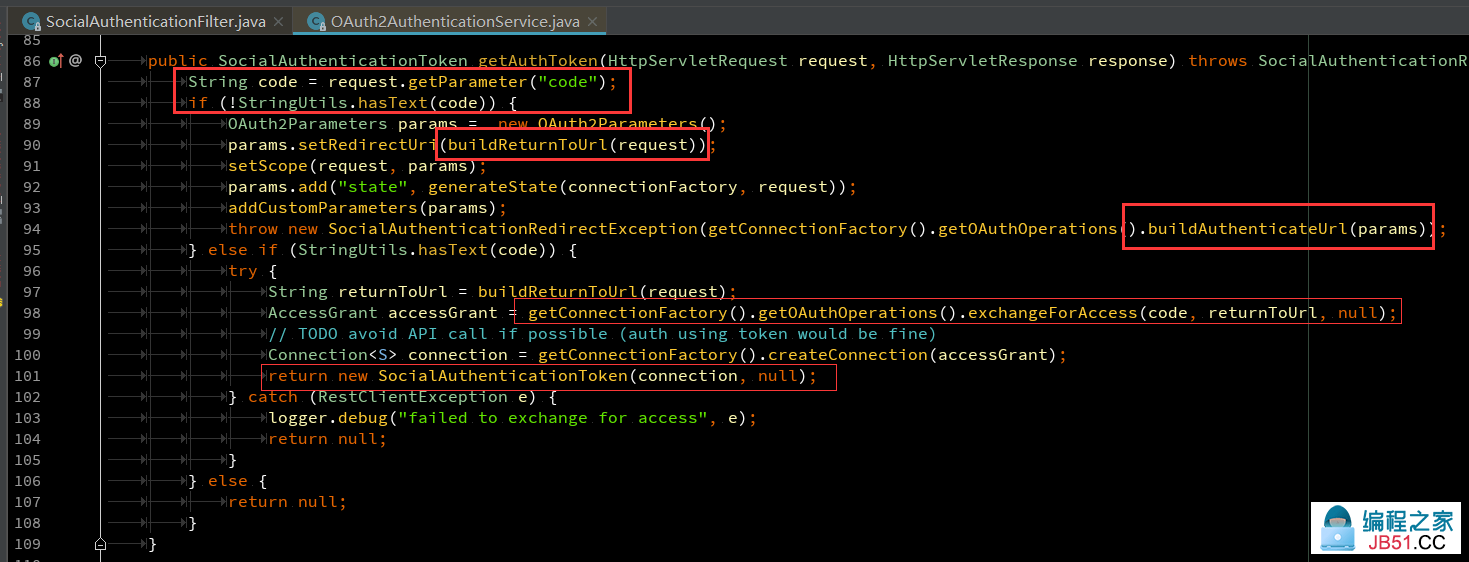
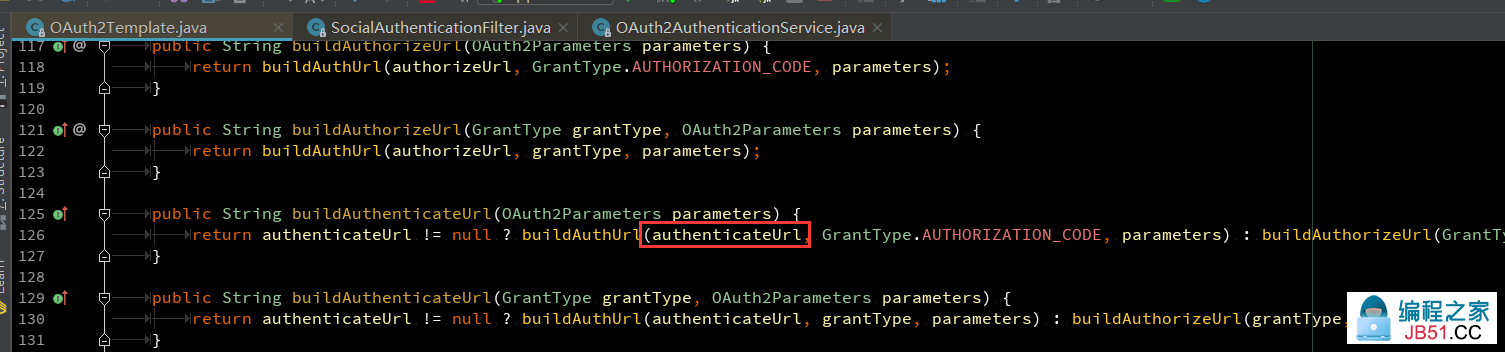
buildAuthenticateUrl 会构造服务提供商的认证地址,会自动帮我们把 redirect_uri、state 等参数拼接上,在创建 OAuth2Template 时我们提供一个基础地址即可。
④ 第二次请求时,有了授权码,则会用授权码去获取令牌 AccessGrant 用于构造 Connection,最终构造 SocialAuthenticationToken(注意此时的 SocialAuthenticationToken 是未认证的) 。
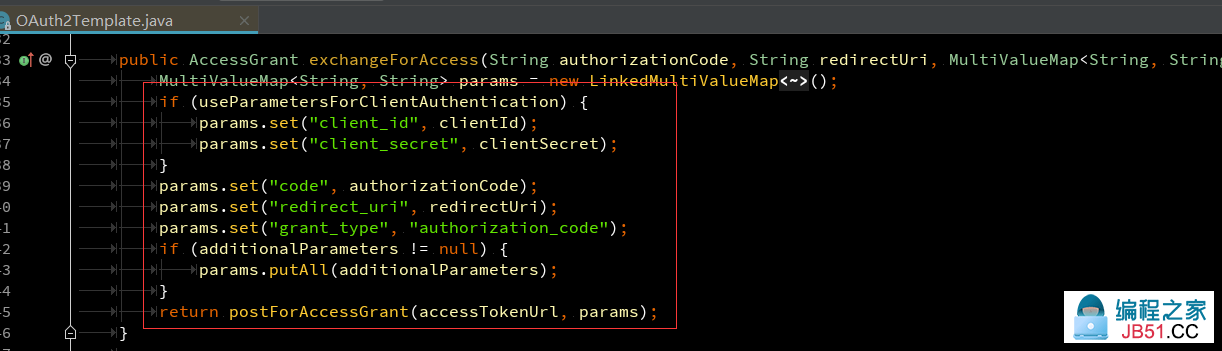
通过 exchangeForAccess 方法,可以发现,会自动帮我们带上获取令牌的参数,如果要带上 client_id、client_secret 需配置 useParametersForClientAuthentication=true。
获取到令牌后会自动帮我们将令牌封装到 AccessGrant 里,默认返回的数据结构为 Map,所以如果服务提供商返回令牌信息时不是 Map 结构的还需定制化处理。


⑤ 创建好 AccessGrant 后,通过 OAuth2ConnectionFactory 创建 Connection,实际是创建 OAuth2Connection 对象。initApi() 方法会获取 ServiceProvider 中配置的Api。

initKey() 用于生成服务提供商用户唯一的 key,根据 providerId 和 providerUserId(服务提供商的用户ID,即openId) 创建。而 providerUserId 则是通过 ApiAdapter 适配器来获取,这需要我们自行设置。


⑥ 获取到 SocialAuthenticationToken 后,相当于服务提供商那边认证完成,接着就会调用 doAuthentication 进行客户端用户认证。
与标准登录流程类似,同样可以自定义 AuthenticationDetailsSource;接着调用认证器进行认证,spring social 的认证器默认使用 SocialAuthenticationProvider 。
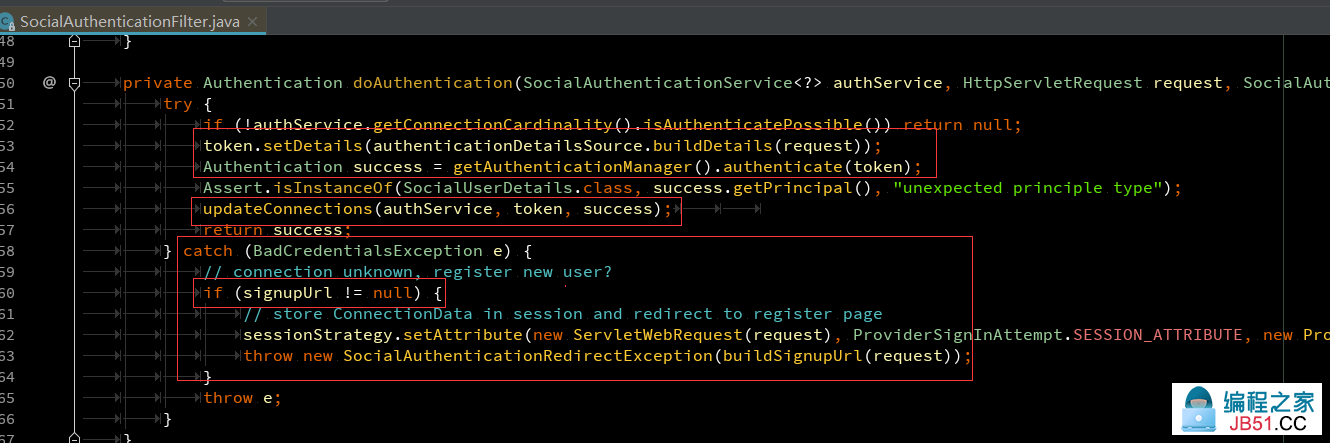
从其认证方法可以看出,将通过之前得到的 providerId 和 providerUserId 来获取 userId (客户端用户ID),这里 spring social 默认有一张表来存储 userId、providerId、providerUserId 之间的关系,可配置 JdbcUsersConnectionRepository 来维护对应的关系。
如果没有获取到对应的 userId,将抛出 BadCredentialsException,在 doAuthentication 里拦截到这个异常后,默认将重定向到 signupUrl 这个注册页面的地址,让用户先注册或绑定三方账号。signupUrl 默认为 "/signup"。
获取到对应的 userId后,就根据 userId 查询用户信息,这需要我们自定义 SocialUserDetailsService 及 SocialUserDetails。获取到用户后,就会创建已认证的 SocialAuthenticationToken。

⑦ 通过 toUserId() 可以发现,根据 Connection 查找系统 userId 时,JdbcUsersConnectionRepository 默认的处理方式是:如果未查询到关联的 userId,可以自定义一个 ConnectionSignUp 用于注册用户并返回一个 userId,并且会调用 addConnection 添加关联。所以对于用户如果未注册,使用三方账号扫码自动注册用户的需求,就可以使用这种方式实现。

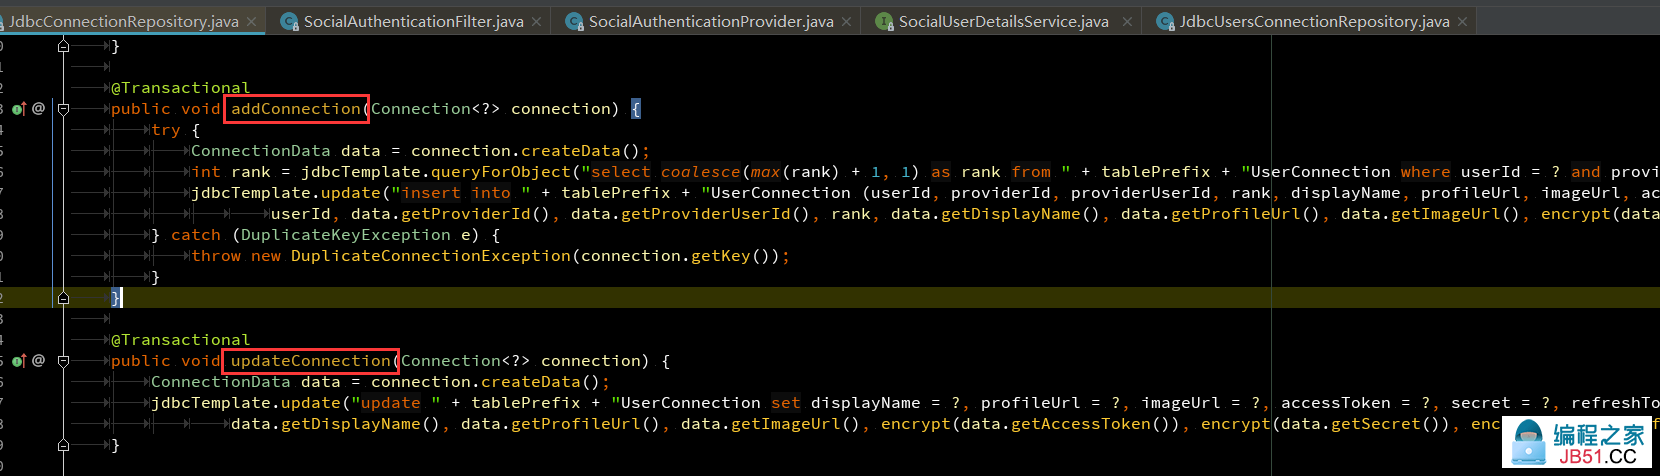
⑧ 客户端这边认证成功后,就会通过 updateConnections 或 addConnection 将用户的 access_token、refresh_token、secret、用户和服务商的关联 等更新到数据库。
4、QQ登录准备工作
① 社交登录必须要有一个外网能访问的域名,所以首先需要自己申请一个域名,然后备案,再将域名指向一台可访问的服务器,将服务部署到这台服务器上。推荐在阿里云上完成这一整套的配置,就不在这里细说了。
② 到 [QQ互联] 上申请成为开发者,然后通过创建应用获取QQ的appId和appKey。

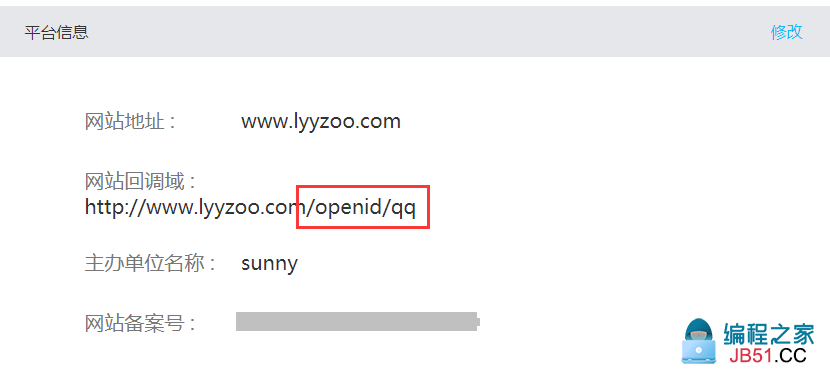
在创建应用时,网站地址 填写公网可访问的域名即可;网站回调域 即请求QQ后回调的地址,这个后面再做详细说明。
③ 获取授权码地址
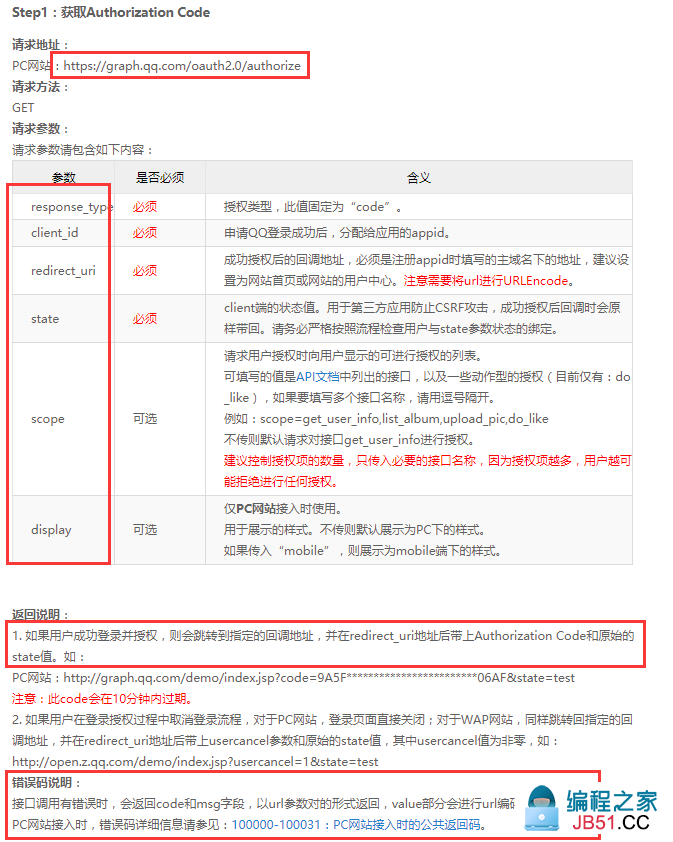
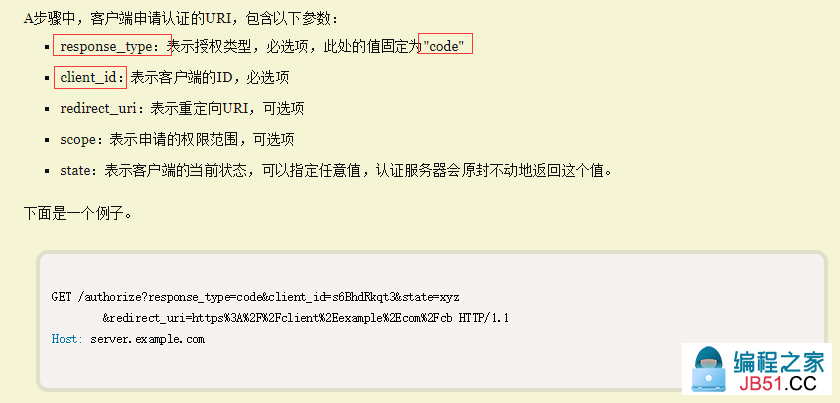
参考QQ互联 使用Authorization_Code获取Access_Token 可以得知获取授权码的地址:[https://graph.qq.com/oauth2.0/authorize],注意请求的参数有 response_type、client_id、redirect_uri、state 等。
client_id 即你申请的 appId,redirect_uri 即网站回调域。
认证的时候,用户成功授权,则会跳转到指定的回调地址,即参数 <redirect_uri>,也即创建应用时填写的 <网站回调域>,这二者必须保持一致,否则会提示重定向地址非法。
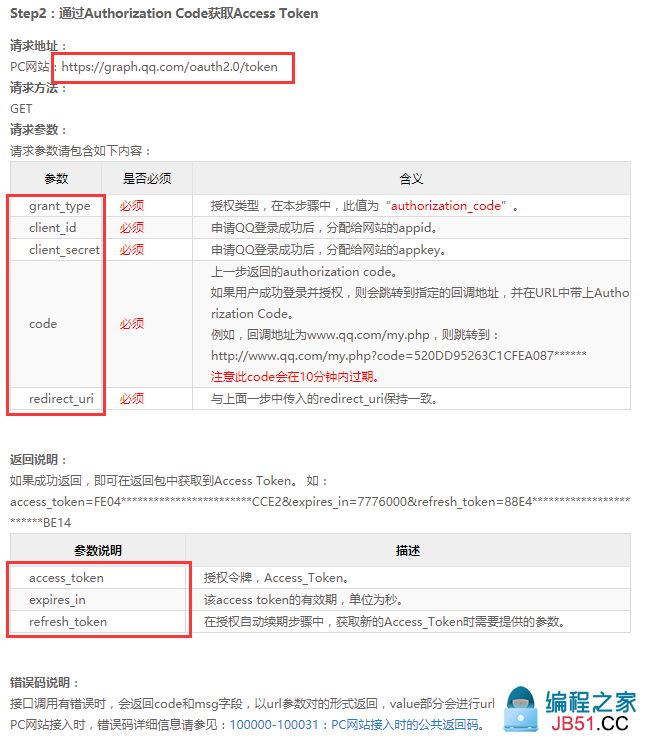
④ 获取令牌地址
可以得到授权码地址 [https://graph.qq.com/oauth2.0/token] ,注意 grant_type、client_id、client_secret、code、redirect_uri 这些必须参数。
client_id 即 appId,client_secret 即 appKey,code 为获取的授权码。
⑤ QQ访问用户资料API
QQ互联上提供了如下的一些API,其中访问用户资料的API是不需要申请的。[QQ互联API列表]
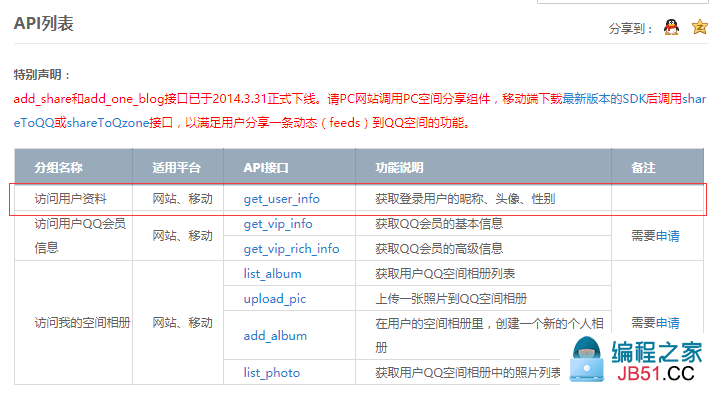
从文档中可以得到访问用户资料的地址:[ https://graph.qq.com/user/get_user_info ]

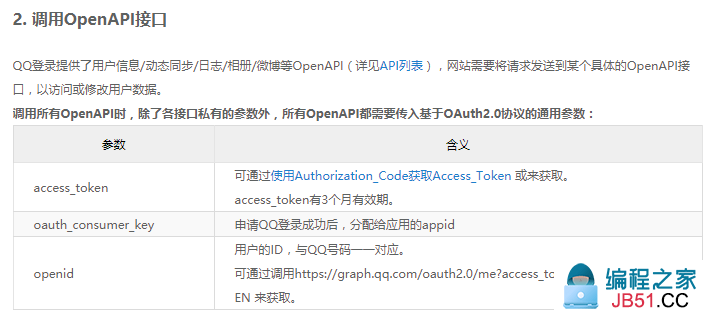
而要调用这个接口则必须带上获取的令牌(access_token),客户端应用申请的 appId,以及 openId,即用户的QQ号,可以使用 [ https://graph.qq.com/oauth2.0/me?access_token=YOUR_ACCESS_TOKEN ] 地址来获取QQ号。
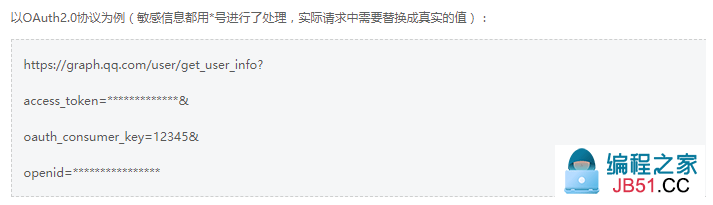
使用 [ https://graph.qq.com/user/get_user_info?access_token=YOUR_ACCESS_TOKEN&oauth_consumer_key=YOUR_APP_ID&openid=YOUR_OPENID ] 地址来获取用户资料。
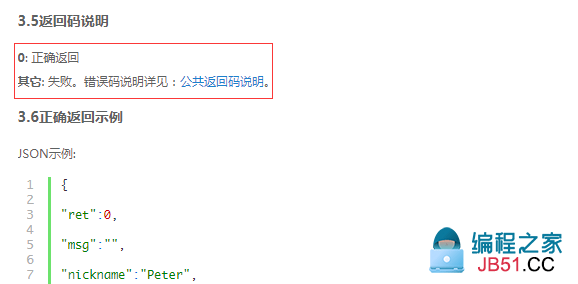
返回参数,这些参数将封装到特定的 UserInfo 中。
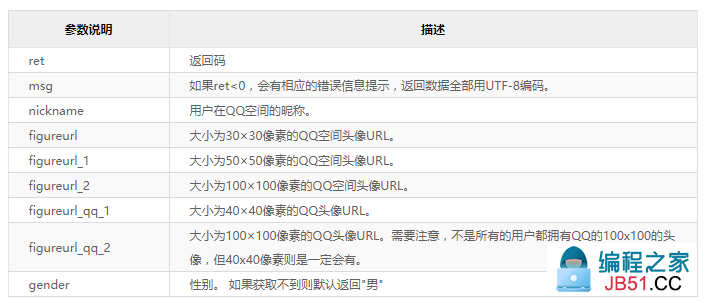
最后,通过返回码来判断是成功还是失败。
5、QQ登录实现
从 SpringSocial 的源码分析中可以得知,我们主要目的就是获取服务提供商的用户信息,用户信息则封装到 Connection 中,想要获得 Connection 就需要 ConnectionFactory,想要构造一个 ConnectionFactory 就需要 ServiceProvider 和 ApiAdapter,ServiceProvider 又需要 OAuth2Operations 和 Api。下面来一步步实现获取QQ用户资料从而登录的流程。
① 构建 Api
首先根据获取QQ用户信息的接口封装QQ用户信息以及QQApi接口。
 com.lyyzoo.sunny.security.social.qq.api;
 com.fasterxml.jackson.annotation.JsonIgnoreProperties;
 * QQ 用户信息
 bojiangzhou 2018/10/16
 9  10 @JsonIgnoreProperties(ignoreUnknown =  QQUser {
13      String ret;
15      String msg;
17      String openId;
 String figureurl;
 String gender;
getter setter
26 }
 * QQ API
 7  interface QQApi {
10          * 获取QQ用户信息
12          QQUser getQQUser();
15 }
提供 Api 默认实现,继承 AbstractOAuth2ApiBinding,用户信息api需要参数 appId 及 openId,而想要获取 openId 就要使用 access_token 获取用户 openId。
 org.springframework.social.oauth2.AbstractOAuth2ApiBinding;
 org.springframework.social.oauth2.TokenStrategy;
10
 com.fasterxml.jackson.databind.ObjectMapper;
 com.lyyzoo.sunny.core.exception.CommonException;
 com.lyyzoo.sunny.security.social.exception.ProviderUserNotFoundException;
 * QQ API 默认实现,继承 { AbstractOAuth2ApiBinding}。
 * 由于 Api 会使用得到的令牌来获取信息,每个用户的令牌是不同的,所以该类不是一个单例对象,每次访问 Api 都需要新建实例。
class DefaultQQApi extends AbstractOAuth2ApiBinding final Logger LOGGER = LoggerFactory.getLogger(DefaultQQApi.     * QQ 获取 openId 的地址
27      final String URL_GET_OPEN_ID = "https://graph.qq.com/oauth2.0/me?access_token={accessToken}"     * QQ 获取用户信息的地址
31      final String URL_GET_USER_INFO = "https://graph.qq.com/user/get_user_info?oauth_consumer_key={appId}&openid={openId}"     * 客户端 appId
36       String appId;
     * openId
40      private ObjectMapper mapper =  ObjectMapper();
 DefaultQQApi(String accessToken,String appId) {
46         (accessToken,TokenStrategy.ACCESS_TOKEN_PARAMETER);
this.appId = appId;
this.openId = getOpenId(accessToken);
 QQUser getQQUser() {
53         String result = getRestTemplate().getForObject(URL_GET_USER_INFO,String.55         QQUser user = try57             user = mapper.readValue(result,QQUser.58         } catch (IOException e) {
59             LOGGER.error("parse qq UserInfo error."new ProviderUserNotFoundException("login.provider.user.not-found"        user.setOpenId(openId);
 user;
68          * 获取用户 OpenId
70       String getOpenId(String accessToken) {
 返回结构:callback( {"client_id":"YOUR_APPID","openid":"YOUR_OPENID"} );
73         String openIdResult = getRestTemplate().getForObject(URL_GET_OPEN_ID,accessToken);
74         if (StringUtils.isBlank(openIdResult) || openIdResult.contains("code"75             new CommonException("获取QQ账号错误"77          解析 openId
78         String[] arr = StringUtils.substringBetween(openIdResult,"{","}").replace("\"","").split(","79         String openid = 80         for (String s : arr) {
81             if (s.contains("openid"82                 openid = s.split(":")[1];
 openid;
87 }
② 构建QQApiAdapter 适配器,在QQApi 与 Connection之间做适配。
 com.lyyzoo.sunny.security.social.qq.connection;
 com.lyyzoo.sunny.security.social.qq.api.QQApi;
 com.lyyzoo.sunny.security.social.qq.api.QQUser;
 org.springframework.social.connect.ApiAdapter;
 org.springframework.social.connect.ConnectionValues;
 org.springframework.social.connect.UserProfile;
 * QQApi 适配器
 bojiangzhou 2018/10/17
13  class QQApiAdapter implements ApiAdapter<QQApi>15
     * 测试Api连接是否可用
     *
     * @param api QQApi
20       test(QQApi api) {
     * QQApi 与 Connection 做适配
 values Connection
 setConnectionValues(QQApi api,ConnectionValues values) {
33         QQUser user = api.getQQUser();
        values.setDisplayName(user.getNickname());
        values.setImageUrl(user.getFigureurl());
        values.setProviderUserId(user.getOpenId());
 UserProfile fetchUserProfile(QQApi api) {
42         46      updateStatus(QQApi api,String message) {
49 }
③ 定制化 QQOAuth2Template,因为标准的 OAuth2Template 处理令牌时,要求返回的数据结构为 Map,而QQ返回的令牌是一个字符串,因此需要定制处理。
 org.springframework.http.converter.StringHttpMessageConverter;
 org.springframework.social.oauth2.AccessGrant;
 org.springframework.social.oauth2.OAuth2Template;
 org.springframework.util.MultiValueMap;
 org.springframework.web.client.RestClientException;
 org.springframework.web.client.RestTemplate;
 com.google.common.base.Charsets;
 * 定制 OAuth2Template
 bojiangzhou 2018/10/26
19  class QQOauth2Template  OAuth2Template {
final Logger LOGGER = LoggerFactory.getLogger(QQOauth2Template. QQOauth2Template(String clientId,String clientSecret,String authorizeUrl,String accessTokenUrl) {
25         (clientId,clientSecret,authorizeUrl,accessTokenUrl);
 设置带上 client_id、client_secret
27         setUseParametersForClientAuthentication(     * 解析 QQ 返回的令牌
32      protected AccessGrant postForAccessGrant(String accessTokenUrl,MultiValueMap<String,String> parameters) {
 返回格式:access_token=FE04********CCE2&expires_in=7776000&refresh_token=88E4***********BE14
36         String result = getRestTemplate().postForObject(accessTokenUrl,parameters,1)"> (StringUtils.isBlank(result)) {
new RestClientException("access token endpoint returned empty result"40         LOGGER.debug("==> get qq access_token: " + result);
41         String[] arr = StringUtils.split(result,"&"42         String accessToken = "",expireIn = "",refreshToken = ""if (s.contains("access_token"45                 accessToken = s.split("=")[146             } else if (s.contains("expires_in"47                 expireIn = s.split("=")[148             } if (s.contains("refresh_token"49                 refreshToken = s.split("=")[1return createAccessGrant(accessToken,1)">null,refreshToken,Long.valueOf(expireIn),1)">     * QQ 响应 ContentType=text/html;因此需要加入 text/html; 的处理器
57      59      RestTemplate createRestTemplate() {
60         RestTemplate restTemplate = .createRestTemplate();
61         restTemplate.getMessageConverters().add( StringHttpMessageConverter(Charsets.UTF_8));
 restTemplate;
64 }
④ 通过 QQOAuth2Template 和 QQApi 构造 QQServiceProvider,创建 OAuth2Template 时,需传入获取授权码的地址和获取令牌的地址。
 com.lyyzoo.sunny.security.social.qq.api.DefaultQQApi;
 org.springframework.social.oauth2.AbstractOAuth2ServiceProvider;
 6
 * QQ 服务提供商
11  class QQServiceProvider extends AbstractOAuth2ServiceProvider<QQApi>     * 获取授权码地址(引导用户跳转到这个地址上去授权)
15      final String URL_AUTHORIZE = "https://graph.qq.com/oauth2.0/authorize"     * 获取令牌地址
19      final String URL_GET_ACCESS_TOKEN = "https://graph.qq.com/oauth2.0/token" QQServiceProvider(String appId,String appSecret) {
 QQOauth2Template(appId,appSecret,URL_AUTHORIZE,URL_GET_ACCESS_TOKEN));
28
 QQApi getApi(String accessToken) {
31          DefaultQQApi(accessToken,appId);
33 }
⑤ 通过QQServiceProvider和QQApiAdapter构造 QQConnectionFactory。
 org.springframework.social.connect.support.OAuth2ConnectionFactory;
 * QQ Connection 工厂
10  class QQConnectionFactory extends OAuth2ConnectionFactory<QQApi>14      QQConnectionFactory(String providerId,String appId,1)">15         super(providerId,1)">new QQServiceProvider(appId,appSecret),1)"> QQApiAdapter());
17 }
⑥ 自定义 CustomSocialUserDetails 及 CustomSocialUserDetailsService,封装 Social 专用的 UserDetails 对象。与 CustomUserDetails 和 CustomUserDetailsService 类似。
 com.lyyzoo.sunny.security.social.common;
 org.springframework.social.security.SocialUserDetails;
 * 定制 SocialUserDetails 封装 Social 登录用户信息
class CustomSocialUserDetails extends User  SocialUserDetails {
 String userId;
 CustomSocialUserDetails(String username,String userId,1)">23                              Collection<?  String getUserId() {
36         42 }
 org.springframework.social.security.SocialUserDetailsService;
 com.lyyzoo.sunny.security.exception.AccountNotExistsException;
 * 定制 Social UserDetailsService 用于获取系统用户信息
class CustomSocialUserDetailsService  SocialUserDetailsService {
public SocialUserDetails loadUserByUserId(String userId) 29         User user = userService.select(Long.valueOf(userId));
32             new AccountNotExistsException("login.username-or-password.error"35         Collection<GrantedAuthority> authorities = 36         authorities.add( CustomSocialUserDetails(user.getUsername(),userId,user.getNickname(),1)">                        user.getLanguage(),1)">41 }
⑥ 自定义 social 配置器,支持设置Social过滤器处理地址
 com.lyyzoo.sunny.security.social.config;
 org.springframework.social.security.SocialAuthenticationFilter;
 org.springframework.social.security.SpringSocialConfigurer;
 7
 * social 配置器,支持设置Social过滤器处理地址.
 * <pre>
 *  SpringSocialConfigurer socialConfigurer = new CustomSocialConfigurer();
 *  http.apply(socialConfigurer);
 * </pre>
 bojiangzhou 2018/10/19
16  class CustomSocialConfigurer  SpringSocialConfigurer {
final String DEFAULT_FILTER_PROCESSES_URL = "/openid"private String filterProcessesUrl = DEFAULT_FILTER_PROCESSES_URL;
 CustomSocialConfigurer() { }
 CustomSocialConfigurer(String filterProcessesUrl) {
27         Assert.notNull(filterProcessesUrl,"social filterProcessesUrl should not be null."this.filterProcessesUrl = filterProcessesUrl;
32     @SuppressWarnings("unchecked"protected <T> T postProcess(T object) {
34         SocialAuthenticationFilter filter =  (SocialAuthenticationFilter) .postProcess(object);
        filter.setFilterProcessesUrl(filterProcessesUrl);
 (T) filter;
38 }
⑦ social 配置,加入 QQConnectionFactory。
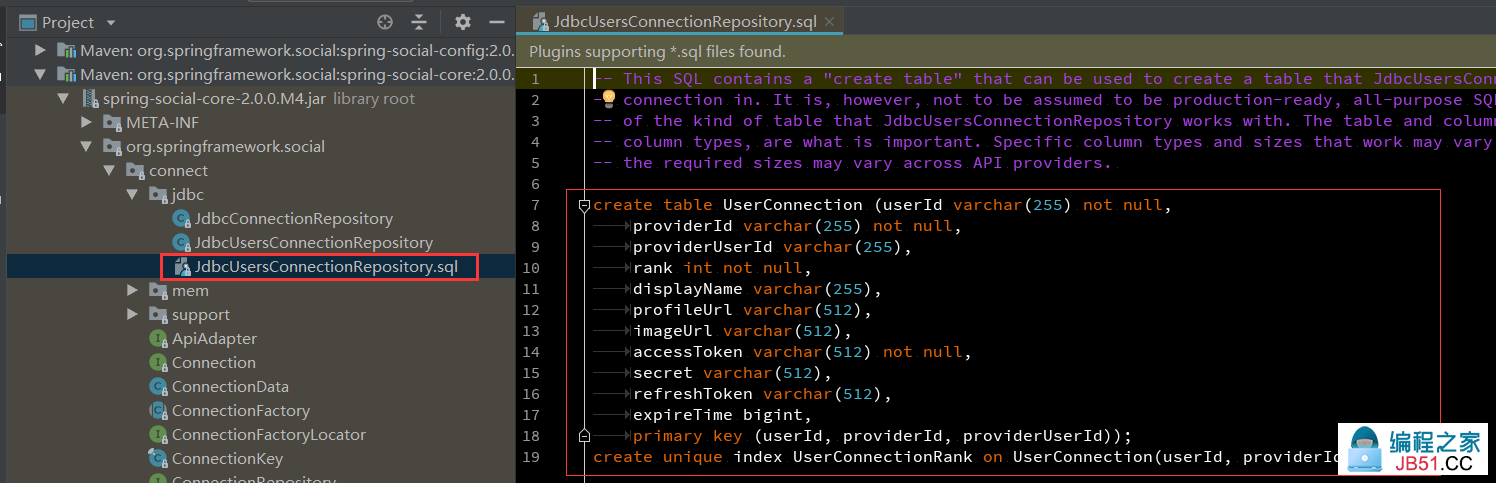
配置增删改查用户三方关系的 UsersConnectionRepository,使用 JdbcUsersConnectionRepository,并设置表前缀,可在源码包里找到初始化脚本,会自动帮我们增删改查用户与第三方账号的关联。
 javax.sql.DataSource;
 com.lyyzoo.sunny.security.social.core.CustomSocialAuthenticationSuccessHandler;
 com.lyyzoo.sunny.security.social.core.CustomSocialUserDetailsService;
 com.lyyzoo.sunny.security.social.qq.connection.QQConnectionFactory;
 com.lyyzoo.sunny.security.social.wechat.connection.WechatConnectionFactory;
 org.springframework.core.env.Environment;
 org.springframework.security.crypto.encrypt.Encryptors;
 org.springframework.social.UserIdSource;
 org.springframework.social.config.annotation.ConnectionFactoryConfigurer;
 org.springframework.social.config.annotation.EnableSocial;
 org.springframework.social.config.annotation.SocialConfigurerAdapter;
 org.springframework.social.connect.ConnectionFactoryLocator;
 org.springframework.social.connect.ConnectionSignUp;
 org.springframework.social.connect.UsersConnectionRepository;
 org.springframework.social.connect.jdbc.JdbcUsersConnectionRepository;
 org.springframework.social.connect.web.ProviderSignInUtils;
 org.springframework.social.security.AuthenticationNameUserIdSource;
 * social 配置
32  @EnableSocial
35 @EnableConfigurationProperties(SocialProperties.class SocialConfiguration  SocialConfigurerAdapter {
 SocialProperties properties;
 DataSource dataSource;
43     @Autowired(required =  ConnectionSignUp connectionSignUp;
45
47      addConnectionFactories(ConnectionFactoryConfigurer connectionFactoryConfigurer,Environment environment) {
 QQ
49         SocialProperties.Qq qq = properties.getQq();
 (StringUtils.isNoneBlank(qq.getAppId(),qq.getAppSecret())) {
            connectionFactoryConfigurer.addConnectionFactory(
52                              QQConnectionFactory(qq.getProviderId(),qq.getAppId(),qq.getAppSecret()));
 UsersConnectionRepository getUsersConnectionRepository(ConnectionFactoryLocator connectionFactoryLocator) {
58         JdbcUsersConnectionRepository usersConnectionRepository =
59                  JdbcUsersConnectionRepository(dataSource,connectionFactoryLocator,Encryptors.noOpText());
 设置表前缀
61         usersConnectionRepository.setTablePrefix("sys_" ConnectionSignUp 需自定义
        usersConnectionRepository.setConnectionSignUp(connectionSignUp);
 usersConnectionRepository;
 UserIdSource getUserIdSource() {
69          AuthenticationNameUserIdSource();
73      SocialUserDetailsService socialUserDetailsService() {
 CustomSocialUserDetailsService();
76
78      CustomSocialAuthenticationSuccessHandler socialAuthenticationSuccessHandler() {
79          CustomSocialAuthenticationSuccessHandler();
81
@Bean
83     public CustomSocialAuthenticationFailureHandler customSocialAuthenticationFailureHandler() {
84         return new CustomSocialAuthenticationFailureHandler();
85     }
86
88      ProviderSignInUtils providerSignInUtils(ConnectionFactoryLocator connectionFactoryLocator,1)">89                                                    UsersConnectionRepository connectionRepository) {
90          ProviderSignInUtils(connectionFactoryLocator,connectionRepository);
91 92
93 }
⑧ 如果用户未绑定QQ账号,则会默认跳转到 /signup 进行新用户注册或者账号绑定,账号绑定会用到 Social 提供的一个工具类 ProviderSignInUtils,会自动帮我们创建关联关系,并且在绑定后继续认证用户信息。
@Service
 2 class UserServiceImpl extends BaseService<User>  UserService {
 3
 5      8      ProviderSignInUtils providerSignInUtils;
11      bindProvider(String username,HttpServletRequest request) {
12          login
13         User user = select(User.FIELD_USERNAME,1)">14         null || !passwordEncoder.matches(password,user.getPassword())) {
15             new CommonException("user.error.login.username-or-password.error"18         providerSignInUtils.doPostSignUp(user.getId().toString(),1)"> ServletWebRequest(request));
21 }
6、实现效果
① 在登录页面点击QQ登录,实际就是访问 /openid/qq。

② 跳转到QQ授权页面进行授权

③ 用户授权之后,跳转回来,将根据 providerId (qq) 和 providerUserId (openid) 查询系统用户ID,然而 sys_userconnection 表中并没有对应的关系,于是自动跳转到注册页面,用户可以选择注册新用户并绑定,或者直接绑定已有账号。

④用户绑定系统账号后,sys_userconnection 表中就会新增一条关联数据,代表系统用户和QQ用户已绑定,下次再登录时就不会再要求进行绑定了。还可以在用户个人中心提供绑定第三方账号的功能,这里就不在演示了,原理是类似的。

五、Session 管理
1、Session 超时处理
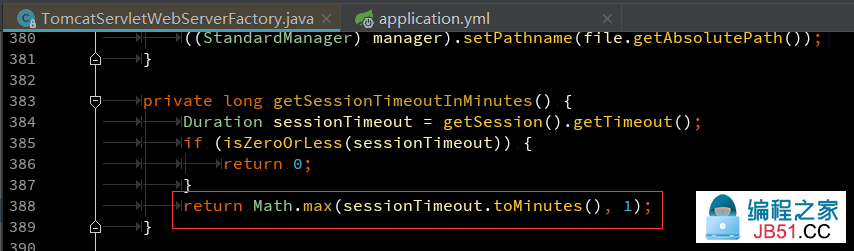
可以通过设置 server.servlet.session.timeout 来设置 Session 超时时间,默认为30分钟
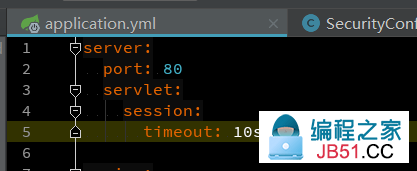
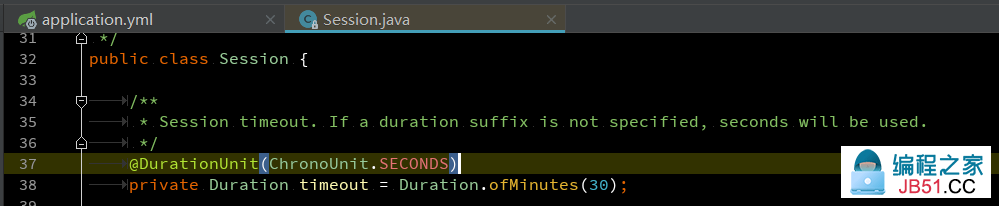
当你设置超时时间小于60秒的时候,实际默认最小为 1 分钟。
可以在 HttpSecurity 的配置中设置Session失效后跳转的地址,这里配置直接跳转到登录页。

2、Session 并发控制
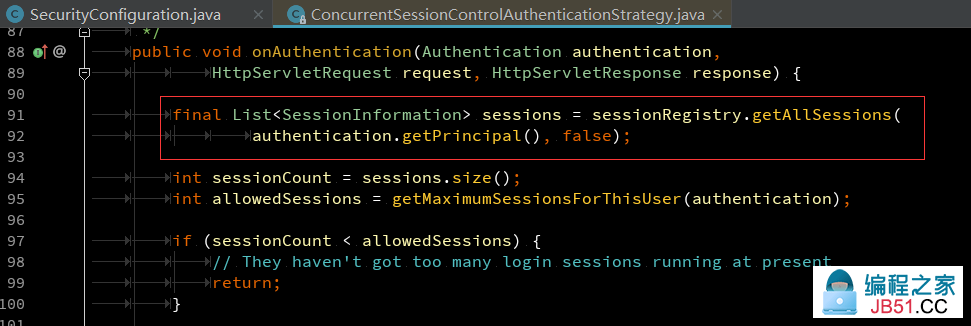
用户登录时,如果只想让用户在一处登录,可设置 Session 并发数量来控制,并且可以设置当后一次登录挤掉前一次登录时的处理策略。

如果用户已经登录,在其它地方登录时则不允许登录,可设置 maxSessionsPreventsLogin=true 即可。

注意:如果发现设置不生效,请检查 UserDetails ,要重写 hashCode、equals、toString 方法,因为判断是否属于同一个用户是通过这几个方法来判断的。
3、集群Session管理
在服务集群中,已经在 serverA 上登录了,登录后的Session是在 serverA 上,再访问 serverB 时,则会要求再次登录,因为没有Session。因此在集群中,可以将Session放到服务之外进行管理,让 Session 在集群中可以共享。
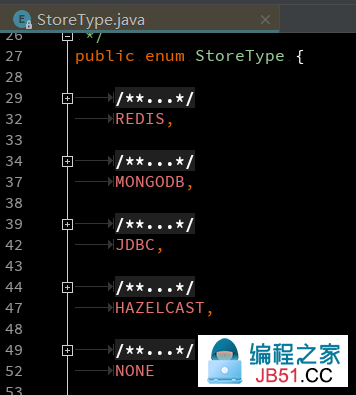
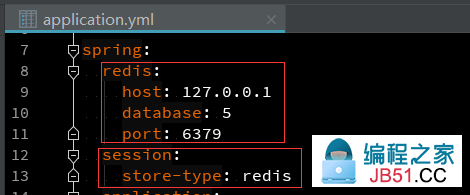
在 SpringBoot 中可以很容易做到这件事,目前可以支持以下几种类型的 Session 存储,我这里使用 Redis 进行 Session 存储。
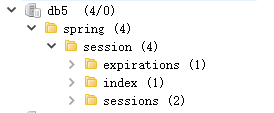
只需在 pom 中加入 spring-session 依赖,然后在配置中启用某种类型的 session 存储即可,最终会启用相关配置类。
1 <!-- spring-session Session集群共享 -->
2 <dependency>
3     groupId>org.springframework.session</4     artifactId>spring-session-core5 6 7     8     >spring-session-data-redis9 >
再次登录时就会发现 Session 已经存储到 redis 中了。
4、退出登录
默认退出地址为 /logout,退出后会跳转到登录地址+?logout,这些就不介绍了,看源码很容易发现这些配置。
我们可以通过 HttpSecurity的logout()来自定义登出的配置,实际会启用 LogoutConfigurer 的配置,注意登出成功地址和登出成功处理器不能同时配置,同时配置了则以后一个生效。可以在登出成功处理器返回 JSON,也可以做一些自定义的逻辑处理等。

六、OAuth登录
前面实现的登录认证方式,登录成功后,登录信息是存储在服务器的 Session 里的,每次浏览器访问服务时,实际是在 Cookie 中带着 JSESSIONID 去访问服务,服务根据 JSESSIONID 来获取用户 Session,这种方式是基于服务器 Session 来保存用户信息。但在前后端分离或开发移动APP的时候,前端是单独部署在一台服务器上,用户实际访问的是 WebServer,所有的服务API请求再间接由 Web Server 发起。用户不再通过浏览器直接访问我们的后端应用,而是通过第三方的应用来访问。这种时候就不便于使用 Cookie + Session 的方式来保存用户信息,Cookie 存在跨域的问题,使用这种开发方式繁琐,安全性差。
于是就有了OAuth,类似于 QQ、微信认证那样,我们自己也可以作为服务提供商,前端应用或APP则作为第三方客户端,通过给客户端发放令牌,客户端在http参数中带着令牌来访问服务,服务端则通过令牌得到用户信息。Spring Social 封装了第三方客户端访问服务提供商时要做的大部分操作,而 Spring Security OAuth 则封装了服务提供商为第三方客户端提供令牌所要做的绝大部分操作,使用 Spring Security OAuth 我们可以快速搭建起一个服务提供商程序。
要实现服务提供商程序,实际就是实现 认证服务器和资源服务器,作为认证服务器,可以使用 OAuth 的四种授权模式,来生成令牌并存储、发放。作为资源服务器,OAuth2 通过向 SpringSecurity 过滤器链上加入 OAuth2AuthenticationProcessingFilter 来对资源进行认证,解析令牌,根据令牌获取用户信息等。
在开始本章之前,建议先熟悉 OAuth2 的认证流程及授权模式等:理解OAuth 2.0
1、OAuth 认证服务器
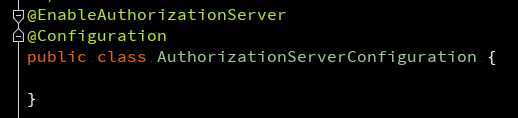
① 只需在配置中加上 @EnableAuthorizationServer 就可启用简单的 OAuth2 认证服务器功能。
实际上,该注解引入的 AuthorizationServerSecurityConfiguration 做了一个 oauth 的 HttpSecurity 配置,创建了一条专用于处理获取令牌(/oauth)相关请求的过滤器链,这个可自行查看。
② 通过其导入的配置可以发现,主要启用了两个端点:授权端点(AuthorizationEndpoint)和令牌端点(TokenEndpoint)。授权端点用于用户授权给第三方客户端,就像我们在QQ授权页面登录授权一样。令牌端点则用于给用户发放令牌。


2、OAuth 授权流程
下面通过授权码模式来了解OAuth的授权流程。
① 在程序启动时,已生成默认的 client-id 和 client-secret(基于内存的方式),第三方客户端将用户重定向到认证服务器上(/oauth/authorize?client_id=xxx&response_type=code..... ) 获取用户授权。
此时默认会跳转到我们之前配置的登录页去进行登录,因为该请求匹配标准登录的过滤器链,发现用户没有认证,则跳转到登录页进行登录。用户确认登录即是向客户端授权,登录成功后就会进入 authorize 端点。

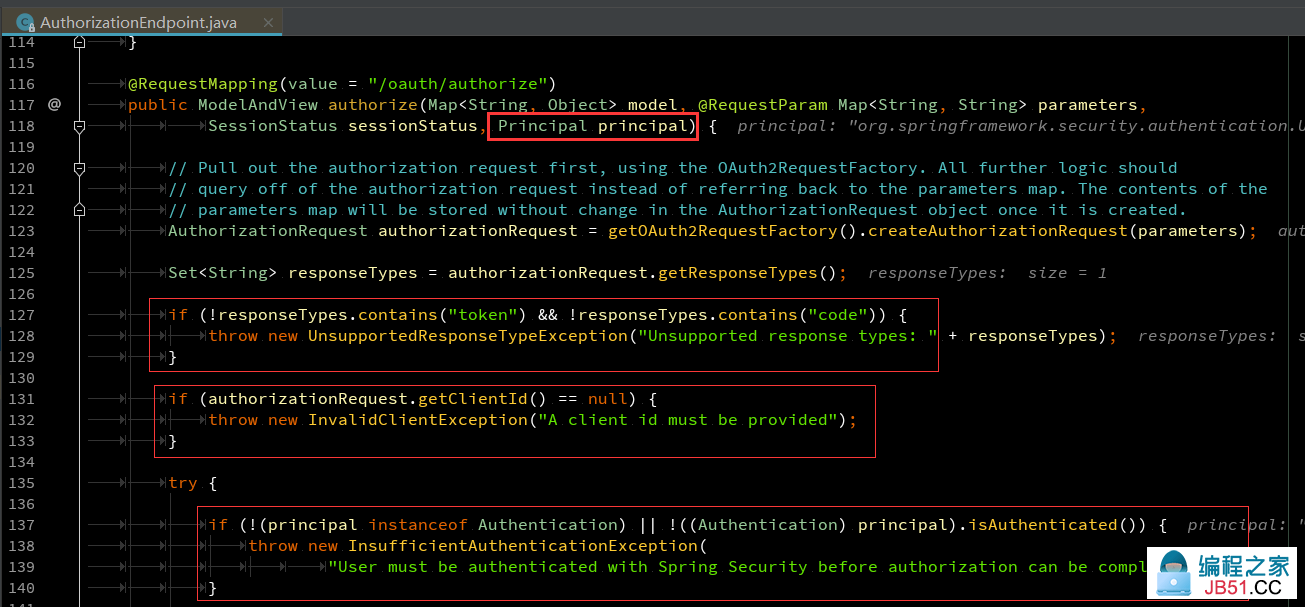
② 可以看出:response_type 参数必须设置为 token 或者 code,可见该端点只用于 授权码模式(authorization code) 和 简化模式(implicit grant type);且必须传入 client_id,客户端ID一般由服务提供商提供给客户端应用;同时要求用户必须已经登录且已认证通过。
③ 之后,通过 client_id 获取 ClientDetails,这里我们就需要做客制化了,我们需要添加自己的客户端应用库,从数据库获取客户端信息。
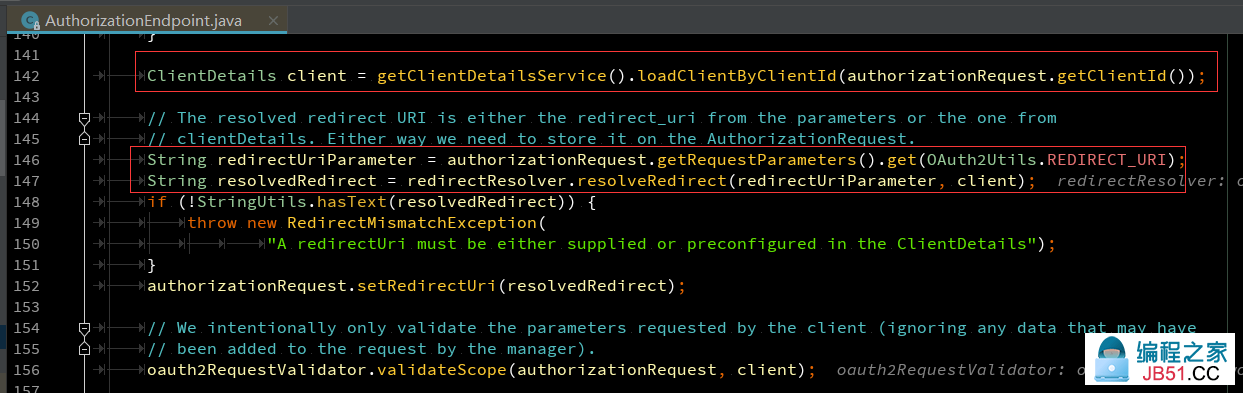
之后会从参数中获取重定向回客户端的 redirect_uri,然后处理重定向地址,客户端(client)是可以配置授权类型的,默认就有这五种类型:authorization_code、password、client_credentials、implicit、refresh_token。
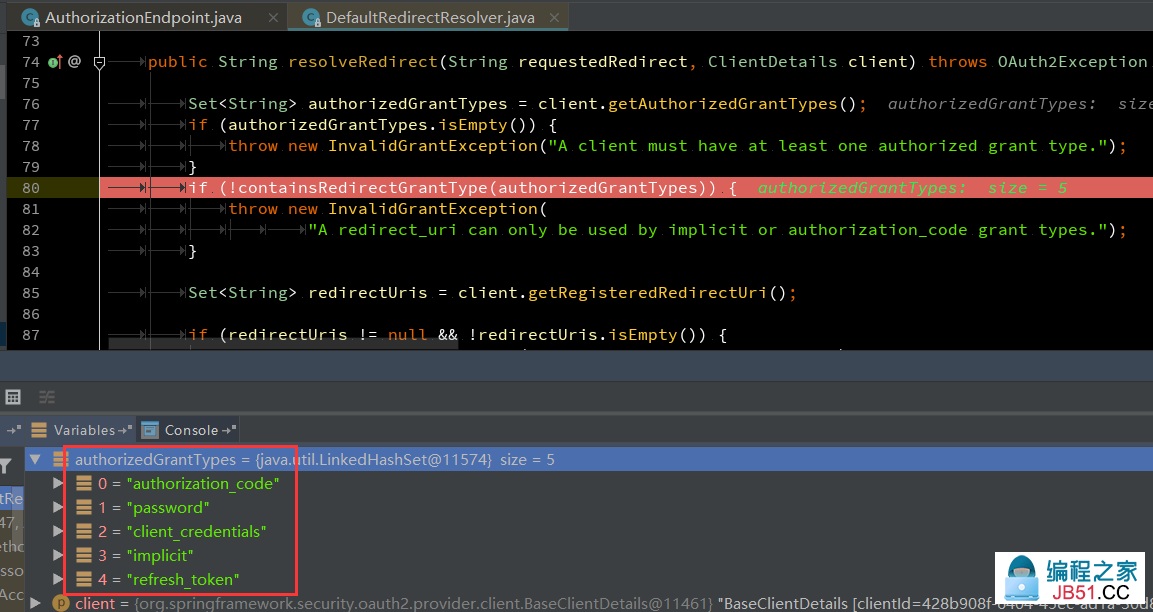
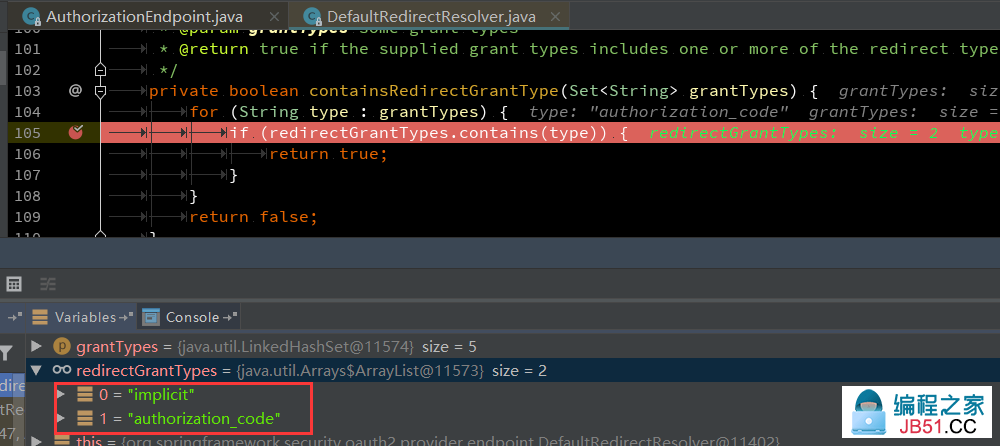
可以看出,能进行重定向回客户端的只支持 授权码模式(authorization code) 和 简化模式(implicit grant type)。
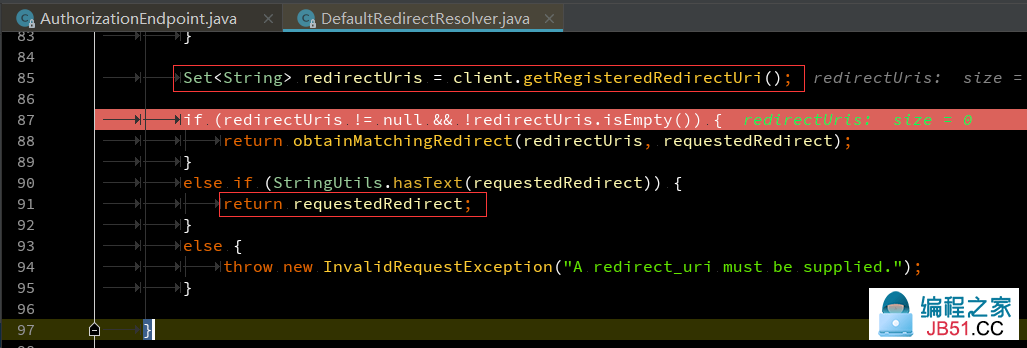
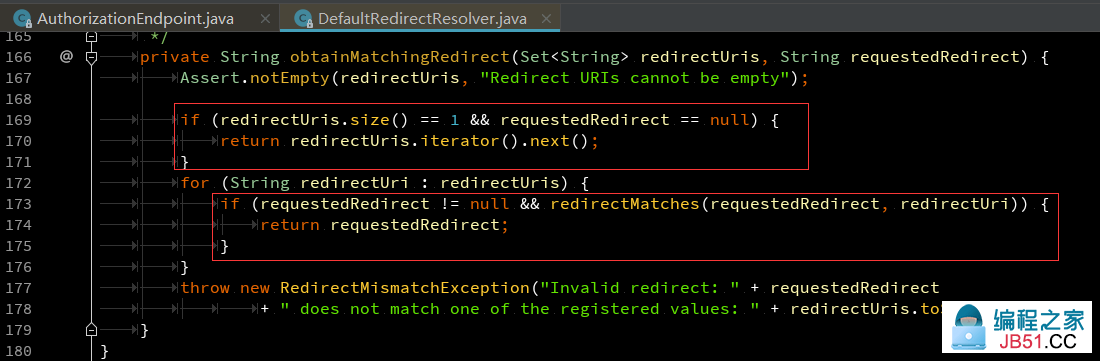
确认可以重定向之后,就会获取 client 配置的重定向地址,如果 client 的重定向地址不为空,就会跟客户端传入的 redirect_uri 进行比对,如果 redirect_uri 为空,则直接返回 client 配置的重定向地址;如果不为空,则要求二者必须保持一致,这也是需要注意的地方。
④ 设置完重定向地址后,接着就检查 scope,即客户端申请访问的权限范围,如果检查发现不需要用户授权,则重定向回去,否则会跳转到一个默认的授权页面让用户授权。
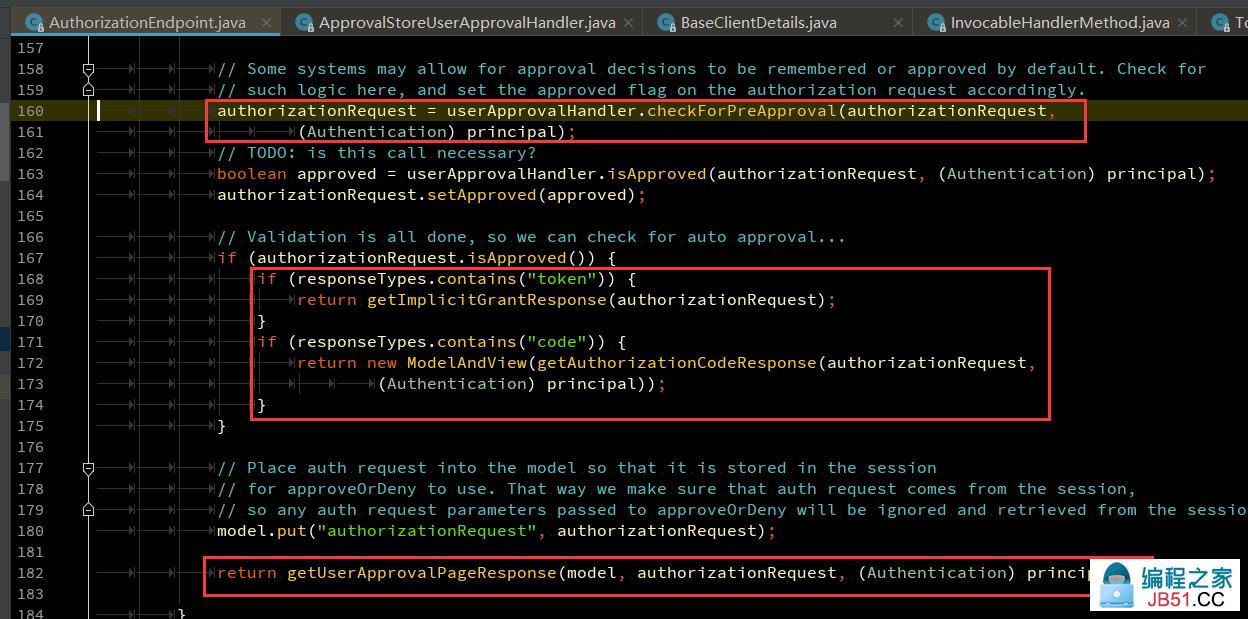

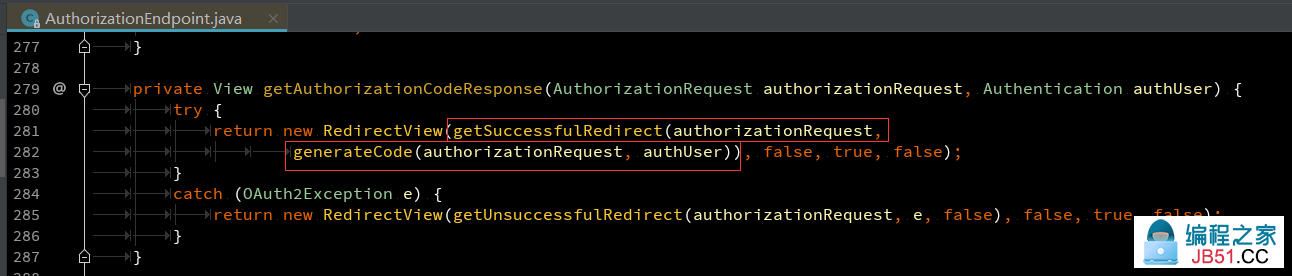
如果 client 中有与请求的 scope 对应的授权范围或者用户允许授权(Approve),则会生成授权码并存储起来,然后重定向到之前设置的地址上去,并返回授权码,以及原样返回 state 参数。之后客户端就可以带着授权码去获取令牌。

3、发放令牌
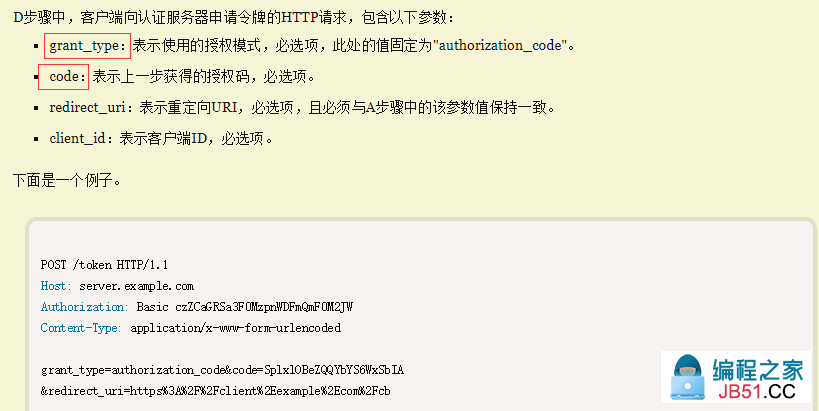
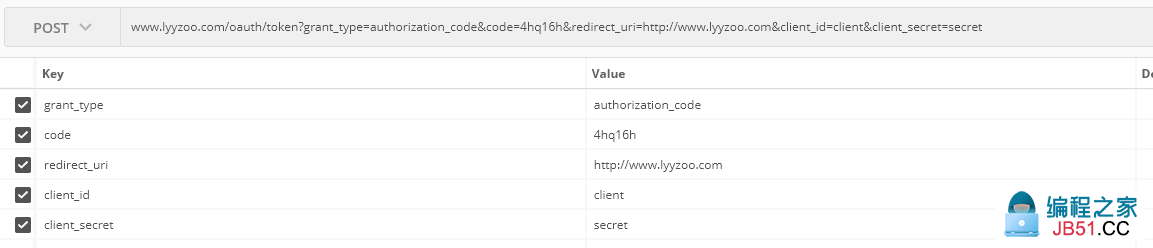
① 客户端得到授权码后,就可以带上授权码去获取令牌(/oauth/token?grant_type=authorization_code&code=xxx&redirect_uri=xxx&client_id=xxx),这里用 Postman 来测试。
注意发起表单请求时,要配置客户端允许表单认证,将向 oauth 过滤器链中加入 ClientCredentialsTokenEndpointFilter 客户端过滤器来拦截用户请求,根据 client_id 和 client_secret 创建 Authentication 。跟标准的用户名密码登录流程一样,只不过这里是校验 client_id 和 client_secret。


② client_id 和 client_secret 认证通过后,就会进入获取令牌的端点,首先根据 client_id 获取 Client ,然后创建 TokenRequest。
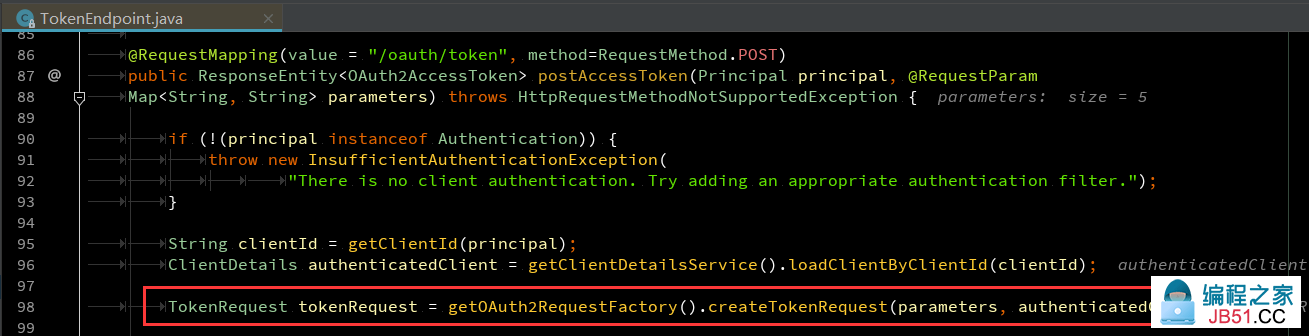
可以看出,获取令牌端点是不支持简化模式的,简化模式是访问 /authorize 端点时直接发放令牌的,这个稍后再说。

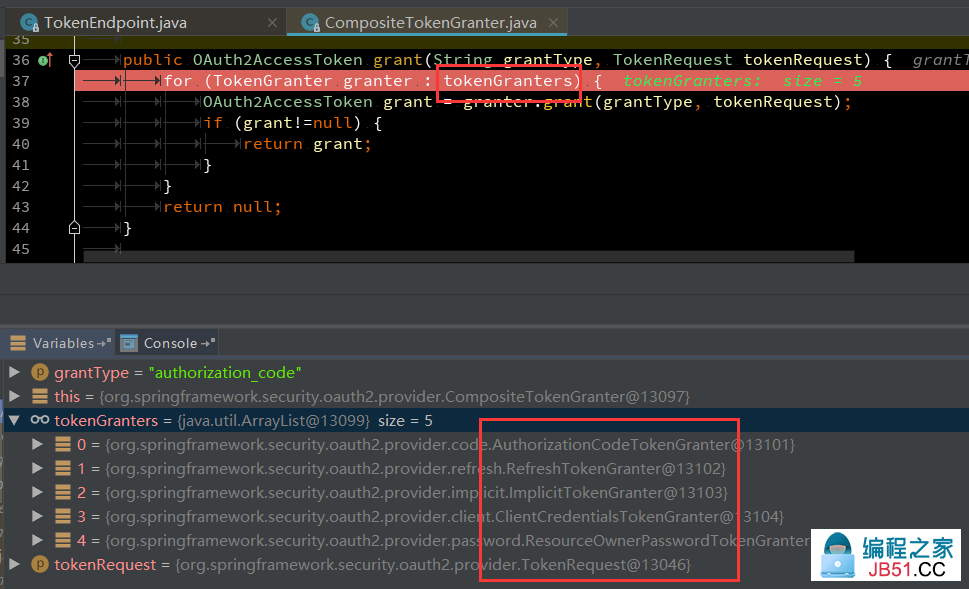
③ 之后就会调用 TokenGranter 进行授权,授权成功将创建 OAuth2AccessToken,最后返回到客户端。

授权时,实际就是调用五种授权类型的 TokenGranter,使用匹配的授权器来创建 AccessToken。

④ 创建 AccessToken 时,首先是根据授权码获取用户信息(创建授权码的时候会把授权的用户信息序列化存储起来)。

从存储中获取 AccessToken,先判断该用户是否已经存在 AccessToken,如果存在且没有过期,则刷新再返回。tokenStore 我们可以配置成数据库存储、Redis 存储等。

如果不存在,则创建 refreshToken 和 accessToken,并存储起来。

⑤ 之后就可以看到返回给客户端的令牌,之后我们就可以带着令牌访问服务的资源了。

4、资源服务器
获取到令牌后,还无法直接通过令牌获访问资源服务,还需启用资源服务功能才能解析令牌。
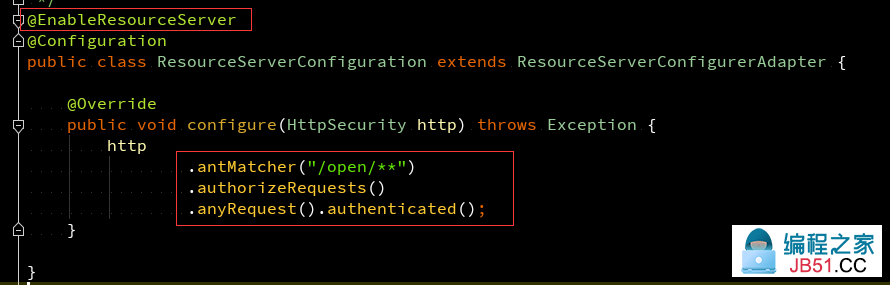
① 启用资源服务器,只需在配置类上加上 @EnableResourceServer 即可,同样会创建一条 oauth 过滤器链,并向该过滤器链中加入 OAuth2AuthenticationProcessingFilter 过滤器来处理令牌。
这里配置该过滤器链仅对 [/open/**] 的请求做处理,其它请求还是走标准的过滤器链。你也可以配置所有请求都通过令牌来访问。
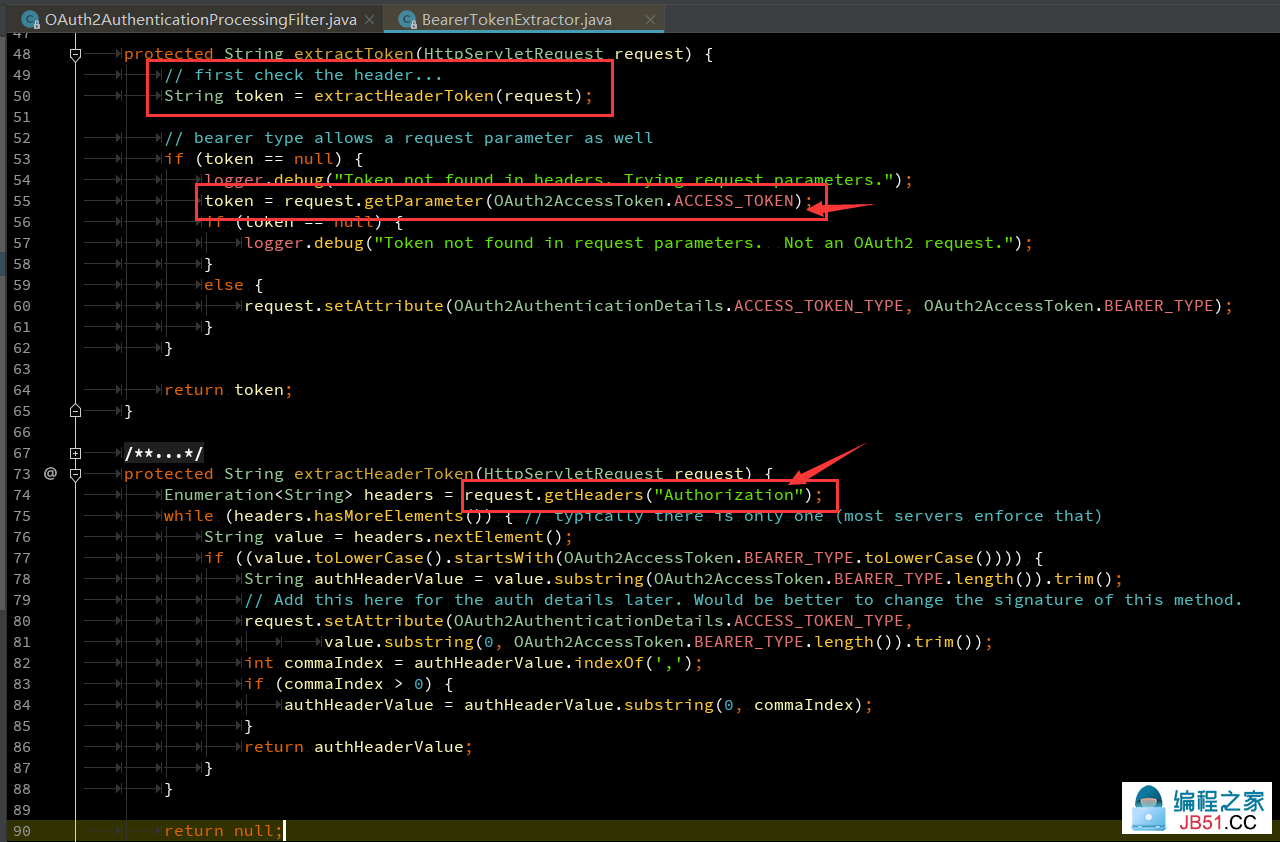
② 在这个过滤器中,将从请求中根据令牌解析 Authentication ,默认的令牌解析器使用 BearerTokenExtractor。
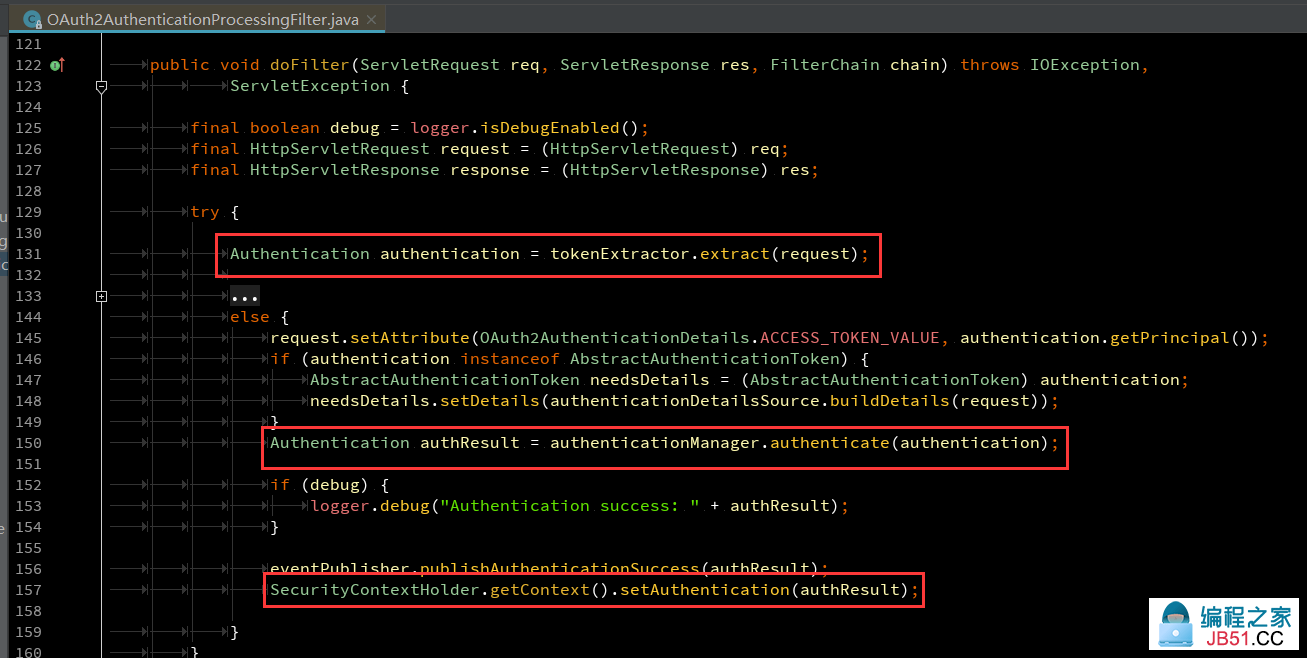
解析令牌时,首先检查请求头是否包含 [Authorization: Bearer token.....],没有的话就判断请求的参数是否包含 access_token,因此我们可以使用这两种方式携带 access_token 去访问资源。
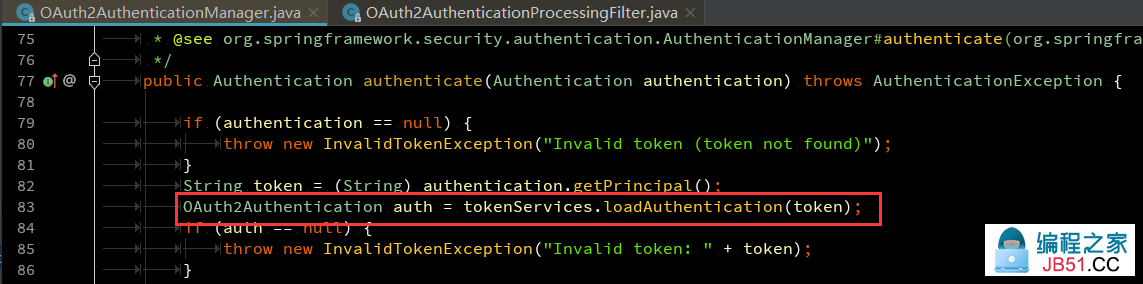
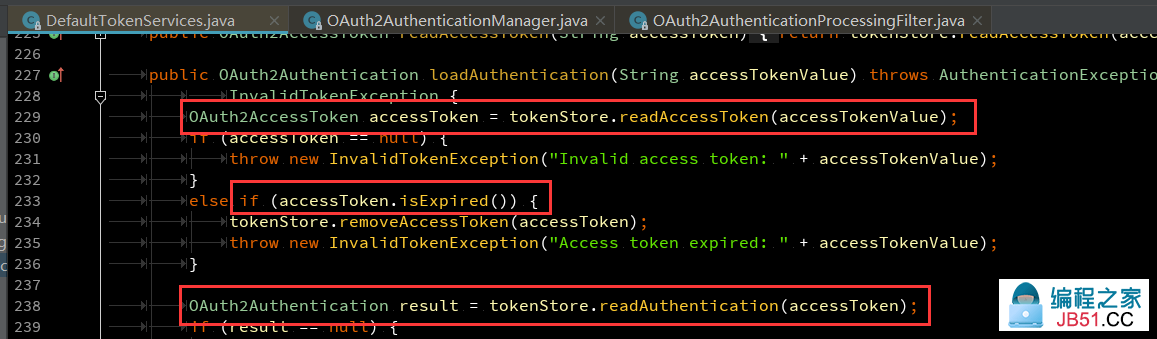
③ 得到 Authentication 后,就对 Authentication 进行认证,在认证过程中,会调用 DefaultTokenServices 获取用户信息,首先读取 AccessToken,并判断令牌是否过期,最后根据令牌得到用户信息。最终放入到 SecurityContextHolder 上下文中表示认证通过。
5、刷新令牌
令牌是存在过期时间的,一般会设置一个小时或两个小时过期。在用户使用过程中,如果令牌过期,则又需要用户重新登录,用户体验不好。因此可以使用得到的更新令牌去重新获取访问令牌而不需要重新登录。
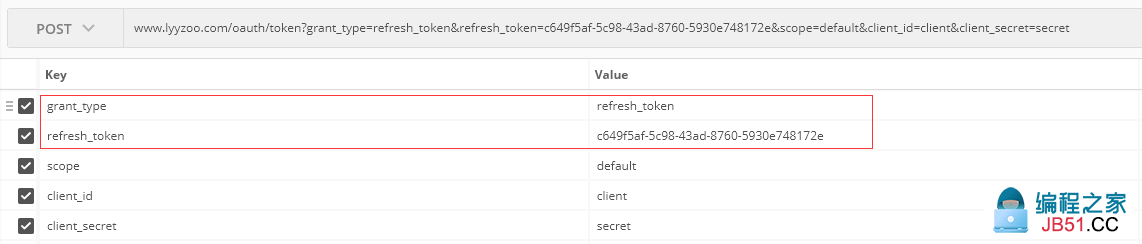
6、简化模式
一般来说,我们自己内部的系统并不需要使用两步的授权码模式来获取授权,我们可以使用简化模式(implicit grant type)来获取授权。
只需将response_type改为token即可: host/oauth/authorize?client_id=client&response_type=token&scope=default&state=test。用户确认授权后,就会在地址中将令牌带回。


7、代码实现
① 自定义客户端服务类,从数据库获取 Client
 com.lyyzoo.sunny.security.oauth;
 java.util.Collections;
 java.util.Map;
 java.util.Optional;
 com.lyyzoo.sunny.security.domain.entity.Client;
 com.lyyzoo.sunny.security.domain.service.ClientService;
 org.springframework.security.oauth2.provider.ClientDetails;
 org.springframework.security.oauth2.provider.ClientDetailsService;
 org.springframework.security.oauth2.provider.ClientRegistrationException;
 org.springframework.security.oauth2.provider.NoSuchClientException;
 org.springframework.util.StringUtils;
 * 自定义 ClientDetailsService
 bojiangzhou 2018/11/03
class CustomClientDetailsService  ClientDetailsService {
final Logger LOGGER = LoggerFactory.getLogger(CustomClientDetailsService. ClientService clientService;
 OAuthProperties properties;
 CustomClientDetailsService(ClientService clientService,OAuthProperties properties) {
this.clientService = clientService;
this.properties = properties;
37     @SuppressWarnings("unchecked"public ClientDetails loadClientByClientId(String clientId)  ClientRegistrationException {
39         Client client = clientService.selectByClientId(clientId);
if (client == 41             new NoSuchClientException("No client with requested id: " + clientId);
43         CustomClientDetails clientDetails =  CustomClientDetails();
        clientDetails.setClientId(client.getClientId());
        clientDetails.setClientSecret(client.getClientSecret());
        clientDetails.setAuthorizedGrantTypes(StringUtils.commaDelimitedListToSet(client.getGrantTypes()));
        clientDetails.setResourceIds(StringUtils.commaDelimitedListToSet(client.getResourceIds()));
        clientDetails.setScope(StringUtils.commaDelimitedListToSet(client.getScope()));
        clientDetails.setRegisteredRedirectUri(StringUtils.commaDelimitedListToSet(client.getRedirectUris()));
        clientDetails.setAuthorities(Collections.emptyList());
int accessTokenValiditySeconds = Optional
                .ofNullable(client.getAccessTokenValidity())
                .orElse(properties.getAccessTokenValiditySeconds());
        clientDetails.setAccessTokenValiditySeconds(accessTokenValiditySeconds);
55         int refreshTokenValiditySeconds =                .ofNullable(client.getRefreshTokenValidity())
                .orElse(properties.getRefreshTokenValiditySeconds());
        clientDetails.setRefreshTokenValiditySeconds(refreshTokenValiditySeconds);
        clientDetails.setAutoApproveScopes(StringUtils.commaDelimitedListToSet(client.getAutoApproveScopes()));
60         String json = client.getAdditionalInformation();
 (org.apache.commons.lang3.StringUtils.isNotBlank(json)) {
63                 Map<String,Object> additionalInformation = mapper.readValue(json,Map.                clientDetails.setAdditionalInformation(additionalInformation);
65             }  (Exception e) {
66                 LOGGER.warn("parser addition info error: {}" clientDetails;
71 }

② 认证服务器配置,主要是针对授权服务端口的配置,配置使用Redis来存储令牌。
 com.lyyzoo.sunny.security.core.CustomUserDetailsService;
 com.lyyzoo.sunny.security.oauth.CustomClientDetailsService;
 org.springframework.boot.autoconfigure.condition.ConditionalOnMissingBean;
 org.springframework.data.redis.connection.RedisConnectionFactory;
 org.springframework.security.config.annotation.authentication.configuration.AuthenticationConfiguration;
 org.springframework.security.crypto.password.NoOpPasswordEncoder;
 org.springframework.security.oauth2.config.annotation.configurers.ClientDetailsServiceConfigurer;
 org.springframework.security.oauth2.config.annotation.web.configuration.AuthorizationServerConfigurerAdapter;
 org.springframework.security.oauth2.config.annotation.web.configuration.EnableAuthorizationServer;
 org.springframework.security.oauth2.config.annotation.web.configurers.AuthorizationServerEndpointsConfigurer;
 org.springframework.security.oauth2.config.annotation.web.configurers.AuthorizationServerSecurityConfigurer;
 org.springframework.security.oauth2.provider.code.JdbcAuthorizationCodeServices;
 org.springframework.security.oauth2.provider.token.store.redis.RedisTokenStore;
 * 认证服务器配置
 bojiangzhou 2018/11/02
26  @EnableAuthorizationServer
class AuthorizationServerConfiguration  AuthorizationServerConfigurerAdapter {
void configure(AuthorizationServerSecurityConfigurer security)         security
                .passwordEncoder(NoOpPasswordEncoder.getInstance())
                .allowFormAuthenticationForClients()
final String FIELD_ACCESS_TOKEN = "oauth2:access_token:"40
 AuthenticationManager authenticationManager;
 CustomClientDetailsService clientDetailsService;
 RedisConnectionFactory redisConnectionFactory;
 AuthorizationServerConfiguration(AuthenticationConfiguration authenticationConfiguration,1)">                                            CustomClientDetailsService clientDetailsService,1)">                                            CustomUserDetailsService userDetailsService,1)">                                            DataSource dataSource,1)">51                                             RedisConnectionFactory redisConnectionFactory) this.authenticationManager = authenticationConfiguration.getAuthenticationManager();
this.clientDetailsService = clientDetailsService;
this.dataSource = dataSource;
this.redisConnectionFactory = redisConnectionFactory;
58
60     void configure(AuthorizationServerEndpointsConfigurer endpoints)         endpoints
62                 .authorizationCodeServices( JdbcAuthorizationCodeServices(dataSource))
                .tokenStore(tokenStore())
                .userDetailsService(userDetailsService)
                .authenticationManager(authenticationManager)
68
void configure(ClientDetailsServiceConfigurer clients) 71         clients.withClientDetails(clientDetailsService);
75     @ConditionalOnMissingBean(RedisTokenStore. RedisTokenStore tokenStore() {
77         RedisTokenStore redisTokenStore =  RedisTokenStore(redisConnectionFactory);
        redisTokenStore.setPrefix(FIELD_ACCESS_TOKEN);
 redisTokenStore;
82 }
七、总结
1、参考文档
The OAuth 2.0 Authorization Framework
2、总结
本篇主要讲述了基于SpringSecurity和OAuth2的几种登录认证方式,主要是分析了整个流程以及相关的源码、原理。前后端分离部分目前只是使用 Postman 简单测试了下,后面有时间考虑使用 Vue 做前端框架,搭建一个前端出来,后面再完善。
本来还要做SSO单点登录和授权相关的内容的,考虑到时间精力有限,就不在这里做介绍了。通过前面对源码的分析梳理,相信这部分内容也不在话下。
下一步计划是做 Spring cloud 这部分的内容,开发微服务中的注册中心(Eureka)、网关(Gateway)等等,通过开发这些服务,去熟悉spring cloud 的使用、熟悉部分核心代码及原理。
3、源码地址
源码仅供参考,很多代码都不完善,尽自己学习使用。
https://gitee.com/bojiangzhou/sunny [都不点赞还要源码 o(一︿一+)o ]
<------------------------------------------------------------------------------------------------------------->
版权声明:本文内容由互联网用户自发贡献,该文观点与技术仅代表作者本人。本站仅提供信息存储空间服务,不拥有所有权,不承担相关法律责任。如发现本站有涉嫌侵权/违法违规的内容, 请发送邮件至 dio@foxmail.com 举报,一经查实,本站将立刻删除。