
文章目录
前言
由于最近经常装系统,经常看到 vmlinux、vmlinuz,便总结起来,顺便记录一下System.map和/proc/kallsyms的知识。
一、vmlinux与vmlinuz
1.1 vmlinux
我以我之前编译的5.0.0内核为例:ubuntu 18.04.6 使用内核源码安装内核

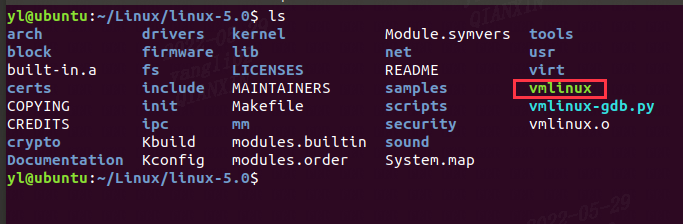
vmlinux(“vm”代表的“virtual memory”)是一个包括linux kernel的静态链接的可运行文件,编译内核源码得到的最原始的内核文件,未压缩,比较大,是elf格式的文件。
file vmlinux

readelf -h vmlinux
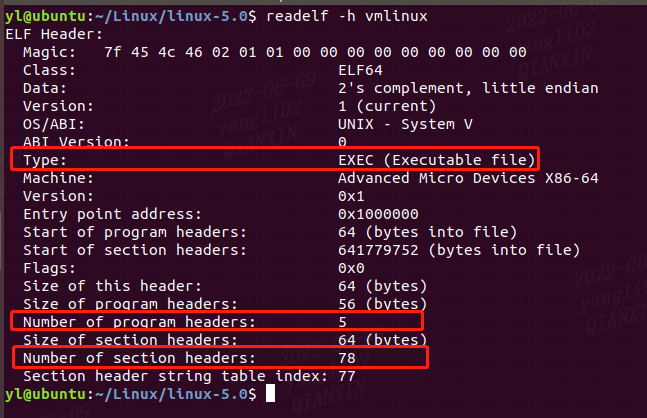
从elf头中我们可以看到:
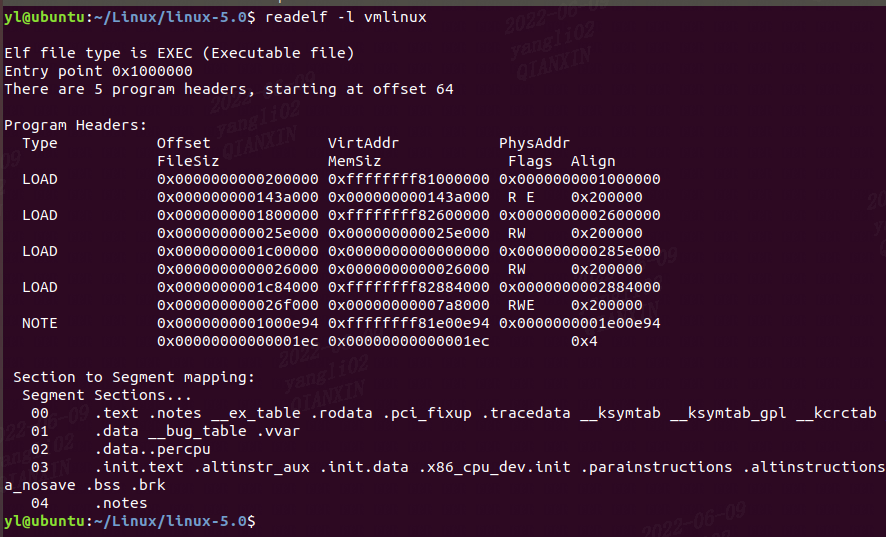
程序头表(program headers)中的表项的数目为5
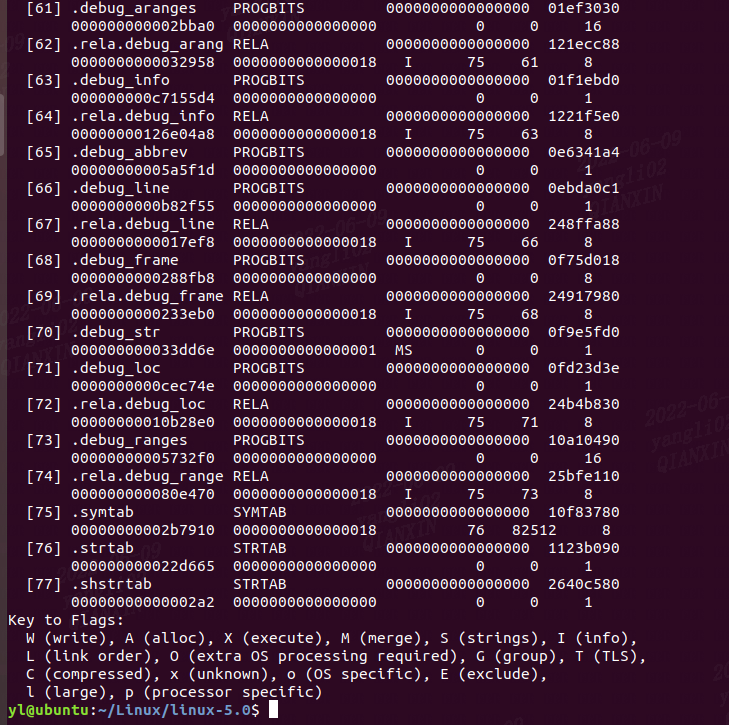
readelf -l vmlinux
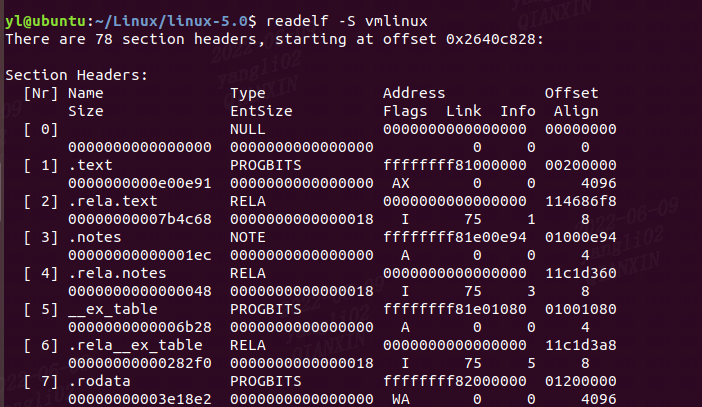
节头表(section headers)中的表项的数目为78
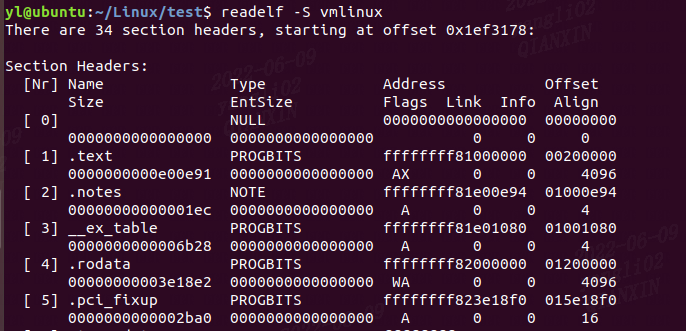
readelf -S vmlinux
1.2 vmlinuz
vmlinuz是可引导的,经过压缩的linux内核。vmlinuz是vmlinux经过gzip和objcopy制作出来的压缩文件。
vmlinuz是一个统称,有两种详细的表现形式:zImage和bzImage。它们不仅是一个压缩文件,而且在这两个文件的开头部分内嵌有 gzip解压缩代码。
(1)bzImage是vmlinux经过gzip压缩后的文件,适用于大内核(bzImage是x86 linux常用的一种压缩镜像文件 )。
(2)zImage是vmlinux经过gzip压缩后的文件,适用于小内核( zImage是ARM linux常用的一种压缩镜像文件)。
备注: bz表示big zImage,其格式与zImage类似,但采用了不同的压缩算法,bzImage的压缩率更高。
我这里是X86_64 ,vmlinuz是bzImage类型的文件.

1.3 extract-vmlinux
在内核源码下 /scripts目录下有一个 extract-vmlinux 脚本文件:

将vmlinuz解压缩还原成vmliunx:
./extract-vmlinux vmlinuz-5.0.0 > vmlinux

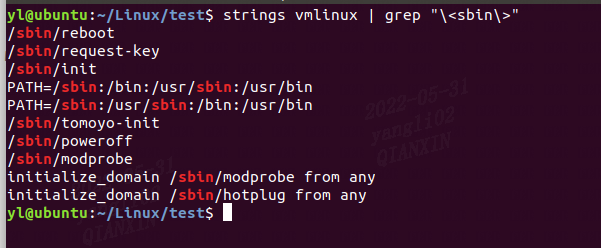
strings vmlinux | grep "\<sbin\>"
sbin(system binary):用于系统管理的程序(以及其他仅限root用户的命令)存储在/sbin、/usr/sbin和/usr/local/sbin中。除/bin中的二进制文件外,/sbin还包含引导、恢复、恢复和/或修复系统所需的二进制文件。
在挂载/usr 之后执行的系统管理程序通常放在/usr/sbin 中。 本地安装的系统管理程序应该放在 /usr/local/sbin。
脚本内容:
#!/bin/sh
# ----------------------------------------------------------------------
# extract-vmlinux - Extract uncompressed vmlinux from a kernel image
# ----------------------------------------------------------------------

check_vmlinux()
{
	# Use readelf to check if it's a valid ELF
	# TODO: find a better to way to check that it's really vmlinux
	#       and not just an elf
	readelf -h $1 > /dev/null 2>&1 || return 1

	cat $1
	exit 0
}

try_decompress()
{
	# The obscure use of the "tr" filter is to work around older versions of
	# "grep" that report the byte offset of the line instead of the pattern.

	# Try to find the header ($1) and decompress from here
	for	pos in `tr "$1\n$2" "\n$2=" < "$img" | grep -abo "^$2"`
	do
		pos=${pos%%:*}
		tail -c+$pos "$img" | $3 > $tmp 2> /dev/null
		check_vmlinux $tmp
	done
}

# Check invocation:
me=${0##*/}
img=$1
if	[ $# -ne 1 -o ! -s "$img" ]
then
	echo "Usage: $me <kernel-image>" >&2
	exit 2
fi

# Prepare temp files:
tmp=$(mktemp /tmp/vmlinux-XXX)
trap "rm -f $tmp" 0

# That didn't work, so retry after decompression.
try_decompress '\037\213\010' xy    gunzip
try_decompress '\3757zXZ\000' abcde unxz
try_decompress 'BZh'          xy    bunzip2
try_decompress '\135\0\0\0'   xxx   unlzma
try_decompress '\211\114\132' xy    'lzop -d'
try_decompress '\002!L\030'   xxx   'lz4 -d'
try_decompress '(\265/\375'   xxx   unzstd

# Finally check for uncompressed images or objects:
check_vmlinux $img

# Bail out:
echo "$me: Cannot find vmlinux." >&2
用file、odjdump和readelf命令进行查看:
file vmlinux
objdump -d vmlinux | more
readelf -h vmlinux
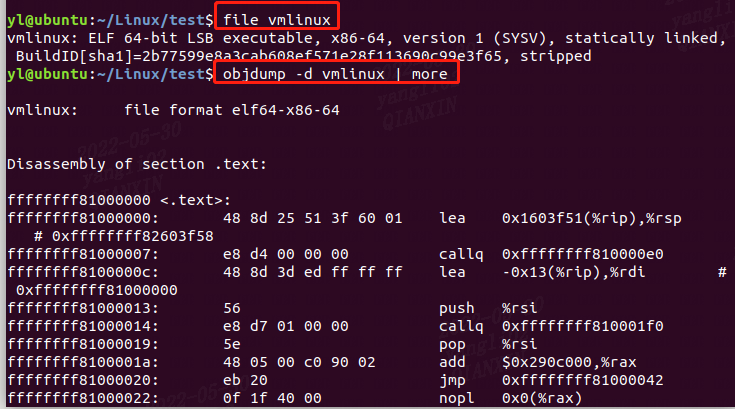
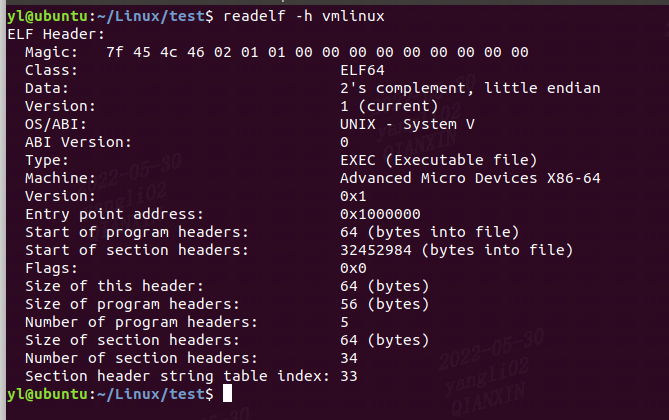
可以看到提取出来的vmlinux 的 节头表(section headers)中的表项的数目只有34项。
1.4 vmlinux 对比
这里将编译出来的原始内核vmlinux与通过extract-vmlinux提取出来的vmlinux做对比:
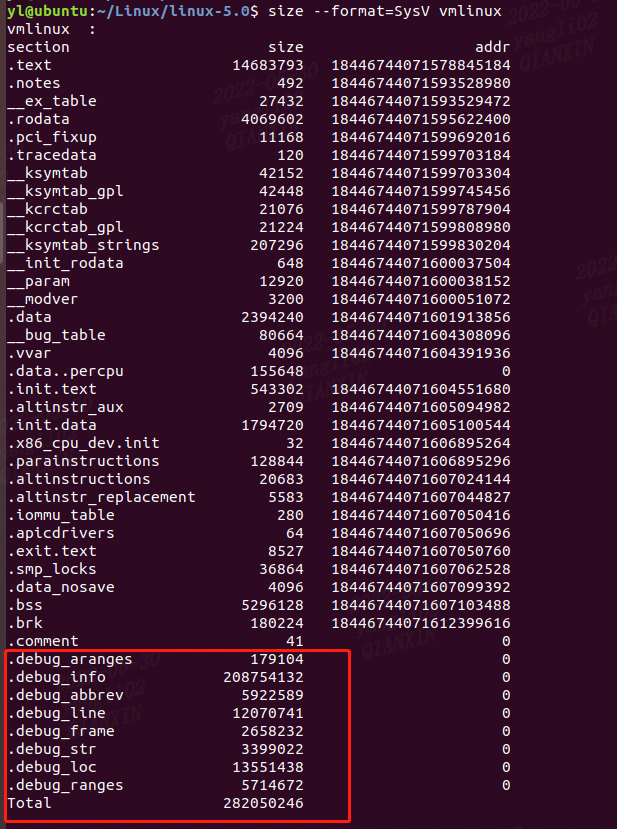
(1)编译出来的原始内核vmlinux

with debug_info,not stripped 代表没有去除调试信息,所以编译出来的内核很大,当然也可以在编译内核时配置不带有调试信息的vmlinux。
size --format=SysV vmlinux
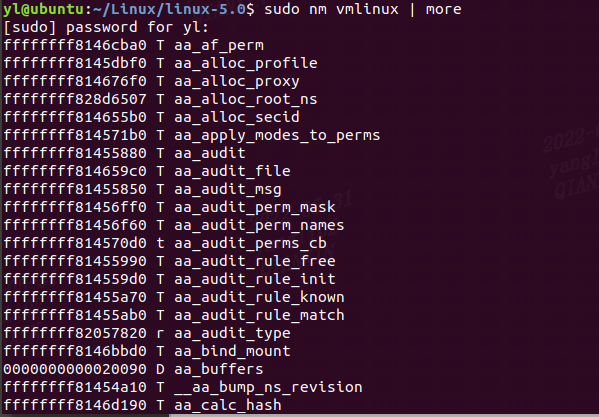
sudo nm vmlinux | more
nm:list symbols from object files,查看vmlinux的符号信息
(2)extract-vmlinux提取出来的vmlinux

stripped 代表去除掉了调试信息。
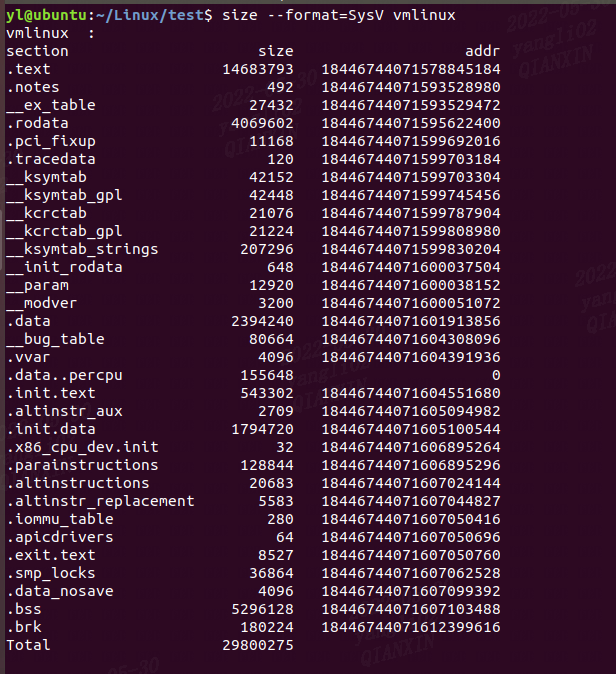
用nm查看符号信息:显示没有符号,提取出来的镜像没有符号信息。

二、System.map与 /proc/kallsyms
2.1 System.map
System.map是编译内核时产生的一个文件,存放着内核符号表信息。每次编译一次内核,就会产生一个新的System.map文件。符号表是所有内核符号及其对应地址的一个列表,如下图所示:
左边是符号地址(默认为十六进制),中间是符号的类型,右边是内核符号。
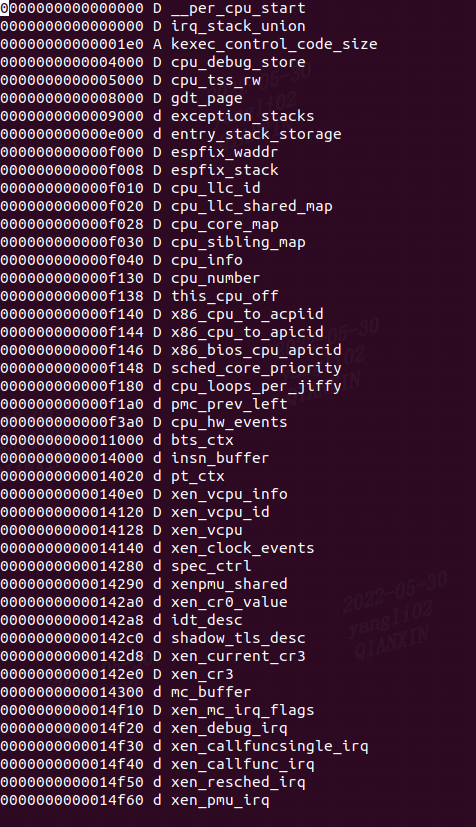
备注:System.map是一个磁盘上的文件。可以由nm vmlinux经过重定向到文件中获得。
输出重定向:将命令的输出发送的一个文件中,终端输出的内容会被保存到输出文件中
bash shell : >    输出的内容会覆盖已有文件的内容
bash shell : >>   输出的内容追加到已有的文件中

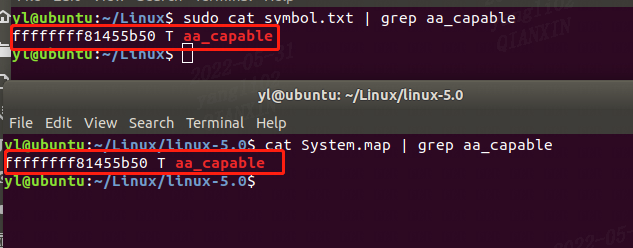
选择一个符号将System.map和 nm vmlinux重定向后的文件 进行内容对比,结果一致。
2.2 /proc/kallsyms
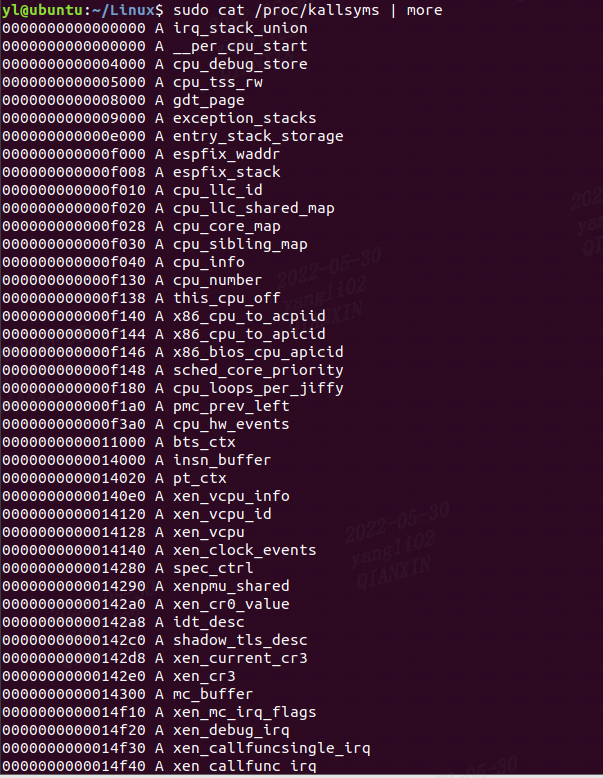
/proc/kallsyms也是内核提供的一个符号表,包含了动态加载的内核模块的符号,可以在模块加载时动态扩展其长度,给出了所有内核符号及其对应地址的一个列表:
左边是符号地址(默认为十六进制),中间是符号的类型,右边是内核符号。
2.3 两者区别
(1)
/proc/kallsysms 具有动态加载模块的符号以及静态代码(kernel image)的符号表。
system.map 仅是静态代码(kernel image)的符号表。
正在运行的内核可能和System.map不匹配,所以/proc/kallsyms才是内核符号参考的主要来源,我们应该通过/proc/kallsyms获得符号的地址。
(2)
System.map 是文件系统上的实际文件。 每次内核编译都会生成一个新的 System.map。
/proc/kallsyms 是内核启动时动态创建的“proc 文件”。 实际上,它并不是真正的磁盘文件。 它是内核数据的表示,已经加载到内存中。因此,对于当前正在运行的内核,它总是正确的。
(3)
因此我们要获取一个内核符号的地址,要通过/proc/kallsyms来获取,比如:
T代表位于代码段,一个全局的符号地址。

2.4 符号表类型
符号类型指明符号位于目标文件的哪个区或其属性。
如果是小写,符号通常是局部的; 如果是大写,则符号是全局的(外部的)。
| type | meaning |
|---|---|
| “A” | The symbol’s value is absolute,and will not be changed by further linking. |
| “B/b” | The symbol is in the BSS data section. This section typically contains zero-initialized or uninitialized data,although the exact behavior is system dependent. |
| “C” | The symbol is common. Common symbols are uninitialized data. When linking,multiple common symbols may appear with the same name. If the symbol is defined anywhere,the common symbols are treated as undefined references. |
| “D/d” | The symbol is in the initialized data section. |
| “G/g” | The symbol is in an initialized data section for small objects. Some object file formats permit more efficient access to small data objects,such as a global int variable as opposed to a large global array. |
| “i” | For ELF format files this indicates that the symbol is an indirect function. This is a GNU extension to the standard set of ELF symbol types. It indicates a symbol which if referenced by a relocation does not evaluate to its address,but instead must be invoked at runtime. The runtime execution will then return the value to be used in the relocation. |
| “I” | The symbol is an indirect reference to another symbol. |
| “N” | The symbol is a debugging symbol |
| “p” | The symbols is in a stack unwind section |
| “R/r” | The symbol is in a read only data section |
| “S/s” | The symbol is in an uninitialized or zero-initialized data section for small objects. |
| “T/t” | The symbol is in the text (code) section. |
| “U” | The symbol is undefined. |
| “u” | The symbol is a unique global symbol. This is a GNU extension to the standard set of ELF symbol bindings. For such a symbol the dynamic linker will make sure that in the entire process there is just one symbol with this name and type in use. |
| “V/v” | The symbol is a weak object. When a weak defined symbol is linked with a normal defined symbol,the normal defined symbol is used with no error. When a weak undefined symbol is linked and the symbol is not defined,the value of the weak symbol becomes zero with no error. On some systems,uppercase indicates that a default value has been specified |
| “W/w” | The symbol is a weak symbol that has not been specifically tagged as a weak object symbol. When a weak defined symbol is linked with a normal defined symbol,the value of the symbol is determined in a system-specific manner without error. On some systems,uppercase indicates that a default value has been specified |
| “-” | The symbol is a stabs symbol in an a.out object file. In this case,the next values printed are the stabs other field,the stabs desc field,and the stab type. Stabs symbols are used to hold debugging information. |
| “?” | The symbol type is unknown,or object file format specific. |
总结
这篇文章主要介绍了linux 中 vmlinux、vmlinuz、System.map和/proc/kallsyms方面的知识。
参考资料
https://blog.51cto.com/u_1472521/4253215
https://www.dingmos.com/index.php/archives/17/
https://refspecs.linuxfoundation.org/FHS_3.0/fhs/ch03s16.html
https://www.cnblogs.com/Oude/articles/12039025.html
原文地址:https://blog.csdn.net/weixin_45030965
版权声明:本文内容由互联网用户自发贡献,该文观点与技术仅代表作者本人。本站仅提供信息存储空间服务,不拥有所有权,不承担相关法律责任。如发现本站有涉嫌侵权/违法违规的内容, 请发送邮件至 dio@foxmail.com 举报,一经查实,本站将立刻删除。