
如果需要训练的数据大小不大,例如不到1G,那么可以直接全部读入内存中进行训练,这样一般效率最高。
但如果需要训练的数据很大,例如超过10G,无法一次载入内存,那么通常需要在训练的过程中分批逐渐读入。
使用 tf.data API 可以构建数据输入管道,轻松处理大量的数据,不同的数据格式,以及不同的数据转换。
一,构建数据管道
可以从 Numpy array,Pandas DataFrame,Python generator,csv文件,文本文件,文件路径,tfrecords文件等方式构建数据管道。
其中通过Numpy array,文件路径构建数据管道是最常用的方法。
通过tfrecords文件方式构建数据管道较为复杂,需要对样本构建tf.Example后压缩成字符串写到tfrecoreds文件,读取后再解析成tf.Example。
但tfrecoreds文件的优点是压缩后文件较小,便于网络传播,加载速度较快。
首先看下iris部分数据:
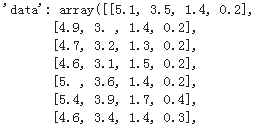
'feature_names': [sepal length (cm)',sepal width (cm)petal length (cm)petal width (cm)],1)">filename': /usr/local/lib/python3.6/dist-packages/sklearn/datasets/data/iris.csvtarget: array([0,1,1,12,1)">]),1)">target_names': array([setosa',versicolorvirginica'],dtype=<U10')
1,从Numpy array构建数据管道
# 从Numpy array构建数据管道

import tensorflow as tf
 numpy as np
from sklearn  datasets
iris = datasets.load_iris()


ds1 = tf.data.Dataset.from_tensor_slices((iris["data"],iris["]))
for features,label in ds1.take(5):
    print(features,label)
tf.Tensor([5.1 3.5 1.4 0.2], shape=(4,), dtype=float64) tf.Tensor(0, shape=(), dtype=int64)
tf.Tensor([4.9 3.  1.4 0.2], dtype=int64)
tf.Tensor([4.7 3.2 1.3 0.2], dtype=int64)
tf.Tensor([4.6 3.1 1.5 0.2], dtype=int64)
tf.Tensor([5.  3.6 1.4 0.2], dtype=int64
2,从 Pandas DataFrame构建数据管道
 从 Pandas DataFrame构建数据管道
 datasets
 pandas as pd
iris = datasets.load_iris()
dfiris = pd.DataFrame(iris[ iris.feature_names)
ds2 = tf.data.Dataset.from_tensor_slices((dfiris.to_dict(list"),1)">]))

in ds2.take(3{'sepal length (cm)': <tf.Tensor: shape=(), dtype=float32, numpy=5.1>, 'sepal width (cm)': <tf.Tensor: shape=(), dtype=float32, numpy=3.5>, 'petal length (cm)': <tf.Tensor: shape=(), numpy=1.4>, 'petal width (cm)': <tf.Tensor: shape=(), numpy=0.2>} tf.Tensor(0, shape=(), dtype=int64)
{'sepal length (cm)': <tf.Tensor: shape=(), numpy=4.9>, numpy=3.0>, numpy=4.7>, numpy=3.2>, numpy=1.3>, dtype=int64)
3,从Python generator构建数据管道
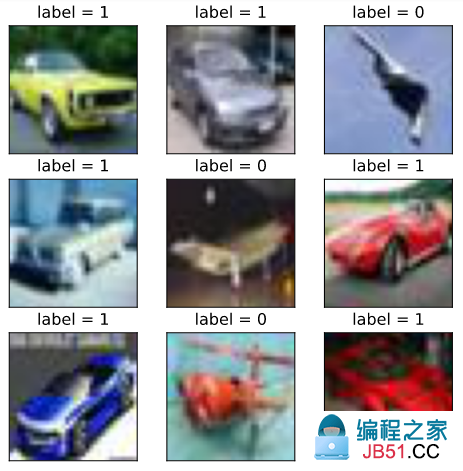
 从Python generator构建数据管道
from matplotlib  pyplot as plt
from tensorflow.keras.preprocessing.image  ImageDataGenerator

 定义一个从文件中读取图片的generator
image_generator = ImageDataGenerator(rescale=1.0/255).flow_from_directory(
                    ./data/cifar2/test/),batch_size=20binary)

classdict = image_generator.class_indices
print(classdict)
Found 2000 images
belonging to 2 classes. {'airplane': 0,'automobile': 1}
def generator():
    in image_generator:
        yield (features,label)

ds3 = tf.data.Dataset.from_generator(generator,output_types=(tf.float32,tf.int32))
%matplotlib inline
%config InlineBackend.figure_format = svg
plt.figure(figsize=(6,6))
for i,(img,label) in enumerate(ds3.unbatch().take(9)):
    ax=plt.subplot(3,3,i+1)
    ax.imshow(img.numpy())
    ax.set_title(label = %d"%label)
    ax.set_xticks([])
    ax.set_yticks([])
plt.show()
4,从csv文件构建数据管道
 从csv文件构建数据管道
ds4 = tf.data.experimental.make_csv_dataset(
      file_pattern = [./data/titanic/train.csv",1)">./data/titanic/test.csv=Survived""=True)

for data,1)">in ds4.take(2print(data,label)
OrderedDict([('PassengerId', <tf.Tensor: shape=(3,), dtype=int32, numpy=array([540,  58, 764], dtype=int32)>), ('Pclass', dtype=int32, numpy=array([1, 3, 1], dtype=int32)>), ('Name', dtype=string, numpy=
array([b'Frolicher, Miss. Hedwig Margaritha', b'Novel, Mr. Mansouer',
       b'Carter, Mrs. William Ernest (Lucile Polk)'], dtype=object)>), ('Sex', numpy=array([b'female', b'male', b'female'], ('Age', <tf.Tensor: shape=(3, numpy=array([22. , 28.5, 36. ], dtype=float32)>), ('SibSp', <tf.Tensor: shape=(3, numpy=array([0, 0, dtype=int32)>), ('Parch', numpy=array([2, 2], ('Ticket', numpy=array([b'13568', b'2697', b'113760'], dtype=object)>), ('Fare', dtype=float32, numpy=array([ 49.5   ,   7.2292, 120.    ], dtype=float32)>), ('Cabin',), numpy=array([b'B39', b'', b'B96 B98'], ('Embarked', <tf.Tensor: shape=(3, numpy=array([b'C', b'C', b'S'], dtype=object)>)]) tf.Tensor([1 0 1], shape=(3, dtype=int32)
OrderedDict([('PassengerId', numpy=array([845,  66, 390], numpy=array([3, numpy=
array([b'Culumovic, Mr. Jeso', b'Moubarek, Master. Gerios',
       b'Lehmann, Miss. Bertha'], ('Sex', numpy=array([b'male', b'female'], dtype=object)>), dtype=float32, numpy=array([17.,  0., 17.], ('SibSp', numpy=array([0, 1, 0], <tf.Tensor: shape=(3, 1, ('Ticket', <tf.Tensor: shape=(3, numpy=array([b'315090', b'2661', b'SC 1748'], <tf.Tensor: shape=(3, numpy=array([ 8.6625, 15.2458, 12.    ], ('Cabin', numpy=array([b'', b''], <tf.Tensor: shape=(3, numpy=array([b'S', b'C'], dtype=object)>)]) tf.Tensor([0 1 1], shape=(3, dtype=int32)
5,从文本文件构建数据管道
 从文本文件构建数据管道

ds5 = tf.data.TextLineDataset(
    filenames = []
    ).skip(1) 略去第一行header

for line in ds5.take(5print(line)
tf.Tensor(b'493,"Molson, Mr. Harry Markland",male,55.0,113787,30.5,C30,S', dtype=string)
tf.Tensor(b'53,"Harper, Mrs. Henry Sleeper (Myna Haxtun)",female,49.0,PC 17572,76.7292,D33,C', dtype=string)
tf.Tensor(b'388,"Buss, Miss. Kate",36.0,27849,13.0, dtype=string)
tf.Tensor(b'192,"Carbines, Mr. William",male,19.0,28424, dtype=string)
tf.Tensor(b'687,"Panula, Mr. Jaako Arnold",male,14.0,4,3101295,39.6875, dtype=string)
6,从文件路径构建数据管道
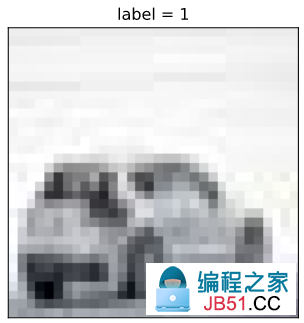
s6 = tf.data.Dataset.list_files(./data/cifar2/train/*/*.jpg)
for file in ds6.take(5print(file)
tf.Tensor(b'./data/cifar2/train/automobile/1263.jpg', dtype=string)
tf.Tensor(b'./data/cifar2/train/airplane/2837.jpg', dtype=string)
tf.Tensor(b'./data/cifar2/train/airplane/4264.jpg', dtype=string)
tf.Tensor(b'./data/cifar2/train/automobile/4241.jpg', dtype=string)
tf.Tensor(b'./data/cifar2/train/automobile/192.jpg', dtype=string)
def load_image(img_path,size = (32,1)">)): label = 1 if tf.strings.regex_full_match(img_path,1)">.*/automobile/.*") else 0 img = tf.io.read_file(img_path) img = tf.image.decode_jpeg(img) 注意此处为jpeg格式 img = tf.image.resize(img,size) return(img,label) %' in enumerate(ds6.map(load_image).take(2)): plt.figure(i) plt.imshow((img/255.0).numpy()) plt.title(label) plt.xticks([]) plt.yticks([])

7,从tfrecords文件构建数据管道
 os
 numpy as np

 inpath:原始数据路径 outpath:TFRecord文件输出路径
 create_tfrecords(inpath,outpath):
    writer = tf.io.TFRecordWriter(outpath)
    dirs = os.listdir(inpath)
    for index,name  enumerate(dirs):
        class_path = inpath +/"+ name+"
        for img_name  os.listdir(class_path):
            img_path = class_path + img_name
            img = tf.io.read_file(img_path)
            img = tf.image.decode_image(img)
            img = tf.image.encode_jpeg(img) #统一成jpeg格式压缩
            example = tf.train.Example(
               features=tf.train.Features(feature={
                    label': tf.train.Feature(int64_list=tf.train.Int64List(value=[index])),1)">img_raw': tf.train.Feature(bytes_list=tf.train.BytesList(value=[img.numpy()]))
               }))
            writer.write(example.SerializeToString())
    writer.close()

create_tfrecords(./data/cifar2_test.tfrecords/)

 pyplot as plt

 parse_example(proto):
    description ={  : tf.io.FixedLenFeature([],tf.string),1)">: tf.io.FixedLenFeature([],tf.int64)}
    example = tf.io.parse_single_example(proto,description)
    img = tf.image.decode_jpeg(example["])   注意此处为jpeg格式
    img = tf.image.resize(img,(32,1)">))
    label = example[]
    ./data/cifar2_test.tfrecords").map(parse_example).shuffle(3000)

%in enumerate(ds7.take(9)
    ax.imshow((img/255.0).numpy())
    ax.set_title(label)
    ax.set_xticks([])
    ax.set_yticks([])
plt.show()

二,应用数据转换
Dataset数据结构应用非常灵活,因为它本质上是一个Sequece序列,其每个元素可以是各种类型,例如可以是张量,列表,字典,也可以是Dataset。
Dataset包含了非常丰富的数据转换功能。
-
map: 将转换函数映射到数据集每一个元素。
-
flat_map: 将转换函数映射到数据集的每一个元素,并将嵌套的Dataset压平。
-
interleave: 效果类似flat_map,但可以将不同来源的数据夹在一起。
-
filter: 过滤掉某些元素。
-
zip: 将两个长度相同的Dataset横向铰合。
-
concatenate: 将两个Dataset纵向连接。
-
reduce: 执行归并操作。
-
batch : 构建批次,每次放一个批次。比原始数据增加一个维度。 其逆操作为unbatch。
-
padded_batch: 构建批次,类似batch,但可以填充到相同的形状。
-
window :构建滑动窗口,返回Dataset of Dataset.
-
shuffle: 数据顺序洗牌。
-
repeat: 重复数据若干次,不带参数时,重复无数次。
-
shard: 采样,从某个位置开始隔固定距离采样一个元素。
- take: 采样,从开始位置取前几个元素。
 map:将转换函数映射到数据集每一个元素

ds = tf.data.Dataset.from_tensor_slices([hello worldhello Chinahello Beijing])
ds_map = ds.map(lambda x:tf.strings.split(x,1)">" ))
for x  ds_map:
    print(x)
tf.Tensor([b'hello' b'world'], shape=(2, dtype=string)
tf.Tensor([b'hello' b'China'], dtype=string)
tf.Tensor([b'hello' b'Beijing'], dtype=string)
flat_map:将转换函数映射到数据集的每一个元素,并将嵌套的Dataset压平。 ]) ds_flatmap = ds.flat_map(lambda x:tf.data.Dataset.from_tensor_slices(tf.strings.split(x,1)">))) ds_flatmap: print(x)
tf.Tensor(b'hello', dtype=string)
tf.Tensor(b'world', dtype=string)
tf.Tensor(b'hello', dtype=string)
tf.Tensor(b'China', dtype=string)
tf.Tensor(b'Beijing', dtype=string)
interleave: 效果类似flat_map,但可以将不同来源的数据夹在一起。 ]) ds_interleave = ds.interleave( ds_interleave: filter:过滤掉某些元素。 ]) 找出含有字母a或B的元素 ds_filter = ds.filter(lambda x: tf.strings.regex_full_match(x,1)">.*[a|B].* ds_filter: print(x)
tf.Tensor(b'hello China', dtype=string)
tf.Tensor(b'hello Beijing', dtype=string)
zip:将两个长度相同的Dataset横向铰合。 ds1 = tf.data.Dataset.range(0,3) ds2 = tf.data.Dataset.range(3,1)">) ds3 = tf.data.Dataset.range(6,9) ds_zip = tf.data.Dataset.zip((ds1,ds2,ds3)) for x,y,z ds_zip: print(x.numpy(),y.numpy(),z.numpy())
0 3 6
1 4 7
2 5 8
condatenate:将两个Dataset纵向连接。 ) ds_concat = tf.data.Dataset.concatenate(ds1,ds2) ds_concat: print(x)
tf.Tensor(0, dtype=int64)
tf.Tensor(1, dtype=int64)
tf.Tensor(2, dtype=int64)
tf.Tensor(3, dtype=int64)
tf.Tensor(4, dtype=int64)
tf.Tensor(5, dtype=int64)
reduce:执行归并操作。 ds = tf.data.Dataset.from_tensor_slices([1,5.0]) result = ds.reduce(0.0,lambda x,y:tf.add(x,y)) result
<tf.Tensor: shape=(), numpy=15.0>batch:构建批次,每次放一个批次。比原始数据增加一个维度。 其逆操作为unbatch。 ds = tf.data.Dataset.range(12) ds_batch = ds.batch(4 ds_batch: print(x)
tf.Tensor([0 1 2 3], dtype=int64)
tf.Tensor([4 5 6 7], dtype=int64)
tf.Tensor([ 8  9 10 11], dtype=int64)
padded_batch:构建批次,类似batch,但可以填充到相同的形状。 elements = [[1,2],[3,5],[6,7],[8]] ds = tf.data.Dataset.from_generator(: iter(elements),tf.int32) ds_padded_batch = ds.padded_batch(2,padded_shapes = [4 ds_padded_batch: print(x)
tf.Tensor(
[[1 2 0 0]
 [3 4 5 0]], 4), dtype=int32)
tf.Tensor(
[[6 7 0 0]
 [8 0 0 0]], dtype=int32)
window:构建滑动窗口,返回Dataset of Dataset. window返回的是Dataset of Dataset,可以用flat_map压平 ds_window = ds.window(3,shift=1).flat_map(lambda x: x.batch(3,drop_remainder=True)) ds_window: print(x)
tf.Tensor([0 1 2], dtype=int64)
tf.Tensor([1 2 3], dtype=int64)
tf.Tensor([2 3 4], dtype=int64)
tf.Tensor([3 4 5], dtype=int64)
tf.Tensor([4 5 6], dtype=int64)
tf.Tensor([5 6 7], dtype=int64)
tf.Tensor([6 7 8], dtype=int64)
tf.Tensor([7 8 9], dtype=int64)
tf.Tensor([ 8  9 10], dtype=int64)
tf.Tensor([ 9 10 11], dtype=int64)
shuffle:数据顺序洗牌。 ) ds_shuffle = ds.shuffle(buffer_size = 5 ds_shuffle: print(x)
tf.Tensor(1, dtype=int64)
tf.Tensor(0, dtype=int64)
tf.Tensor(6, dtype=int64)
tf.Tensor(7, dtype=int64)
tf.Tensor(11, dtype=int64)
tf.Tensor(9, dtype=int64)
tf.Tensor(10, dtype=int64)
tf.Tensor(8, dtype=int64)
repeat:重复数据若干次,不带参数时,重复无数次。 ds = tf.data.Dataset.range(3) ds_repeat = ds.repeat(3 ds_repeat:shard:采样,从某个位置开始隔固定距离采样一个元素。 ) ds_shard = ds.shard(3,index = 1 ds_shard:take:采样,从开始位置取前几个元素。 ) ds_take = ds.take(3) list(ds_take.as_numpy_iterator())
[0, 2]三,提升管道性能
训练深度学习模型常常会非常耗时。
模型训练的耗时主要来自于两个部分,一部分来自数据准备,另一部分来自参数迭代。
参数迭代过程的耗时通常依赖于GPU来提升。
而数据准备过程的耗时则可以通过构建高效的数据管道进行提升。
以下是一些构建高效数据管道的建议。
-
1,使用 prefetch 方法让数据准备和参数迭代两个过程相互并行。
-
2,使用 interleave 方法可以让数据读取过程多进程执行,并将不同来源数据夹在一起。
-
3,使用 map 时设置num_parallel_calls 让数据转换过程多进行执行。
-
4,使用 cache 方法让数据在第一个epoch后缓存到内存中,仅限于数据集不大情形。
-
5,使用 map转换时,先batch,然后采用向量化的转换方法对每个batch进行转换。
1,使用 prefetch 方法让数据准备和参数迭代两个过程相互并行。
 tensorflow as tf

 打印时间分割线
@tf.function
 printbar():
    ts = tf.timestamp()
    today_ts = ts%(24*60*60)

    hour = tf.cast(today_ts//3600+8,tf.int32)%tf.constant(24)
    minite = tf.cast((today_ts%3600)//60 timeformat(m):
        if tf.strings.length(tf.strings.format({}:
            return(tf.strings.format(0{}= tf.strings.join([timeformat(hour),timeformat(minite),timeformat(second)],separator = :)
    tf.print(=========="*8,end = print(timestring)

 time

 数据准备和参数迭代两个过程默认情况下是串行的。

 模拟数据准备
for i in range(10):
        假设每次准备数据需要2s
        time.sleep(2)
         i
ds = tf.data.Dataset.from_generator(generator,output_types = (tf.int32))

 模拟参数迭代
 train_step():
    假设每一步训练需要1s
    time.sleep(1)

 训练过程预计耗时 10*2+10*1+ = 30s
printbar()
tf.print(tf.constant(start training... ds:
    train_step()
printbar()
tf.end training... 使用 prefetch 方法让数据准备和参数迭代两个过程相互并行。

 训练过程预计耗时 max(10*2,10*1) = 20s
start training with prefetch...))

 tf.data.experimental.AUTOTUNE 可以让程序自动选择合适的参数
in ds.prefetch(buffer_size = tf.data.experimental.AUTOTUNE):
    train_step()

printbar()
tf."))
================================================================================16:18:31
start training...
================================================================================16:19:01
end training...
================================================================================16:19:01
start training with prefetch...
================================================================================16:19:23
end training...
2,使用 interleave 方法可以让数据读取过程多进程执行,并将不同来源数据夹在一起。
ds_files = tf.data.Dataset.list_files(./data/titanic/*.csv) ds = ds_files.flat_map(lambda x:tf.data.TextLineDataset(x).skip(1in ds.take(4ds_files = tf.data.Dataset.list_files() ds = ds_files.interleave(in ds.take(8print(line)
tf.Tensor(b'181,"Sage, Miss. Constance Gladys",8,CA. 2343,69.55, dtype=string)
tf.Tensor(b'493, dtype=string)
tf.Tensor(b'405,"Oreskovic, Miss. Marija",female,20.0,315096,8.6625, dtype=string)
tf.Tensor(b'53, dtype=string)
tf.Tensor(b'635,"Skoog, Miss. Mabel",9.0,347088,27.9, dtype=string)
tf.Tensor(b'701,"Astor, Mrs. John Jacob (Madeleine Talmadge Force)",18.0,PC 17757,227.525,C62 C64,C', dtype=string)
3,使用 map 时设置num_parallel_calls 让数据转换过程多进行执行
ds = tf.data.Dataset.list_files( 单进程转换
start transformation...))

ds_map = ds.map(load_image)
for _ pass

printbar()
tf.end transformation... 多进程转换
start parallel transformation...))

ds_map_parallel = ds.map(load_image,num_parallel_calls = tf.data.experimental.AUTOTUNE)
 ds_map_parallel:
    end parallel transformation..."))
4,使用 cache 方法让数据在第一个epoch后缓存到内存中,仅限于数据集不大情形。
in range(5假设每一步训练需要0s
    pass

 训练过程预计耗时 (5*2+5*0)*3 = 30s
for epoch in tf.range(3 ds:
        train_step()
    printbar()
    tf.epoch = ended)
printbar()
tf. i

 使用 cache 方法让数据在第一个epoch后缓存到内存中,仅限于数据集不大情形。
ds = tf.data.Dataset.from_generator(generator,1)"> (tf.int32)).cache()

假设每一步训练需要0s
    time.sleep(0)

 训练过程预计耗时 (5*2+5*0)+(5*0+5*0)*2 = 10s
"))
================================================================================17:07:57
start training...
================================================================================17:08:07
epoch = 0  ended
================================================================================17:08:17
epoch = 1  ended
================================================================================17:08:27
epoch = 2
end training...
================================================================================17:08:27
start training...
================================================================================17:08:37 0  ended
================================================================================17:08:37  ended
================================================================================17:08:37
end training...
5,使用 map转换时,先batch,然后采用向量化的转换方法对每个batch进行转换。
 先map后batch
ds = tf.data.Dataset.range(100000)
ds_map_batch = ds.map(lambda x:x**2).batch(20)

printbar()
tf.start scalar transformation... ds_map_batch:

printbar()
tf.end scalar transformation... 先batch后map
ds = tf.data.Dataset.range(100000)
ds_batch_map = ds.batch(20).map(lambda x:x**2start vector transformation... ds_batch_map:
    end vector transformation..."))
================================================================================17:09:10
start scalar transformation...
================================================================================17:09:13
end scalar transformation...
================================================================================17:09:13
start vector transformation...
================================================================================17:09:14
end vector transformation...
参考:
开源电子书地址:https://lyhue1991.github.io/eat_tensorflow2_in_30_days/
GitHub 项目地址:https://github.com/lyhue1991/eat_tensorflow2_in_30_days
版权声明:本文内容由互联网用户自发贡献,该文观点与技术仅代表作者本人。本站仅提供信息存储空间服务,不拥有所有权,不承担相关法律责任。如发现本站有涉嫌侵权/违法违规的内容, 请发送邮件至 dio@foxmail.com 举报,一经查实,本站将立刻删除。