
文章目录
需求分析
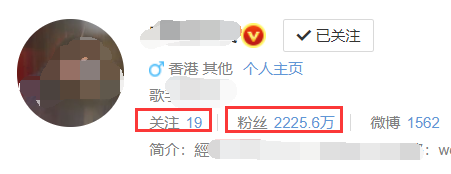
好友功能是目前社交场景的必备功能之一,一般好友相关的功能包含有:关注/取关、我(他)的关注、我(他)的粉丝、共同关注、我关注的人也关注他等这样一些功能。
类似于这样的功能我们如果采用数据库做的话只是单纯得到用户的一些粉丝或者关注列表的话是很简单也很容易实现,但是如果我想要查出两个甚至多个用户共同关注了哪些人或者想要查询两个或者多个用户的共同粉丝的话就会很麻烦,效率也不会很高。但是如果你用redis去做的话就会相当的简单而且效率很高。原因是redis自己本身带有专门针对于这种集合的交集、并集、差集的一些操作。
设计思路
总体思路我们采用MySQL + Redis的方式结合完成。MySQL主要是保存落地数据,而利用Redis的Sets数据类型进行集合操作。Sets拥有去重(我们不能多次关注同一用户)功能。一个用户我们存贮两个集合:一个是保存用户关注的人 另一个是保存关注用户的人。
- SADD 添加成员;命令格式:
SADD key member [member …]----- 关注 - SREM 移除某个成员;命令格式:
SREM key member [member …]-------取关 - SCARD 统计集合内的成员数;命令格式:
SCARD key-------关注/粉丝个数 - SISMEMBER 判断是否是集合成员;命令格式:
SISMEMBER key member---------判断是否关注(如果关注那么只可以点击取关) - SMEMBERS 查询集合内的成员;命令格式:
SMEMBERS key-------列表使用(关注列表和粉丝列表) - SINTER 查询集合的交集;命令格式:
SINTER key [key …]--------共同关注、我关注的人关注了他
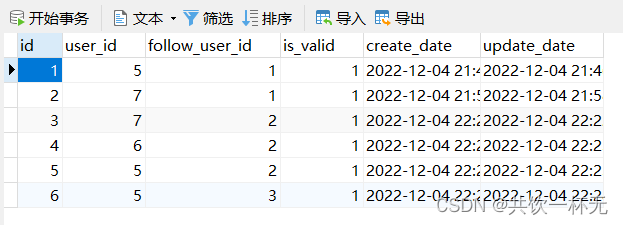
数据库表设计
这个数据库表的结构比较简单,主要记录了用户id、用户关注的id和关注状态。
CREATE TABLE `t_follow` (
  `id` int(11) NOT NULL AUTO_INCREMENT,
  `user_id` int(11) DEFAULT NULL COMMENT '当前登录用户的id',
  `follow_user_id` int(11) DEFAULT NULL COMMENT '当前登录用户关注的用户的id',
  `is_valid` tinyint(1) DEFAULT NULL COMMENT '关注状态,0-没有关注,1-关注了',
  `create_date` datetime DEFAULT NULL,
  `update_date` datetime DEFAULT NULL,
  PRIMARY KEY (`id`)
) ENGINE=InnoDB DEFAULT CHARSET=utf8 ROW_FORMAT=COMPACT COMMENT='用户和用户关注表';
新建好友功能微服务
添加依赖和配置
pom依赖如下:
<?xml version="1.0" encoding="UTF-8"?>
<project xmlns="http://maven.apache.org/POM/4.0.0"
         xmlns:xsi="http://www.w3.org/2001/XMLSchema-instance"
         xsi:schemaLocation="http://maven.apache.org/POM/4.0.0 http://maven.apache.org/xsd/maven-4.0.0.xsd">
    <parent>
        <artifactId>redis-seckill</artifactId>
        <groupId>com.zjq</groupId>
        <version>1.0-SNAPSHOT</version>
    </parent>
    <modelVersion>4.0.0</modelVersion>

    <artifactId>ms-follow</artifactId>

    <dependencies>
        <!-- eureka client -->
        <dependency>
            <groupId>org.springframework.cloud</groupId>
            <artifactId>spring-cloud-starter-netflix-eureka-client</artifactId>
        </dependency>
        <!-- spring web -->
        <dependency>
            <groupId>org.springframework.boot</groupId>
            <artifactId>spring-boot-starter-web</artifactId>
        </dependency>
        <!-- mysql -->
        <dependency>
            <groupId>mysql</groupId>
            <artifactId>mysql-connector-java</artifactId>
        </dependency>
        <!-- spring data redis -->
        <dependency>
            <groupId>org.springframework.boot</groupId>
            <artifactId>spring-boot-starter-data-redis</artifactId>
        </dependency>
        <!-- mybatis -->
        <dependency>
            <groupId>org.mybatis.spring.boot</groupId>
            <artifactId>mybatis-spring-boot-starter</artifactId>
        </dependency>
        <!-- commons 公共项目 -->
        <dependency>
            <groupId>com.zjq</groupId>
            <artifactId>commons</artifactId>
            <version>1.0-SNAPSHOT</version>
        </dependency>
        <!-- swagger -->
        <dependency>
            <groupId>com.battcn</groupId>
            <artifactId>swagger-spring-boot-starter</artifactId>
        </dependency>
    </dependencies>

</project>
springboot配置如下:
server:
  port: 7004 # 端口

spring:
  application:
    name: ms-follow # 应用名
  # 数据库
  datasource:
    driver-class-name: com.mysql.cj.jdbc.Driver
    username: root
    password: root
    url: jdbc:mysql://127.0.0.1:3306/seckill?serverTimezone=Asia/Shanghai&characterEncoding=utf8&useUnicode=true&useSSL=false
  # Redis
  redis:
    port: 6379
    host: localhost
    timeout: 3000
    password: 123456
    database: 2
  # Swagger
  swagger:
    base-package: com.zjq.follow
    title: 好用功能微服务API接口文档

# 配置 Eureka Server 注册中心
eureka:
  instance:
    prefer-ip-address: true
    instance-id: ${spring.cloud.client.ip-address}:${server.port}
  client:
    service-url:
      defaultZone: http://localhost:7000/eureka/

service:
  name:
    ms-oauth-server: http://ms-oauth2-server/
    ms-diners-server: http://ms-users/

mybatis:
  configuration:
    map-underscore-to-camel-case: true # 开启驼峰映射

logging:
  pattern:
    console: '%d{HH:mm:ss} [%thread] %-5level %logger{50} - %msg%n'
添加配置类
redis配置类:
package com.zjq.seckill.config;

import com.fasterxml.jackson.annotation.JsonAutoDetect;
import com.fasterxml.jackson.annotation.PropertyAccessor;
import com.fasterxml.jackson.databind.ObjectMapper;
import org.springframework.context.annotation.Bean;
import org.springframework.context.annotation.Configuration;
import org.springframework.core.io.ClassPathResource;
import org.springframework.data.redis.connection.RedisConnectionFactory;
import org.springframework.data.redis.core.RedisTemplate;
import org.springframework.data.redis.core.script.DefaultRedisScript;
import org.springframework.data.redis.serializer.Jackson2JsonRedisSerializer;
import org.springframework.data.redis.serializer.StringRedisSerializer;

/**
 * RedisTemplate配置类
 * @author zjq
 */
@Configuration
public class RedisTemplateConfiguration {

    /**
     * redisTemplate 序列化使用的jdkSerializeable,存储二进制字节码,所以自定义序列化类
     *
     * @param redisConnectionFactory
     * @return
     */
    @Bean
    public RedisTemplate<Object, Object> redisTemplate(RedisConnectionFactory redisConnectionFactory) {
        RedisTemplate<Object, Object> redisTemplate = new RedisTemplate<>();
        redisTemplate.setConnectionFactory(redisConnectionFactory);

        // 使用Jackson2JsonRedisSerialize 替换默认序列化
        Jackson2JsonRedisSerializer jackson2JsonRedisSerializer = new Jackson2JsonRedisSerializer(Object.class);

        ObjectMapper objectMapper = new ObjectMapper();
        objectMapper.setVisibility(PropertyAccessor.ALL, JsonAutoDetect.Visibility.ANY);
        jackson2JsonRedisSerializer.setObjectMapper(objectMapper);

        // 设置key和value的序列化规则
        redisTemplate.setValueSerializer(jackson2JsonRedisSerializer);
        redisTemplate.setKeySerializer(new StringRedisSerializer());

        redisTemplate.setHashKeySerializer(new StringRedisSerializer());
        redisTemplate.setHashValueSerializer(jackson2JsonRedisSerializer);

        redisTemplate.afterPropertiesSet();
        return redisTemplate;
    }


}
REST配置类:
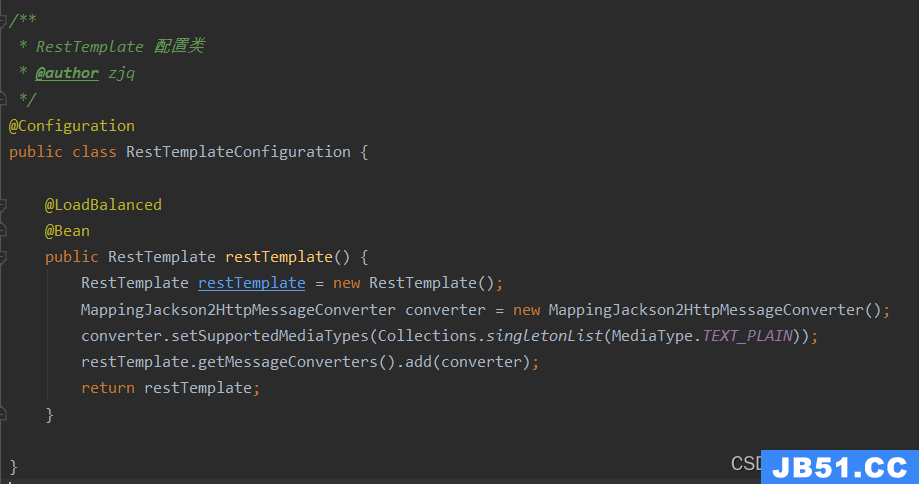
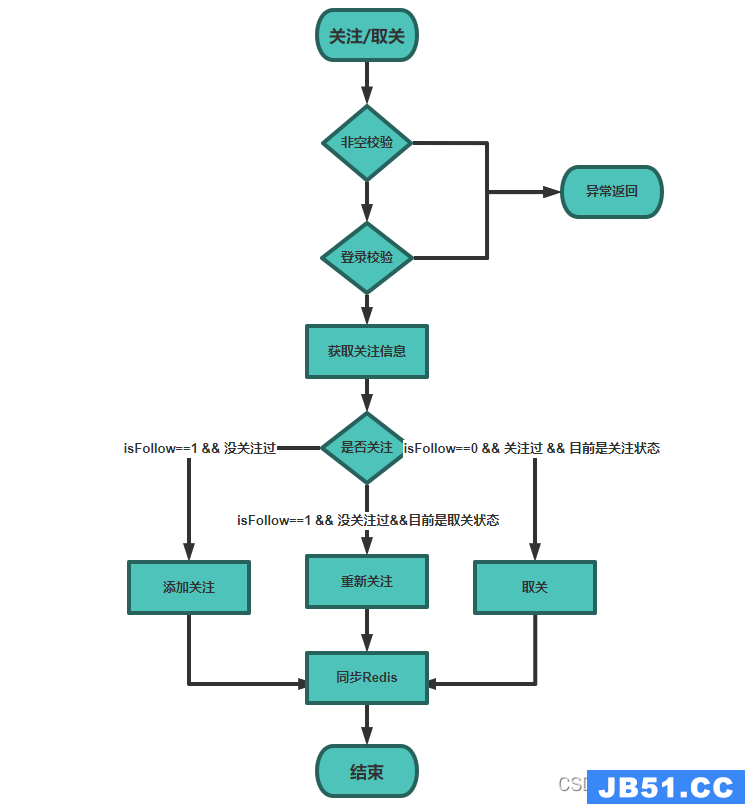
关注/取关实现
业务逻辑
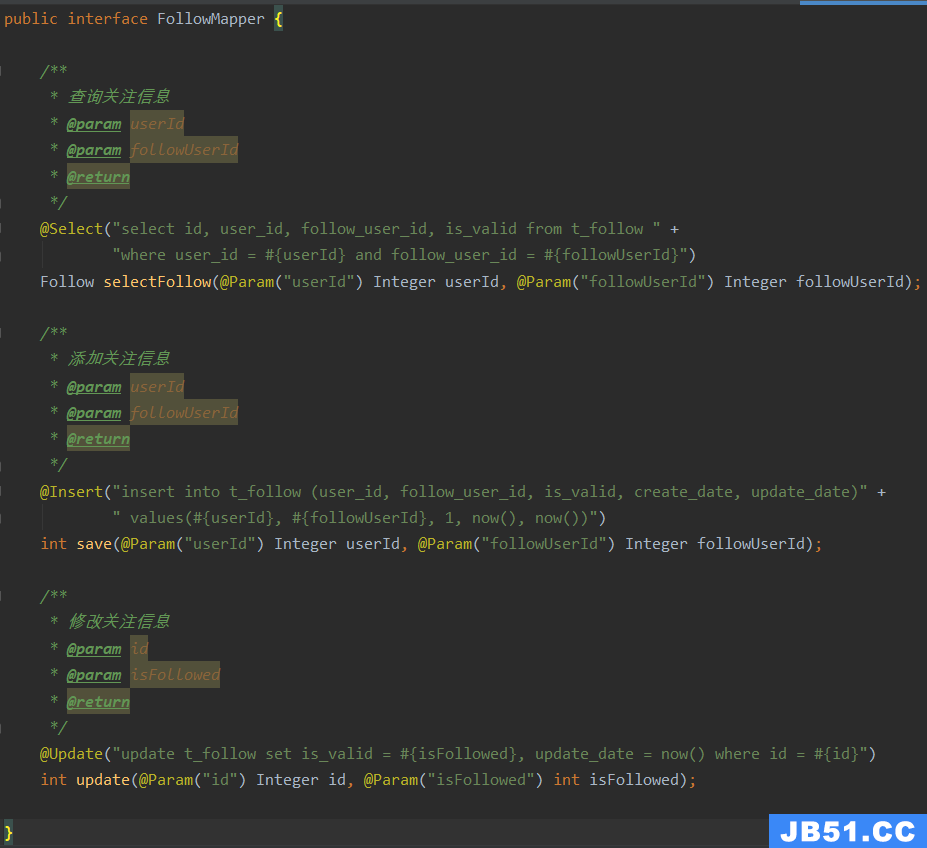
Mapper实现
Mapper比较简单主要是查询关注信息、添加关注信息、取关或者再次关注。
Service层实现
package com.zjq.seckill.service;
import cn.hutool.core.bean.BeanUtil;
import com.zjq.commons.constant.ApiConstant;
import com.zjq.commons.constant.RedisKeyConstant;
import com.zjq.commons.exception.ParameterException;
import com.zjq.commons.model.domain.ResultInfo;
import com.zjq.commons.model.pojo.Follow;
import com.zjq.commons.model.vo.SignInUserInfo;
import com.zjq.commons.utils.AssertUtil;
import com.zjq.commons.utils.ResultInfoUtil;
import com.zjq.seckill.mapper.FollowMapper;
import org.springframework.beans.factory.annotation.Value;
import org.springframework.data.redis.core.RedisTemplate;
import org.springframework.stereotype.Service;
import org.springframework.web.client.RestTemplate;
import javax.annotation.Resource;
import java.util.LinkedHashMap;
/**
* 关注/取关业务逻辑层
* @author zjq
*/
@Service
public class FollowService {
@Value("${service.name.ms-oauth-server}")
private String oauthServerName;
@Value("${service.name.ms-diners-server}")
private String dinersServerName;
@Resource
private RestTemplate restTemplate;
@Resource
private FollowMapper followMapper;
@Resource
private RedisTemplate redisTemplate;
/**
* 关注/取关
*
* @param followUserId 关注的食客ID
* @param isFollowed 是否关注 1=关注 0=取关
* @param accessToken 登录用户token
* @param path 访问地址
* @return
*/
public ResultInfo follow(Integer followUserId, int isFollowed,
String accessToken, String path) {
// 是否选择了关注对象
AssertUtil.isTrue(followUserId == null || followUserId < 1,
"请选择要关注的人");
// 获取登录用户信息 (封装方法)
SignInUserInfo dinerInfo = loadSignInDinerInfo(accessToken);
// 获取当前登录用户与需要关注用户的关注信息
Follow follow = followMapper.selectFollow(dinerInfo.getId(), followUserId);
// 如果没有关注信息,且要进行关注操作 -- 添加关注
if (follow == null && isFollowed == 1) {
// 添加关注信息
int count = followMapper.save(dinerInfo.getId(), followUserId);
// 添加关注列表到 Redis
if (count == 1) {
addToRedisSet(dinerInfo.getId(), followUserId);
}
return ResultInfoUtil.build(ApiConstant.SUCCESS_CODE,
"关注成功", path, "关注成功");
}
// 如果有关注信息,且目前处于关注状态,且要进行取关操作 -- 取关关注
if (follow != null && follow.getIsValid() == 1 && isFollowed == 0) {
// 取关
int count = followMapper.update(follow.getId(), isFollowed);
// 移除 Redis 关注列表
if (count == 1) {
removeFromRedisSet(dinerInfo.getId(),
"成功取关", "成功取关");
}
// 如果有关注信息,且目前处于取关状态,且要进行关注操作 -- 重新关注
if (follow != null && follow.getIsValid() == 0 && isFollowed == 1) {
// 重新关注
int count = followMapper.update(follow.getId(), isFollowed);
// 添加关注列表到 Redis
if (count == 1) {
addToRedisSet(dinerInfo.getId(), "关注成功");
}
return ResultInfoUtil.buildSuccess(path, "操作成功");
}
/**
* 添加关注列表到 Redis
*
* @param dinerId
* @param followUserId
*/
private void addToRedisSet(Integer dinerId, Integer followUserId) {
redisTemplate.opsForSet().add(RedisKeyConstant.following.getKey() + dinerId, followUserId);
redisTemplate.opsForSet().add(RedisKeyConstant.followers.getKey() + followUserId, dinerId);
}
/**
* 移除 Redis 关注列表
*
* @param dinerId
* @param followUserId
*/
private void removeFromRedisSet(Integer dinerId, Integer followUserId) {
redisTemplate.opsForSet().remove(RedisKeyConstant.following.getKey() + dinerId, followUserId);
redisTemplate.opsForSet().remove(RedisKeyConstant.followers.getKey() + followUserId, dinerId);
}
/**
* 获取登录用户信息
*
* @param accessToken
* @return
*/
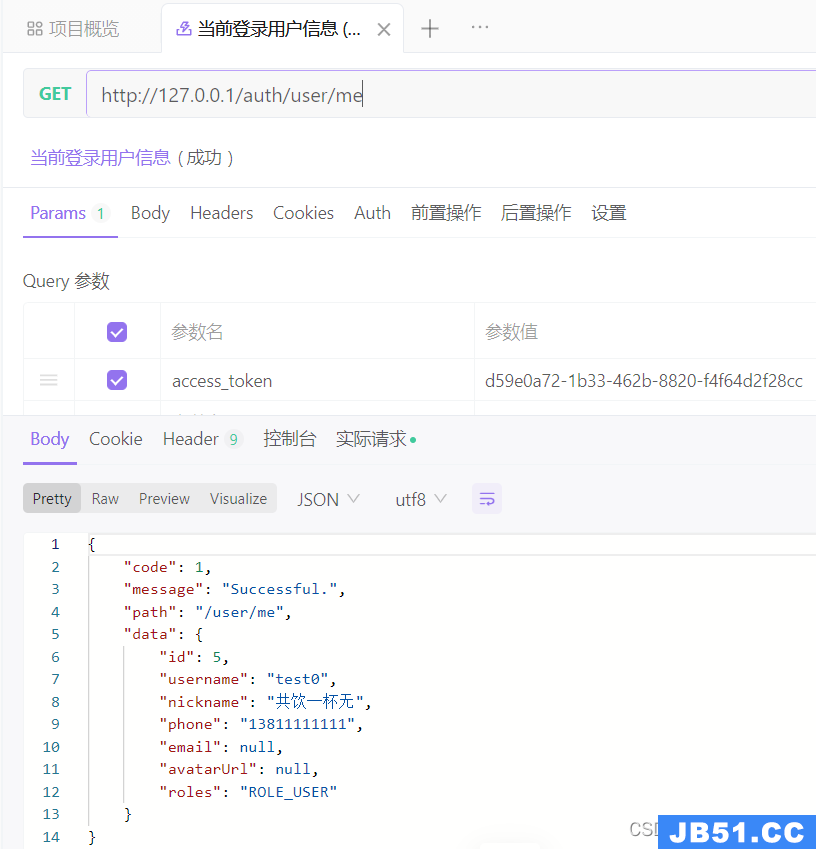
private SignInUserInfo loadSignInDinerInfo(String accessToken) {
// 必须登录
AssertUtil.mustLogin(accessToken);
String url = oauthServerName + "user/me?access_token={accessToken}";
ResultInfo resultInfo = restTemplate.getForObject(url, ResultInfo.class, accessToken);
if (resultInfo.getCode() != ApiConstant.SUCCESS_CODE) {
throw new ParameterException(resultInfo.getMessage());
}
SignInUserInfo dinerInfo = BeanUtil.fillBeanWithMap((LinkedHashMap) resultInfo.getData(),
new SignInUserInfo(), false);
return dinerInfo;
}
}
Controller实现
package com.zjq.seckill.controller;


import com.zjq.commons.model.domain.ResultInfo;
import com.zjq.seckill.service.FollowService;
import org.springframework.web.bind.annotation.*;

import javax.annotation.Resource;
import javax.servlet.http.HttpServletRequest;

/**
 * 关注/取关控制层
 * @author zjq
 */
@RestController
public class FollowController {

    @Resource
    private FollowService followService;
    @Resource
    private HttpServletRequest request;

    /**
     * 关注/取关
     *
     * @param followUserId 关注的用户ID
     * @param isFollowed    是否关注 1=关注 0=取消
     * @param access_token  登录用户token
     * @return
     */
    @PostMapping("/{followUserId}")
    public ResultInfo follow(@PathVariable Integer followUserId,
                             @RequestParam int isFollowed,
                             String access_token) {
        ResultInfo resultInfo = followService.follow(followUserId,
                isFollowed, access_token, request.getServletPath());
        return resultInfo;
    }

}
网关配置路由规则
spring:
  application:
    name: ms-gateway
  cloud:
    gateway:
      discovery:
        locator:
          enabled: true # 开启配置注册中心进行路由功能
          lower-case-service-id: true # 将服务名称转小写
      routes:

        	# 好友功能微服务
        - id: ms-follow
          uri: lb://ms-follow
          predicates:
            - Path=/follow/**
          filters:
            - StripPrefix=1
测试验证
依次启动,注册中心、网关、认证中心、好友功能微服务。
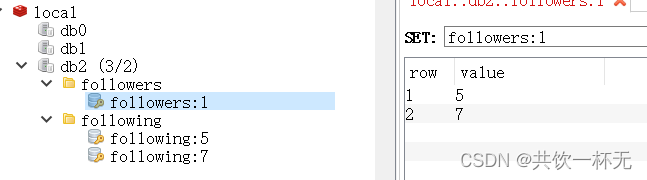
测试id为5的用户,关注id为1的用户。
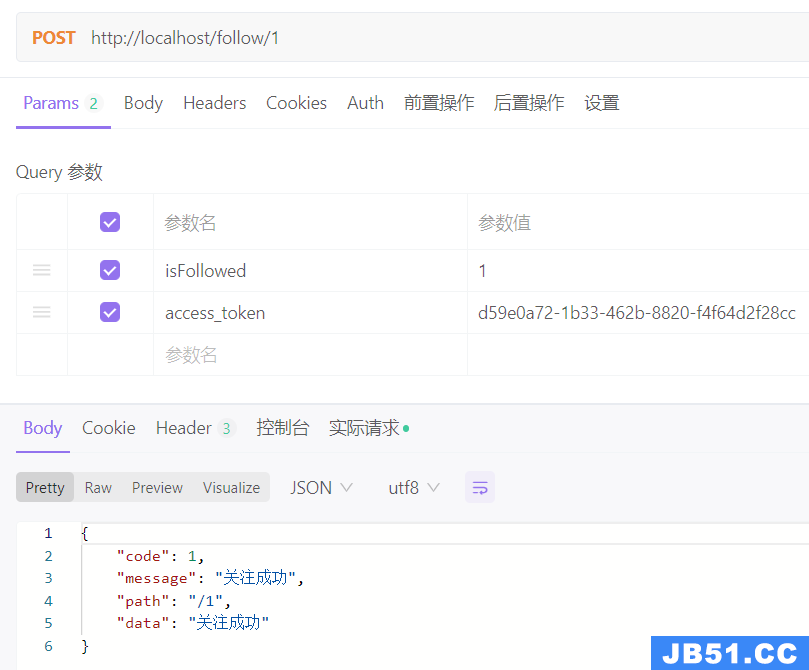
查看redis可以看到有两个集合,一个粉丝集合,一个关注集合。
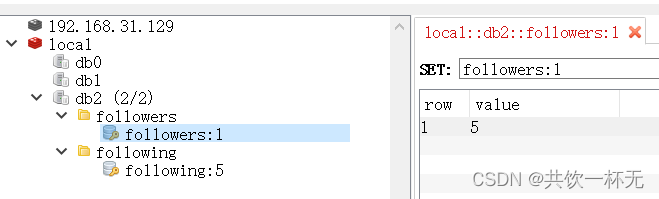
查看数据库,id为5的用户关注了id为1的用户

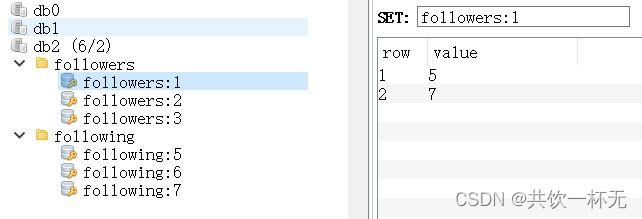
让id等于7的用户关注id等于1的用户,redis和数据库存储信息如下:

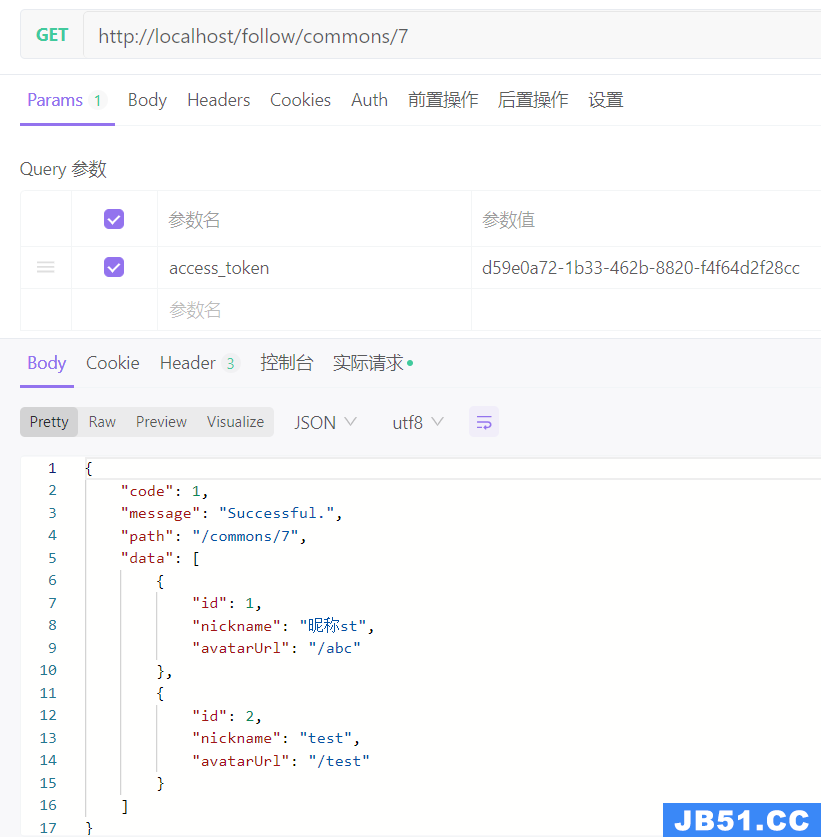
共同关注列表
- 从Redis中读取登录用户的关注列表与查看用户的关注列表,然后进行交集操作,获取共同关注的用户id
- 然后通过用户服务传入用户id数据获取用户基本信息
Controller添加方法
    /**
     * 共同关注列表
     *
     * @param userId
     * @param access_token
     * @return
     */
    @GetMapping("commons/{userId}")
    public ResultInfo findCommonsFriends(@PathVariable Integer userId,
                                         String access_token) {
        return followService.findCommonsFriends(userId, request.getServletPath());
    }
Service添加方法
    /**
     * 共同关注列表
     *
     * @param userId
     * @param accessToken
     * @param path
     * @return
     */
    @Transactional(rollbackFor = Exception.class)
    public ResultInfo findCommonsFriends(Integer userId, String accessToken, String path) {
        // 是否选择了查看对象
        AssertUtil.isTrue(userId == null || userId < 1,
                "请选择要查看的人");
        // 获取登录用户信息
        SignInUserInfo userInfo = loadSignInuserInfo(accessToken);
        // 获取登录用户的关注信息
        String loginuserKey = RedisKeyConstant.following.getKey() + userInfo.getId();
        // 获取登录用户查看对象的关注信息
        String userKey = RedisKeyConstant.following.getKey() + userId;
        // 计算交集
        Set<Integer> userIds = redisTemplate.opsForSet().intersect(loginuserKey, userKey);
        // 没有
        if (userIds == null || userIds.isEmpty()) {
            return ResultInfoUtil.buildSuccess(path, new ArrayList<ShortUserInfo>());
        }
        // 调用食客服务根据 ids 查询食客信息
        ResultInfo resultInfo = restTemplate.getForObject(usersServerName + "findByIds?access_token={accessToken}&ids={ids}",
                ResultInfo.class, accessToken, StrUtil.join(",", userIds));
        if (resultInfo.getCode() != ApiConstant.SUCCESS_CODE) {
            resultInfo.setPath(path);
            return resultInfo;
        }
        // 处理结果集
        List<LinkedHashMap> dinnerInfoMaps = (ArrayList) resultInfo.getData();
        List<ShortUserInfo> userInfos = dinnerInfoMaps.stream()
                .map(user -> BeanUtil.fillBeanWithMap(user, new ShortUserInfo(), true))
                .collect(Collectors.toList());

        return ResultInfoUtil.buildSuccess(path, userInfos);
    }
用户服务新增根据ids查询用户集合
Controller:
    /**
     * 根据 ids 查询用户信息
     *
     * @param ids
     * @return
     */
    @GetMapping("findByIds")
    public ResultInfo<List<ShortUserInfo>> findByIds(String ids) {
        List<ShortUserInfo> dinerInfos = userService.findByIds(ids);
        return ResultInfoUtil.buildSuccess(request.getServletPath(), dinerInfos);
    }
Service:
    /**
     * 根据 ids 查询食客信息
     *
     * @param ids 主键 id,多个以逗号分隔,逗号之间不用空格
     * @return
     */
    public List<ShortUserInfo> findByIds(String ids) {
        AssertUtil.isNotEmpty(ids);
        String[] idArr = ids.split(",");
        List<ShortUserInfo> dinerInfos = usersMapper.findByIds(idArr);
        return dinerInfos;
    }
Mapper:
    /**
     * 根据 ID 集合查询多个食客信息
     * @param ids
     * @return
     */
    @Select("<script> " +
            " select id,nickname,avatar_url from t_diners " +
            " where is_valid = 1 and id in " +
            " <foreach item=\"id\" collection=\"ids\" open=\"(\" separator=\",\" close=\")\"> " +
            "   #{id} " +
            " </foreach> " +
            " </script>")
    List<ShortUserInfo> findByIds(@Param("ids") String[] ids);
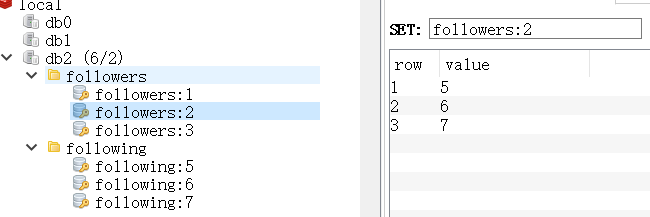
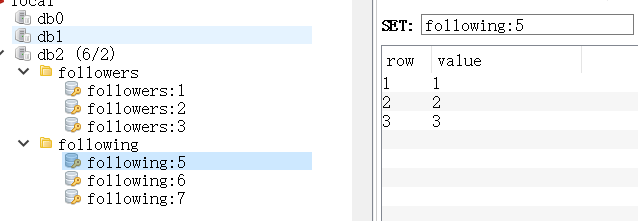
上面测试已经让id5和7的用户关注了id为1的用户,我们继续让id5的用户关注id为3的用户,让id5、6、7的用户关注了id为2的用户:
redis和数据库信息如下:
测试验证
查询当前登录用户id为5和id为7的共同关注信息:
查询当前登录用户id为6和id为7的共同关注信息:
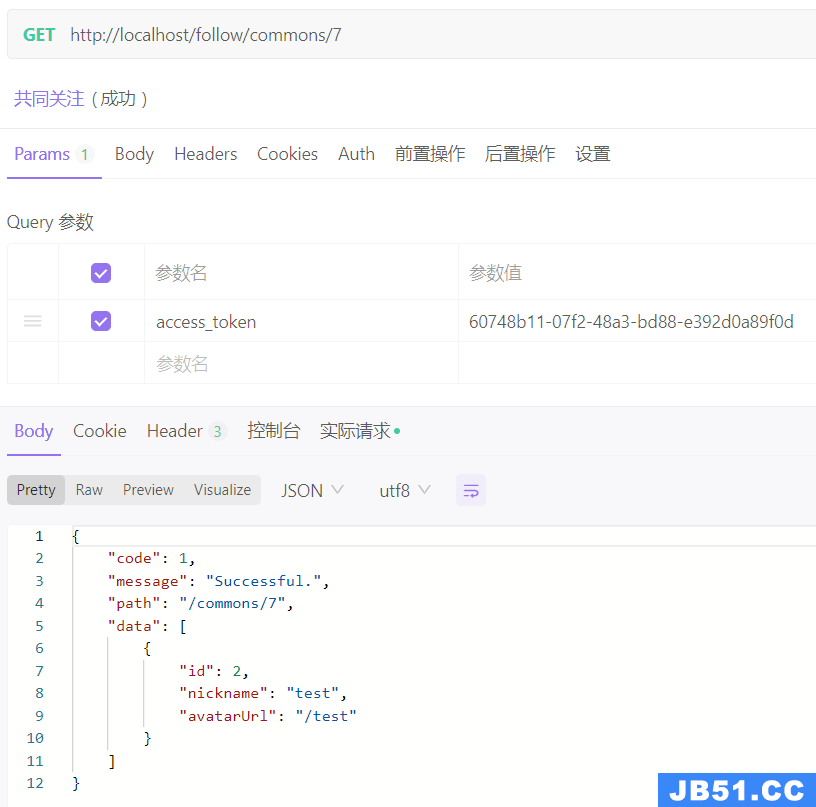
可以看出来5和7共同关注了1和2,6和7只共同关注了2,符合预期。
本文内容到此结束了,
如有收获欢迎点赞原文地址:https://zhanjq.blog.csdn.net" target="_blank" rel="noopener" title="共饮一杯无">共饮一杯无</a> <img class="article-time-img article-heard-img" src="https://csdnimg.cn/release/blogv2/dist/pc
版权声明:本文内容由互联网用户自发贡献,该文观点与技术仅代表作者本人。本站仅提供信息存储空间服务,不拥有所有权,不承担相关法律责任。如发现本站有涉嫌侵权/违法违规的内容, 请发送邮件至 dio@foxmail.com 举报,一经查实,本站将立刻删除。