
1、编译安装LNMP,并安装wordpress
首先准备环境,编译安装LNMP可以是多台主机,也可以是单台主机,把nginx,mysql,php都集中安装在一个主机上;我这里以一台主机为例吧!!
一、编译安装nginx
1)准备编译环境
yum groupinstall "development tools" "server platform development" -y
yum install pcre-devel openssl-devel zlib-devel geoip geoip-devel perl-devel perl-ExtUtils-Embed gd-devel libxml2-devel libxslt-devel -y
提示:可能上面安装的包依赖有epel仓库,所以建议还需要把epel仓库配好;
2)下载nginx源码包
[root@lnmp ~]# ls
[root@lnmp ~]# wget http://nginx.org/download/nginx-1.16.1.tar.gz
--2020-03-18 12:47:31--  http://nginx.org/download/nginx-1.16.1.tar.gz
Resolving nginx.org (nginx.org)... 62.210.92.35,95.211.80.227,2001:1af8:4060:a004:21::e3
Connecting to nginx.org (nginx.org)|62.210.92.35|:80... connected.
HTTP request sent,awaiting response... 200 OK
Length: 1032630 (1008K) [application/octet-stream]
Saving to: ‘nginx-1.16.1.tar.gz’

100%[======================================================================================>] 1,032,630   27.8KB/s   in 51s

2020-03-18 12:48:23 (19.6 KB/s) - ‘nginx-1.16.1.tar.gz’ saved [1032630/1032630]

[root@lnmp ~]# ls
nginx-1.16.1.tar.gz
[root@lnmp ~]# tar xf nginx-1.16.1.tar.gz
[root@lnmp ~]# cd nginx-1.16.1
[root@lnmp nginx-1.16.1]# ls
auto  CHANGES  CHANGES.ru  conf  configure  contrib  html  LICENSE  man  README  src
[root@lnmp nginx-1.16.1]#
3)创建nginx用户用于后续启动nginx用的用户
[root@lnmp nginx-1.16.1]# getent passwd nginx
[root@lnmp nginx-1.16.1]# useradd -r nginx -s /sbin/nologin -d /var/lib/nginx
[root@lnmp nginx-1.16.1]# getent passwd nginx
nginx:x:997:995::/var/lib/nginx:/sbin/nologin
[root@lnmp nginx-1.16.1]#
4)加载预编译环境检查
[root@lnmp nginx-1.16.1]# ./configure --prefix=/usr/share/nginx \
> --sbin-path=/usr/sbin/nginx \
> --modules-path=/usr/lib64/nginx/modules \
> --conf-path=/etc/nginx/nginx.conf \
> --error-log-path=/var/log/nginx/error.log \
> --http-log-path=/var/log/nginx/access.log \
> --http-client-body-temp-path=/var/lib/nginx/tmp/client_body \
> --http-proxy-temp-path=/var/lib/nginx/tmp/proxy \
> --http-fastcgi-temp-path=/var/lib/nginx/tmp/fastcgi \
> --http-uwsgi-temp-path=/var/lib/nginx/tmp/uwsgi \
> --http-scgi-temp-path=/var/lib/nginx/tmp/scgi \
> --pid-path=/run/nginx.pid \
> --lock-path=/run/lock/subsys/nginx \
> --user=nginx --group=nginx \
> --with-file-aio \
> --with-http_ssl_module \
> --with-http_v2_module \
> --with-http_realip_module \
> --with-stream_ssl_preread_module \
> --with-http_addition_module \
> --with-http_xslt_module=dynamic \
> --with-http_image_filter_module=dynamic \
> --with-http_sub_module \
> --with-http_dav_module \
> --with-http_flv_module \
> --with-http_mp4_module \
> --with-http_gunzip_module \
> --with-http_gzip_static_module \
> --with-http_random_index_module \
> --with-http_secure_link_module \
> --with-http_degradation_module \
> --with-http_slice_module \
> --with-http_stub_status_module \
> --with-http_perl_module=dynamic \
> --with-http_auth_request_module \
> --with-mail=dynamic \
> --with-mail_ssl_module \
> --with-pcre \
> --with-pcre-jit \
> --with-stream=dynamic \
> --with-stream_ssl_module \
> --with-google_perftools_module \
> --with-debug \
> --with-cc-opt='-O2 -g -pipe -Wall -Wp,-D_FORTIFY_SOURCE=2 -fexceptions -fstack-protector-strong --param=ssp-buffer-size=4 -grecord-gcc-switches -specs=/usr/lib/rpm/redhat/redhat-hardened-cc1 -m64 -mtune=generic' \
> --with-ld-opt='-Wl,-z,relro -specs=/usr/lib/rpm/redhat/redhat-hardened-ld -Wl,-E'
提示:在这个过程中可能会出现缺少环境依赖包,这个要看提示什么,对应安装好提示的包即可解决问题;
checking for GD library ... found
checking for GD WebP support ... not found
checking for perl
 + perl version: This is perl 5,version 16,subversion 3 (v5.16.3) built for x86_64-linux-thread-multi
 + perl interpreter multiplicity found
checking for Google perftools ... found
creating objs/Makefile

Configuration summary
  + using system PCRE library
  + using system OpenSSL library
  + using system zlib library

  nginx path prefix: "/usr/share/nginx"
  nginx binary file: "/usr/sbin/nginx"
  nginx modules path: "/usr/lib64/nginx/modules"
  nginx configuration prefix: "/etc/nginx"
  nginx configuration file: "/etc/nginx/nginx.conf"
  nginx pid file: "/run/nginx.pid"
  nginx error log file: "/var/log/nginx/error.log"
  nginx http access log file: "/var/log/nginx/access.log"
  nginx http client request body temporary files: "/var/lib/nginx/tmp/client_body"
  nginx http proxy temporary files: "/var/lib/nginx/tmp/proxy"
  nginx http fastcgi temporary files: "/var/lib/nginx/tmp/fastcgi"
  nginx http uwsgi temporary files: "/var/lib/nginx/tmp/uwsgi"
  nginx http scgi temporary files: "/var/lib/nginx/tmp/scgi"

[root@lnmp nginx-1.16.1]#
提示:出现以上内容表示我们的编译环境是可以正常编译nginx,接下来就可以使用make && make install 编译安装了
[root@lnmp nginx-1.16.1]# make -j 4 && make install
make -f objs/Makefile
make[1]: Entering directory `/root/nginx-1.16.1'
cc -c -pipe  -O -W -Wall -Wpointer-arith -Wno-unused-parameter -Werror -g -O2 -g -pipe -Wall -Wp,-D_FORTIFY_SOURCE=2 -fexceptions -fstack-protector-strong --param=ssp-buffer-size=4 -grecord-gcc-switches -specs=/usr/lib/rpm/redhat/redhat-hardened-cc1 -m64 -mtune=generic -I src/core -I src/event -I src/event/modules -I src/os/unix -I src/http/modules/perl -I /usr/include/libxml2 -I objs \
……省略部分内容……
Installing /usr/local/lib64/perl5/auto/nginx/nginx.bs
Installing /usr/local/lib64/perl5/auto/nginx/nginx.so
Installing /usr/local/lib64/perl5/nginx.pm
Installing /usr/local/share/man/man3/nginx.3pm
Appending installation info to /usr/lib64/perl5/perllocal.pod
make[2]: Leaving directory `/root/nginx-1.16.1/objs/src/http/modules/perl'
test -d '/usr/share/nginx' || mkdir -p '/usr/share/nginx'
test -d '/usr/sbin' \
        || mkdir -p '/usr/sbin'
test ! -f '/usr/sbin/nginx' \
        || mv '/usr/sbin/nginx' \
                '/usr/sbin/nginx.old'
cp objs/nginx '/usr/sbin/nginx'
test -d '/etc/nginx' \
        || mkdir -p '/etc/nginx'
cp conf/koi-win '/etc/nginx'
cp conf/koi-utf '/etc/nginx'
cp conf/win-utf '/etc/nginx'
test -f '/etc/nginx/mime.types' \
        || cp conf/mime.types '/etc/nginx'
cp conf/mime.types '/etc/nginx/mime.types.default'
test -f '/etc/nginx/fastcgi_params' \
        || cp conf/fastcgi_params '/etc/nginx'
cp conf/fastcgi_params \
        '/etc/nginx/fastcgi_params.default'
test -f '/etc/nginx/fastcgi.conf' \
        || cp conf/fastcgi.conf '/etc/nginx'
cp conf/fastcgi.conf '/etc/nginx/fastcgi.conf.default'
test -f '/etc/nginx/uwsgi_params' \
        || cp conf/uwsgi_params '/etc/nginx'
cp conf/uwsgi_params \
        '/etc/nginx/uwsgi_params.default'
test -f '/etc/nginx/scgi_params' \
        || cp conf/scgi_params '/etc/nginx'
cp conf/scgi_params \
        '/etc/nginx/scgi_params.default'
test -f '/etc/nginx/nginx.conf' \
        || cp conf/nginx.conf '/etc/nginx/nginx.conf'
cp conf/nginx.conf '/etc/nginx/nginx.conf.default'
test -d '/run' \
        || mkdir -p '/run'
test -d '/var/log/nginx' \
        || mkdir -p '/var/log/nginx'
test -d '/usr/share/nginx/html' \
        || cp -R html '/usr/share/nginx'
test -d '/var/log/nginx' \
        || mkdir -p '/var/log/nginx'
test -d '/usr/lib64/nginx/modules' \
        || mkdir -p '/usr/lib64/nginx/modules'
test ! -f '/usr/lib64/nginx/modules/ngx_http_xslt_filter_module.so' \
        || mv '/usr/lib64/nginx/modules/ngx_http_xslt_filter_module.so' \
                '/usr/lib64/nginx/modules/ngx_http_xslt_filter_module.so.old'
cp objs/ngx_http_xslt_filter_module.so '/usr/lib64/nginx/modules/ngx_http_xslt_filter_module.so'
test ! -f '/usr/lib64/nginx/modules/ngx_http_image_filter_module.so' \
        || mv '/usr/lib64/nginx/modules/ngx_http_image_filter_module.so' \
                '/usr/lib64/nginx/modules/ngx_http_image_filter_module.so.old'
cp objs/ngx_http_image_filter_module.so '/usr/lib64/nginx/modules/ngx_http_image_filter_module.so'
test ! -f '/usr/lib64/nginx/modules/ngx_http_perl_module.so' \
        || mv '/usr/lib64/nginx/modules/ngx_http_perl_module.so' \
                '/usr/lib64/nginx/modules/ngx_http_perl_module.so.old'
cp objs/ngx_http_perl_module.so '/usr/lib64/nginx/modules/ngx_http_perl_module.so'
test ! -f '/usr/lib64/nginx/modules/ngx_mail_module.so' \
        || mv '/usr/lib64/nginx/modules/ngx_mail_module.so' \
                '/usr/lib64/nginx/modules/ngx_mail_module.so.old'
cp objs/ngx_mail_module.so '/usr/lib64/nginx/modules/ngx_mail_module.so'
test ! -f '/usr/lib64/nginx/modules/ngx_stream_module.so' \
        || mv '/usr/lib64/nginx/modules/ngx_stream_module.so' \
                '/usr/lib64/nginx/modules/ngx_stream_module.so.old'
cp objs/ngx_stream_module.so '/usr/lib64/nginx/modules/ngx_stream_module.so'
make[1]: Leaving directory `/root/nginx-1.16.1'
[root@lnmp nginx-1.16.1]#
提示:出现以上提示就表示nginx编译安装就完成了;
4)为了管理方便,我们给nginx添加一个unix_file脚本
[root@lnmp nginx-1.16.1]# cat > /usr/lib/systemd/system/nginx.service
[Unit]
Description=The nginx HTTP and reverse proxy server
After=network.target remote-fs.target nss-lookup.target

[Service]
Type=forking
PIDFile=/run/nginx.pid
# Nginx will fail to start if /run/nginx.pid already exists but has the wrong
# SELinux context. This might happen when running `nginx -t` from the cmdline.
# https://bugzilla.redhat.com/show_bug.cgi?id=1268621
ExecStartPre=/usr/bin/rm -f /run/nginx.pid
ExecStartPre=/usr/sbin/nginx -t
ExecStart=/usr/sbin/nginx
ExecReload=/bin/kill -s HUP $MAINPID
KillSignal=SIGQUIT
TimeoutStopSec=5
KillMode=process
PrivateTmp=true

[Install]
WantedBy=multi-user.target
^C
[root@lnmp nginx-1.16.1]# ll /usr/lib/systemd/system/nginx.service
-rw-r--r-- 1 root root 620 Mar 18 13:20 /usr/lib/systemd/system/nginx.service
[root@lnmp nginx-1.16.1]#
5)加载systemctl配置文件,启动nginx
[root@lnmp nginx-1.16.1]# systemctl daemon-reload
[root@lnmp nginx-1.16.1]# systemctl start nginx
Job for nginx.service failed because the control process exited with error code. See "systemctl status nginx.service" and "journalctl -xe" for details.
[root@lnmp nginx-1.16.1]# systemctl status nginx
● nginx.service - The nginx HTTP and reverse proxy server
   Loaded: loaded (/usr/lib/systemd/system/nginx.service; disabled; vendor preset: disabled)
   Active: failed (Result: exit-code) since Wed 2020-03-18 13:22:28 CST; 11s ago
  Process: 14504 ExecStartPre=/usr/sbin/nginx -t (code=exited,status=1/FAILURE)
  Process: 14501 ExecStartPre=/usr/bin/rm -f /run/nginx.pid (code=exited,status=0/SUCCESS)

Mar 18 13:22:28 lnmp systemd[1]: Starting The nginx HTTP and reverse proxy server...
Mar 18 13:22:28 lnmp nginx[14504]: nginx: the configuration file /etc/nginx/nginx.con... ok
Mar 18 13:22:28 lnmp nginx[14504]: nginx: [emerg] mkdir() "/var/lib/nginx/tmp/client_...ry)
Mar 18 13:22:28 lnmp nginx[14504]: nginx: configuration file /etc/nginx/nginx.conf te...led
Mar 18 13:22:28 lnmp systemd[1]: nginx.service: control process exited,code=exited s...s=1
Mar 18 13:22:28 lnmp systemd[1]: Failed to start The nginx HTTP and reverse proxy server.
Mar 18 13:22:28 lnmp systemd[1]: Unit nginx.service entered failed state.
Mar 18 13:22:28 lnmp systemd[1]: nginx.service failed.
Hint: Some lines were ellipsized,use -l to show in full.
[root@lnmp nginx-1.16.1]# tail -f /var/log/messages
Mar 18 01:01:01 lnmp systemd: Starting Session 2 of user root.
Mar 18 01:22:21 lnmp systemd: Reloading.
Mar 18 01:22:28 lnmp systemd: Starting The nginx HTTP and reverse proxy server...
Mar 18 01:22:28 lnmp nginx: nginx: the configuration file /etc/nginx/nginx.conf syntax is ok
Mar 18 01:22:28 lnmp nginx: nginx: [emerg] mkdir() "/var/lib/nginx/tmp/client_body" failed (2: No such file or directory)
Mar 18 01:22:28 lnmp nginx: nginx: configuration file /etc/nginx/nginx.conf test failed
Mar 18 01:22:28 lnmp systemd: nginx.service: control process exited,code=exited status=1
Mar 18 01:22:28 lnmp systemd: Failed to start The nginx HTTP and reverse proxy server.
Mar 18 01:22:28 lnmp systemd: Unit nginx.service entered failed state.
Mar 18 01:22:28 lnmp systemd: nginx.service failed.
提示:启动nginx时它提示我们缺少/var/lib/nginx/tmp/client_body这个目录 ,我们直接创建即可
[root@lnmp nginx-1.16.1]# mkdir -p /var/lib/nginx/tmp/client_body
[root@lnmp nginx-1.16.1]# systemctl start nginx
[root@lnmp nginx-1.16.1]# ss -ntl
State       Recv-Q Send-Q Local Address:Port               Peer Address:Port
LISTEN      0      128               *:80                            *:*
LISTEN      0      128               *:22                            *:*
LISTEN      0      100       127.0.0.1:25                            *:*
LISTEN      0      128              :::22                           :::*
LISTEN      0      100             ::1:25                           :::*
[root@lnmp nginx-1.16.1]#
提示:可以看到我们把对应目录创建起来,nginx启动就没有任何问题;到此nginx编译安装就完成了;我们可以选择用浏览器访问nginx测试主页,如果能看到,说明我们编译的nginx是没有问题的;
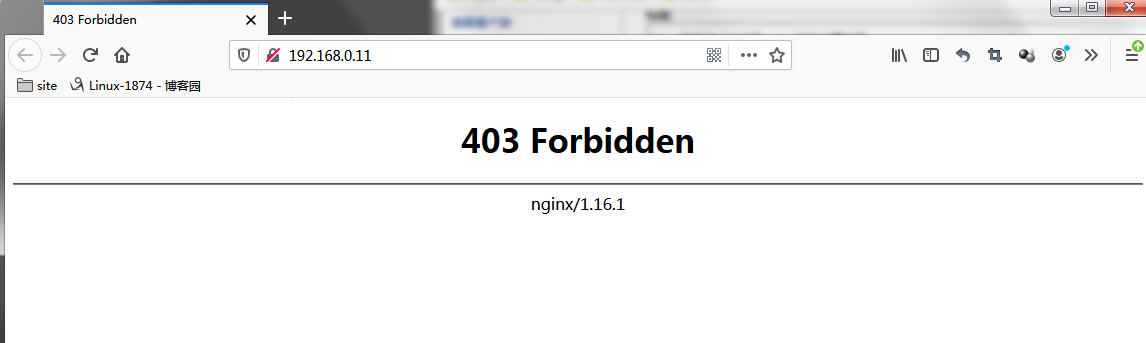
提示:我们访问nginx对外监听的地址,告诉我们没有权限;这不是nginx的问题 ,是我们对应目录下没有资源,我们可以在其根目录创建一主页文件即可;
[root@lnmp ~]# ll /usr/share/nginx/html/
total 0
[root@lnmp ~]# echo "this is test page." > /usr/share/nginx/html/index.html
[root@lnmp ~]#
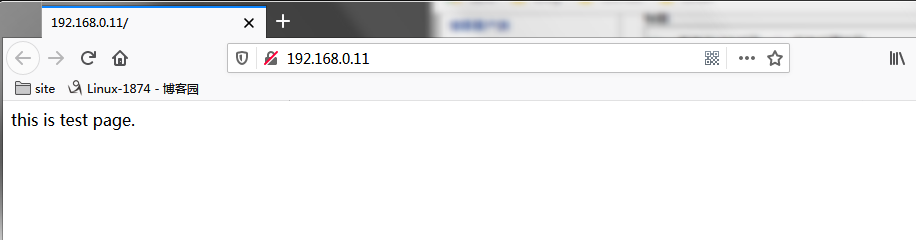
提示:到此我们能够正常访问的nginx的测试页面,接下来我们再来编译安装mysql和php
二、编译安装mariadb
1)下载源码包,并将源码包上传至服务器并解压
[root@lnmp ~]# ls
nginx-1.16.1  nginx-1.16.1.tar.gz
[root@lnmp ~]# rz
rz waiting to receive.
 zmodem trl+C ȡ

  100%   70172 KB 70172 KB/s 00:00:01       0 Errors..
Transferring mariadb-10.2.19.tar.gz...

[root@lnmp ~]# ls
mariadb-10.2.19.tar.gz  nginx-1.16.1  nginx-1.16.1.tar.gz
[root@lnmp ~]# tar xf mariadb-10.2.19.tar.gz
[root@lnmp ~]#
2)安装环境依赖包
[root@lnmp ~]# yum install bison bison-devel zlib-devel libcurl-devel libarchive-devel boost-devel gcc gcc-c++ cmake ncurses-devel gnutls-devel libxml2-devel openssl-devel libevent-devel libaio-devel -y
3)创建系统账号
[root@lnmp ~]# getent passwd mysql
[root@lnmp ~]# useradd -r mysql -s /sbin/nologin -d /app/mysql
[root@lnmp ~]# getent passwd mysql
mysql:x:995:993::/app/mysql:/sbin/nologin
[root@lnmp ~]#
4)进入到解压后的目录,cmake 编译并指定编译选项
[root@lnmp ~]# cd mariadb-10.2.19
[root@lnmp mariadb-10.2.19]# cmake . \
> -DCMAKE_INSTALL_PREFIX=/app/mysql \
> -DMYSQL_DATADIR=/data/mysql/ \
> -DSYSCONFDIR=/etc/mysql \
> -DMYSQL_USER=mysql \
> -DWITH_INNOBASE_STORAGE_ENGINE=1 \
> -DWITH_ARCHIVE_STORAGE_ENGINE=1 \
> -DWITH_BLACKHOLE_STORAGE_ENGINE=1 \
> -DWITH_PARTITION_STORAGE_ENGINE=1 \
> -DWITHOUT_MROONGA_STORAGE_ENGINE=1 \
> -DWITH_DEBUG=0 \
> -DWITH_READLINE=1 \
> -DWITH_SSL=system \
> -DWITH_ZLIB=system \
> -DWITH_LIBWRAP=0 \
> -DENABLED_LOCAL_INFILE=1 \
> -DMYSQL_UNIX_ADDR=/data/mysql/mysql.sock \
> -DDEFAULT_CHARSET=utf8 \
> -DDEFAULT_COLLATION=utf8_general_ci
提示:如果中间编译环境检查出现error环境缺少库或者包的情况,我们需要安装对应的包和库,然后删除CMakeCache.txt文件后,在运行cmake指定的编译选项来检查环境,以及生成makefile文件;
-- Looking for strndup - found
-- Looking for krb5_free_unparsed_name
-- Looking for krb5_free_unparsed_name - found
-- Looking for event.h
-- Looking for event.h - found
-- Configuring done
-- Generating done
-- Build files have been written to: /root/mariadb-10.2.19
[root@lnmp mariadb-10.2.19]#
提示:如果环境检查没有什么问题,就不会出现error的字眼,如上,就表示环境检查没有问题,接下来我们就可以直接来编译安装了
[root@lnmp mariadb-10.2.19]# make -j 4&& make install
提示:-j表示启用多线程来编译 -j 4表示4个线程同时进行编译,这样对于编译大型项目是可以缩短一定的时间;
-- Installing: /app/mysql/support-files/policy/apparmor/README
-- Installing: /app/mysql/support-files/policy/apparmor/usr.sbin.mysqld
-- Installing: /app/mysql/support-files/policy/apparmor/usr.sbin.mysqld.local
-- Installing: /app/mysql/share/pkgconfig/mariadb.pc
-- Installing: /app/mysql/share/aclocal/mysql.m4
-- Installing: /app/mysql/support-files/mysql.server
[root@lnmp mariadb-10.2.19]#
提示:如果编译安装过程中没有出现error的情况,就表示编译安装没有问题如上
通常情况下我们编译安装指定的路径都没有在path环境变量中,接下来我们给mariadb的路径加入到环境变量中,让其我们使用不用每次都写绝对路径
[root@lnmp mariadb-10.2.19]# echo 'PATH=/app/mysql/bin:$PATH' > /etc/profile.d/mysql.sh
[root@lnmp mariadb-10.2.19]# cat /etc/profile.d/mysql.sh
PATH=/app/mysql/bin:$PATH
[root@lnmp mariadb-10.2.19]# . /etc/profile.d/mysql.sh
[root@lnmp mariadb-10.2.19]#
提示:环境变量准备好后,接下来生成数据库文件
[root@lnmp mariadb-10.2.19]# cd /app/mysql/
[root@lnmp mysql]# scripts/mysql_install_db --datadir=/data/mysql --user=mysql
Installing MariaDB/MySQL system tables in '/data/mysql' ...
OK

To start mysqld at boot time you have to copy
support-files/mysql.server to the right place for your system


PLEASE REMEMBER TO SET A PASSWORD FOR THE MariaDB root USER !
To do so,start the server,then issue the following commands:

'./bin/mysqladmin' -u root password 'new-password'
'./bin/mysqladmin' -u root -h lnmp password 'new-password'

Alternatively you can run:
'./bin/mysql_secure_installation'

which will also give you the option of removing the test
databases and anonymous user created by default.  This is
strongly recommended for production servers.

See the MariaDB Knowledgebase at http://mariadb.com/kb or the
MySQL manual for more instructions.

You can start the MariaDB daemon with:
cd '.' ; ./bin/mysqld_safe --datadir='/data/mysql'

You can test the MariaDB daemon with mysql-test-run.pl
cd './mysql-test' ; perl mysql-test-run.pl

Please report any problems at http://mariadb.org/jira

The latest information about MariaDB is available at http://mariadb.org/.
You can find additional information about the MySQL part at:
http://dev.mysql.com
Consider joining MariaDB's strong and vibrant community:
https://mariadb.org/get-involved/

[root@lnmp mysql]#
提示:生成数据库相关文件,我们需要用到scripts/mysql_install_db脚本,同时指定数据存放目录 和创建这些文件的用户即可,系统数据库相关文件生成完成后,我们需要给mariadb准备配置文件,接下来准备配置文件
[root@lnmp mysql]# cp /app/mysql/support-files/my-huge.cnf /etc/my.cnf
cp: overwrite ‘/etc/my.cnf’? y
[root@lnmp mysql]#
提示:mariadb自身提供了几个配置文件示例文件,我们可以选择对应的配置文件,然后复制到我们编译时指定的配置文件目录,并改名为对应的文件名即可;
准备启动脚本
[root@lnmp mysql]# cp /app/mysql/support-files/mysql.server /etc/init.d/mysqld
[root@lnmp mysql]#
提示:mairadb也提供了一个bash脚本启动脚本,我们可以将其直接复制到/etc/init.d/并改名为mysqld,当然这个启动脚本也可以自己写,或者直接弄一个unix file脚本用systemctl来管理mairadb 也是可以的
把脚本加入到chkconfig中,设置为开机启动,并启动服务
[root@lnmp mysql]# chkconfig --add mysqld
[root@lnmp mysql]# chkconfig --list mysqld

Note: This output shows SysV services only and does not include native
      systemd services. SysV configuration data might be overridden by native
      systemd configuration.

      If you want to list systemd services use 'systemctl list-unit-files'.
      To see services enabled on particular target use
      'systemctl list-dependencies [target]'.

mysqld          0:off   1:off   2:on    3:on    4:on    5:on    6:off
[root@lnmp mysql]# service mysqld start
Starting mysqld (via systemctl):                           [  OK  ]
[root@lnmp mysql]# ss -ntl
State       Recv-Q Send-Q Local Address:Port               Peer Address:Port
LISTEN      0      128               *:80                            *:*
LISTEN      0      128               *:22                            *:*
LISTEN      0      100       127.0.0.1:25                            *:*
LISTEN      0      128              :::22                           :::*
LISTEN      0      100             ::1:25                           :::*
LISTEN      0      80               :::3306                         :::*
[root@lnmp mysql]#
提示:默认情况我们把mysqld加入到chkconfig中,3模式默认就是开机启动,所以我们这里可以不用指定3级别运行时开机启动;可以看到我们把脚本加入到chkconfig中后,直接用service命令将mariadb给启动起来了;
测试:我们用本地客户端连接mairadb看看是否能够连接上,并进入mariadb数据库?
[root@lnmp mysql]# mysql
Welcome to the MariaDB monitor.  Commands end with ; or \g.
Your MariaDB connection id is 10
Server version: 10.2.19-MariaDB-log Source distribution

Copyright (c) 2000,2018,Oracle,MariaDB Corporation Ab and others.

Type 'help;' or '\h' for help. Type '\c' to clear the current input statement.

MariaDB [(none)]> show databases;
+--------------------+
| Database           |
+--------------------+
| information_schema |
| mysql              |
| performance_schema |
| test               |
+--------------------+
4 rows in set (0.00 sec)

MariaDB [(none)]> \q
Bye
[root@lnmp mysql]#
提示:到此mairadb编译就完成了,后续我们就可以来配置mariadb使用mariadb存储wordpress程序所需要用到数据;
三、编译安装php
1)准备php源码包
[root@lnmp ~]# ls
mariadb-10.2.19  mariadb-10.2.19.tar.gz  nginx-1.16.1  nginx-1.16.1.tar.gz
[root@lnmp ~]# wget https://www.php.net/distributions/php-7.4.3.tar.bz2
--2020-03-18 15:33:23--  https://www.php.net/distributions/php-7.4.3.tar.bz2
Resolving www.php.net (www.php.net)... 185.85.0.29,2a02:cb40:200::1ad
Connecting to www.php.net (www.php.net)|185.85.0.29|:443... connected.
HTTP request sent,awaiting response... 200 OK
Length: 12695760 (12M) [application/octet-stream]
Saving to: ‘php-7.4.3.tar.bz2’

100%[======================================================================================>] 12,695,760  1.35MB/s   in 11s

2020-03-18 15:33:35 (1.12 MB/s) - ‘php-7.4.3.tar.bz2’ saved [12695760/12695760]

[root@lnmp ~]# ls
mariadb-10.2.19  mariadb-10.2.19.tar.gz  nginx-1.16.1  nginx-1.16.1.tar.gz  php-7.4.3.tar.bz2
[root@lnmp ~]# tar xf php-7.4.3.tar.bz2
[root@lnmp ~]# cd php-7.4.3
[root@lnmp php-7.4.3]# ls
appveyor             buildconf.bat        docs        NEWS                 README.REDIST.BINS  travis               Zend
azure                CODING_STANDARDS.md  ext         pear                 run-tests.php       TSRM
azure-pipelines.yml  configure            EXTENSIONS  php.ini-development  sapi                UPGRADING
build                configure.ac         LICENSE     php.ini-production   scripts             UPGRADING.INTERNALS
buildconf            CONTRIBUTING.md      main        README.md            tests               win32
[root@lnmp php-7.4.3]#
2)指定编译参数,检查编译环境
[root@lnmp php-7.4.3]# ./configure --prefix=/app/php \
> --enable-mysqlnd \
> --with-mysqli=mysqlnd \
> --with-openssl \
> --with-pdo-mysql=mysqlnd \
> --enable-mbstring \
> --with-freetype-dir \
> --with-jpeg-dir \
> --with-png-dir \
> --with-zlib \
> --with-libxml-dir=/usr \
> --enable-xml \
> --enable-sockets \
> --with-apxs2=/usr/bin/apxs \
> --with-config-file-path=/etc \
> --with-config-file-scan-dir=/etc/php.d \
> --enable-maintainer-zts \
> --disable-fileinfo
提示:如果以上环境检查没有问题,即可进行编译安装,如果有问题,根据提示安装环境依赖包组件;如下
Configuring SAPI modules
checking for Apache 2 handler module support via DSO through APXS...

Sorry,I cannot run apxs.  Possible reasons follow:

1. Perl is not installed
2. apxs was not found. Try to pass the path using --with-apxs2=/path/to/apxs
3. Apache was not built using --enable-so (the apxs usage page is displayed)

The output of /usr/bin/apxs follows:
./configure: line 6336: /usr/bin/apxs: No such file or directory
configure: error: Aborting
[root@lnmp php-7.4.3]#
提示:以上提示我们/usr/bin/apxs未找到,我们安装httpd-devel包即可解决
[root@lnmp php-7.4.3]# yum install -y httpd-devel
提示:安装好缺少的包后,然后在进行环境检查,看看还有其他问题
checking for sqlite3 > 3.7.4... no
configure: error: Package requirements (sqlite3 > 3.7.4) were not met:

No package 'sqlite3' found

Consider adjusting the PKG_CONFIG_PATH environment variable if you
installed software in a non-standard prefix.

Alternatively,you may set the environment variables SQLITE_CFLAGS
and SQLITE_LIBS to avoid the need to call pkg-config.
See the pkg-config man page for more details.
[root@lnmp php-7.4.3]#
提示:系统告诉我们所sqlite3没有,我们安装sqlite-devel试试
checking whether to enable multibyte regex support (requires oniguruma)... yes
checking for oniguruma... no
configure: error: Package requirements (oniguruma) were not met:

No package 'oniguruma' found

Consider adjusting the PKG_CONFIG_PATH environment variable if you
installed software in a non-standard prefix.

Alternatively,you may set the environment variables ONIG_CFLAGS
and ONIG_LIBS to avoid the need to call pkg-config.
See the pkg-config man page for more details.
提示:安装sqlite-devel包后,重新检查环境提示我们没有oniguruma,我们可以尝试安装oniguruma-devel试试
+--------------------------------------------------------------------+
| License:                                                           |
| This software is subject to the PHP License,available in this     |
| distribution in the file LICENSE. By continuing this installation  |
| process,you are bound by the terms of this license agreement.     |
| If you do not agree with the terms of this license,you must abort |
| the installation process at this point.                            |
+--------------------------------------------------------------------+

Thank you for using PHP.

configure: WARNING: unrecognized options: --with-freetype-dir,--with-jpeg-dir,--with-png-dir,--with-libxml-dir
[root@lnmp php-7.4.3]#
提示:最后能够看到thank you for using php就表示我们可以编译安装php了;
[root@lnmp php-7.4.3]# make -j 8 && make install
/bin/sh /root/php-7.4.3/libtool --silent --preserve-dup-deps --mode=compile cc -DZEND_ENABLE_STATIC_TSRMLS_CACHE=1 -Iext/standard/ -I/root/php-7.4.3/ext/standard/ -DPHP_ATOM_INC -I/root/php-7.4.3/include -I/root/php-7.4.3/main -I/root/php-7.4.3 -I/root/php-7.4.3/ext/date/lib -I/usr/include/libxml2 -I/root/php-7.4.3/ext/mbstring/libmbfl -I/root/php-7.4.3/ext/mbstring/libmbfl/mbfl -I/root/php-7.4.3/TSRM -I/root/php-7.4.3/Zend  -D_REENTRANT -pthread  -I/usr/include -g -O2 -fvisibility=hidden -pthread -Wall -Wno-strict-aliasing -DZTS -DZEND_SIGNALS   -c /root/php-7.4.3/ext/standard/info.c -o ext/standard/info.lo
……省略部分信息……
Build complete.
Don't forget to run 'make test'.

Installing shared extensions:     /app/php/lib/php/extensions/no-debug-zts-20190902/
Installing PHP CLI binary:        /app/php/bin/
Installing PHP CLI man page:      /app/php/php/man/man1/
Installing PHP FPM binary:        /app/php/sbin/
Installing PHP FPM defconfig:     /app/php/etc/
Installing PHP FPM man page:      /app/php/php/man/man8/
Installing PHP FPM status page:   /app/php/php/php/fpm/
Installing phpdbg binary:         /app/php/bin/
Installing phpdbg man page:       /app/php/php/man/man1/
Installing PHP CGI binary:        /app/php/bin/
Installing PHP CGI man page:      /app/php/php/man/man1/
Installing build environment:     /app/php/lib/php/build/
Installing header files:          /app/php/include/php/
Installing helper programs:       /app/php/bin/
  program: phpize
  program: php-config
Installing man pages:             /app/php/php/man/man1/
  page: phpize.1
  page: php-config.1
/root/php-7.4.3/build/shtool install -c ext/phar/phar.phar /app/php/bin
ln -s -f phar.phar /app/php/bin/phar
Installing PDO headers:           /app/php/include/php/ext/pdo/
[root@lnmp php-7.4.3]#
提示:到此php就编译安装好了,接下给php提供给配置文件和服务启动脚本
[root@lnmp php-7.4.3]# cp php.ini-production /etc/php.ini
[root@lnmp php-7.4.3]# cp sapi/fpm/init.d.php-fpm.in /etc/init.d/php-fpm
[root@lnmp php-7.4.3]# chmod +x /etc/init.d/php-fpm
[root@lnmp php-7.4.3]# chkconfig --add php-fpm
[root@lnmp php-7.4.3]# chkconfig php-fpm on
[root@lnmp php-7.4.3]#  cd /app/php/etc/
[root@lnmp etc]# cp php-fpm.conf.default php-fpm.conf
[root@lnmp etc]# cp php-fpm.d/www.conf.default php-fpm.d/www.conf
[root@lnmp etc]#
提示:到此我们就把php fpm方式的脚本和配置文件就准备好了,接下就可以启动php-fpm了
[root@lnmp etc]# service php-fpm start
Starting php-fpm /etc/init.d/php-fpm: line 57: @sbindir@/php-fpm: No such file or directory
 failed
[root@lnmp etc]#
提示:启动提示我们@sbindir@/php-fpm没有找到,这很明显是一个变量没有赋值引起的问题,我们可以把脚本稍微改动下,把我们php安装路径告诉脚本相关变量,即可启动起来,如下

提示:就只需要根据自己的环境来设定这几个变量就好了
[root@lnmp ~]# ss -ntl
State      Recv-Q Send-Q                   Local Address:Port                                  Peer Address:Port
LISTEN     0      128                                  *:80                                               *:*
LISTEN     0      128                                  *:22                                               *:*
LISTEN     0      100                          127.0.0.1:25                                               *:*
LISTEN     0      128                                 :::22                                              :::*
LISTEN     0      100                                ::1:25                                              :::*
LISTEN     0      80                                  :::3306                                            :::*
[root@lnmp ~]# service  php-fpm start
Starting php-fpm  done
[root@lnmp ~]# ss -ntl
State      Recv-Q Send-Q                   Local Address:Port                                  Peer Address:Port
LISTEN     0      128                                  *:80                                               *:*
LISTEN     0      128                                  *:22                                               *:*
LISTEN     0      100                          127.0.0.1:25                                               *:*
LISTEN     0      128                          127.0.0.1:9000                                             *:*
LISTEN     0      128                                 :::22                                              :::*
LISTEN     0      100                                ::1:25                                              :::*
LISTEN     0      80                                  :::3306                                            :::*
[root@lnmp ~]#
提示:到此php就编译完成了,接下来就是把nginx和php相连,php同mariadb要能够互相通信即可
首先配置nginx,让其把.php结尾的请求反代到后端127.0.0.1:9000端口上

提示:以上配置信息表示,访问.php结尾的资源,ngxin都会通过fastcgi协议反代之127.0.0.1:9000端口处理,后端php的工作目录为/usr/share/nginx/html,意思就是我们需要把.php的脚本放到该目录才能够php执行后响应给客户端;
测试:在php的工作目录下新建一个测试脚本,看看nginx是否能够代理.php结尾的资源?
[root@lnmp ~]# cd /usr/share/nginx/html/
[root@lnmp html]# ls
index.html
[root@lnmp html]# cat >> test.php
<?php
        phpinfo();
?>
^C
[root@lnmp html]# cat test.php
<?php
        phpinfo();
?>
[root@lnmp html]# nginx -t
nginx: the configuration file /etc/nginx/nginx.conf syntax is ok
nginx: configuration file /etc/nginx/nginx.conf test is successful
[root@lnmp html]# nginx -s reload
[root@lnmp html]#
提示:我们在php的工作目录里写了一个测试脚本,我们如果用浏览器访问test.php能够拿到对应的php信息的一个页面就说明nginx 代理php的请求是没有问题的

提示:可以看到我们是可以正常访问php信息页的,说明nginx和php的交互没有问题了,接下我们还需要测试php连接mariadb数据
测试:php连接mairiadb
我们在php工作目录创建一个连接数据库测试脚本,如果php能够连接mysql就打印ok,不能就打印Failure,在这之前我们需要到数据库里创建一个账号,用于php应用服务器连接mysql用
MariaDB [(none)]> grant all on *.* to 'php_app'@'%' identified by 'admin';
Query OK,0 rows affected (0.00 sec)

MariaDB [(none)]> flush privileges;
Query OK,0 rows affected (0.00 sec)
提示:创建好账号后,我们就可以写测试脚本了
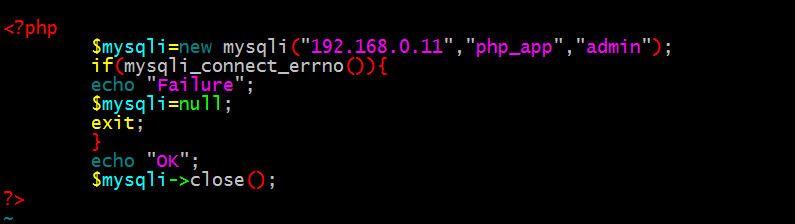
提示:创建好php连接mysql的测试脚本后,我们可以通过浏览器访问该脚本,就可以看到php是否能够连接mysql数据库了

提示:可以看到显示是OK的,这就说明php是可以正常连接mysql数据库的,到此LNMP的环境就准备好了,接下来我们就可以把我们的wordpress 给部署到LNMP环境中即可以;
部署wordpress
1)将wordpress源码程序解压放到nginx和php的工作目录(如果是多台服务器,需要在nginx前端代理放一份,用于静态资源的响应,另外还需要在php-fpm服务器上放一份,用于动态页面的解析,如果是像我这种测试环境,LNMP在一台主机上,放一份即可)

提示:我们把wordpress程序放到我们预先搭建好的LNMP环境中,接下来就可以直接浏览器上访问对应的目录下的index.php就可以进行安装wordpress了
在此之前我们需要在数据库里事先创建一个库用于存放wordpress程序各个表格数据
MariaDB [(none)]> create database wordpress;
Query OK,1 row affected (0.00 sec)
到此我们就可以通过浏览器来安装wordpress
提示:到此wordpress就安装好了,我们就可以通过安装时指定的用户名和密码进行登录到后台管理wordpress
2、配置虚拟主机,www.x.com域名实现首页访问;admin.x.com域名实现wordpress的后台访问
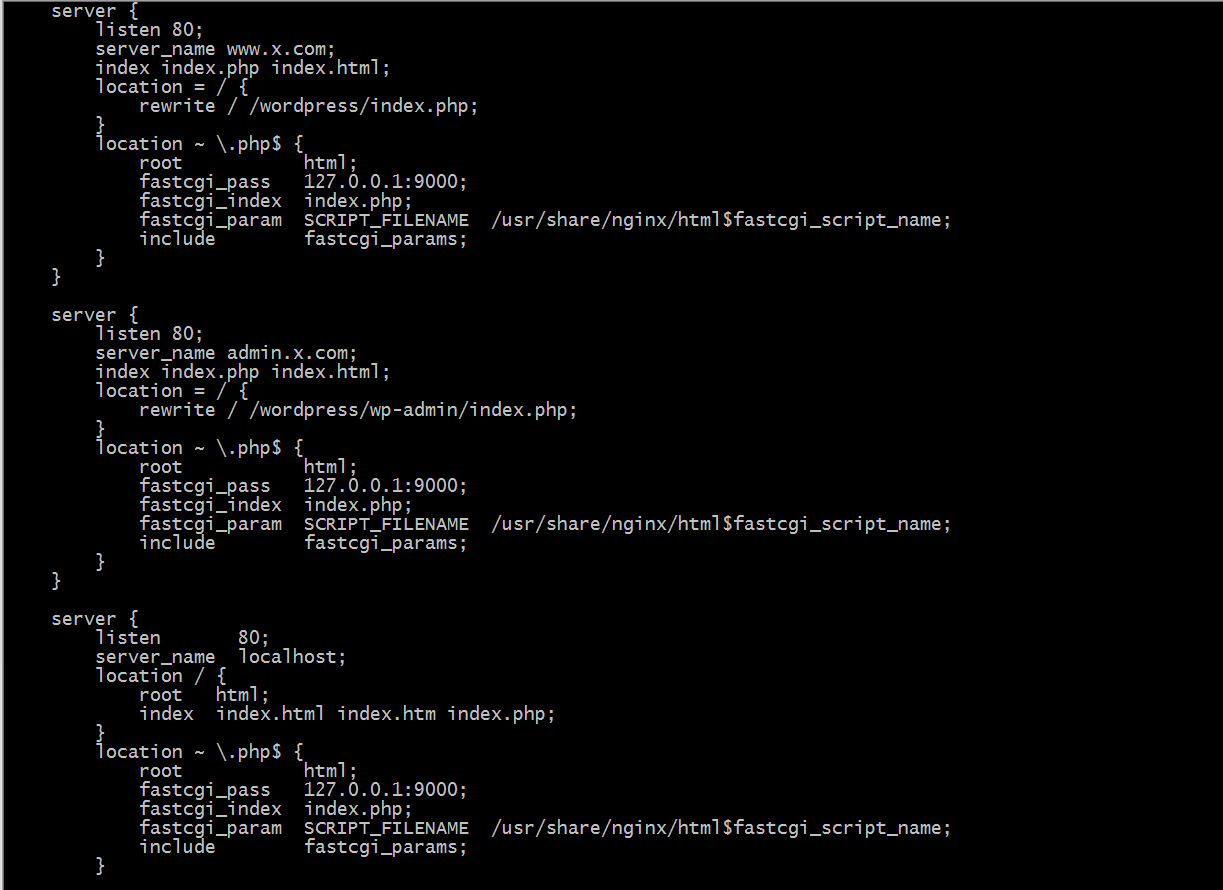
提示:以上配置表示3个虚拟主机,第一个是基于域名www.x.com的配置,第二个是基于域名admin.x.com的配置,第三个是基于主机名是localhost或者IP地址的虚拟主机的配置;
测试:

3、配置nginx反向代理,实现api.x.com域名代理本地9001端口
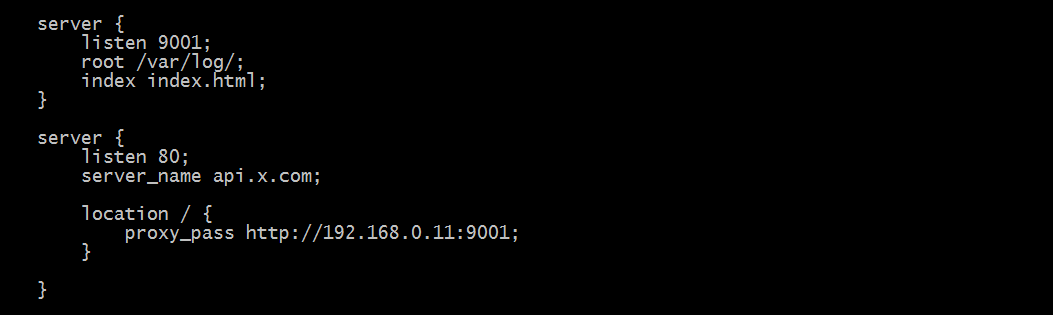
提示:在nginx里创建一个基于本地9001的server,然后在建立一个server将其用作代理来把请求代理至192.168.0.11:9001上;
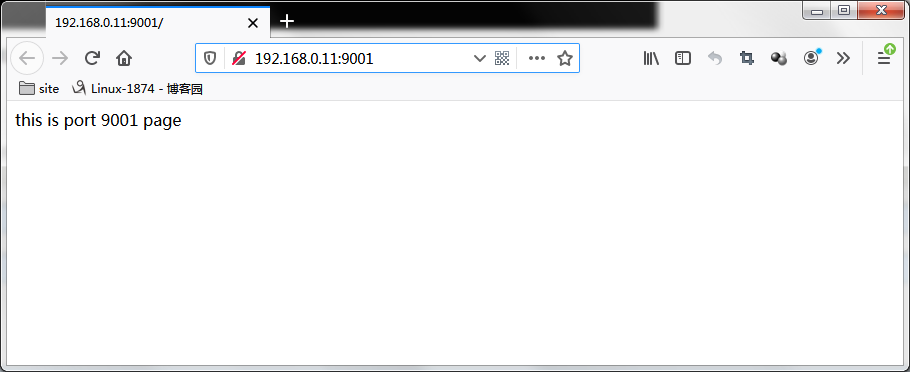
测试:
单独访问9001端口
通过aip.x.com代理
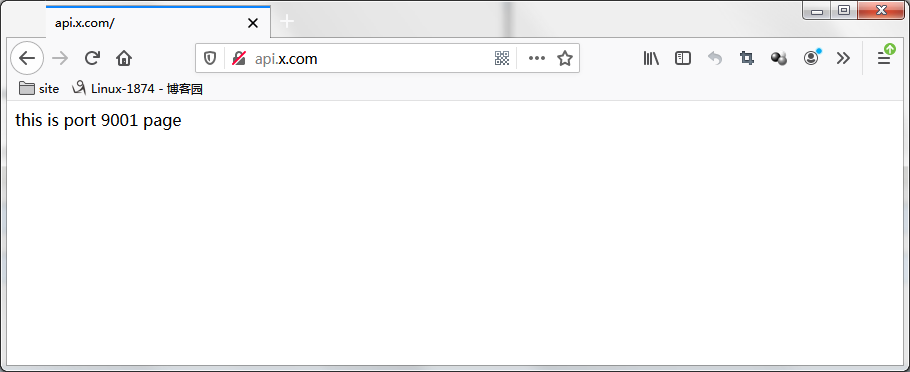
提示:做以上是实验需要在windows主机上做好hosts解析;
版权声明:本文内容由互联网用户自发贡献,该文观点与技术仅代表作者本人。本站仅提供信息存储空间服务,不拥有所有权,不承担相关法律责任。如发现本站有涉嫌侵权/违法违规的内容, 请发送邮件至 dio@foxmail.com 举报,一经查实,本站将立刻删除。