<p style="text-align: center"> <img src="https://www.jb51.cc/res/2019/01-18/19/44816cddfcde19becc0e7afe1614086b.png" alt="">
5.1. 配置互信
配置三台机器的互信:
cd
mkdir ~/.ssh
cd /root/.ssh/
ssh-keygen -t dsa -P '' -f id_dsa
id_dsa.pub为公钥,id_dsa为私钥,紧接着将公钥文件复制authorized_keys文件,过程:
cat id_dsa.pub >> authorized_keys
从库1执行:
ssh-keygen -t dsa -P '' -f id_dsa
cat id_dsa.pub >> authorized_keys
从库2执行:
ssh-keygen -t dsa -P '' -f id_dsa
cat id_dsa.pub >> authorized_keys
在把秘钥的传到主库过程:
scp /root/.ssh/id_dsa.pub 172.16.10.22:/root/.ssh/id_dsa.pub.61
scp /root/.ssh/id_dsa.pub 172.16.10.22:/root/.ssh/id_dsa.pub.62
查看主库秘钥:
接收完成后执行合并秘钥:
cat id_dsa.pub.61 >> authorized_keys
cat id_dsa.pub.62 >> authorized_keys
scp /root/.ssh/authorized_keys 172.16.10.61:/root/.ssh/
scp /root/.ssh/authorized_keys 172.16.10.62:/root/.ssh/
然后三台服务器添加域名解析:
vi /etc/hosts
172.16.10.22 rac2
172.16.10.61 racdg1
172.16.10.62 racdg2
验证互信:
主执行:
ssh racdg1 date
ssh racdg2 date
Slave1执行:
ssh rac2 date
ssh racdg2 date
Slave2执行:
ssh rac2 date
ssh racdg1 date
5.2. 搭建一主两从
搭建主从环境,使用的是5.7版本,基于GTID+ROW模式进行搭建。
所以机器执行创建复制账号步骤:
create user 'rep'@'172.16.10.%' identified by 'mysql';
grant replication slave on *.* to 'rep'@'172.16.10.%';
flush privileges;
show grants for 'rep'@'172.16.10.%';

所有主机创建管理账号:
create user 'zs'@'172.16.10.%' identified by '123456';
grant all privileges on *.* to 'zs'@'172.16.10.%';
flush privileges;

配置主从命令并且开启主从同步:
初始化:
/usr/local/mysql5.7/bin/mysqldump -S /tmp/mysql3307.sock --single-transaction -uroot -pmysql --master-data=2 -A > slave.sql
注意:必须加参数 –master-data=2,让备份出来的文件中记录备份这一刻binlog文件与position号,为搭建主从环境做准备。查看备份文件中记录的当前binlog文件和position号。
scp slave.sql 172.16.10.61:/root
scp slave.sql 172.16.10.62:/root
注意,如果主从GTID不一样,数据一致可以:
set global gtid_purged='*******';
主库需要以下配置:
gtid_mode=on
enforce_gtid_consistency=on
log_bin=on
从库需要以下配置:
servier-id 主从库不能一样。
gtid_mode=on
enforce_gtid_consistency=on
log_slave_updates=1
mysql -S /tmp/mysql3307.sock -uroot -pmysql < slave.sql
从库执行:
change master to master_host='172.16.10.22',master_port=3307,master_user='rep',master_password='mysql',master_auto_position=1;
start slave;
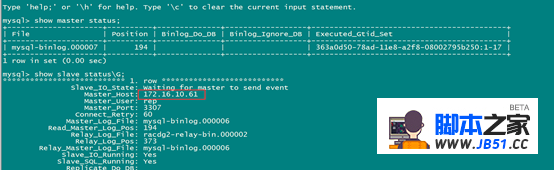
show slave status\G;

5.3. 安装MHA节点
所有MHA服务器安装Perl环境
yum install perl-DBD-MySQL
注意最新的为0.58版本,但是对应的是centos7/redhat7,如果是低版本,建议用0.57(本人已经踩过这个坑)
a) 安装MHA-NODE节点
所有节点上执行以下:
tar -zxvf mha4mysql-node-0.57.tar.gz
yum install perl-CPAN*
cd mha4mysql-node-0.57
perl Makefile.PL
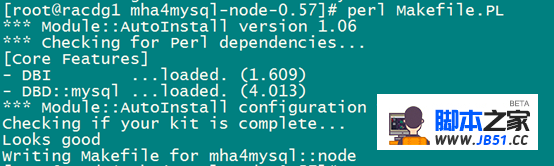
make && make install

ls -lh /usr/local/bin/
查看生成的文件:

b) 安装配置MHA-manager管理节点
在salve2执行以下操作:
安装管理节点,先安装介质包:
yum install perl-DBD-MySQL perl-Config-Tiny perl-Log-Dispatch perl-Parallel-ForkManager perl-Time-HiRes –y
yum -y install perl*

查看,并下载需要安装的依赖包:
先检查:
rpm -qa|grep perl-Config-Tiny
rpm -qa|grep perl-Email-Date-Format
rpm -qa|grep perl-Log-Dispatch
rpm -qa|grep perl-Mail-Sender
rpm -qa|grep perl-Mail-Sendmail
rpm -qa|grep perl-MIME-Lite
rpm -qa|grep perl-Time-HiRes
rpm -qa|grep perl-Parallel-ForkManager
后安装:
rpm -ivh perl-Config-Tiny-2.12-1.el6.rfx.noarch.rpm
rpm -ivh perl-Email-Date-Format-1.002-1.el6.rfx.noarch.rpm
rpm -ivh perl-Parallel-ForkManager-0.7.9-1.el6.noarch.rpm
rpm -ivh perl-Mail-Sendmail-0.79_16-4.2.noarch.rpm
rpm -ivh perl-Mail-Sender-0.8.16-3.el6.noarch.rpm
rpm -ivh perl-MIME-Lite-3.029-1.el6.rfx.noarch.rpm
rpm -ivh perl-Parallel-ForkManager-0.7.9-1.el6.noarch.rpm
rpm -ivh perl-Log-Dispatch-2.27-1.el6.noarch.rpm

然后安装管理节点:
tar -zxvf mha4mysql-manager-0.57.tar.gz
cd mha4mysql-manager-0.57
perl Makefile.PL

make

make install
ls -lh /usr/local/bin

进行管理节点MHA的配置过程。
slave2执行:
mkdir -p /usr/local/mha
mkdir -p /etc/mha
cd /etc/mha/
vim mha.conf
[server default]
user=zs
password=123456
manager_workdir=/usr/local/mha
manager_log=/usr/local/mha/manager.log
remote_workdir=/usr/local/mha
ssh_user=root
repl_user=rep
repl_password=mysql
ping_interval=1
master_ip_failover_script=/usr/local/scripts/master_ip_failover
master_ip_online_change_script=/usr/local/scripts/master_ip_online_change
[server1]
hostname=172.16.10.22
ssh_port=22
master_binlog_dir=/mydata/mysql/mysql3307/logs/
candidate_master=1
port=3307
[server2]
hostname=172.16.10.61
ssh_port=22
master_binlog_dir=/mydata/mysql/mysql3307/logs/
candidate_master=1
port=3307
[server3]
hostname=172.16.10.62
ssh_port=22
master_binlog_dir=/mydata/mysql/mysql3307/logs/
no_master=1
port=3307
注释:
manager_workdir=/usr/local/mha //设置manager的工作目录manager_log=/usr/local/mhamanager.log //设置manager的日志
ping_interval=1 //设置监控主库,发送ping包的时间间隔,默认是3秒,尝试三次没有回应的时候自动进行failover
master_ip_failover_script=/usr/local/scripts/master_ip_failover //设置自动failover时候的切换脚本
master_ip_online_change_script= /usr/local/scripts/master_ip_online_change //设置手动切换时候的切换脚本
candidate_master=1 //设置为候选master,如果设置该参数以后,发生主从切换以后将会将此从库提升为主库,即使这个主库不是集群中事件最新的slave
check_repl_delay=0 //默认情况下如果一个slave落后master 100M的relay logs的话,MHA将不会选择该slave作为一个新的master,因为对于这个slave的恢复需要花费很长时间,通过设置check_repl_delay=0,MHA触发切换在选择一个新的master的时候将会忽略复制延时,这个参数对于设置了candidate_master=1的主机非常有用,因为这个候选主在切换的过程中一定是新的master
no_master=1 //意味着这个server从来不会成为新的master,这个参数用来标记从来不用成为新主的服务器。
编辑failover切换脚本:
mkdir -p /usr/local/scripts
cd /usr/local/scripts
vim master_ip_failover
脚本内容如下:
#!/usr/bin/env perluse strict;use warnings FATAL => 'all';use Getopt::Long;
my ( $command,$ssh_user,$orig_master_host,$orig_master_ip, $orig_master_port,$new_master_host,$new_master_ip,$new_master_port);
my $vip = '172.16.10.30/24';my $key = '1';#my $ssh_start_vip = "/sbin/ip addr add $vip dev eth0";my $ssh_start_vip = "/sbin/ifconfig eth0:$key $vip";#my $ssh_stop_vip = "/sbin/ifconfig eth0:$key down";my $ssh_stop_vip = "/sbin/ip addr del $vip dev eth0";
GetOptions( 'command=s' => \$command, 'ssh_user=s' => \$ssh_user, 'orig_master_host=s' => \$orig_master_host, 'orig_master_ip=s' => \$orig_master_ip, 'orig_master_port=i' => \$orig_master_port, 'new_master_host=s' => \$new_master_host, 'new_master_ip=s' => \$new_master_ip, 'new_master_port=i' => \$new_master_port,);
exit &main();
sub main {
print "\n\nIN SCRIPT TEST====$ssh_stop_vip==$ssh_start_vip===\n\n";
if ( $command eq "stop" || $command eq "stopssh" ) {
my $exit_code = 1; eval { print "Disabling the VIP on old master: $orig_master_host \n"; &stop_vip(); $exit_code = 0; }; if ($@) { warn "Got Error: $@\n"; exit $exit_code; } exit $exit_code; } elsif ( $command eq "start" ) {
my $exit_code = 10; eval { print "Enabling the VIP - $vip on the new master - $new_master_host \n"; &start_vip(); $exit_code = 0; }; if ($@) { warn $@; exit $exit_code; } exit $exit_code; } elsif ( $command eq "status" ) { print "Checking the Status of the script.. OK \n"; exit 0; } else { &usage(); exit 1; }}
sub start_vip() { `ssh $ssh_user\@$new_master_host \" $ssh_start_vip \"`;}sub stop_vip() { return 0 unless ($ssh_user); `ssh $ssh_user\@$orig_master_host \" $ssh_stop_vip \"`;}
sub usage { print "Usage: master_ip_failover --command=start|stop|stopssh|status --orig_master_host=host --orig_master_ip=ip --orig_master_port=port --new_master_host=host --new_master_ip=ip --new_master_port=port\n";}
chmod +x master_ip_failover
vi master_ip_online_change
脚本内容如下:
#!/usr/bin/env perl
# Copyright (C) 2011 DeNA Co.,Ltd.
#
# This program is free software; you can redistribute it and/or modify
# it under the terms of the GNU General Public License as published by
# the Free Software Foundation; either version 2 of the License,or
# (at your option) any later version.
#
# This program is distributed in the hope that it will be useful,
# but WITHOUT ANY WARRANTY; without even the implied warranty of
# MERCHANTABILITY or FITNESS FOR A PARTICULAR PURPOSE. See the
# GNU General Public License for more details.
#
# You should have received a copy of the GNU General Public License
# along with this program; if not,write to the Free Software
# Foundation,Inc.,
# 51 Franklin Street,Fifth Floor,Boston,MA 02110-1301 USA
## Note: This is a sample script and is not complete. Modify the script based on your environment.
use strict;
use warnings FATAL => 'all';
use Getopt::Long;
use MHA::DBHelper;
use MHA::NodeUtil;
use Time::HiRes qw( sleep gettimeofday tv_interval );
use Data::Dumper;
my $_tstart;
my $_running_interval = 0.1;
my $vip = '172.16.10.30';
my $key = "2";
my $ssh_start_vip = "/sbin/ifconfig eth0:$key $vip";my $ssh_stop_vip = "/sbin/ip addr del $vip dev eth0";my $ssh_send_garp = "/sbin/arping -U $vip -I eth0 -c 1";
my (
$command, $orig_master_is_new_slave,
$orig_master_ip, $orig_master_port, $orig_master_user,
$orig_master_password,$orig_master_ssh_user, $new_master_host,
$new_master_ip, $new_master_port, $new_master_user,
$new_master_password, $new_master_ssh_user,
);
GetOptions(
'command=s' => \$command,
'orig_master_is_new_slave' => \$orig_master_is_new_slave,
'orig_master_host=s' => \$orig_master_host,
'orig_master_ip=s' => \$orig_master_ip,
'orig_master_port=i' => \$orig_master_port,
'orig_master_user=s' => \$orig_master_user,
'orig_master_password=s' => \$orig_master_password,
'orig_master_ssh_user=s' => \$orig_master_ssh_user,
'new_master_host=s' => \$new_master_host,
'new_master_ip=s' => \$new_master_ip,
'new_master_port=i' => \$new_master_port,
'new_master_user=s' => \$new_master_user,
'new_master_password=s' => \$new_master_password,
'new_master_ssh_user=s' => \$new_master_ssh_user,
);
exit &main();
sub start_vip(){
`ssh $new_master_ssh_user\@$new_master_host \" $ssh_start_vip \"`;
`ssh $new_master_ssh_user\@$new_master_host \" $ssh_send_garp \"`;
}
sub stop_vip(){
`ssh $orig_master_ssh_user\@$orig_master_host \" $ssh_stop_vip \"`;
}
sub current_time_us {
my ( $sec,$microsec ) = gettimeofday();
my $curdate = localtime($sec);
return $curdate . " " . sprintf( "%06d",$microsec );
}
sub sleep_until {
my $elapsed = tv_interval($_tstart);
if ( $_running_interval > $elapsed ) {
sleep( $_running_interval - $elapsed );
}
}
sub get_threads_util {
my $dbh = shift;
my $my_connection_id = shift;
my $running_time_threshold = shift;
my $type = shift;
$running_time_threshold = 0 unless ($running_time_threshold);
$type = 0 unless ($type);
my @threads;
my $sth = $dbh->prepare("SHOW PROCESSLIST");
$sth->execute();
while ( my $ref = $sth->fetchrow_hashref() ) {
my $id = $ref->{Id};
my $user = $ref->{User};
my $host = $ref->{Host};
my $command = $ref->{Command};
my $state = $ref->{State};
my $query_time = $ref->{Time};
my $info = $ref->{Info};
$info =~ s/^\s*(.*?)\s*$/$1/ if defined($info);
next if ( $my_connection_id == $id );
next if ( defined($query_time) && $query_time < $running_time_threshold );
next if ( defined($command) && $command eq "Binlog Dump" );
next if ( defined($user) && $user eq "system user" );
next
if ( defined($command)
&& $command eq "Sleep"
&& defined($query_time)
&& $query_time >= 1 );
if ( $type >= 1 ) {
next if ( defined($command) && $command eq "Sleep" );
next if ( defined($command) && $command eq "Connect" );
}
if ( $type >= 2 ) {
next if ( defined($info) && $info =~ m/^select/i );
next if ( defined($info) && $info =~ m/^show/i );
}
push @threads,$ref;
}
return @threads;
}
sub main {
if ( $command eq "stop" ) {
## Gracefully killing connections on the current master
# 1. Set read_only= 1 on the new master
# 2. DROP USER so that no app user can establish new connections
# 3. Set read_only= 1 on the current master
# 4. Kill current queries
# * Any database access failure will result in script die.
my $exit_code = 1;
eval {
## Setting read_only=1 on the new master (to avoid accident)
my $new_master_handler = new MHA::DBHelper();
# args: hostname,port,user,password,raise_error(die_on_error)_or_not
$new_master_handler->connect( $new_master_ip,$new_master_port,
$new_master_user,$new_master_password,1 );
print current_time_us() . " Set read_only on the new master.. ";
$new_master_handler->enable_read_only();
if ( $new_master_handler->is_read_only() ) {
print "ok.\n";
}
else {
die "Failed!\n";
}
$new_master_handler->disconnect();
# Connecting to the orig master,die if any database error happens
my $orig_master_handler = new MHA::DBHelper();
$orig_master_handler->connect( $orig_master_ip,$orig_master_port,
$orig_master_user,$orig_master_password,1 );
## Drop application user so that nobody can connect. Disabling per-session binlog beforehand
$orig_master_handler->disable_log_bin_local();
# print current_time_us() . " Drpping app user on the orig master..\n";
#drop_app_user($orig_master_handler);
## Waiting for N * 100 milliseconds so that current connections can exit
my $time_until_read_only = 15;
$_tstart = [gettimeofday];
my @threads = get_threads_util( $orig_master_handler->{dbh},
$orig_master_handler->{connection_id} );
while ( $time_until_read_only > 0 && $#threads >= 0 ) {
if ( $time_until_read_only % 5 == 0 ) {
printf
"%s Waiting all running %d threads are disconnected.. (max %d milliseconds)\n",
current_time_us(),$#threads + 1,$time_until_read_only * 100;
if ( $#threads < 5 ) {
print Data::Dumper->new( [$_] )->Indent(0)->Terse(1)->Dump . "\n"
foreach (@threads);
}
}
sleep_until();
$_tstart = [gettimeofday];
$time_until_read_only--;
@threads = get_threads_util( $orig_master_handler->{dbh},
$orig_master_handler->{connection_id} );
}
## Setting read_only=1 on the current master so that nobody(except SUPER) can write
print current_time_us() . " Set read_only=1 on the orig master.. ";
$orig_master_handler->enable_read_only();
if ( $orig_master_handler->is_read_only() ) {
print "ok.\n";
}
else {
die "Failed!\n";
}
## Waiting for M * 100 milliseconds so that current update queries can complete
my $time_until_kill_threads = 5;
@threads = get_threads_util( $orig_master_handler->{dbh},
$orig_master_handler->{connection_id} );
while ( $time_until_kill_threads > 0 && $#threads >= 0 ) {
if ( $time_until_kill_threads % 5 == 0 ) {
printf
"%s Waiting all running %d queries are disconnected.. (max %d milliseconds)\n",$time_until_kill_threads * 100;
if ( $#threads < 5 ) {
print Data::Dumper->new( [$_] )->Indent(0)->Terse(1)->Dump . "\n"
foreach (@threads);
}
}
sleep_until();
$_tstart = [gettimeofday];
$time_until_kill_threads--;
@threads = get_threads_util( $orig_master_handler->{dbh},
$orig_master_handler->{connection_id} );
}
## Terminating all threads
print current_time_us() . " Killing all application threads..\n";
$orig_master_handler->kill_threads(@threads) if ( $#threads >= 0 );
print current_time_us() . " done.\n";
$orig_master_handler->enable_log_bin_local();
$orig_master_handler->disconnect();
## Droping the VIP
print "Disabling the VIP an old master: $orig_master_host \n";
&stop_vip();
## After finishing the script,MHA executes FLUSH TABLES WITH READ LOCK
$exit_code = 0;
};
if ($@) {
warn "Got Error: $@\n";
exit $exit_code;
}
exit $exit_code;
}
elsif ( $command eq "start" ) {
## Activating master ip on the new master
# 1. Create app user with write privileges
# 2. Moving backup script if needed
# 3. Register new master's ip to the catalog database
# We don't return error even though activating updatable accounts/ip failed so that we don't interrupt slaves' recovery.
# If exit code is 0 or 10,MHA does not abort
my $exit_code = 10;
eval {
my $new_master_handler = new MHA::DBHelper();
# args: hostname,raise_error_or_not
$new_master_handler->connect( $new_master_ip,1 );
## Set read_only=0 on the new master
$new_master_handler->disable_log_bin_local();
print current_time_us() . " Set read_only=0 on the new master.\n";
$new_master_handler->disable_read_only();
## Creating an app user on the new master
#print current_time_us() . " Creating app user on the new master..\n";
# create_app_user($new_master_handler);
print "Enabling the VIP $vip on the new master: $new_master_host \n";
&start_vip();
$new_master_handler->enable_log_bin_local();
$new_master_handler->disconnect();
## Update master ip on the catalog database,etc
$exit_code = 0;
};
if ($@) {
warn "Got Error: $@\n";
exit $exit_code;
}
exit $exit_code;
}
elsif ( $command eq "status" ) {
# do nothing
exit 0;
}
else {
&usage();
exit 1;
}
}
sub usage {
print
"Usage: master_ip_online_change --command=start|stop|status --orig_master_host=host --orig_master_ip=ip --orig_master_port=port --new_master_host=host --new_master_ip=ip --new_master_port=port\n";
die;
}
chmod +x master_ip_online_change
利用MHA工具检测SSH。
安装需要的环境包:
yum -y install perl-Time-HiRes
执行检测命令:
/usr/local/bin/masterha_check_ssh --conf=/etc/mha/mha.conf

结果全是OK代表着SSH检测成功。
检测整个主从结构:
/usr/local/bin/masterha_check_repl --conf=/etc/mha/mha.conf
这个容易报错:
注意:update mysql.user set Host='%' where User='root'; (需要主从root 互相登陆)
5.4. 添加VIP
在主库(172.16.10.22)上执行添加VIP的过程(第一次手动添加)
ip addr add 172.16.10.30/24 dev eth0:1
ip addr show
删除的话:ip addr del 172.16.10.30/24 dev eth0
5.5. 启动MHA服务
在管理节点(172.16.10.62)slave2上执行MHA的启动:
nohup /usr/local/bin/masterha_manager --conf=/etc/mha/mha.conf > /tmp/mha_manager.log < /dev/null 2>&1 &
注意:如果做过一次FAILOVER测试,启动MHA 建议如下启动:
nohup /usr/local/bin/masterha_manager --conf=/etc/mha/mha.conf --ignore_last_failover > /tmp/mha_manager.log < /dev/null 2>&1 &

验证启动成功命令并且查看显示状态:
/usr/local/bin/masterha_check_status --conf=/etc/mha/mha.conf

5.6. 故障转移演练
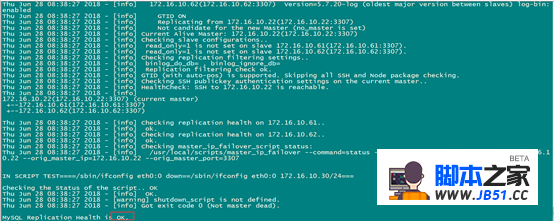
模拟主库(172.16.10.22)宕机,即停止MySQL服务。
mysqladmin -S /tmp/mysql3307.sock -uroot -pmysql shutdown
原salve1自动获得VIP 172.16.10.30,如下图:
ip addr
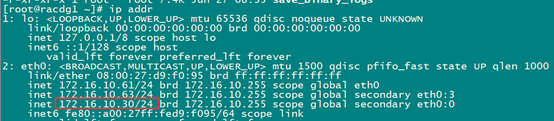
即salve1转换成新的主库。
Slave2指向新的主库,如下图:
且管理节点即(172.16.10.62)上MHA进程自动停止,如下图:
ps -ef |grep MHA
root 11998 5673 0 09:01 pts/1 00:00:00 grep MHA
/usr/local/bin/masterha_check_status --conf=/etc/mha/mha.conf

5.7. 恢复原master
启动原master
mysqld_safe --defaults-file=/etc/my3307.cnf &
重新配置主从:
当然,数据要一致是前提(生产上数据不一致,要备份恢复),配置新主从如下:
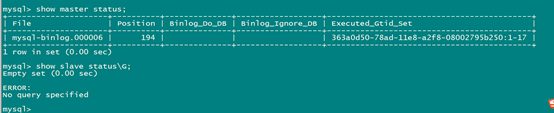
即原master变成新的从库:
新一主两从结构如下:

change master to master_host='172.16.10.61',master_auto_position=1;
手动在线切换:
我的测试环境执行下面一句:
/usr/local/bin/masterha_master_switch --conf=/etc/mha/mha.conf --master_state=alive --new_master_host=172.16.10.22 --new_master_port=3307 --orig_master_is_new_slave --running_updates_limit=10000
注意:回切可以不用启动monitor进程。
中间提示输入YES.

原salve1(现为master)需要switch
查看VIP
VIP漂过来了。回切成功。
后成功后启动MHA:
nohup /usr/local/bin/masterha_manager --conf=/etc/mha/mha.conf --ignore_last_failover > /tmp/mha_manager.log < /dev/null 2>&1 &
版权声明:本文内容由互联网用户自发贡献,该文观点与技术仅代表作者本人。本站仅提供信息存储空间服务,不拥有所有权,不承担相关法律责任。如发现本站有涉嫌侵权/违法违规的内容, 请发送邮件至 dio@foxmail.com 举报,一经查实,本站将立刻删除。
相关推荐
在正式开始之前,我们先来看下 MySQL 服务器的配置和版本号信息,如下图所示: “兵马未动粮草先行”,看完了相关的配置之后,我们先来创建一张测试表和一些测试数据。 -- 如果存在 person 表先删除 DROP TABLE IF EXISTS person; -- 创建 person 表,其中
> [合辑地址:MySQL全面瓦解](https://www.cnblogs.com/wzh2010/category/1859594.html "合辑地址:MySQL全面瓦解") # 1 为什么需要数据库备份 - 灾难恢复:当发生数据灾难的时候,需要对损坏的数据进行恢复和
物理服务机的CPU、内存、存储设备、连接数等资源有限,某个时段大量连接同时执行操作,会导致数据库在处理上遇到性能瓶颈。为了解决这个问题,行业先驱门充分发扬了分而治之的思想,对大库表进行分割,
然后实施更好的控制和管理,同时使用多台机器的CPU、内存、存储,提供更好的性能。而分治有两种实现方式:垂直拆
1 回顾 上一节我们详细讲解了如何对数据库进行分区操作,包括了 垂直拆分(Scale Up 纵向扩展)和 水平拆分(Scale Out 横向扩展) ,同时简要整理了水平分区的几种策略,现在来回顾一下。 2 水平分区的5种策略 2.1 Hash(哈希) 这种策略是通过对表的一个或多个列的Ha
navicat查看某个表的所有字段的详细信息 navicat设计表只能一次查看一个字段的备注信息,那怎么才能做到一次性查询表的信息呢?SELECT COLUMN_NAME,COLUMN_COMMENT,COLUMN_TYPE,COLUMN_KEY FROM information_schema.CO
文章浏览阅读4.3k次。转载请把头部出处链接和尾部二维码一起转载,本文出自逆流的鱼yuiop:http://blog.csdn.net/hejjunlin/article/details/52768613前言:数据库每天的数据不断增多,自动删除机制总体风险太大,想保留更多历史性的数据供查询,于是从小的hbase换到大的hbase上,势在必行。今天记录下这次数据仓库迁移。看下Agenda:彻底卸载MySQL安装MySQL_linux服务器进行数据迁移
文章浏览阅读488次。恢复步骤概要备份frm、ibd文件如果mysql版本发生变化,安装回原本的mysql版本创建和原本库名一致新库,字符集都要保持一样通过frm获取到原先的表结构,通过的得到的表结构创建一个和原先结构一样的空表。使用“ALTER TABLE DISCARD TABLESPACE;”命令卸载掉表空间将原先的ibd拷贝到mysql的仓库下添加用户权限 “chown . .ibd”,如果是操作和mysql的使用权限一致可以跳过通过“ALTER TABLE IMPORT TABLESPACE;”命令恢_alter table discard tablespace
文章浏览阅读225次。当MySQL单表记录数过大时,增删改查性能都会急剧下降,可以参考以下步骤来优化:单表优化除非单表数据未来会一直不断上涨,否则不要一开始就考虑拆分,拆分会带来逻辑、部署、运维的各种复杂度,一般以整型值为主的表在千万级以下,字符串为主的表在五百万以下是没有太大问题的。而事实上很多时候MySQL单表的性能依然有不少优化空间,甚至能正常支撑千万级以上的数据量:字段尽量使用TINYINT、SMALLINT、MEDIUM_INT作为整数类型而非INT,如果非负则加上UNSIGNEDVARCHAR的长度只分配_开发项目 浏览记录表 过大怎么办
文章浏览阅读1.5k次。Mysql创建、删除用户MySql中添加用户,新建数据库,用户授权,删除用户,修改密码(注意每行后边都跟个;表示一个命令语句结束):1.新建用户登录MYSQL:@>mysql -u root -p@>密码创建用户:mysql> insert into mysql.user(Host,User,Password) values("localhost_删除mysql用户组
MySQL是一种开源的关系型数据库管理系统,被广泛应用于各类应用程序的开发中。对于MySQL中的字段,我们需要进行数据类型以及默认值的设置,这对于数据的存储和使用至关重要。其中,有一个非常重要的概念就是MySQL字段默认字符串。 CREATE TABLE `my_...
MySQL是一个流行的开源关系型数据库管理系统,广泛应用于Web应用程序开发、数据存储和管理。在使用MySQL时,正确设置字符集非常重要,以确保数据的正确性和可靠性。 在MySQL中,字符集表示为一系列字符和字母的集合。MySQL支持多种字符集,包括ASCII、UTF...
MySQL存储函数 n以内偶数 MySQL存储函数能够帮助用户简化操作,提高效率,常常被用于计算和处理数据。下面我们就来了解一下如何使用MySQL存储函数计算n以内的偶数。 定义存储函数 首先,我们需要定义一个MySQL存储函数,以计算n以内的偶数。下...
MySQL是一个流行的关系型数据库管理系统,基于客户机-服务器模式,可在各种操作系统上运行。 MySQL支持多种字符集,不同的字符集包括不同的字符,如字母、数字、符号等,并提供不同的排序规则,以满足不同语言环境的需求。 //查看MySQL支持的字符集与校对规...
在MySQL数据库中,我们有时需要对特定的字符串进行截取并进行分组统计。这种操作对于数据分析和报表制作有着重要的应用。下面我们将讲解一些基本的字符串截取和分组统计的方法。 首先,我们可以使用substring函数对字段中的字符串进行截取。假设我们有一张表stude...
MySQL提供了多种字符串的查找函数。下面我们就一一介绍。 1. LIKE函数 SELECT * FROM mytable WHERE mycolumn LIKE 'apple%'; 其中"apple%"表示以apple开头的字符串,%表示任意多个字符...
MySQL 是一种关系型数据库管理系统,广泛应用于各种不同规模和类型的应用程序中。在 MySQL 中,处理字符串数据是很常见的任务。有时候,我们需要在字符串的开头添加一定数量的 0 ,以达到一定的位数。比如,我们可能需要将一个数字转换为 4 位或 5 位的字符串,不足的...
MySQL是一种流行的关系型数据库管理系统,支持多种数据类型。以下是MySQL所支持的数据类型: 1. 数值型数据类型: - TINYINT 保存-128到127范围内的整数 - SMALLINT 保存-32768到32767范围内的整数 - MEDIU...
MySQL中存储Emoji表情字段类型 在现代互联网生态中,表情符号已经成为人们展示情感和思想的重要方式之一,因此将表情符号存储到数据库中是一个经常出现的问题。MySQL作为最流行的开源关系型数据库管理系统之一,也需要能够存储和管理这些表情符号的字段类型。 UT...
MySQL是一种关系型数据库管理系统。在MySQL数据库中,有多种不同的数据类型。而其中,最常见的数据类型之一就是字符串类型。在MySQL中,字符串类型的数据通常会被存储为TEXT或VARCHAR类型。 首先,让我们来看一下VARCHAR类型。VARCHAR是My...
MySQL字符串取整知识详解 MySQL是一种开源的关系型数据库管理系统,广泛应用于各个领域。在使用MySQL过程当中,我们经常需要对数据进行取整操作。本文将介绍如何使用MySQL字符串取整来处理数据取整问题。 什么是MySQL字符串取整? MySQL...
