本章目录
[TOC]
0x00 前言简述
为啥有此篇文章? 描述: 在进行公司的图片存储解决方案研究中,最开始准备使用的是FastDFS,但是经过深思熟虑,以及后期运维成本考虑还是放弃了,只能转而使用存储直接存放图片文件,直接请求效率提示杠杠的,但如何最大限度保证业务安全以及减少业务对数据库增删改查的压力? 在 Google 、Github一番查找后发现可以直接使用 Nginx + Lua 进行访问数据进行获取静态资源信息,而不用业务系统进行访问数据库直接获取静态资源路径,而显式的展现资源真实暴露给外部,非常容易被批量抓取。
其次笔者在实践中发现当前搜索到的安装部署Nginx+Lua可能已将不适用最新稳定版本的Nginx版本,基本上都是 1.15.x ~ 1.18.x,对于当前Nginx 1.22.0 版本来说显然是太老了。
所以本章就该问题进行 Nginx + Lua + Redis 模块环境的安装以及简单的实践,希望能帮助到各位有相同需求的Person。
基础知识:
- Nginx: 是一个高性能的HTTP和反向代理web服务器,同时也提供了IMAP/POP3/SMTP服务, 其三大核心功能,包含静态资源、反向代理、api模块扩展,对于lua脚本的扩展,例如由lua-nginx-module模块,就是api模块扩展的一部分,并且nginx可以通过lua脚本直接调用redis服务器;
- Lua: 是一种功能强大,高效,轻量级,可嵌入的脚本语言,非常容易嵌入到我们应用程序中, 它用于各种应用程序,从游戏到Web应用程序和图像处理。
- lua-nginx-module : 该模块是 OpenResty 的核心组件,目录是将lua的功能嵌入到Nginx http服务器中。
- lua-resty-redis : 该模块是在 OpenResty 项目下基于 cosocket API 的 ngx_lua 的 Lua redis 客户端驱动。
温馨提示: 如果不是现有业务大量使用Nginx进行承载不能直接替换其它优秀的解决方案,只能一步一步来,从而转入 OpenResty 或者 caddy 搭建能够处理超高并发、扩展性极高的动态 Web 应用、Web 服务和动态网关。
原文地址: https://blog.weiyigeek.top
知识引入
Nginx 的指令的都是安装执行顺序的吗?
答: 既然我都这样问了答案则是显而易见的,这也是大多数新手频繁遇到的一个困惑,当然也困惑了笔者,否则我也不会这样问。
那我们下来来看这么一个示例: (验证此示例你可能需要先按照下一章的【0x01 部署环境】进行准备相关环境), 此时你可能会说输出不就是WeiyiGeek吗?
location /sequence_demo_1 {
 set $a Weiyi;
 echo $a;
 set $a Geek;
 echo $a;
}
但如果请求该URL你会发现实时并非如此。
$ curl http://demo.weiyigeek.top/sequence_demo_1
Geek
Geek
那为什么出现了这种不合常理的现象呢?
答: 为了解释此现象, 我们不得不介绍Nginx的请求处理的11阶段,分别是post-read、server-rewrite、find-config、rewrite、post-rewrite、preaccess、access、post-access、precontent、content以及log,其中3个比较常见的按照执行时的先后顺序依次是rewrite阶段、access阶段以及content阶段。 Nginx 配置指令一般只会注册并运行在其中的某一个处理阶段,比如
set指令就是在rewrite阶段运行的,而echo指令只会在content阶段运行, 在一次请求处理流程中rewrite阶段总是在content阶段之前执行。

WeiyiGeek.Nginx的请求处理的11阶段
因此,属于rewrite阶段的配置指令(示例中的set)总是会无条件地在content阶段的配置指令(示例中的echo)之前执行,即便是echo指令出现在set指令的前面, 上面例子中的指令按照请求处理阶段的先后次序排序,实际的执行次序如下:
location /sequence_demo_1 {
 # rewrite阶段的配置指令,执行在前面
 set $a Weiyi;
 set $a Geek ;
 # content阶段的配置指令,执行在后面
 echo $a;
 echo $a;
}
所以,输出的结果就是Weiyi Geek了。
Lua模块指令阶段
各阶段使用Lua模块指令 描述: 由于本章 Nginx 也是使用 OpenResty Lua 模块实现的解析Lua脚本,所以其指令我们也需要做一个简单了解,对于后续学习有非常大的帮助。
指令语法: https://github.com/openresty/lua-nginx-module#synopsis
使用Lua来构建nginx脚本就是通过一条条指令来完成的,指令常用于指定 Lua 代码是什么时候执行的以及如何使用运行的结果,lua 指令分为配置指令、控制指令, 而控制指令分为两种方式。
- lua脚本块 :
*_by_lua_block - lua脚本文件 :
*_by_lua_file
下图展示了指令执行的顺序:从上至下:初始化、重写/访问、内容处理、日志输出四个阶段

WeiyiGeek.ngx-lua-order
lua-nginx-module Directives Document(Lua Nginx 模块指令文档):
- lua_load_resty_core
- lua_capture_error_log
- lua_use_default_type
- lua_malloc_trim
- lua_code_cache
- lua_thread_cache_max_entries
- lua_regex_cache_max_entries
- lua_regex_match_limit
- lua_package_path
- lua_package_cpath
- init_by_lua
- init_by_lua_block
- init_by_lua_file
- init_worker_by_lua
- init_worker_by_lua_block
- init_worker_by_lua_file
- exit_worker_by_lua_block
- exit_worker_by_lua_file
- set_by_lua
- set_by_lua_block
- set_by_lua_file
- content_by_lua
- content_by_lua_block
- content_by_lua_file
- server_rewrite_by_lua_block
- server_rewrite_by_lua_file
- rewrite_by_lua
- rewrite_by_lua_block
- rewrite_by_lua_file
- access_by_lua
- access_by_lua_block
- access_by_lua_file
- header_filter_by_lua
- header_filter_by_lua_block
- header_filter_by_lua_file
- body_filter_by_lua
- body_filter_by_lua_block
- body_filter_by_lua_file
- log_by_lua
- log_by_lua_block
- log_by_lua_file
- balancer_by_lua_block
- balancer_by_lua_file
- lua_need_request_body
- ssl_client_hello_by_lua_block
- ssl_client_hello_by_lua_file
- ssl_certificate_by_lua_block
- ssl_certificate_by_lua_file
- ssl_session_fetch_by_lua_block
- ssl_session_fetch_by_lua_file
- ssl_session_store_by_lua_block
- ssl_session_store_by_lua_file
- lua_shared_dict
- lua_socket_connect_timeout
- lua_socket_send_timeout
- lua_socket_send_lowat
- lua_socket_read_timeout
- lua_socket_buffer_size
- lua_socket_pool_size
- lua_socket_keepalive_timeout
- lua_socket_log_errors
- lua_ssl_ciphers
- lua_ssl_crl
- lua_ssl_protocols
- lua_ssl_trusted_certificate
- lua_ssl_verify_depth
- lua_ssl_conf_command
- lua_http10_buffering
- rewrite_by_lua_no_postpone
- access_by_lua_no_postpone
- lua_transform_underscores_in_response_headers
- lua_check_client_abort
- lua_max_pending_timers
- lua_max_running_timers
- lua_sa_restart
- lua_worker_thread_vm_pool_size
值得注意的是Nginx可以提前终止请求(至少),这意味着跳过正常运行的阶段,例如重写或访问阶段。这也意味着,不管运行的后期阶段(例如log_by_lua)将无法访问通常在这些阶段中设置的信息。
400 (Bad Request)
405 (Not Allowed)
408 (Request Timeout)
413 (Request Entity Too Large)
414 (Request URI Too Large)
494 (Request Headers Too Large)
499 (Client Closed Request)
500 (Internal Server Error)
501 (Not Implemented)
好了,此处就只是先简单点一下,在后续实践中您在回过头来看即可。
0x01 部署环境
安装说明
环境描述:
# 系统信息
$ cat /etc/issue.net
Ubuntu 20.04.3 LTS
$ uname -a
Linux weiyigeek.top 5.4.0-92-generic \#103-Ubuntu SMP Fri Nov 26 16:13:00 UTC 2021 x86_64 x86_64 x86_64 GNU/Linux

# 软件版本
Nginx - 1.22.0  (stable 版本)
pcre - 8.45
zlib - 1.2.12
Lua - 5.4
openssl - 1.1.1q
ngx_devel_kit - v0.3.1
lua-nginx-module - v0.10.21
echo-nginx-module - v0.62
lua-resty-core - v0.1.23
lua-resty-lrucache - v0.13
lua-resty-redis - v0.29
温馨提示: 此处使用的是 Ubuntu 20.04 操作系统, 该系统已做安全加固和内核优化符合等保2.0要求【SecOpsDev/Ubuntu-InitializeSecurity.sh at master · WeiyiGeek/SecOpsDev 】, 如你的Linux未进行相应配置环境可能与读者有些许差异, 如需要进行(windows server、Ubuntu、CentOS)安全加固请参照如下加固脚本进行加固, 请大家疯狂的 star 。 加固脚本地址:【 https://github.com/WeiyiGeek/SecOpsDev/blob/master/OS-%E6%93%8D%E4%BD%9C%E7%B3%BB%E7%BB%9F/Linux/Ubuntu/Ubuntu-InitializeSecurity.sh 】
为了节省大家的实践时间,我已经把需要用到的源码包上传到空间中,有需要的朋友可以看一下,下载地址: (http://share.weiyigeek.top/d/36158960-50338508-7c5982?p=2088)(访问密码:2088) 温馨提示: 如提示证书不对,请点击高级继续访问即可.

WeiyiGeek.Nginx及其模块下载
安装部署
源代码编译构建 Step 1.在 Ubuntu 20.04 LTS 系统安装编译所需环境.
apt install -y gcc g++ make perl net-toolsStep 2.下载 Nginx、PCRE、zlib、OpenSSL 源代码包,并编译构建 PCRE、zlib、OpenSSL.
cd /usr/local/src
# Nginx 轻量级的Web代理服务器。
# 官网: https://nginx.org/en/download.html
wget -c https://nginx.org/download/nginx-1.22.0.tar.gz -O /usr/local/src/nginx-1.22.0.tar.gz
tar -zxf nginx-1.22.0.tar.gz

# PCRE – 支持正则表达式,NGINX Core 和 Rewrite 模块需要
# 官网: http://pcre.org/
wget -c https://nchc.dl.sourceforge.net/project/pcre/pcre/8.45/pcre-8.45.tar.bz2
tar -jxf pcre-8.45.tar.bz2 && cd pcre-8.45
./configure
make && sudo make install

# zlib – 支持标头压缩, NGINX Gzip 模块需要。
# 官网:http://www.zlib.net/
wget -c http://www.zlib.net/zlib-1.2.12.tar.gz
tar -zxf zlib-1.2.12.tar.gz && cd zlib-1.2.12
./configure
make && sudo make install

# OpenSSL – 支持 HTTPS 协议, NGINX SSL 模块和其他模块需要。
# 官网: https://www.openssl.org/source/
wget -c https://www.openssl.org/source/openssl-1.1.1q.tar.gz
tar -zxf openssl-1.1.1q.tar.gz && cd openssl-1.1.1q
./config --prefix=/usr/local/openssl
make && sudo make install
ln -s /usr/local/openssl/bin/openssl /usr/local/bin/openssl
# lib 库加载到系统
echo "/usr/local/openssl/lib" >> /etc/ld.so.conf.d/libc.conf
ldconfig
# 执行命令验证系统的 OpenSSL 版本
/usr/local/bin/openssl version
OpenSSL 1.1.1q 5 Jul 2022
温馨提示: 如./configure未指定--prefix参数的将会直接安装在/usr/local目录下的bin、lib、share等子目录中。
Step 3.下载编译构建Lua解析器以及Nginx所需的开发工具包和Lua模块。
cd /usr/local/src
# ngx_devel_kit - 是Nginx开发工具包,实际上可以看做一个Nginx模块,它添加了额外的通用工具,模块开发人员可以在自己的模块中使用这些工具。
# 项目地址: https://github.com/simpl/ngx_devel_kit
# 项目地址: https://github.com/vision5/ngx_devel_kit
wget -c https://github.com/vision5/ngx_devel_kit/archive/refs/tags/v0.3.1.tar.gz -O ngx_devel_kit-v0.3.1.tar.gz
tar -zxf ngx_devel_kit-v0.3.1.tar.gz && ls ngx_devel_kit-0.3.1
  # auto  config  docs  examples  LICENSE  ngx_auto_lib_core  notes  objs  patches  README_AUTO_LIB.md  README.md  src

# lua-nginx-module - 将Lua的强大功能嵌入到NGINX HTTP服务器中
# 项目地址: https://github.com/openresty/lua-nginx-module
wget -c https://github.com/openresty/lua-nginx-module/archive/refs/tags/v0.10.21.tar.gz -O /usr/local/src/lua-nginx-module-v0.10.21.tar.gz
tar -zxf lua-nginx-module-v0.10.21.tar.gz && ls lua-nginx-module-0.10.21
  # config  doc  dtrace  misc  README.markdown  src  t  tapset  util  valgrind.suppress

# echo-nginx-module - 一个Nginx的输出模块,用于将“echo”、“sleep”、“time”等功能引入Nginx的配置文件, 此模块不随Nginx源一起分发。
# 项目地址: https://github.com/openresty/echo-nginx-module
wget --no-check-certificate -c https://github.com/openresty/echo-nginx-module/archive/refs/tags/v0.62.tar.gz -O /usr/local/src/echo-nginx-module-v0.62.tar.gz
tar -zxf echo-nginx-module-v0.62.tar.gz && ls echo-nginx-module-0.62
  # config  LICENSE  README.markdown  src  t  util  valgrind.suppress

# luajit2 - lua 解析器 LuaJIT 2 OpenResty 的分支,且注意解析器的Lua版本为5.1
# 项目地址: https://github.com/openresty/luajit2
wget -c  https://github.com/openresty/luajit2/archive/refs/tags/v2.1-20220411.tar.gz -O /usr/local/src/luajit2-v2.1-20220411.tar.gz
tar -zxvf luajit2-v2.1-20220411.tar.gz && cd luajit2-2.1-20220411
make PREFIX=/usr/local/luajit && make install PREFIX=/usr/local/luajit
ln -s /usr/local/luajit/bin/luajit /usr/local/bin/luajit

# 链接库设置
echo "/usr/local/luajit/lib" >> /etc/ld.so.conf.d/libc.conf
ldconfig

# 临时生效
export LUAJIT_LIB=/usr/local/luajit/lib
export LUAJIT_INC=/usr/local/luajit/include/luajit-2.1

/usr/local/bin/luajit -v
  # LuaJIT 2.1.0-beta3 -- Copyright (C) 2005-2017 Mike Pall. http://luajit.org/
温馨提示: 上述 lua 解析器此处采用的是 LuaJIT 官方的 OpenResty 分支, 而不是 luajit 的主分支https://luajit.org/download/LuaJIT-2.1.0-beta3.tar.gz,后面入坑出坑会解释为啥这样做。
Step 4.为了使Nginx可以连接到redis数据库中执行一些列操作,此处借助于lua-nginx-module模块下载并解压所需的lua-resty-core、lua-resty-lrucache、lua-resty-redis。
cd /usr/local/src
# 基于 FFI 的 lua-nginx-module API
# 项目地址: https://github.com/openresty/lua-resty-core
wget -c https://github.com/openresty/lua-resty-core/archive/refs/tags/v0.1.23.tar.gz -O /usr/local/src/lua-resty-core.tar.gz
tar -zxvf lua-resty-core.tar.gz && ls lua-resty-core-0.1.23
  # dist.ini  lib  Makefile  README.markdown  t  valgrind.suppress

# 基于 LuaJIT FFI 的 Lua-land LRU Cache
# 项目地址: https://github.com/openresty/lua-resty-lrucache
wget -c https://github.com/openresty/lua-resty-lrucache/archive/refs/tags/v0.13.tar.gz -O /usr/local/src/lua-resty-lrucache-v0.13.tar.gz
tar -zxvf lua-resty-lrucache-v0.13.tar.gz && ls lua-resty-lrucache-0.13/
  # dist.ini  lib  Makefile  README.markdown  t  valgrind.suppress

# 基于 cosocket API 的 ngx_lua 的 Lua redis 客户端驱动
# 项目地址: https://github.com/openresty/lua-resty-redis
wget -c https://github.com/openresty/lua-resty-redis/archive/refs/tags/v0.29.tar.gz -O /usr/local/src/lua-resty-redis-v0.29.tar.gz
tar -zxvf lua-resty-redis-v0.29.tar.gz && ls lua-resty-redis-0.29/
# 在使用时可将lua脚本放入到nginx配置目录中。
mkdir -vp /usr/local/nginx/lua/
cp -a  /usr/local/src/lua-resty-redis-0.29/lib /usr/local/nginx/lua/
# 以树形结构显示该目录
$ tree /usr/local/nginx/lua/
/usr/local/nginx/lua/
├── hello.lua
└── lib
    └── resty
        └── redis.lua
Step 5.在上面步骤操作完毕之后,我们便可以进行nginx编译安装了,构建流程如下(在博主的前面讲解的Nginx系列教程就已经有详细讲述 【[Nginx进阶学习之最佳配置实践指南][https://blog.weiyigeek.top/2019/9-1-124.html]】,此处就不在大篇幅累述了):
# 创建允许用户和组,不需要家目录不登录bash
useradd -M -s /sbin/nologin nginx

# 创建 Nginx 所需目录
sudo mkdir -vp /usr/local/nginx/{module,modules,lua} /var/cache/nginx/{client_temp,proxy_temp,fastcgi_temp,uwsgi_temp,scgi_temp}
cd /usr/local/src/nginx-1.22.0

# Nginx 预编译参数设置
./configure \
--prefix=/usr/local/nginx \
--user=nginx --group=nginx \
--with-pcre=../pcre-8.45 \
--with-zlib=../zlib-1.2.12 \
--with-openssl=../openssl-1.1.1q \
--sbin-path=/usr/sbin/nginx \
--conf-path=/usr/local/nginx/nginx.conf \
--pid-path=/usr/local/nginx/nginx.pid \
--error-log-path=/var/log/nginx/error.log \
--http-log-path=/var/log/nginx/access.log \
--lock-path=/var/run/nginx.lock \
--modules-path=/usr/local/nginx/modules \
--http-client-body-temp-path=/var/cache/nginx/client_temp \
--http-proxy-temp-path=/var/cache/nginx/proxy_temp \
--http-fastcgi-temp-path=/var/cache/nginx/fastcgi_temp \
--http-uwsgi-temp-path=/var/cache/nginx/uwsgi_temp \
--http-scgi-temp-path=/var/cache/nginx/scgi_temp \
--with-threads \
--with-http_sub_module --with-http_v2_module \
--with-http_auth_request_module --with-http_realip_module --with-http_secure_link_module \
--with-http_gunzip_module --with-http_gzip_static_module --with-http_ssl_module \
--with-http_slice_module --with-http_stub_status_module --with-http_image_filter_module \
--with-http_dav_module --with-http_flv_module --with-http_mp4_module \
--with-stream --with-stream_realip_module --with-stream_ssl_module --with-stream_ssl_preread_module --with-stream_geoip_module \
--with-mail --with-mail_ssl_module \
--with-http_addition_module --with-http_random_index_module \
--with-compat --with-file-aio \
--with-cc-opt='-Os -fomit-frame-pointer -g'  \
--with-ld-opt='-Wl,-rpath,/usr/local/luajit/lib,--as-needed,-O1,--sort-common' \
--add-module=/usr/local/src/ngx_devel_kit-0.3.1 \
--add-module=/usr/local/src/lua-nginx-module-0.10.21 \
--add-dynamic-module=/usr/local/src/echo-nginx-module-0.62 \

# 编译构建安装
make & make install
温馨提示: 上述 ./configure 编译配置中使用静态链接库方式来添加ngx_devel_kit-0.3.1/lua-nginx-module-0.10.21模块, 又为了演示加入动态链接库的使用方式,此处使用--add-dynamic-module参数指定echo-nginx-module-0.62的解压目录,如果使用动态连接库的方式加载模块将会在后续实践中展示。
构建结果:
# configure 结果
Configuration summary
  # + using threads
  # + using PCRE library: ../pcre-8.45
  # + using OpenSSL library: ../openssl-1.1.1q
  # + using zlib library: ../zlib-1.2.12
  # nginx path prefix: "/usr/local/nginx"
  # ....................................
  # nginx http scgi temporary files: "/var/cache/nginx/scgi_temp"

# Make 构建安装后提示lib动态链接库地址。
- add LIBDIR to the 'LD_LIBRARY_PATH' environment variable during execution
- add LIBDIR to the 'LD_RUN_PATH' environment variable during linking
- use the '-Wl,-rpath -Wl,LIBDIR' linker flag # 或者在编译是添加依赖的Lib目录。
- have your system administrator add LIBDIR to '/etc/ld.so.conf'

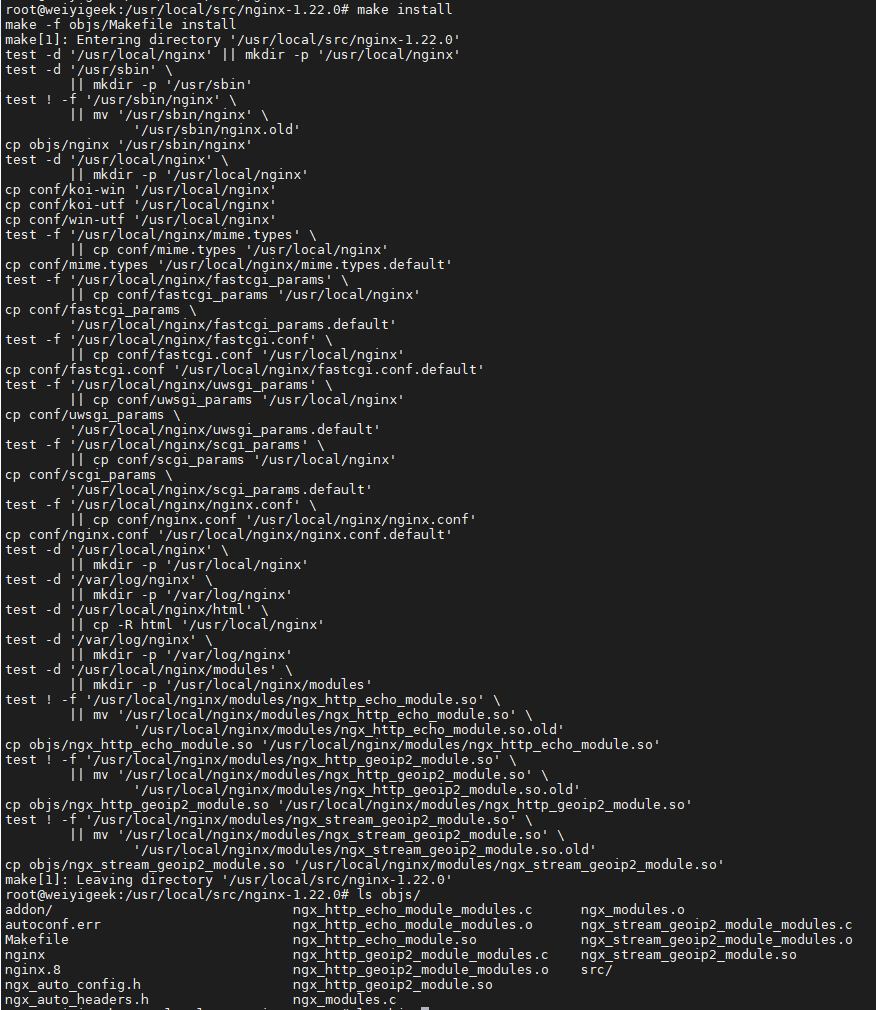
/usr/local/src/nginx-1.22.0# ls objs/
  # ls objs/
  # addon         ngx_auto_config.h
  # autoconf.err  ngx_auto_headers.h
  # Makefile      ngx_http_echo_module_modules.c
  # nginx         ngx_http_echo_module_modules.o
  # ngx_modules.c src
  # nginx.8       ngx_http_echo_module.so   ngx_modules.o
WeiyiGeek.build Nginx
Step 6.在Nginx安装部署成功后,为了验证Nginx + Lua安装环境,我们需要再 nginx 主配置文件入口配置如下关键内容,注意下面带有文字注释部分。
$ grep -v "^#|^$|#"  /usr/local/nginx/conf.d/nginx.conf
worker_processes  1;
events {
  worker_connections  1024;
}
http {
  include       mime.types;
  default_type  application/octet-stream;
  # 去除 log_format 前者的注释符 `#`
  log_format  main  '$remote_addr - $remote_user [$time_local] "$request" '
                    '$status $body_bytes_sent "$http_referer" '
                    '"$http_user_agent" "$http_x_forwarded_for"';
  sendfile        on;
  keepalive_timeout  65;
  # lua 包模块依赖路径
  lua_package_path '/usr/local/src/lua-resty-core-0.1.23/lib/?.lua;/usr/local/src/lua-resty-lrucache-0.13/lib/?.lua;';
  ...
  # 添加加载nginx家目录下的conf.d/目录子配置文件 (通配符)
  include conf.d/*.conf;
}
然后再创建子配置目录与demo.weiyigeek.top站点配置demo.conf文件中,添加如下server字段内容片段。
mkdir /usr/local/nginx/conf.d
tee /usr/local/nginx/conf.d/demo.conf <<'EOF'
# https - demo.weiyigeek.top
server {
  listen       80;
  server_name  demo.weiyigeek.top;
  charset utf-8;
  access_log /var/log/nginx/demo-access.log main buffer=128k flush=1m;
  # 方式1.content_by_lua_block lua 片段
  location /hello-lua {
    default_type 'text/plain';
    content_by_lua_block {
      ngx.say("Hello World! Lua & Nginx .")
    }
  }

  # 方式2.content_by_lua_file lua 脚本文件路径
  location /hello-lua-file {
    default_type 'text/html';
    content_by_lua_file ./lua/hello.lua;
  }

  # 方式3.access_by_lua 在请求访问阶段处理用于访问控制。
  location /hello-lua-access {
    default_type 'text/html';
    access_by_lua '
      local message = "403 - Hello World! Lua & Nginx  access_by_lua"
      ngx.say(message)
    ';
  }

  # 方式4.content_by_lua 在内容处理阶段接受请求并输出响应。
  location /hello-lua-content {
    default_type 'text/html';
    content_by_lua "ngx.print('Hello World!')";
  }
}
EOF温馨提示:access_by_lua与 content_by_lua 的区别是对于Nginx请求的不同处理阶段,前者是访问阶段处理用于访问控制(适用于http、server、location、location if),后者内容处理器接受请求并输出响应,适用于location、location if
Step 7.上述配置完成后为了验证配置文件是否存在问题,可执行如下命令如果显示 successful 表示配置没有问题,之后就可重载 nginx 服务。
$ nginx -t
  # nginx: the configuration file /usr/local/nginx/nginx.conf syntax is ok
  # nginx: configuration file /usr/local/nginx/nginx.conf test is successful

$ /usr/sbin/nginx -s reload
$ ps -ef | grep "nginx"
  # root      244962       1  0 16:40 ?        00:00:00 nginx: master process nginx
  # nginx     245707  244962  0 21:42 ?        00:00:00 nginx: worker process
  # root      245710  245523  0 21:42 pts/0    00:00:00 grep nginx
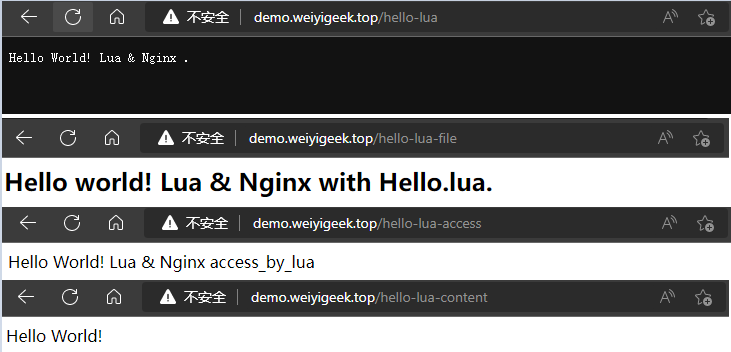
Step 8.验证基本的Nginx+Lua环境,我们访问上述配置文件中的域名和子目录,访问结果如下图所示则表示环境OK,否则请排查错误或者查看是否存在下述的入坑出坑中相关问题。
curl -H "host:demo.weiyigeek.top" 10.20.172.201/hello-lua
Hello World! Lua & Nginx .

curl -H "host:demo.weiyigeek.top" 10.20.172.201/hello-lua-file
<h2> Hello world! Lua & Nginx with Hello.lua. </h2>

curl -H "host:demo.weiyigeek.top" 10.20.172.201/hello-lua-access
Hello World! Lua & Nginx  access_by_lua

curl -H "host:demo.weiyigeek.top" 10.20.172.201/hello-lua-content
Hello World!
WeiyiGeek.demo.weiyigeek.top
知识扩展: 编译构建nginx后我们可通过nginx -V命令查看曾经./configure预编译参数的设置。
$ nginx -V
nginx version: nginx/1.22.0
built by gcc 9.4.0 (Ubuntu 9.4.0-1ubuntu1~20.04.1)
built with OpenSSL 1.1.1q  5 Jul 2022
TLS SNI support enabled
configure arguments: --prefix=/usr/local/nginx
....
--add-module=/usr/local/src/lua-nginx-module-0.10.21 --add-dynamic-module=/usr/local/src/echo-nginx-module-0.62 -
0x02 使用实践
1.Nginx 实践使用 echo-nginx-module 模块之动态加载链接库
描述: 从 NGINX 1.9.11 开始,您还可以将此模块编译为动态模块,方法是在上面的 ./configure 命令行中使用 --add-dynamic-module=PATH 选项而不是--add-module=PATH选项,然后你可以通过 load_module 指令在你的 nginx.conf 中显式加载模块,注意必须在 events{} 片段之前.
模块语法: https://github.com/openresty/echo-nginx-module#synopsis
Step 1.在Nginx.conf文件中配置load_module指令以动态加载 echo-nginx-module 模块。
# 方式1.绝对路径
load_module /usr/local/nginx/modules/ngx_http_echo_module.so;
# 方式2.相对路径
load_module ./modules/ngx_http_echo_module.so;
.....
events {
  worker_connections  1024;
}
Step 2.同样在demo.conf文件中的进行该模块常规的使用实践。
$ cat conf.d/demo.conf

server {
  ...
  # 示例1.常规输出(注意文本类型则网页中反馈展现数据也不相同)。
  location /nginx-module/echo {
    default_type 'text/html';
    echo -n "<b>Domain: demo.weiyigeek.top</b> <br/>";
    echo "Hello World! by ngx_http_echo_module.so";
  }

  # 示例2.请求延时显示以及重置时间定时器。
  location /nginx-module/timed {
    default_type 'text/plain';
    echo "Hello World! by ngx_http_echo_module.so \r";
    echo_reset_timer;
    echo "1.takes about $echo_timer_elapsed sec \r";
    echo_flush;
    echo_sleep 2.5;  # in sec
    echo "2.takes about $echo_timer_elapsed sec.";
    echo "End";
  }

  # 示例3.Body文档前后插入数据以及在中部插嵌入反向代理网站源码。
  location /nginx-module/body {
    resolver 223.6.6.6;
    default_type 'text/html';
    echo "Hello World! by ngx_http_echo_module.so";
    echo_before_body 'Blog - ';
    proxy_pass $scheme://www.weiyigeek.top:$server_port/index.html;
    echo_before_body 'www.WeiyiGeek.top';
    echo_after_body '[END]';
  }

  # 示例4.多次输出同一个字符串以及显示客户端请求header与请求body主体参数
  location /nginx-module/duplicate {
    default_type 'text/plain';
    echo_duplicate 3 "--";
    echo_duplicate 1 "\rHello World! by ngx_http_echo_module.so \r\r";
    # echo_duplicate 1000_000 "Hello World! by ngx_http_echo_module.so";
    echo "\r";
    echo_duplicate 1 $echo_client_request_headers;
    echo "\r";
    echo_read_request_body;
    echo "\r";
    echo_request_body;
    echo_duplicate 3 "--";
    echo;
   }

  # 示例5.正则匹配请求参数,注意`$arg_var`后面的var是可以自定义设置,此处为flag参数。
  location ^~ /nginx-module/if {
    default_type 'text/plain';
    set $res default;
    echo $arg_flag;
    if ($arg_flag ~* '^a') {
      set $res change;
      echo $arg_flag, $res;
    }
    echo $res;
  }
  ....
}
补充 echo_subrequest_async 异步请求 描述: 使用 HTTP 方法、可选的 url 参数(或查询字符串)和可选的请求主体发起异步子请求,请求主体可以定义为字符串或包含主体的文件的路径。
# GET /multi will yields
 #   querystring: foo=Foo
 #   method: POST
 #   body: hi
 #   content length: 2
 #   ///
 #   querystring: bar=Bar
 #   method: PUT
 #   body: hello
 #   content length: 5
 #   ///
 location /multi {
     echo_subrequest_async POST '/sub' -q 'foo=Foo' -b 'hi';
     echo_subrequest_async PUT '/sub' -q 'bar=Bar' -b 'hello';
 }
 location /sub {
     echo "querystring: $query_string";
     echo "method: $echo_request_method";
     echo "body: $echo_request_body";
     echo "content length: $http_content_length";
     echo '///';
 }
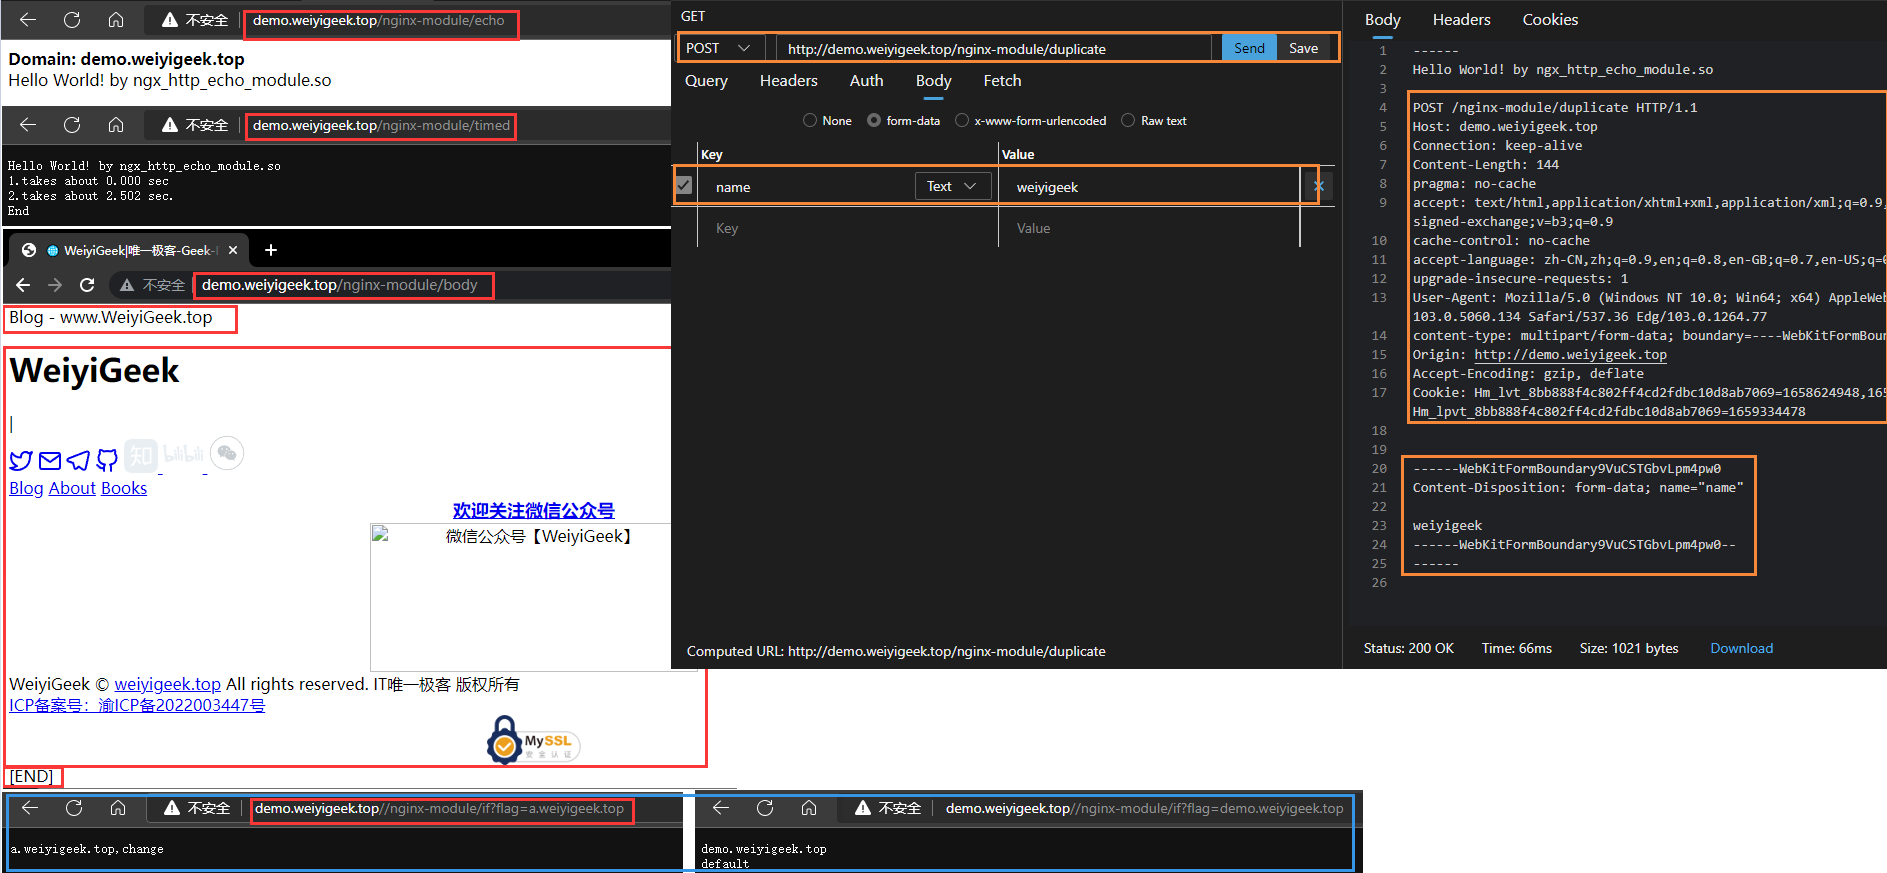
Step 3.完成配置后重载nginx服务, 通过浏览器访问上述路径验证模块使用与输出,效果如下图所示:

WeiyiGeek.use ngx_http_echo_module
该模块的其它使用请参考其项目地址Readme文档,此处演示了如何加载动态链接库到nginx,并且使用链接库中的模块。
2.Nginx 实践使用 lua-resty-redis 模块连接 Redis 进行数据操作与展示
描述: 前面环境部署中已下载 ngx_lua_nginx 模块的 Redis 客户端驱动程序Lua库, 下面将演示如何在 Nginx 基于 ngx_lua_nginx 模块连接到Redis内存数据库进行相应数据查找,好了本小节就直奔主题。
语法参考: https://github.com/openresty/lua-resty-redis#synopsis
废话不多说,实践出真知
Step 1.在前面环境安装中我们解压在 ngx_lua_nginx 模块使用 Redis 客户端驱动程序Lua库,并将其 Lib 目录复制到 /usr/local/nginx/lua/ 目录中,其次我也准备了Redis数据库环境,针对安装部署步骤就不在详述了, 想要快速安装的朋友可以参考我的此篇文章【[Redis内存数据库环境快速搭建部署][https://blog.weiyigeek.top/2022/4-24-653.html]】。
$ tree /usr/local/nginx/lua/lib/
/usr/local/nginx/lua/lib/
└── resty
    └── redis.lua

# Redis 数据库 & 为了演示数据准备两个Key即domain/blog
192.168.1.22 6379 weiyigeek.top
/data # redis-cli
127.0.0.1:6379> auth  weiyigeek.top
OK
127.0.0.1:6379> ping
PONG
127.0.0.1:6379> set domain www.weiyigeek.top
OK
127.0.0.1:6379> set blog blog.weiyigeek.top
OK
Step 2.想要在Nginx使用该redis.lua链接到数据库,首先我们需要在nginx.conf配置文件中加入该lua包路径/usr/local/nginx/lua/lib/,例如:
$ grep "lua_package_path" /usr/local/nginx/nginx.conf
lua_package_path '/usr/local/nginx/lua/lib/?.lua;/usr/local/src/lua-resty-core-0.1.23/lib/?.lua;/usr/local/src/lua-resty-lrucache-0.13/lib/?.lua;'
Step 3.此处也是在 demo.conf 中进行配置使用Redis客户端驱动程序Lua库,连接到Redis数据库中, 此处为了方便演示就直接在该配置文件content_by_lua_block 代码块中使用lua语法,在企业生产实践环境中一定要将其写入到lua文件文件中。
# /usr/local/nginx/conf.d/demo.conf
server {
...
  location /redis/get {
    default_type 'text/html';
    set $key $arg_key;
    content_by_lua_block {
      -- # 引入resty.redis模块与创建实例化对象
      local redis = require "resty.redis"
      local client = redis:new()
      local REDIS_HOST = "192.168.1.22"
      local REDIS_PROT = 6379
      local REDIS_AUTH = "weiyigeek.top"
      -- # ngx.log(ngx.ERR, ngx.var.key)
      -- # 分别设置连接、发送和读取超时阈值(以毫秒为单位),用于后续套接字操作。
      client:set_timeouts(1000, 1000, 1000)

      -- # 创建链接对象, 连接到Redis数据库
      ngx.say("1.connect redis server..... <br>");
      local ok, err = client:connect(REDIS_HOST, REDIS_PROT)
      if not ok then
        ngx.say("failed to connect: ", err)
        return
      end

      -- # 认证
      ngx.say("2.auth redis server..... <br>");
      local res, err = client:auth(REDIS_AUTH)
      if not res then
        ngx.say("failed to authenticate: ", err)
        return
      end

      -- # 获取指定请求键值
      ngx.say("3.get custom KV for redis server, Key = ",ngx.var.key," <br>");
      local res, err = client:get(ngx.var.key)
      if not res then
          ngx.say("failed to get key: ", err)
          return
      end
      if res == ngx.null then
          ngx.say("key not found.")
          return
      end

      -- # 输出结果
      ngx.say("<b style='color:red'>4.result value: ",res,"</b><br/>")

      -- # 使用完毕后立即关闭销毁Redis连接(短连接可以如此使用,如果是长链接建议回收该连接池对象即可)
      local ok, err = client:close()
      if not ok then
        ngx.say("failed to close: ", err)
        return
      else
        ngx.say("5.just close the Redis connection right away <br/>")
      end
    }
  }
...
}
WeiyiGeek.Lua-redis-demo1
Step 5.在演示一个示例,我们可以一次性执行多个redis操作命令 lua-resty-redis 库支持pipeline提交,下面我们演示使用 content_by_lua_file 关键字指定连接操作redis的lua脚本地址(/usr/local/nginx/lua/custom/nginx-redis.lua)实践, 该方式在线上环境中推荐使用。
# 1) 操作 redis 数据库的 lua 脚本示例。
tee /usr/local/nginx/lua/custom/nginx-redis.lua <<'EOF'
-- # 引入resty.redis模块与创建实例化对象
local redis = require "resty.redis"
local client = redis:new()
local REDIS_HOST = "192.168.1.22"
local REDIS_PROT = 6379
local REDIS_AUTH = "weiyigeek.top"
-- # ngx.log(ngx.ERR, ngx.var.key)
-- # 分别设置连接、发送和读取超时阈值(以毫秒为单位),用于后续套接字操作。
client:set_timeouts(1000, 1000, 1000)

-- # 验证请求的参数是否存在
if (ngx.var.key == ngx.null and ngx.var.value == ngx.null)
then
  ngx.say("Request parameters : key + value not found!")
  ngx.exit(404)
end

-- # 创建链接对象, 连接到Redis数据库
ngx.say("1.connect redis server..... <br>");
local ok, err = client:connect(REDIS_HOST, REDIS_PROT)
if not ok then
  ngx.say("failed to connect: ", err)
  return
end

-- # 认证
ngx.say("2.auth redis server..... <br>");
local res, err = client:auth(REDIS_AUTH)
if not res then
  ngx.say("failed to authenticate: ", err)
  return
end

-- # 使用 pipeline 通道方式进行redis 数据库操作
client:init_pipeline()
client:set(ngx.var.key, ngx.var.value)
client:get(ngx.var.key)
client:get("domain")
local results, err = client:commit_pipeline()
if not results then
  ngx.say("failed to commit the pipelined requests: ", err)
  return
end

-- 结果遍历
for i, res in ipairs(results) do
  if type(res) == "table" then
      if res[1] == false then
          ngx.say("failed to run command ", i, ": ", res[2],"<br/>")
      else
        -- process the table value
        ngx.say("3) 3.",i, ": ", res[2],"<br/>")
      end
  else
    -- process the scalar value
    ngx.say("<p style='color:red'>3) ",i,"---",res,"</p>")
  end
end

-- 将当前 Redis 连接立即放入 ngx_lua cosocket 连接池(将其放入大小为100的连接池中,最大空闲时间为10秒)。
local ok, err = client:set_keepalive(10000, 100)
if not ok then
  ngx.say("failed to set keepalive: ", err)
  return
end
ngx.say("4.将当前 Redis 连接立即放入 ngx_lua cosocket 连接池<br/>")
EOF


# 2) 配置 demo.conf 文件 同样在 server 片段中加入如下 location 片段。
server {
....
  location /redis/pipeline {
    default_type 'text/html';
    # 获取请求参数中key的值与value的值并存放到nginx环境变量中
    set $key $arg_key;
    set $value $arg_value;
    # 调用并执行指定的lua脚本
    content_by_lua_file ./lua/custom/nginx-redis.lua;
  }
....
}
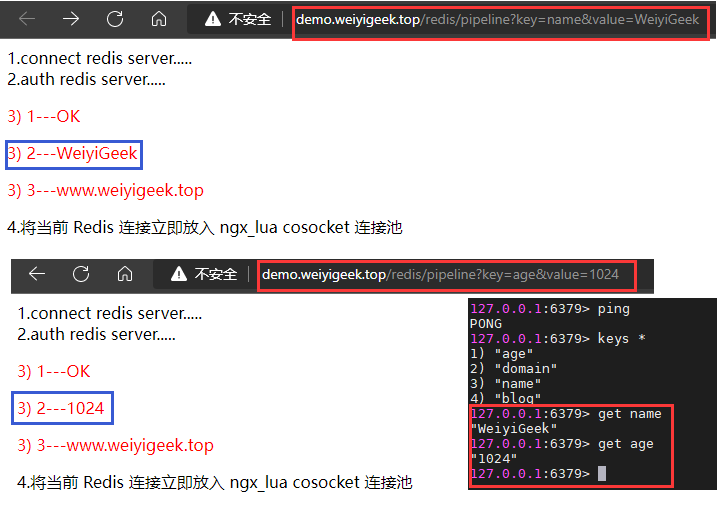
在配置完成后我们便可以重载nginx,并使用访问浏览器访问上述路径,例如: http://demo.weiyigeek.top/redis/pipeline?key=name&value=WeiyiGeek,此处我演示的结果如下图所示。

WeiyiGeek.lua-redis-pipeline
3.Nginx 实践读取Redis数据库中图片绑定对应键值并进行图片展示
描述: 假如在这样一个场景中,为了避免恶意用户遍历有规律的图片进行下载,那如何解决这个问题呢?
方法是有得但也不限于本节实践的案例,此处我们可以将其图片名称或者图片md5值存入到Redis数据库中作为Key,而实际的图片路径作为Value,在请求时我们将该md5值作为参数进行传入,经过 Nginx 对请求参数的处理,使用前面的方式在 Lua 脚本中连接Redis,并将URL传递的md5参数作为key进行get查询,并将查询到的图片路径,反馈给set指令设置的变量之中,然后我们便可以通过 proxy_pass 进行代理访问(地址栏中的url不会变化,保证实际的图片路径),或者也可以加上一个头Content-Disposition直接进行图片下载。
不在多说废话了,只有实践才是王道。
实践流程:
- Step 1.准备一个图片目录以及放入几张图片进行演示,此处你可以使用图片名称md5也可使用图形文件本身md5效验值。
$ tree /usr/local/nginx/html/
/usr/local/nginx/html/
├── 50x.html
├── images
│   ├── 1562941454569.jpeg
│   ├── 1562941454570.jpeg
│   └── 1562941454571.png
└── index.html

# 文件的MD5值
/usr/local/nginx/html/images# md5sum * | awk '{print "set "$1" "$2}'
set 6fad4c2466dc7f61fb055021ec65324d  1562941454569.jpeg
set 611877180883388de4752ded33a81165  1562941454570.jpeg
set 6636d52bfbe068177df5219edf4dd456  1562941454571.png

# 写入KV到redis数据库中
127.0.0.1:6379> set 6fad4c2466dc7f61fb055021ec65324d 1562941454569.jpeg
OK
127.0.0.1:6379> set 611877180883388de4752ded33a81165 1562941454570.jpeg
OK
127.0.0.1:6379> set 6636d52bfbe068177df5219edf4dd456 1562941454571.png
OK
Step 2.在demo.conf文件中的server片段中增加 location 片段,其中进行如下配置:
$ vim conf.d/demo.conf
server {
......
 location = /api/v2/images/get {
   resolver 223.6.6.6;
   set $key $arg_md5sum;
   set $name "";
   access_by_lua_block {
    local redis = require "resty.redis"
    local client = redis:new()
    local REDIS_HOST = "192.168.1.22"
    local REDIS_PROT = 6379
    local REDIS_AUTH = "weiyigeek.top"
    client:set_timeouts(1000, 1000, 1000)
    local ok, err = client:connect(REDIS_HOST, REDIS_PROT)
    if not ok then
      ngx.say("failed to connect: ", err)
      return
    end
    local res, err = client:auth(REDIS_AUTH)
    if not res then
      ngx.say("failed to authenticate: ", err)
      return
    end
    local res, err = client:get(ngx.var.key)
    if not res then
        ngx.say("failed to get key: ", err)
        return
    end
    if res == ngx.null then
        ngx.say("key not found.")
        return
    else
      -- # 关键点将redis中指定键的值赋予给nginx指定变量
      ngx.var.name = res
    end
    local ok, err = client:set_keepalive(10000, 100)
    if not ok then
      ngx.say("failed to set keepalive: ", err)
      return
    end
   }
   proxy_pass $scheme://$server_name/images/$name;
  }
......
}
在配置完成后我们重载 Nginx,然后利用浏览器进行访问如上URL,例如http://demo.weiyigeek.top/api/v2/images/get?md5sum=6636d52bfbe068177df5219edf4dd456,执行结果如下所示:

WeiyiGeek.access_by_lua_block-proxy_pass
- Step 3.如果我们想通过浏览器访问上述地址就直接弹出源文件名称进行下载的,我们则可以在
proxy_pass片段后加上如下header头:add_header Content-Disposition "attachment;filename=$name";
...
proxy_pass $scheme://$server_name/images/$name;
add_header Content-Disposition "attachment;filename=$name";
...

# 重载Nginx后利用CURL访问该URL
$ curl -I http://demo.weiyigeek.top/api/v2/images/get?md5sum=6636d52bfbe068177df5219edf4dd456
HTTP/1.1 200 OK
Server: nginx/1.22.0
Date: Tue, 02 Aug 2022 02:23:12 GMT
Content-Type: image/png
Content-Length: 32641
Connection: keep-alive
Last-Modified: Wed, 23 Mar 2022 00:48:26 GMT
ETag: "623a6e5a-7f81"
Accept-Ranges: bytes
Content-Disposition: attachment;filename=1562941454571.png
WeiyiGeek.proxy_pass-Content-Disposition
- Step 4.当然,你也可使用
rewrite_by_lua_block代码块包含Lua可直接或者图片路径,然后使用ngx.redirect()方法进行跳转。
$ vim conf.d/demo.conf
server {
......
 location = /api/v1/images/get {
  resolver 223.6.6.6;
  set $key $arg_md5sum;
  rewrite_by_lua_block {
    local redis = require "resty.redis"
    local client = redis:new()
    local REDIS_HOST = "192.168.1.22"
    local REDIS_PROT = 6379
    local REDIS_AUTH = "weiyigeek.top"
    client:set_timeouts(1000, 1000, 1000)
    local ok, err = client:connect(REDIS_HOST, REDIS_PROT)
    if not ok then
      ngx.say("failed to connect: ", err)
      return
    end
    local res, err = client:auth(REDIS_AUTH)
    if not res then
      ngx.say("failed to authenticate: ", err)
      return
    end
    local res, err = client:get(ngx.var.key)
    if not res then
        ngx.say("failed to get key: ", err)
        return
    end
    if res == ngx.null then
      ngx.say("key not found.")
    else
      -- # 关键点图片格式化。
      return ngx.redirect(string.format("%s%s","/images/",res))
    end
    local ok, err = client:set_keepalive(10000, 100)
    if not ok then
      ngx.say("failed to set keepalive: ", err)
      return
    end
   }
   # 若没有匹配搭配到进行跳转进行跳转则访问首页
   proxy_pass $scheme://$server_name/index.html;
  }
......
}
WeiyiGeek.rewrite_by_lua_block+ngx.redirect
好了,本章实践就到此处了,更多的奇技淫巧尽在 [weiyigeek] 公众号.
0x03 扩展补充
示例1.使用 ngx.location.capture() 请求内部接口
location = /auth {
  internal;
  retur 200 '{"status":"$auth_status"}'
}

# 此处根据业务的需求来写正则表达式,一定要个 redis 里的 KEY  对应上
location  ~/[0-9].*\.(gif|jpg|jpeg|png)$ {
  set $target '';
  access_by_lua '
  # 使用 nginx 的内部参数 ngx.var.uri 来获取请求的 uri 地址,如 /000001.jpg
    local key = ngx.var.uri
  # 根据正则匹配到 KEY ,从 redis 数据库里获取文件 ID (路径和文件名)
    local res = ngx.location.capture(
        "/Redis", { args = { key = key } }
    )
    if res.status ~= 200 then
        ngx.log(ngx.ERR, "Redis server returned bad status: ",res.status)
        ngx.exit(res.status)
    end
    if not res.body then
        ngx.log(ngx.ERR, "Redis returned empty body")
        ngx.exit(500)
    end
    local parser = require "Redis.parser"
    local filename, typ = parser.parse_reply(res.body)
    if typ ~= parser.BULK_REPLY or not server then
        ngx.log(ngx.ERR, "bad Redis response: ", res.body)
        ngx.exit(500)
    end

    ngx.var.target = filename
  ';
    proxy_pass http://10.20.172.196/$target;
}
示例2.Nginx在reponse返回的cookie中设置HttpOnly
local cookies = ngx.header.set_cookie
if cookies then
    if type(cookies) == "table" then
        for k,v in pairs(cookies) do
            cookies[k] = v .. "; HttpOnly"
            ngx.header.set_cookie = cookies
        end
    else
        local cookiesStr = cookies .. "; HttpOnly"
        ngx.header.set_cookie = cookiesStr;
    end
end
以上脚本的含义:
- 获取 nginx 响应信息中的cookie信息
- 如果cookie信息为空,则直接跳过,如果不为空则判断是多个 cookie 还是单个 cookie 返回
- 如果是多个 cookie 的话,则遍历数组,每个 cookie 字符串拼接 ‘; HttpOnly’ 的字符串
- 如果是单个 cookie 的话,则直接拼接 ‘; HttpOnly’ 的字符串
0x0n 入坑出坑
问题1. 当编译 Nginx 时报checking for LuaJIT 2.x ... not found, ./configure: error: unsupported LuaJIT version; ngx_http_lua_module requires LuaJIT 2.x. 错误时的解决办法。
问题描述: tell nginx’s build system where to find LuaJIT 2.1 解决办法:
# 临时生效
export LUAJIT_LIB=/usr/local/luajit/lib
export LUAJIT_INC=/usr/local/luajit/include/luajit-2.1

# 永久生效
tee -a /etc/profile <<'EOF'
export LUAJIT_LIB=/usr/local/luajit/lib
export LUAJIT_INC=/usr/local/luajit/include/luajit-2.1
EOF
source /etc/profile问题2.在使用luajit官方主分支LuaJIT-2.1.0-beta3提供LuaJIT安装部署出现nginx: [alert] detected a LuaJIT version which is not OpenResty's;以及nginx: [alert] failed to load the 'resty.core' module警告。
错误信息:
$ /usr/sbin/nginx
nginx: [alert] detected a LuaJIT version which is not OpenResty's; many optimizations will be disabled and performance will be compromised (see https://github.com/openresty/luajit2 for OpenResty's LuaJIT or, even better, consider using the OpenResty releases from https://openresty.org/en/download.html)
nginx: [alert] failed to load the 'resty.core' module (https://github.com/openresty/lua-resty-core); ensure you are using an OpenResty release from https://openresty.org/en/download.html (reason: module 'resty.core' not found:
  no field package.preload['resty.core']
  no file './resty/core.lua'
  no file '/usr/local/share/luajit-2.1.0-beta3/resty/core.lua'
  no file '/usr/local/share/lua/5.1/resty/core.lua'
  no file '/usr/local/share/lua/5.1/resty/core/init.lua'
  no file './resty/core.so'
  no file '/usr/local/lib/lua/5.1/resty/core.so'
  no file '/usr/local/lib/lua/5.1/loadall.so'
  no file './resty.so'
  no file '/usr/local/lib/lua/5.1/resty.so'
  no file '/usr/local/lib/lua/5.1/loadall.so') in /usr/local/nginx/nginx.conf:117
问题原因1: 提示LuaJIT的版本不匹配OpenResty’s内核版本, 让我不要用这个luajit版本,可以用openresty提供的luajit优化版本,或者干脆直接用openresty,下面将安装卸载luajit官网版本,下载openresty提供的luajit优化版本(即上面环境安装已经实践了,按照上面版本进行安装一般不会存在该问题)。
# 你可能会进行 Lua 脚本解释器的安装 LuaJIT
http://luajit.org/download.html
wget -c https://luajit.org/download/LuaJIT-2.1.0-beta3.tar.gz
tar -zxf LuaJIT-2.1.0-beta3.tar.gz && cd LuaJIT-2.1.0-beta3
make && make install
ln -sf /usr/local/bin/luajit-2.1.0-beta3 /usr/local/bin/luajit
# 卸载LuaJIT官网主分支版本,然后重新安装openresty提供的luajit优化版即可
make uninstall
make clean
问题原因2: 提示加载’resty.core’模块失败,其解决办法,按照https://github.com/openresty/lua-nginx-module/issues/1509上面所说, 安装lua-resty-core和依赖文件lua-resty-lrucache解决问题,即我前面实践中已经进行此部分操作,若不会操作请上翻到 【安装部署】标题进行查看。
原文地址: https://blog.weiyigeek.top/2022/7-2-676.html
原文地址:https://cloud.tencent.com/developer/article/2129899
版权声明:本文内容由互联网用户自发贡献,该文观点与技术仅代表作者本人。本站仅提供信息存储空间服务,不拥有所有权,不承担相关法律责任。如发现本站有涉嫌侵权/违法违规的内容, 请发送邮件至 dio@foxmail.com 举报,一经查实,本站将立刻删除。

