
前文我们介绍了helm的相关术语和使用helm安装和卸载应用,回顾请参考:https://www.cnblogs.com/qiuhom-1874/p/14305902.html;今天我们来介绍下自定义chart以及打包chart,helm其他命令使用和私有helm仓库搭建相关话题;
继上一篇博客,我们了解了使用helm在k8s上安装应用,卸载应用,以及仓库的添加删除更新等等操作;对于helm chart来说,它就是一个打包文件,把我们需要用到的配置清单,以模板的形式发布出来,用户使用时,可以根据values.yaml文件来自行定义对应的属性的值,当然也可以使用--set选项来指定个别配置清单的属性的值;那么我们使用helm命令从仓库中安装应用,它对应的打包文件放在那里的呢?默认情况我们使用helm命令安装应用,它会把对应应用的chart 打包文件存放在当前用户的家目录中的.cache/helm/repository/目录下,以.tgz结尾的一个压缩包;如下

提示:上述目录只要我们使用过helm install命令安装应用,对应的chart 打包文件都会下载到此处;
查看对应打包目录结构
[root@master01 ~]# ll .cache/helm/repository/
total 6520
-rw-r--r-- 1 root root     865 Jan 21 02:23 bitnami-charts.txt
-rw-r--r-- 1 root root 6555926 Jan 21 02:23 bitnami-index.yaml
-rw-r--r-- 1 root root    4381 Jan 20 23:19 redis
-rw-r--r-- 1 root root   31909 Jan 20 22:54 redis-10.5.7.tgz
-rw-r--r-- 1 root root   72791 Jan 21 02:26 redis-12.6.2.tgz
[root@master01 ~]# cp .cache/helm/repository/redis-12.6.2.tgz .
[root@master01 ~]# ls
redis-12.6.2.tgz
[root@master01 ~]# tar xf redis-12.6.2.tgz
[root@master01 ~]# ls
redis  redis-12.6.2.tgz
[root@master01 ~]# tree redis
redis
├── Chart.lock
├── charts
│   └── common
│       ├── Chart.yaml
│       ├── README.md
│       ├── templates
│       │   ├── _affinities.tpl
│       │   ├── _capabilities.tpl
│       │   ├── _errors.tpl
│       │   ├── _images.tpl
│       │   ├── _ingress.tpl
│       │   ├── _labels.tpl
│       │   ├── _names.tpl
│       │   ├── _secrets.tpl
│       │   ├── _storage.tpl
│       │   ├── _tplvalues.tpl
│       │   ├── _utils.tpl
│       │   ├── validations
│       │   │   ├── _cassandra.tpl
│       │   │   ├── _mariadb.tpl
│       │   │   ├── _mongodb.tpl
│       │   │   ├── _postgresql.tpl
│       │   │   ├── _redis.tpl
│       │   │   └── _validations.tpl
│       │   └── _warnings.tpl
│       └── values.yaml
├── Chart.yaml
├── ci
│   ├── default-values.yaml
│   ├── extra-flags-values.yaml
│   └── production-sentinel-values.yaml
├── img
│   ├── redis-cluster-topology.png
│   └── redis-topology.png
├── README.md
├── templates
│   ├── configmap-scripts.yaml
│   ├── configmap.yaml
│   ├── headless-svc.yaml
│   ├── health-configmap.yaml
│   ├── _helpers.tpl
│   ├── metrics-prometheus.yaml
│   ├── metrics-svc.yaml
│   ├── networkpolicy.yaml
│   ├── NOTES.txt
│   ├── pdb.yaml
│   ├── prometheusrule.yaml
│   ├── psp.yaml
│   ├── redis-master-statefulset.yaml
│   ├── redis-master-svc.yaml
│   ├── redis-node-statefulset.yaml
│   ├── redis-rolebinding.yaml
│   ├── redis-role.yaml
│   ├── redis-serviceaccount.yaml
│   ├── redis-slave-statefulset.yaml
│   ├── redis-slave-svc.yaml
│   ├── redis-with-sentinel-svc.yaml
│   └── secret.yaml
├── values.schema.json
└── values.yaml

7 directories,53 files
[root@master01 ~]#
提示:charts目录主要用来存放对应chart所依赖的其他chart文件;chart.yaml文件主要用来描述对应chart的元数据信息,比如chart 的版本,名字,简介信息等等;ci目录用于存放各种环境的values.yaml文件,默认情况不指定values文件,对应生效的是values.yaml文件;img目录主要用于存放对应chart在仓库中对应的图标;README.md文件用于描述该chart的使用方式,部署手册等等信息;template目录主要用来存放该chart部署为release所需的所有资源清单文件,该目录下的资源清单文件不是我们前边使用的资源清单文件,它里面的格式是通过go模板语言写的资源清单,在使用时,我们必须结合values.yaml中定义的值,通过模板引擎将其渲染以后才能正常使用;values.yaml文件主要用来描述对应资源模板清单中对应属性的默认值,一般不指定values文件,chart应用的值都来自于values.yaml文件,当然用户可以通过--set 来指定对应属性的值,也可以手动编辑values文件,用--values或者-f选项指定对应的值文件也行;
创建自定义chart命令帮助
[root@master01 ~]# helm create -h

This command creates a chart directory along with the common files and
directories used in a chart.

For example,'helm create foo' will create a directory structure that looks
something like this:

    foo/
    ├── .helmignore   # Contains patterns to ignore when packaging Helm charts.
    ├── Chart.yaml    # Information about your chart
    ├── values.yaml   # The default values for your templates
    ├── charts/       # Charts that this chart depends on
    └── templates/    # The template files
        └── tests/    # The test files

'helm create' takes a path for an argument. If directories in the given path
do not exist,Helm will attempt to create them as it goes. If the given
destination exists and there are files in that directory,conflicting files
will be overwritten,but other files will be left alone.

Usage:
  helm create NAME [flags]

Flags:
  -h,--help             help for create
  -p,--starter string   the name or absolute path to Helm starter scaffold

Global Flags:
      --debug                       enable verbose output
      --kube-apiserver string       the address and the port for the Kubernetes API server
      --kube-as-group stringArray   group to impersonate for the operation,this flag can be repeated to specify multiple groups.
      --kube-as-user string         username to impersonate for the operation
      --kube-ca-file string         the certificate authority file for the Kubernetes API server connection
      --kube-context string         name of the kubeconfig context to use
      --kube-token string           bearer token used for authentication
      --kubeconfig string           path to the kubeconfig file
  -n,--namespace string            namespace scope for this request
      --registry-config string      path to the registry config file (default "/root/.config/helm/registry.json")
      --repository-cache string     path to the file containing cached repository indexes (default "/root/.cache/helm/repository")
      --repository-config string    path to the file containing repository names and URLs (default "/root/.config/helm/repositories.yaml")
[root@master01 ~]#
示例:创建一个myapp的chart
[root@master01 ~]# helm create myapp
Creating myapp
[root@master01 ~]# ls
myapp  redis  redis-12.6.2.tgz
[root@master01 ~]# tree myapp/
myapp/
├── charts
├── Chart.yaml
├── templates
│   ├── deployment.yaml
│   ├── _helpers.tpl
│   ├── hpa.yaml
│   ├── ingress.yaml
│   ├── NOTES.txt
│   ├── serviceaccount.yaml
│   ├── service.yaml
│   └── tests
│       └── test-connection.yaml
└── values.yaml

3 directories,10 files
[root@master01 ~]#
查看chart.yaml文件内容
[root@master01 ~]# cat myapp/Chart.yaml
apiVersion: v2
name: myapp
description: A Helm chart for Kubernetes

# A chart can be either an 'application' or a 'library' chart.
#
# Application charts are a collection of templates that can be packaged into versioned archives
# to be deployed.
#
# Library charts provide useful utilities or functions for the chart developer. They're included as
# a dependency of application charts to inject those utilities and functions into the rendering
# pipeline. Library charts do not define any templates and therefore cannot be deployed.
type: application

# This is the chart version. This version number should be incremented each time you make changes
# to the chart and its templates,including the app version.
# Versions are expected to follow Semantic Versioning (https://semver.org/)
version: 0.1.0

# This is the version number of the application being deployed. This version number should be
# incremented each time you make changes to the application. Versions are not expected to
# follow Semantic Versioning. They should reflect the version the application is using.
# It is recommended to use it with quotes.
appVersion: "1.16.0"
[root@master01 ~]#
提示:Chart.yaml文件主要用来描述对应chart的相关属性信息,其中apiVersion字段用于描述对应chart使用的api版本,默认是v2版本;name字段用于描述对应chart的名称;description字段用于描述对应chart的说明简介;type字段用户描述对应chart是应用程序还是库文件,应用程序类型的chart,它可以运行为一个release,但库类型的chart不能运行为release,它只能作为依赖被application类型的chart所使用;version字段用于描述对应chart版本;appVersion字段用于描述对应chart内部程序的版本信息;
查看模板文件
[root@master01 ~]# ll myapp/templates/
total 28
-rw-r--r-- 1 root root 1826 Jan 21 14:44 deployment.yaml
-rw-r--r-- 1 root root 1762 Jan 21 14:44 _helpers.tpl
-rw-r--r-- 1 root root  910 Jan 21 14:44 hpa.yaml
-rw-r--r-- 1 root root 1052 Jan 21 14:44 ingress.yaml
-rw-r--r-- 1 root root 1739 Jan 21 14:44 NOTES.txt
-rw-r--r-- 1 root root  316 Jan 21 14:44 serviceaccount.yaml
-rw-r--r-- 1 root root  355 Jan 21 14:44 service.yaml
drwxr-xr-x 2 root root   34 Jan 21 14:44 tests
[root@master01 ~]# cat myapp/templates/deployment.yaml
apiVersion: apps/v1
kind: Deployment
metadata:
  name: {{ include "myapp.fullname" . }}
  labels:
    {{- include "myapp.labels" . | nindent 4 }}
spec:
  {{- if not .Values.autoscaling.enabled }}
  replicas: {{ .Values.replicaCount }}
  {{- end }}
  selector:
    matchLabels:
      {{- include "myapp.selectorLabels" . | nindent 6 }}
  template:
    metadata:
      {{- with .Values.podAnnotations }}
      annotations:
        {{- toYaml . | nindent 8 }}
      {{- end }}
      labels:
        {{- include "myapp.selectorLabels" . | nindent 8 }}
    spec:
      {{- with .Values.imagePullSecrets }}
      imagePullSecrets:
        {{- toYaml . | nindent 8 }}
      {{- end }}
      serviceAccountName: {{ include "myapp.serviceAccountName" . }}
      securityContext:
        {{- toYaml .Values.podSecurityContext | nindent 8 }}
      containers:
        - name: {{ .Chart.Name }}
          securityContext:
            {{- toYaml .Values.securityContext | nindent 12 }}
          image: "{{ .Values.image.repository }}:{{ .Values.image.tag | default .Chart.AppVersion }}"
          imagePullPolicy: {{ .Values.image.pullPolicy }}
          ports:
            - name: http
              containerPort: 80
              protocol: TCP
          livenessProbe:
            httpGet:
              path: /
              port: http
          readinessProbe:
            httpGet:
              path: /
              port: http
          resources:
            {{- toYaml .Values.resources | nindent 12 }}
      {{- with .Values.nodeSelector }}
      nodeSelector:
        {{- toYaml . | nindent 8 }}
      {{- end }}
      {{- with .Values.affinity }}
      affinity:
        {{- toYaml . | nindent 8 }}
      {{- end }}
      {{- with .Values.tolerations }}
      tolerations:
        {{- toYaml . | nindent 8 }}
      {{- end }}
[root@master01 ~]#
提示:该部署清单模板文件,主要用go模板语言来写的,其中{{ include "myapp.fullname" . }}就表示取myapp的全名;{{ .Values.image.repository }}这段代码表示读取当前目录下的values文件中的image.repository字段的值;{{ .Values.image.tag | default .Chart.AppVersion }}表示对于values文件中image.tag的值或者读取default.chart文件中的AppVersion字段的值;简单讲go模板就是应用对应go模板语法来定义关属性的的值;一般都是从values.yaml文件中加载对应字段的值作为模板文件相关属性的值;
values文件中的值引用
[root@master01 ~]# cat myapp/values.yaml
# Default values for myapp.
# This is a YAML-formatted file.
# Declare variables to be passed into your templates.

replicaCount: 1

image:
  repository: nginx
  pullPolicy: IfNotPresent
  # Overrides the image tag whose default is the chart appVersion.
  tag: ""

imagePullSecrets: []
nameOverride: ""
fullnameOverride: ""

serviceAccount:
  # Specifies whether a service account should be created
  create: true
  # Annotations to add to the service account
  annotations: {}
  # The name of the service account to use.
  # If not set and create is true,a name is generated using the fullname template
  name: ""

podAnnotations: {}

podSecurityContext: {}
  # fsGroup: 2000

securityContext: {}
  # capabilities:
  #   drop:
  #   - ALL
  # readOnlyRootFilesystem: true
  # runAsNonRoot: true
  # runAsUser: 1000

service:
  type: ClusterIP
  port: 80

ingress:
  enabled: false
  annotations: {}
    # kubernetes.io/ingress.class: nginx
    # kubernetes.io/tls-acme: "true"
  hosts:
    - host: chart-example.local
      paths: []
  tls: []
  #  - secretName: chart-example-tls
  #    hosts:
  #      - chart-example.local

resources: {}
  # We usually recommend not to specify default resources and to leave this as a conscious
  # choice for the user. This also increases chances charts run on environments with little
  # resources,such as Minikube. If you do want to specify resources,uncomment the following
  # lines,adjust them as necessary,and remove the curly braces after 'resources:'.
  # limits:
  #   cpu: 100m
  #   memory: 128Mi
  # requests:
  #   cpu: 100m
  #   memory: 128Mi

autoscaling:
  enabled: false
  minReplicas: 1
  maxReplicas: 100
  targetCPUUtilizationPercentage: 80
  # targetMemoryUtilizationPercentage: 80

nodeSelector: {}

tolerations: []

affinity: {}
[root@master01 ~]#
提示:比如我们要引用values.yaml文件中的image字段下的tag字段的值,我们可以在模板文件中写成{{ .Values.image.tag }};如果在命令行使用--set选项来应用我们可以写成 image.tag;修改对应的值可以直接编辑对应values.yaml文件中对应字段的值,也可以直接使用--set 指定对应字段的对应值即可;默认情况在命令行使用--set选项给出的值,都会直接被替换,没有给定的值,默认还是使用values.yaml文件中给定的默认值;
示例:修改values.yaml文件中的值
[root@master01 ~]# cat myapp/values.yaml
# Default values for myapp.
# This is a YAML-formatted file.
# Declare variables to be passed into your templates.

replicaCount: 1

image:
  repository: ikubernetes/myapp
  pullPolicy: IfNotPresent
  # Overrides the image tag whose default is the chart appVersion.
  tag: "v1"

imagePullSecrets: []
nameOverride: ""
fullnameOverride: ""

serviceAccount:
  # Specifies whether a service account should be created
  create: true
  # Annotations to add to the service account
  annotations: {}
  # The name of the service account to use.
  # If not set and create is true,and remove the curly braces after 'resources:'.
  limits:
    cpu: 100m
    memory: 128Mi
  requests:
    cpu: 100m
    memory: 128Mi

autoscaling:
  enabled: false
  minReplicas: 1
  maxReplicas: 100
  targetCPUUtilizationPercentage: 80
  # targetMemoryUtilizationPercentage: 80

nodeSelector: {}

tolerations: []

affinity: {}
[root@master01 ~]#
提示:上述values.yaml文件,我们修改了image.repository的值为ikubernetes/myapp和image.tag为v1;这表示对应chart使用程序的镜像仓库为ikubernetes/myapp仓库;版本为v1;然后修改了resources字段;添加了对应的资源限制配置;
检查对应values文件的语法是否正确?
[root@master01 ~]# helm  lint ./myapp/
==> Linting ./myapp/
[INFO] Chart.yaml: icon is recommended
[ERROR] values.yaml: unable to parse YAML: error converting YAML to JSON: yaml: line 60: did not find expected key
[ERROR] templates/: cannot load values.yaml: error converting YAML to JSON: yaml: line 60: did not find expected key
[ERROR] : unable to load chart
        cannot load values.yaml: error converting YAML to JSON: yaml: line 60: did not find expected key

Error: 1 chart(s) linted,1 chart(s) failed
[root@master01 ~]#
提示:检查values文件的配置语法,可以使用helm lint命令指定对应chart的目录即可;上述检查结果告诉我们所values.yaml的60配置有问题;
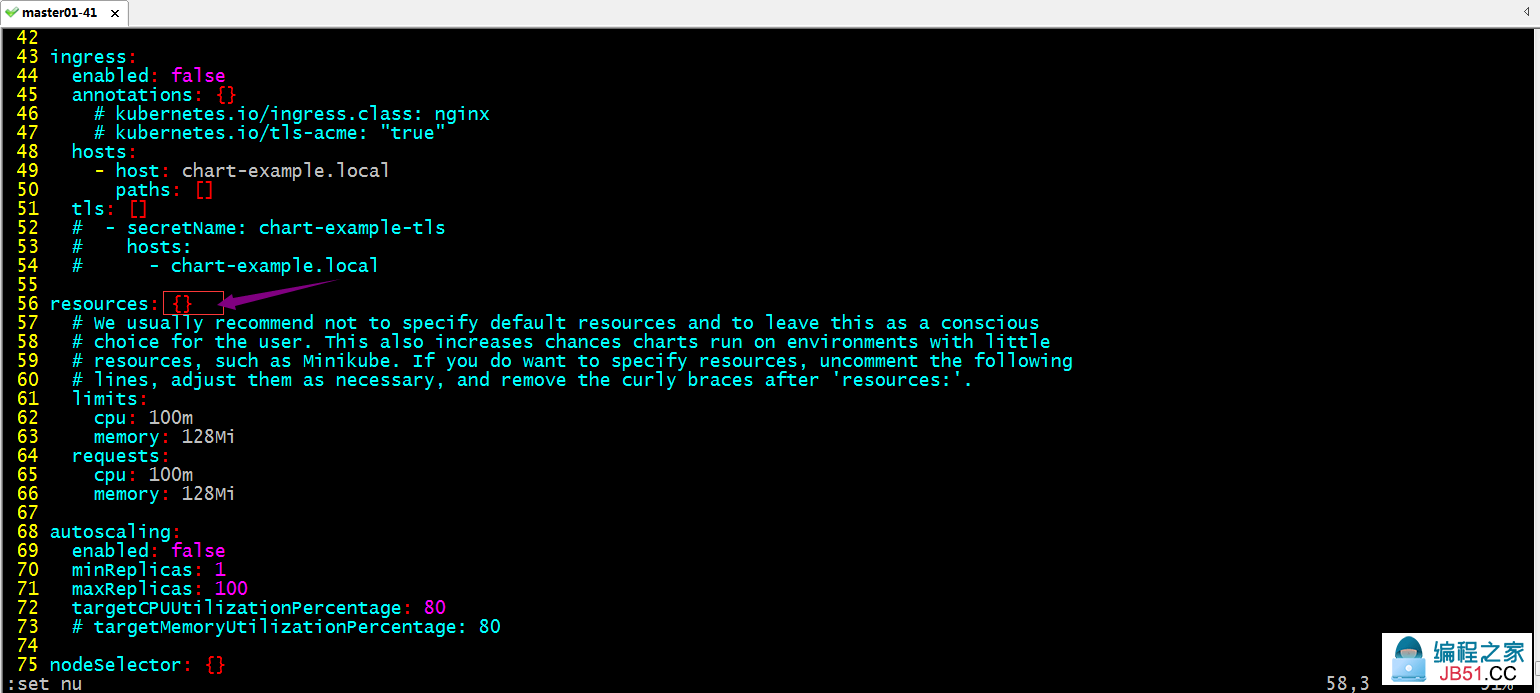
提示:上述values文件中,resource字段后面给定了对应的配置,对应{}就不能再使用,使用{}表示把resource字段留空;所以我们只需把对应的大括号删除即可;
删除resource字段的大括号,再次检查values的语法
[root@master01 ~]# helm  lint ./myapp/
==> Linting ./myapp/
[INFO] Chart.yaml: icon is recommended

1 chart(s) linted,0 chart(s) failed
[root@master01 ~]#
提示:只要上述检查过程中没有出现错误的类信息,表示values语法正确;到此我们就可以使用我们手动创建的chart来部署为一个release了;
修改Chart.yaml中的信息,将myapp chart 部署为一个release
[root@master01 ~]# cat ./myapp/Chart.yaml
apiVersion: v2
name: myapp
description: web server

# A chart can be either an 'application' or a 'library' chart.
#
# Application charts are a collection of templates that can be packaged into versioned archives
# to be deployed.
#
# Library charts provide useful utilities or functions for the chart developer. They're included as
# a dependency of application charts to inject those utilities and functions into the rendering
# pipeline. Library charts do not define any templates and therefore cannot be deployed.
type: application

# This is the chart version. This version number should be incremented each time you make changes
# to the chart and its templates,including the app version.
# Versions are expected to follow Semantic Versioning (https://semver.org/)
version: 0.1.0

# This is the version number of the application being deployed. This version number should be
# incremented each time you make changes to the application. Versions are not expected to
# follow Semantic Versioning. They should reflect the version the application is using.
# It is recommended to use it with quotes.
appVersion: "v1"
[root@master01 ~]#
应用myapp chart
[root@master01 ~]# helm install myapp-v1 ./myapp/
NAME: myapp-v1
LAST DEPLOYED: Thu Jan 21 15:15:52 2021
NAMESPACE: default
STATUS: deployed
REVISION: 1
NOTES:
1. Get the application URL by running these commands:
  export POD_NAME=$(kubectl get pods --namespace default -l "app.kubernetes.io/name=myapp,app.kubernetes.io/instance=myapp-v1" -o jsonpath="{.items[0].metadata.name}")
  export CONTAINER_PORT=$(kubectl get pod --namespace default $POD_NAME -o jsonpath="{.spec.containers[0].ports[0].containerPort}")
  echo "Visit http://127.0.0.1:8080 to use your application"
  kubectl --namespace default port-forward $POD_NAME 8080:$CONTAINER_PORT
[root@master01 ~]#
提示:部署自定义chart 使用helm install 指定对应release名称,以及chart所在目录即可;
查看release
[root@master01 ~]# helm list
NAME            NAMESPACE       REVISION        UPDATED                                 STATUS          CHART           APP VERSION
myapp-v1        default         1               2021-01-21 15:15:52.57286036 +0800 CST  deployed        myapp-0.1.0     v1
redis           default         1               2021-01-21 02:26:26.13324987 +0800 CST  deployed        redis-12.6.2    6.0.10
redis-demo      default         1               2021-01-21 01:58:18.20798703 +0800 CST  deployed        redis-12.6.2    6.0.10
[root@master01 ~]#
查看对应pod是否正常运行?对应service是否正常创建?
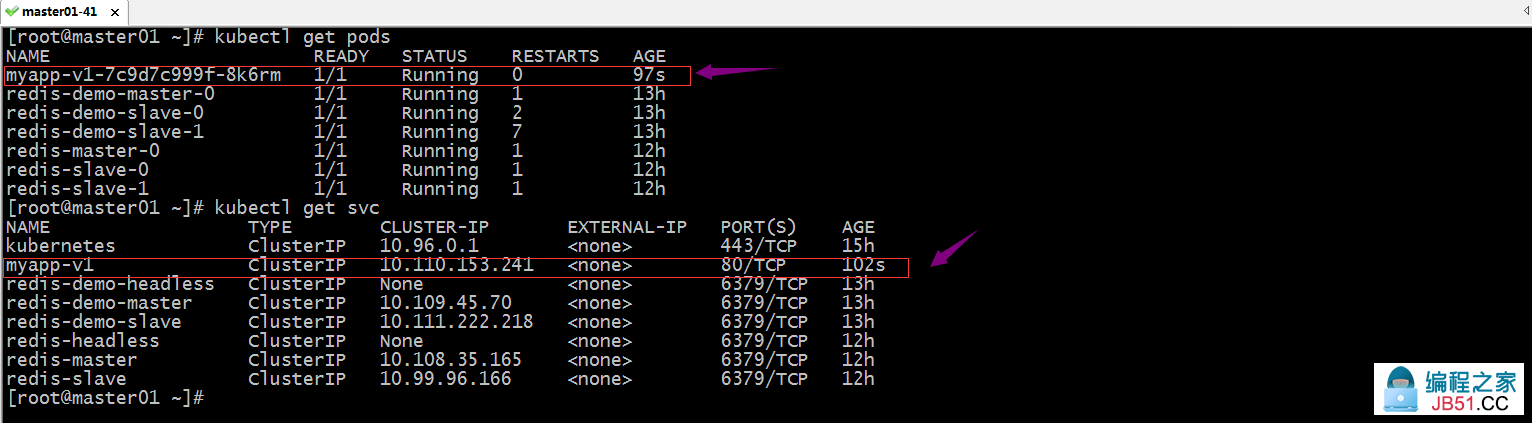
提示:可以看到对应pod和svc都正常创建;
升级release
更改Chart.yaml文件中的内容
[root@master01 ~]# cat myapp/Chart.yaml
apiVersion: v2
name: myapp
description: web server

# A chart can be either an 'application' or a 'library' chart.
#
# Application charts are a collection of templates that can be packaged into versioned archives
# to be deployed.
#
# Library charts provide useful utilities or functions for the chart developer. They're included as
# a dependency of application charts to inject those utilities and functions into the rendering
# pipeline. Library charts do not define any templates and therefore cannot be deployed.
type: application

# This is the chart version. This version number should be incremented each time you make changes
# to the chart and its templates,including the app version.
# Versions are expected to follow Semantic Versioning (https://semver.org/)
version: 0.2.0

# This is the version number of the application being deployed. This version number should be
# incremented each time you make changes to the application. Versions are not expected to
# follow Semantic Versioning. They should reflect the version the application is using.
# It is recommended to use it with quotes.
appVersion: "v2"
[root@master01 ~]#
更改values.yaml文件中对应镜像的版本
[root@master01 ~]# cat myapp/values.yaml
# Default values for myapp.
# This is a YAML-formatted file.
# Declare variables to be passed into your templates.

replicaCount: 1

image:
  repository: ikubernetes/myapp
  pullPolicy: IfNotPresent
  # Overrides the image tag whose default is the chart appVersion.
  tag: "v2"

imagePullSecrets: []
nameOverride: ""
fullnameOverride: ""

serviceAccount:
  # Specifies whether a service account should be created
  create: true
  # Annotations to add to the service account
  annotations: {}
  # The name of the service account to use.
  # If not set and create is true,a name is generated using the fullname template
  name: ""

podAnnotations: {}

podSecurityContext: {}
  # fsGroup: 2000

securityContext: {}
  # capabilities:
  #   drop:
  #   - ALL
  # readOnlyRootFilesystem: true
  # runAsNonRoot: true
  # runAsUser: 1000

service:
  type: ClusterIP
  port: 80

ingress:
  enabled: false
  annotations: {}
    # kubernetes.io/ingress.class: nginx
    # kubernetes.io/tls-acme: "true"
  hosts:
    - host: chart-example.local
      paths: []
  tls: []
  #  - secretName: chart-example-tls
  #    hosts:
  #      - chart-example.local

resources:
  # We usually recommend not to specify default resources and to leave this as a conscious
  # choice for the user. This also increases chances charts run on environments with little
  # resources,and remove the curly braces after 'resources:'.
  limits:
    cpu: 100m
    memory: 128Mi
  requests:
    cpu: 100m
    memory: 128Mi

autoscaling:
  enabled: false
  minReplicas: 1
  maxReplicas: 100
  targetCPUUtilizationPercentage: 80
  # targetMemoryUtilizationPercentage: 80

nodeSelector: {}

tolerations: []

affinity: {}
[root@master01 ~]#
使用upgrade命令升级release
[root@master01 ~]# helm list
NAME            NAMESPACE       REVISION        UPDATED                                 STATUS          CHART           APP VERSION
myapp-v1        default         1               2021-01-21 15:15:52.57286036 +0800 CST  deployed        myapp-0.1.0     v1
redis           default         1               2021-01-21 02:26:26.13324987 +0800 CST  deployed        redis-12.6.2    6.0.10
redis-demo      default         1               2021-01-21 01:58:18.20798703 +0800 CST  deployed        redis-12.6.2    6.0.10
[root@master01 ~]# helm upgrade --set service.type="NodePort" myapp-v1 ./myapp/
Release "myapp-v1" has been upgraded. Happy Helming!
NAME: myapp-v1
LAST DEPLOYED: Thu Jan 21 15:24:22 2021
NAMESPACE: default
STATUS: deployed
REVISION: 2
NOTES:
1. Get the application URL by running these commands:
  export NODE_PORT=$(kubectl get --namespace default -o jsonpath="{.spec.ports[0].nodePort}" services myapp-v1)
  export NODE_IP=$(kubectl get nodes --namespace default -o jsonpath="{.items[0].status.addresses[0].address}")
  echo http://$NODE_IP:$NODE_PORT
[root@master01 ~]# helm list
NAME            NAMESPACE       REVISION        UPDATED                                 STATUS          CHART           APP VERSION
myapp-v1        default         2               2021-01-21 15:24:22.882236621 +0800 CST deployed        myapp-0.2.0     v2
redis           default         1               2021-01-21 02:26:26.13324987 +0800 CST  deployed        redis-12.6.2    6.0.10
redis-demo      default         1               2021-01-21 01:58:18.20798703 +0800 CST  deployed        redis-12.6.2    6.0.10
[root@master01 ~]# kubectl get pods
NAME                        READY   STATUS        RESTARTS   AGE
myapp-v1-7c9d7c999f-8k6rm   0/1     Terminating   0          8m47s
myapp-v1-866b6d4cc6-nx87c   1/1     Running       0          16s
redis-demo-master-0         1/1     Running       1          13h
redis-demo-slave-0          1/1     Running       2          13h
redis-demo-slave-1          1/1     Running       7          13h
redis-master-0              1/1     Running       1          12h
redis-slave-0               1/1     Running       1          12h
redis-slave-1               1/1     Running       1          12h
[root@master01 ~]# kubectl get svc
NAME                  TYPE        CLUSTER-IP       EXTERNAL-IP   PORT(S)        AGE
kubernetes            ClusterIP   10.96.0.1        <none>        443/TCP        15h
myapp-v1              NodePort    10.110.153.241   <none>        80:32434/TCP   8m53s
redis-demo-headless   ClusterIP   None             <none>        6379/TCP       13h
redis-demo-master     ClusterIP   10.109.45.70     <none>        6379/TCP       13h
redis-demo-slave      ClusterIP   10.111.222.218   <none>        6379/TCP       13h
redis-headless        ClusterIP   None             <none>        6379/TCP       12h
redis-master          ClusterIP   10.108.35.165    <none>        6379/TCP       12h
redis-slave           ClusterIP   10.99.96.166     <none>        6379/TCP       12h
[root@master01 ~]#
提示:可以看到对应myapp-v1pod和svc都发生了变化;
验证:查看对应pod的版本信息
[root@master01 ~]# kubectl describe pods myapp-v1-866b6d4cc6-nx87c |grep Image
    Image:          ikubernetes/myapp:v2
    Image ID:       docker-pullable://ikubernetes/myapp@sha256:85a2b81a62f09a414ea33b74fb8aa686ed9b168294b26b4c819df0be0712d358
[root@master01 ~]#
当然如果更新操作改动的信息较少,我们也可以直接在命令使用--set选项来指定对应的属性的值进行更新也行,如下
[root@master01 ~]# helm list
NAME            NAMESPACE       REVISION        UPDATED                                 STATUS          CHART           APP VERSION
myapp-v1        default         2               2021-01-21 15:24:22.882236621 +0800 CST deployed        myapp-0.2.0     v2
redis           default         1               2021-01-21 02:26:26.13324987 +0800 CST  deployed        redis-12.6.2    6.0.10
redis-demo      default         1               2021-01-21 01:58:18.20798703 +0800 CST  deployed        redis-12.6.2    6.0.10
[root@master01 ~]# helm upgrade --set image.tag="v3" myapp-v1 ./myapp/
Release "myapp-v1" has been upgraded. Happy Helming!
NAME: myapp-v1
LAST DEPLOYED: Thu Jan 21 15:29:46 2021
NAMESPACE: default
STATUS: deployed
REVISION: 3
NOTES:
1. Get the application URL by running these commands:
  export POD_NAME=$(kubectl get pods --namespace default -l "app.kubernetes.io/name=myapp,app.kubernetes.io/instance=myapp-v1" -o jsonpath="{.items[0].metadata.name}")
  export CONTAINER_PORT=$(kubectl get pod --namespace default $POD_NAME -o jsonpath="{.spec.containers[0].ports[0].containerPort}")
  echo "Visit http://127.0.0.1:8080 to use your application"
  kubectl --namespace default port-forward $POD_NAME 8080:$CONTAINER_PORT
[root@master01 ~]# helm list
NAME            NAMESPACE       REVISION        UPDATED                                 STATUS          CHART           APP VERSION
myapp-v1        default         3               2021-01-21 15:29:46.491467084 +0800 CST deployed        myapp-0.2.0     v2
redis           default         1               2021-01-21 02:26:26.13324987 +0800 CST  deployed        redis-12.6.2    6.0.10
redis-demo      default         1               2021-01-21 01:58:18.20798703 +0800 CST  deployed        redis-12.6.2    6.0.10
[root@master01 ~]#
提示:手动使用命令行选项--set更新,对应我们需要把对应的Chart中的信息要提前修改了,否则像上面我们没有修改对应文件中的信息,它保留的还是原来的信息;
验证:查看对应pod是否更新了版本?
[root@master01 ~]# kubectl get pods
NAME                        READY   STATUS    RESTARTS   AGE
myapp-v1-675d685ddf-nn2zd   1/1     Running   0          106s
redis-demo-master-0         1/1     Running   1          13h
redis-demo-slave-0          1/1     Running   2          13h
redis-demo-slave-1          1/1     Running   7          13h
redis-master-0              1/1     Running   1          13h
redis-slave-0               1/1     Running   1          13h
redis-slave-1               1/1     Running   1          13h
[root@master01 ~]# kubectl describe pods/myapp-v1-675d685ddf-nn2zd |grep Image
    Image:          ikubernetes/myapp:v3
    Image ID:       docker-pullable://ikubernetes/myapp@sha256:b8d74db2515d3c1391c78c5768272b9344428035ef6d72158fd9f6c4239b2c69
[root@master01 ~]# kubectl get svc
NAME                  TYPE        CLUSTER-IP       EXTERNAL-IP   PORT(S)    AGE
kubernetes            ClusterIP   10.96.0.1        <none>        443/TCP    15h
myapp-v1              ClusterIP   10.110.153.241   <none>        80/TCP     16m
redis-demo-headless   ClusterIP   None             <none>        6379/TCP   13h
redis-demo-master     ClusterIP   10.109.45.70     <none>        6379/TCP   13h
redis-demo-slave      ClusterIP   10.111.222.218   <none>        6379/TCP   13h
redis-headless        ClusterIP   None             <none>        6379/TCP   13h
redis-master          ClusterIP   10.108.35.165    <none>        6379/TCP   13h
redis-slave           ClusterIP   10.99.96.166     <none>        6379/TCP   13h
[root@master01 ~]#
提示:上面用命令行选项指定对应镜像的版本更新是成功的;对应svc没有指定其类型,也是使用的默认类型;
回滚release
[root@master01 ~]# helm list
NAME            NAMESPACE       REVISION        UPDATED                                 STATUS          CHART           APP VERSION
myapp-v1        default         3               2021-01-21 15:29:46.491467084 +0800 CST deployed        myapp-0.2.0     v2
redis           default         1               2021-01-21 02:26:26.13324987 +0800 CST  deployed        redis-12.6.2    6.0.10
redis-demo      default         1               2021-01-21 01:58:18.20798703 +0800 CST  deployed        redis-12.6.2    6.0.10
[root@master01 ~]# helm rollback myapp-v1 2
Rollback was a success! Happy Helming!
[root@master01 ~]# helm list
NAME            NAMESPACE       REVISION        UPDATED                                 STATUS          CHART           APP VERSION
myapp-v1        default         4               2021-01-21 15:33:58.389015959 +0800 CST deployed        myapp-0.2.0     v2
redis           default         1               2021-01-21 02:26:26.13324987 +0800 CST  deployed        redis-12.6.2    6.0.10
redis-demo      default         1               2021-01-21 01:58:18.20798703 +0800 CST  deployed        redis-12.6.2    6.0.10
[root@master01 ~]# helm rollback myapp-v1 2
Rollback was a success! Happy Helming!
[root@master01 ~]# helm rollback myapp-v1 1
Rollback was a success! Happy Helming!
[root@master01 ~]# helm history myapp-v1
REVISION        UPDATED                         STATUS          CHART           APP VERSION     DESCRIPTION
1               Thu Jan 21 15:15:52 2021        superseded      myapp-0.1.0     v1              Install complete
2               Thu Jan 21 15:24:22 2021        superseded      myapp-0.2.0     v2              Upgrade complete
3               Thu Jan 21 15:29:46 2021        superseded      myapp-0.2.0     v2              Upgrade complete
4               Thu Jan 21 15:33:58 2021        superseded      myapp-0.2.0     v2              Rollback to 2
5               Thu Jan 21 15:36:08 2021        superseded      myapp-0.2.0     v2              Rollback to 2
6               Thu Jan 21 15:36:26 2021        deployed        myapp-0.1.0     v1              Rollback to 1
[root@master01 ~]# helm rollback myapp-v1 1
Rollback was a success! Happy Helming!
[root@master01 ~]# helm history myapp-v1
REVISION        UPDATED                         STATUS          CHART           APP VERSION     DESCRIPTION
1               Thu Jan 21 15:15:52 2021        superseded      myapp-0.1.0     v1              Install complete
2               Thu Jan 21 15:24:22 2021        superseded      myapp-0.2.0     v2              Upgrade complete
3               Thu Jan 21 15:29:46 2021        superseded      myapp-0.2.0     v2              Upgrade complete
4               Thu Jan 21 15:33:58 2021        superseded      myapp-0.2.0     v2              Rollback to 2
5               Thu Jan 21 15:36:08 2021        superseded      myapp-0.2.0     v2              Rollback to 2
6               Thu Jan 21 15:36:26 2021        superseded      myapp-0.1.0     v1              Rollback to 1
7               Thu Jan 21 15:38:21 2021        deployed        myapp-0.1.0     v1              Rollback to 1
[root@master01 ~]# helm rollback myapp-v1 3
Rollback was a success! Happy Helming!
[root@master01 ~]# helm history myapp-v1
REVISION        UPDATED                         STATUS          CHART           APP VERSION     DESCRIPTION
1               Thu Jan 21 15:15:52 2021        superseded      myapp-0.1.0     v1              Install complete
2               Thu Jan 21 15:24:22 2021        superseded      myapp-0.2.0     v2              Upgrade complete
3               Thu Jan 21 15:29:46 2021        superseded      myapp-0.2.0     v2              Upgrade complete
4               Thu Jan 21 15:33:58 2021        superseded      myapp-0.2.0     v2              Rollback to 2
5               Thu Jan 21 15:36:08 2021        superseded      myapp-0.2.0     v2              Rollback to 2
6               Thu Jan 21 15:36:26 2021        superseded      myapp-0.1.0     v1              Rollback to 1
7               Thu Jan 21 15:38:21 2021        superseded      myapp-0.1.0     v1              Rollback to 1
8               Thu Jan 21 15:40:38 2021        deployed        myapp-0.2.0     v2              Rollback to 3
[root@master01 ~]#
提示:回滚操作我们需要指定对应回滚的位置,这个位置用一个数字表示,这个数字就是对应的历史版本的序号;比如回滚到序号为2的版本上,就使用helm rollback myapp-v1 2;如果回滚到版本序号为3的版本上,就把对应后面的版本序号更改为3即可;依此逻辑进行回滚;查看对应release的版本历史,可以使用helm history RELEASE_NAME来查看;上述命令最后我们会滚到序号为3的版本上,该版本对应应用程序的版本为v3;
验证:查看对应pod程序版本是否v3?
[root@master01 ~]# kubectl get pods
NAME                        READY   STATUS    RESTARTS   AGE
myapp-v1-675d685ddf-7c8zd   1/1     Running   0          11m
redis-demo-master-0         1/1     Running   1          13h
redis-demo-slave-0          1/1     Running   2          13h
redis-demo-slave-1          1/1     Running   7          13h
redis-master-0              1/1     Running   1          13h
redis-slave-0               1/1     Running   1          13h
redis-slave-1               1/1     Running   1          13h
[root@master01 ~]# kubectl describe pods/myapp-v1-675d685ddf-7c8zd |grep Image
    Image:          ikubernetes/myapp:v3
    Image ID:       docker-pullable://ikubernetes/myapp@sha256:b8d74db2515d3c1391c78c5768272b9344428035ef6d72158fd9f6c4239b2c69
[root@master01 ~]#
提示:可以看到对应pod使用的镜像版本是v3;
查看myapp-v1的状态
[root@master01 ~]# helm status myapp-v1
NAME: myapp-v1
LAST DEPLOYED: Thu Jan 21 15:40:38 2021
NAMESPACE: default
STATUS: deployed
REVISION: 8
NOTES:
1. Get the application URL by running these commands:
  export POD_NAME=$(kubectl get pods --namespace default -l "app.kubernetes.io/name=myapp,app.kubernetes.io/instance=myapp-v1" -o jsonpath="{.items[0].metadata.name}")
  export CONTAINER_PORT=$(kubectl get pod --namespace default $POD_NAME -o jsonpath="{.spec.containers[0].ports[0].containerPort}")
  echo "Visit http://127.0.0.1:8080 to use your application"
  kubectl --namespace default port-forward $POD_NAME 8080:$CONTAINER_PORT
[root@master01 ~]#
提示:helm status命令就相当于是把对应chart中的template目录下NOTES.txt文件进行渲染以后,输出给用户;这个内容主要告诉用户对应chart怎么连接使用,对应chart的状态信息等等;
使用命令查看readme文件内容,chart.yaml文件内容和values文件内容
[root@master01 ~]# helm show readme
[root@master01 ~]# helm show readme myapp/
[root@master01 ~]# helm show chart myapp/
apiVersion: v2
appVersion: v2
description: web server
name: myapp
type: application
version: 0.2.0

[root@master01 ~]# helm show values myapp/
# Default values for myapp.
# This is a YAML-formatted file.
# Declare variables to be passed into your templates.

replicaCount: 1

image:
  repository: ikubernetes/myapp
  pullPolicy: IfNotPresent
  # Overrides the image tag whose default is the chart appVersion.
  tag: "v2"

imagePullSecrets: []
nameOverride: ""
fullnameOverride: ""

serviceAccount:
  # Specifies whether a service account should be created
  create: true
  # Annotations to add to the service account
  annotations: {}
  # The name of the service account to use.
  # If not set and create is true,and remove the curly braces after 'resources:'.
  limits:
    cpu: 100m
    memory: 128Mi
  requests:
    cpu: 100m
    memory: 128Mi

autoscaling:
  enabled: false
  minReplicas: 1
  maxReplicas: 100
  targetCPUUtilizationPercentage: 80
  # targetMemoryUtilizationPercentage: 80

nodeSelector: {}

tolerations: []

affinity: {}

[root@master01 ~]#
提示:对应chart中没有README.md文件,对应使用helm show readme命令也是无法获取到对应内容;
查看template目录下的模板文件内容
[root@master01 ~]# helm template myapp/
---
# Source: myapp/templates/serviceaccount.yaml
apiVersion: v1
kind: ServiceAccount
metadata:
  name: RELEASE-NAME-myapp
  labels:
    helm.sh/chart: myapp-0.2.0
    app.kubernetes.io/name: myapp
    app.kubernetes.io/instance: RELEASE-NAME
    app.kubernetes.io/version: "v2"
    app.kubernetes.io/managed-by: Helm
---
# Source: myapp/templates/service.yaml
apiVersion: v1
kind: Service
metadata:
  name: RELEASE-NAME-myapp
  labels:
    helm.sh/chart: myapp-0.2.0
    app.kubernetes.io/name: myapp
    app.kubernetes.io/instance: RELEASE-NAME
    app.kubernetes.io/version: "v2"
    app.kubernetes.io/managed-by: Helm
spec:
  type: ClusterIP
  ports:
    - port: 80
      targetPort: http
      protocol: TCP
      name: http
  selector:
    app.kubernetes.io/name: myapp
    app.kubernetes.io/instance: RELEASE-NAME
---
# Source: myapp/templates/deployment.yaml
apiVersion: apps/v1
kind: Deployment
metadata:
  name: RELEASE-NAME-myapp
  labels:
    helm.sh/chart: myapp-0.2.0
    app.kubernetes.io/name: myapp
    app.kubernetes.io/instance: RELEASE-NAME
    app.kubernetes.io/version: "v2"
    app.kubernetes.io/managed-by: Helm
spec:
  replicas: 1
  selector:
    matchLabels:
      app.kubernetes.io/name: myapp
      app.kubernetes.io/instance: RELEASE-NAME
  template:
    metadata:
      labels:
        app.kubernetes.io/name: myapp
        app.kubernetes.io/instance: RELEASE-NAME
    spec:
      serviceAccountName: RELEASE-NAME-myapp
      securityContext:
        {}
      containers:
        - name: myapp
          securityContext:
            {}
          image: "ikubernetes/myapp:v2"
          imagePullPolicy: IfNotPresent
          ports:
            - name: http
              containerPort: 80
              protocol: TCP
          livenessProbe:
            httpGet:
              path: /
              port: http
          readinessProbe:
            httpGet:
              path: /
              port: http
          resources:
            limits:
              cpu: 100m
              memory: 128Mi
            requests:
              cpu: 100m
              memory: 128Mi
---
# Source: myapp/templates/tests/test-connection.yaml
apiVersion: v1
kind: Pod
metadata:
  name: "RELEASE-NAME-myapp-test-connection"
  labels:
    helm.sh/chart: myapp-0.2.0
    app.kubernetes.io/name: myapp
    app.kubernetes.io/instance: RELEASE-NAME
    app.kubernetes.io/version: "v2"
    app.kubernetes.io/managed-by: Helm
  annotations:
    "helm.sh/hook": test
spec:
  containers:
    - name: wget
      image: busybox
      command: ['wget']
      args: ['RELEASE-NAME-myapp:80']
  restartPolicy: Never
[root@master01 ~]#
提示:上述清单是通过模板引擎结合values文件中定义的值进行渲染以后的结果;
从仓库中下载chart文件到本地

提示:如果要下载对应chart文件,我们可以使用pull命令,该命令会到对应仓库把对应chart的打包文件下载到本地;你的服务器不能正常连接仓库,请使用代理;如上;
获取已经安装的release的扩展信息
[root@master01 ~]# helm list
NAME            NAMESPACE       REVISION        UPDATED                                 STATUS          CHART           APP VERSION
myapp-v1        default         8               2021-01-21 15:40:38.060295891 +0800 CST deployed        myapp-0.2.0     v2
redis           default         1               2021-01-21 02:26:26.13324987 +0800 CST  deployed        redis-12.6.2    6.0.10
redis-demo      default         1               2021-01-21 01:58:18.20798703 +0800 CST  deployed        redis-12.6.2    6.0.10
[root@master01 ~]# helm get values myapp-v1
USER-SUPPLIED VALUES:
image:
  tag: v3
[root@master01 ~]# helm get notes myapp-v1
NOTES:
1. Get the application URL by running these commands:
  export POD_NAME=$(kubectl get pods --namespace default -l "app.kubernetes.io/name=myapp,app.kubernetes.io/instance=myapp-v1" -o jsonpath="{.items[0].metadata.name}")
  export CONTAINER_PORT=$(kubectl get pod --namespace default $POD_NAME -o jsonpath="{.spec.containers[0].ports[0].containerPort}")
  echo "Visit http://127.0.0.1:8080 to use your application"
  kubectl --namespace default port-forward $POD_NAME 8080:$CONTAINER_PORT

[root@master01 ~]# helm get hooks myapp-v1
---
# Source: myapp/templates/tests/test-connection.yaml
apiVersion: v1
kind: Pod
metadata:
  name: "myapp-v1-test-connection"
  labels:
    helm.sh/chart: myapp-0.2.0
    app.kubernetes.io/name: myapp
    app.kubernetes.io/instance: myapp-v1
    app.kubernetes.io/version: "v2"
    app.kubernetes.io/managed-by: Helm
  annotations:
    "helm.sh/hook": test
spec:
  containers:
    - name: wget
      image: busybox
      command: ['wget']
      args: ['myapp-v1:80']
  restartPolicy: Never
[root@master01 ~]# helm get manifest myapp-v1
---
# Source: myapp/templates/serviceaccount.yaml
apiVersion: v1
kind: ServiceAccount
metadata:
  name: myapp-v1
  labels:
    helm.sh/chart: myapp-0.2.0
    app.kubernetes.io/name: myapp
    app.kubernetes.io/instance: myapp-v1
    app.kubernetes.io/version: "v2"
    app.kubernetes.io/managed-by: Helm
---
# Source: myapp/templates/service.yaml
apiVersion: v1
kind: Service
metadata:
  name: myapp-v1
  labels:
    helm.sh/chart: myapp-0.2.0
    app.kubernetes.io/name: myapp
    app.kubernetes.io/instance: myapp-v1
    app.kubernetes.io/version: "v2"
    app.kubernetes.io/managed-by: Helm
spec:
  type: ClusterIP
  ports:
    - port: 80
      targetPort: http
      protocol: TCP
      name: http
  selector:
    app.kubernetes.io/name: myapp
    app.kubernetes.io/instance: myapp-v1
---
# Source: myapp/templates/deployment.yaml
apiVersion: apps/v1
kind: Deployment
metadata:
  name: myapp-v1
  labels:
    helm.sh/chart: myapp-0.2.0
    app.kubernetes.io/name: myapp
    app.kubernetes.io/instance: myapp-v1
    app.kubernetes.io/version: "v2"
    app.kubernetes.io/managed-by: Helm
spec:
  replicas: 1
  selector:
    matchLabels:
      app.kubernetes.io/name: myapp
      app.kubernetes.io/instance: myapp-v1
  template:
    metadata:
      labels:
        app.kubernetes.io/name: myapp
        app.kubernetes.io/instance: myapp-v1
    spec:
      serviceAccountName: myapp-v1
      securityContext:
        {}
      containers:
        - name: myapp
          securityContext:
            {}
          image: "ikubernetes/myapp:v3"
          imagePullPolicy: IfNotPresent
          ports:
            - name: http
              containerPort: 80
              protocol: TCP
          livenessProbe:
            httpGet:
              path: /
              port: http
          readinessProbe:
            httpGet:
              path: /
              port: http
          resources:
            limits:
              cpu: 100m
              memory: 128Mi
            requests:
              cpu: 100m
              memory: 128Mi

[root@master01 ~]#
提示:如果要一次获取上述所有内容,可以使用helm get all 命令进行获取;
打包自定义chart
[root@master01 ~]# ls
logstash-3.0.2.tgz  myapp  redis  redis-12.6.2.tgz
[root@master01 ~]# helm package ./myapp/
Successfully packaged chart and saved it to: /root/myapp-0.2.0.tgz
[root@master01 ~]# ls
logstash-3.0.2.tgz  myapp  myapp-0.2.0.tgz  redis  redis-12.6.2.tgz
[root@master01 ~]#
提示:打包好chart文件以后,我们就可以把对应文件放到对应的仓库中共享给别人使用;
helm私有仓库搭建
helm私有仓库本质上就是一个http文件服务器,我们只需要将对应的chart打包文件,以及对应仓库的元数据信息放到对应目录即可
找一台服务器安装nginx作为helm 私有仓库
[root@docker_registry ~]# yum install -y nginx
生成仓库元数据信息
[root@master01 ~]# mkdir repo-test
[root@master01 ~]# mv *.tgz repo-test/
[root@master01 ~]# ls
myapp  redis  repo-test
[root@master01 ~]# cd repo-test/
[root@master01 repo-test]# helm repo index . --url http://192.168.0.99/repo-test
[root@master01 repo-test]# ls
index.yaml  logstash-3.0.2.tgz  myapp-0.2.0.tgz  redis-12.6.2.tgz
[root@master01 repo-test]# cat index.yaml
apiVersion: v1
entries:
  logstash:
  - annotations:
      category: LogManagement
    apiVersion: v2
    appVersion: 7.10.2
    created: "2021-01-21T16:43:51.585642435+08:00"
    dependencies:
    - name: common
      repository: https://charts.bitnami.com/bitnami
      tags:
      - bitnami-common
      version: 1.x.x
    description: Logstash is an open source,server-side data processing pipeline that ingests data from a multitude of sources simultaneously,transforms it,and then sends it to your favorite "stash".
    digest: b60ccc7d48acfbfafd6a226b32316fff173f7e17112cee8367c5680012bc37a1
    home: https://github.com/bitnami/charts/tree/master/bitnami/logstash
    icon: https://bitnami.com/assets/stacks/logstash/img/logstash-stack-220x234.png
    keywords:
    - logstash
    - logging
    - elk
    maintainers:
    - email: containers@bitnami.com
      name: Bitnami
    name: logstash
    sources:
    - https://github.com/bitnami/bitnami-docker-logstash
    - https://www.elastic.co/products/logstash
    urls:
    - http://192.168.0.99/repo-test/logstash-3.0.2.tgz
    version: 3.0.2
  myapp:
  - apiVersion: v2
    appVersion: v2
    created: "2021-01-21T16:43:51.586100842+08:00"
    description: web server
    digest: 55710394a8f2a8b0770c7212aaa92477adefebfbe72640d8c84e42c7999dd1d9
    name: myapp
    type: application
    urls:
    - http://192.168.0.99/repo-test/myapp-0.2.0.tgz
    version: 0.2.0
  redis:
  - annotations:
      category: Database
    apiVersion: v2
    appVersion: 6.0.10
    created: "2021-01-21T16:43:51.589712477+08:00"
    dependencies:
    - name: common
      repository: https://charts.bitnami.com/bitnami
      tags:
      - bitnami-common
      version: 1.x.x
    description: Open source,advanced key-value store. It is often referred to as a data structure server since keys can contain strings,hashes,lists,sets and sorted sets.
    digest: 4208a6eae05c9486dbecc55db3bc6e04960708e0b389adfa1f7e309d3937a451
    home: https://github.com/bitnami/charts/tree/master/bitnami/redis
    icon: https://bitnami.com/assets/stacks/redis/img/redis-stack-220x234.png
    keywords:
    - redis
    - keyvalue
    - database
    maintainers:
    - email: containers@bitnami.com
      name: Bitnami
    - email: cedric@desaintmartin.fr
      name: desaintmartin
    name: redis
    sources:
    - https://github.com/bitnami/bitnami-docker-redis
    - http://redis.io/
    urls:
    - http://192.168.0.99/repo-test/redis-12.6.2.tgz
    version: 12.6.2
generated: "2021-01-21T16:43:51.568008766+08:00"
[root@master01 repo-test]#
复制repo-test目录到web服务器nginx的网页根目录
[root@master01 repo-test]# cd ..
[root@master01 ~]# scp -r repo-test 192.168.0.99:/usr/share/nginx/html/
root@192.168.0.99's password:
logstash-3.0.2.tgz                                                                                      100%   26KB   8.8MB/s   00:00
myapp-0.2.0.tgz                                                                                         100% 3584   406.3KB/s   00:00
redis-12.6.2.tgz                                                                                        100%   71KB  10.5MB/s   00:00
index.yaml                                                                                              100% 2548   348.1KB/s   00:00
[root@master01 ~]# ssh 192.168.0.99
root@192.168.0.99's password:
Last login: Thu Jan 21 16:35:28 2021 from 192.168.0.232
[root@docker_registry ~]# ll /usr/share/nginx/html/
total 12
-rw-r--r-- 1 root root 3650 Nov  1 10:01 404.html
-rw-r--r-- 1 root root 3693 Nov  1 10:01 50x.html
lrwxrwxrwx 1 root root   20 Jan 21 16:36 en-US -> ../../doc/HTML/en-US
drwxr-xr-x 2 root root   27 Jan 21 16:36 icons
lrwxrwxrwx 1 root root   18 Jan 21 16:36 img -> ../../doc/HTML/img
lrwxrwxrwx 1 root root   25 Jan 21 16:36 index.html -> ../../doc/HTML/index.html
-rw-r--r-- 1 root root  368 Nov  1 10:01 nginx-logo.png
lrwxrwxrwx 1 root root   14 Jan 21 16:36 poweredby.png -> nginx-logo.png
drwxr-xr-x 2 root root   97 Jan 21 16:45 repo-test
[root@docker_registry ~]#
启动nginx服务
[root@docker_registry ~]# systemctl start nginx
[root@docker_registry ~]# ss -tnl
State      Recv-Q Send-Q                        Local Address:Port                                       Peer Address:Port
LISTEN     0      128                                       *:111                                                   *:*
LISTEN     0      128                                       *:80                                                    *:*
LISTEN     0      128                                       *:20048                                                 *:*
LISTEN     0      5                             192.168.122.1:53                                                    *:*
LISTEN     0      128                                       *:22                                                    *:*
LISTEN     0      128                            192.168.0.99:631                                                   *:*
LISTEN     0      100                               127.0.0.1:25                                                    *:*
LISTEN     0      64                                        *:45725                                                 *:*
LISTEN     0      128                                       *:36254                                                 *:*
LISTEN     0      64                                        *:2049                                                  *:*
LISTEN     0      128                                      :::111                                                  :::*
LISTEN     0      128                                      :::80                                                   :::*
LISTEN     0      128                                      :::20048                                                :::*
LISTEN     0      128                                      :::22                                                   :::*
LISTEN     0      100                                     ::1:25                                                   :::*
LISTEN     0      128                                      :::52761                                                :::*
LISTEN     0      64                                       :::2049                                                 :::*
LISTEN     0      64                                       :::43907                                                :::*
[root@docker_registry ~]#
验证:使用helm添加私有仓库
[root@master01 ~]# helm repo add repo-test http://192.168.0.99/repo-test
"repo-test" has been added to your repositories
[root@master01 ~]# helm repo list
NAME            URL
bitnami         https://charts.bitnami.com/bitnami
repo-test       http://192.168.0.99/repo-test
[root@master01 ~]# helm search repo repo-test
NAME                    CHART VERSION   APP VERSION     DESCRIPTION
repo-test/logstash      3.0.2           7.10.2          Logstash is an open source,server-side data pr...
repo-test/myapp         0.2.0           v2              web server
repo-test/redis         12.6.2          6.0.10          Open source,advanced key-value store. It is of...
[root@master01 ~]#
提示:可以看到对应仓库中的chart都可以正常列出来;
安装私有仓库中的chart
[root@master01 ~]# helm install myapp-test repo-test/myapp
NAME: myapp-test
LAST DEPLOYED: Thu Jan 21 16:54:06 2021
NAMESPACE: default
STATUS: deployed
REVISION: 1
NOTES:
1. Get the application URL by running these commands:
  export POD_NAME=$(kubectl get pods --namespace default -l "app.kubernetes.io/name=myapp,app.kubernetes.io/instance=myapp-test" -o jsonpath="{.items[0].metadata.name}")
  export CONTAINER_PORT=$(kubectl get pod --namespace default $POD_NAME -o jsonpath="{.spec.containers[0].ports[0].containerPort}")
  echo "Visit http://127.0.0.1:8080 to use your application"
  kubectl --namespace default port-forward $POD_NAME 8080:$CONTAINER_PORT
[root@master01 ~]# helm list
NAME            NAMESPACE       REVISION        UPDATED                                 STATUS          CHART           APP VERSION
myapp-test      default         1               2021-01-21 16:54:06.041883984 +0800 CST deployed        myapp-0.2.0     v2
myapp-v1        default         8               2021-01-21 15:40:38.060295891 +0800 CST deployed        myapp-0.2.0     v2
redis           default         1               2021-01-21 02:26:26.13324987 +0800 CST  deployed        redis-12.6.2    6.0.10
redis-demo      default         1               2021-01-21 01:58:18.20798703 +0800 CST  deployed        redis-12.6.2    6.0.10
[root@master01 ~]# kubectl get pods
NAME                          READY   STATUS    RESTARTS   AGE
myapp-test-58c57d75fc-s22cn   1/1     Running   0          31s
myapp-v1-675d685ddf-7c8zd     1/1     Running   0          73m
redis-demo-master-0           1/1     Running   1          14h
redis-demo-slave-0            1/1     Running   2          14h
redis-demo-slave-1            1/1     Running   7          14h
redis-master-0                1/1     Running   1          14h
redis-slave-0                 1/1     Running   1          14h
redis-slave-1                 1/1     Running   1          14h
[root@master01 ~]# kubectl get svc
NAME                  TYPE        CLUSTER-IP       EXTERNAL-IP   PORT(S)    AGE
kubernetes            ClusterIP   10.96.0.1        <none>        443/TCP    17h
myapp-test            ClusterIP   10.108.7.220     <none>        80/TCP     39s
myapp-v1              ClusterIP   10.110.153.241   <none>        80/TCP     98m
redis-demo-headless   ClusterIP   None             <none>        6379/TCP   14h
redis-demo-master     ClusterIP   10.109.45.70     <none>        6379/TCP   14h
redis-demo-slave      ClusterIP   10.111.222.218   <none>        6379/TCP   14h
redis-headless        ClusterIP   None             <none>        6379/TCP   14h
redis-master          ClusterIP   10.108.35.165    <none>        6379/TCP   14h
redis-slave           ClusterIP   10.99.96.166     <none>        6379/TCP   14h
[root@master01 ~]# curl 10.108.7.220
Hello MyApp | Version: v2 | <a href="hostname.html">Pod Name</a>
[root@master01 ~]#
提示:可以看到使用私有仓库中的chart能够正常运行为一个release,对应生成的svc也能正常访问;
使用阿里云云效私有helm仓库
1、进入:https://repomanage.rdc.aliyun.com/my/repo?spm=a2c4g.11186623.2.7.7b646b06Zv1cAd,登录阿里云账号,并注册开通云效服务,创建一个企业;
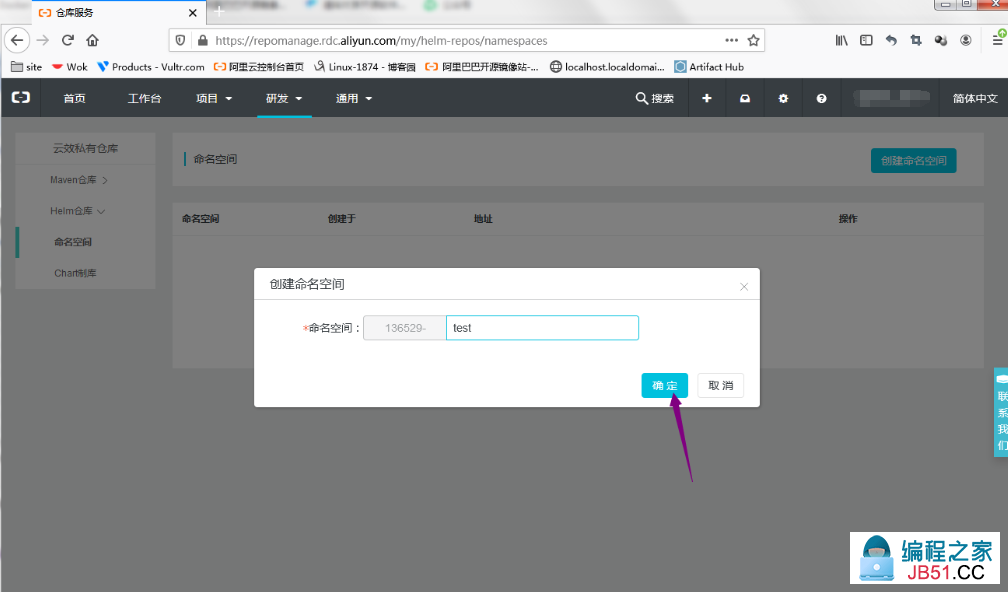
2、创建名称空间
3、添加仓库

4、helm push 插件
[root@master01 ~]# helm plugin install https://github.com/chartmuseum/helm-push
Downloading and installing helm-push v0.9.0 ...
https://github.com/chartmuseum/helm-push/releases/download/v0.9.0/helm-push_0.9.0_linux_amd64.tar.gz
Installed plugin: push
[root@master01 ~]#
5、发布chart目录
[root@master01 ~]# cat myapp/Chart.yaml
apiVersion: v2
name: myapp
description: web server

# A chart can be either an 'application' or a 'library' chart.
#
# Application charts are a collection of templates that can be packaged into versioned archives
# to be deployed.
#
# Library charts provide useful utilities or functions for the chart developer. They're included as
# a dependency of application charts to inject those utilities and functions into the rendering
# pipeline. Library charts do not define any templates and therefore cannot be deployed.
type: application

# This is the chart version. This version number should be incremented each time you make changes
# to the chart and its templates,including the app version.
# Versions are expected to follow Semantic Versioning (https://semver.org/)
version: 0.2.0

# This is the version number of the application being deployed. This version number should be
# incremented each time you make changes to the application. Versions are not expected to
# follow Semantic Versioning. They should reflect the version the application is using.
# It is recommended to use it with quotes.
appVersion: "v2"
[root@master01 ~]# helm push myapp/ $NAMESPACE
Pushing myapp-0.2.0.tgz to 136529-test...
Done.
[root@master01 ~]#
6、发布chart打包文件
[root@master01 ~]#  helm push repo-test/myapp-0.2.0.tgz $NAMESPACE
Pushing myapp-0.2.0.tgz to 136529-test...
Done.
[root@master01 ~]#
提示:如果没有将自定义chart打包,请先使用helm package CHART_DIR打包;
7、更新本地仓库索引
[root@master01 ~]# helm repo update
Hang tight while we grab the latest from your chart repositories...
...Successfully got an update from the "repo-test" chart repository
...Successfully got an update from the "bitnami" chart repository
...Successfully got an update from the "136529-test" chart repository
Update Complete. ⎈Happy Helming!⎈
[root@master01 ~]#
验证:搜索myapp,看看对应仓库是否能够列出对应的chart?
[root@master01 ~]# helm search repo myapp
NAME                    CHART VERSION   APP VERSION     DESCRIPTION
136529-test/myapp       0.2.0           v2              web server
repo-test/myapp         0.2.0           v2              web server
[root@master01 ~]#
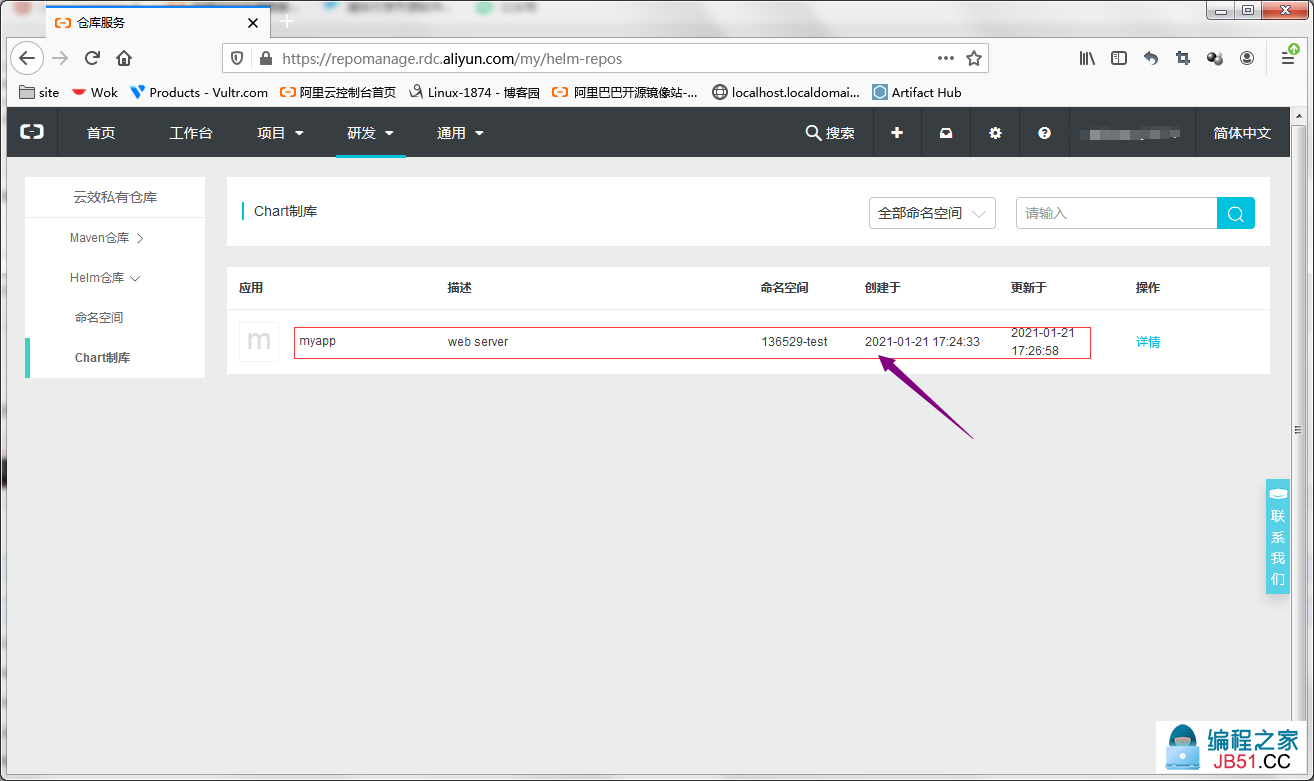
在阿里云云效网站上查看上传的chart
验证:安装myapp,看看对应chart是否能够运行为一个release?
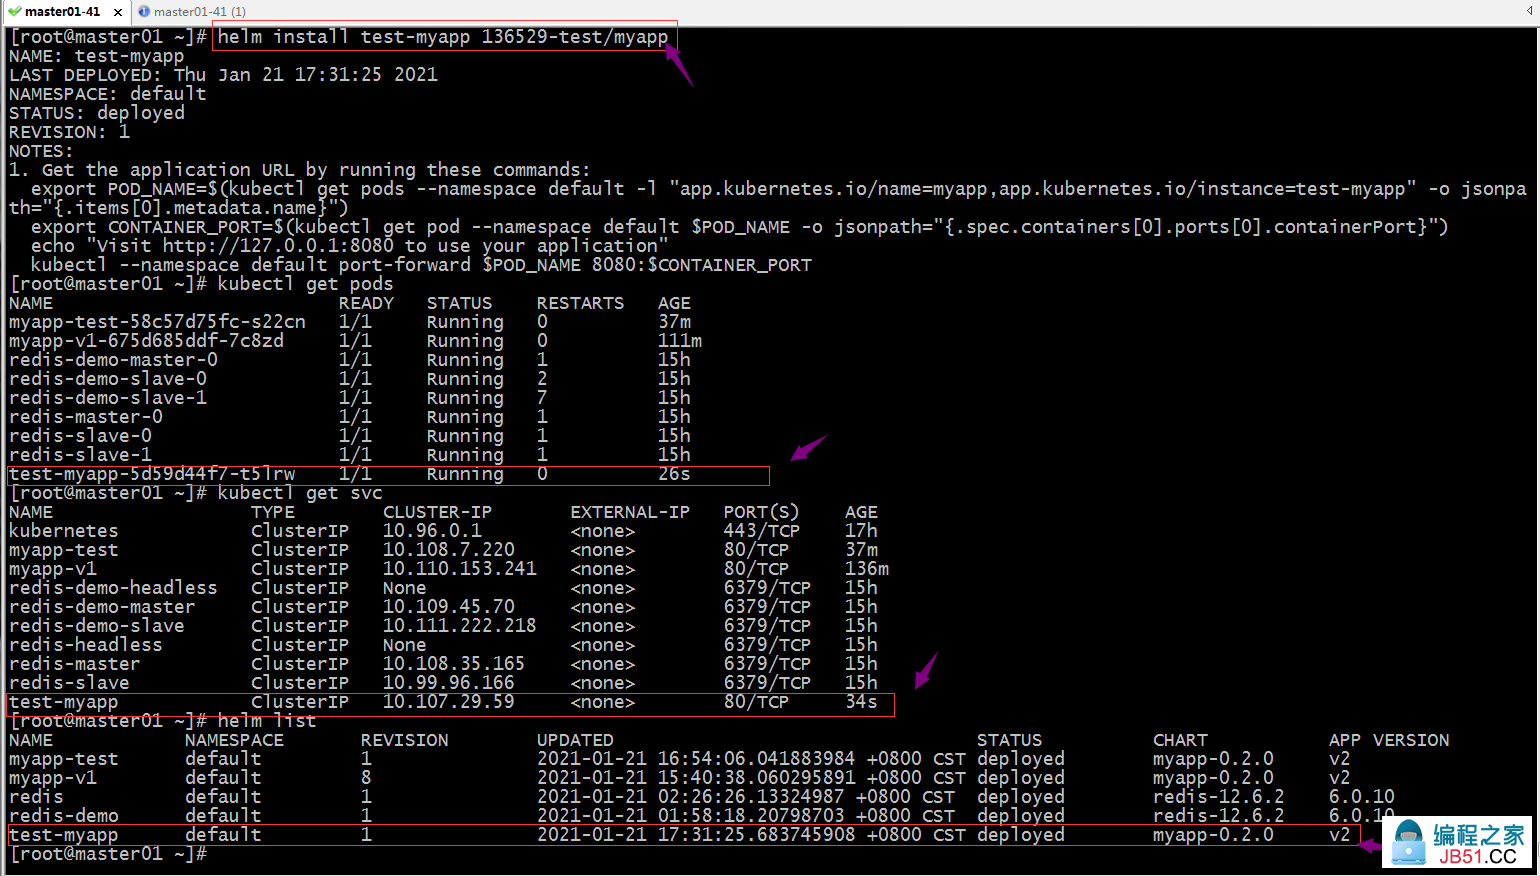
提示:可以看到可以从对应helm仓库下载对应的chart,并在k8s上运行为一个release;
版权声明:本文内容由互联网用户自发贡献,该文观点与技术仅代表作者本人。本站仅提供信息存储空间服务,不拥有所有权,不承担相关法律责任。如发现本站有涉嫌侵权/违法违规的内容, 请发送邮件至 dio@foxmail.com 举报,一经查实,本站将立刻删除。