目录
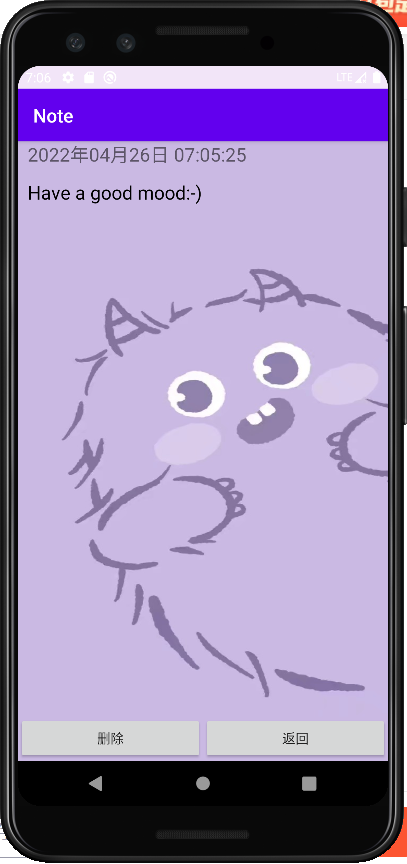
效果展示:


路径和文件:

AndroidManifest.xml
<?xml version="1.0" encoding="utf-8"?>
<manifest xmlns:android="http://schemas.android.com/apk/res/android"
    package="cn.itcast.note">

    <application
        android:allowBackup="true"
        android:icon="@mipmap/ic_launcher"
        android:label="@string/app_name"
        android:roundIcon="@mipmap/ic_launcher_round"
        android:supportsRtl="true"
        android:theme="@style/AppTheme">
        <activity android:name=".MainActivity">
            <intent-filter>
                <action android:name="android.intent.action.MAIN" />

                <category android:name="android.intent.category.LAUNCHER" />
            </intent-filter>
        </activity>
        <activity android:name=".AddContent"></activity>
        <activity android:name=".ShowContent"></activity>
    </application>

</manifest>
AddContent.java
package cn.itcast.note;


import android.content.ContentValues;
import android.database.sqlite.SQLiteDatabase;
import androidx.appcompat.app.AppCompatActivity;
import android.os.Bundle;
import android.view.View;
import android.widget.EditText;

import java.text.SimpleDateFormat;
import java.util.Date;

public class AddContent extends AppCompatActivity {
    private EditText mEt;
    private NoteDb mDb;
    private SQLiteDatabase mSqldb;
    @Override
    protected void onCreate(Bundle savedInstanceState) {
        super.onCreate(savedInstanceState);
        setContentView(R.layout.activity_add_content);
        mEt = (EditText) this.findViewById(R.id.text);
        mDb = new NoteDb(this);
        mSqldb = mDb.getWritableDatabase();//获取可读写SQLiteDatabase对象
    }
    public void save(View v) {
        DbAdd();
        finish();
    }
    public void cancle(View v) {
        mEt.setText("");
        finish();
    }
    public void DbAdd() {
        ContentValues cv = new ContentValues();
        cv.put(NoteDb.CONTENT,mEt.getText().toString());
        cv.put(NoteDb.TIME,getTime());
        mSqldb.insert(NoteDb.TABLE_NAME,null,cv);
    }
    //获得当前时间
    public String getTime() {
        SimpleDateFormat sdf = new SimpleDateFormat("yyyy年MM月dd日 HH:mm:ss");
        Date date = new Date();
        String str = sdf.format(date);
        return str;
    }
}
MainActivity.java
package cn.itcast.note;

import android.annotation.SuppressLint;
import android.content.Intent;
import android.database.Cursor;
import android.database.sqlite.SQLiteDatabase;
import androidx.appcompat.app.AppCompatActivity;
import android.os.Bundle;
import android.view.View;
import android.widget.AdapterView;
import android.widget.Button;
import android.widget.ListView;

public class MainActivity extends AppCompatActivity {
    private Button mButton;
    private ListView mList;
    private Intent mIntent;
    private MyAdapter mAdapter;
    private NoteDb mNotedb;
    private Cursor cursor;
    private SQLiteDatabase dbreader;
    @Override
    protected void onCreate(Bundle savedInstanceState) {
        super.onCreate(savedInstanceState);
        setContentView(R.layout.activity_main);
        mList = (ListView) this.findViewById(R.id.list);//首页显示的记事本内容ListView
        mNotedb = new NoteDb(this);
        dbreader = mNotedb.getReadableDatabase();//获取可读SQLiteDatabase()对象
        mList.setOnItemClickListener(new AdapterView.OnItemClickListener() {
            @SuppressLint("Range")
            @Override
            public void onItemClick(AdapterView<?> adapterView,View view,int i,long l) {
                cursor.moveToPosition(i);
                Intent intent = new Intent(MainActivity.this,ShowContent.class);
                intent.putExtra(NoteDb.ID,cursor.getInt(cursor.getColumnIndex(NoteDb.ID)));
                intent.putExtra(NoteDb.CONTENT,cursor.getString(cursor.getColumnIndex(NoteDb.CONTENT)));
                intent.putExtra(NoteDb.TIME,cursor.getString(cursor.getColumnIndex(NoteDb.TIME)));
                startActivity(intent);
            }
        });
    }

    public void add(View v) {
        //显示intent指的是直接指定目标组件
        //使用Intent显示指定要跳转的目标Activity
        //创建Intent对象传入2个参数,第一个参数:表示当前的Activity,第二个参数:表示要跳转到的目标Activity
        //启动Activity
        mIntent = new Intent(MainActivity.this,AddContent.class);
        startActivity(mIntent);
    }
    public void selectDb() {
        //query()方法,该方法返回的是一个行数集合Cursor,Cursor是一个游标接口,提供遍历查询结果的方法。
        cursor = dbreader.query
                (NoteDb.TABLE_NAME,null);
        mAdapter = new MyAdapter(this,cursor);
        mList.setAdapter(mAdapter);
    }

    @Override
    protected void onResume() {
        super.onResume();
        selectDb();
    }
}
MyAdapter.java
package cn.itcast.note;

import android.content.Context;
import android.database.Cursor;
import android.view.LayoutInflater;
import android.view.View;
import android.view.ViewGroup;
import android.widget.BaseAdapter;
import android.widget.LinearLayout;
import android.widget.TextView;

public class MyAdapter extends BaseAdapter {
    private Context mContext;
    private Cursor mCursor;
    private LinearLayout mLayout;
    public MyAdapter(Context mContext,Cursor mCursor) {
        this.mContext = mContext;
        this.mCursor = mCursor;
    }

    @Override
    public int getCount() {
        return mCursor.getCount();
    }

    @Override
    public Object getItem(int position) {
        return mCursor.getPosition();
    }

    @Override
    public long getItemId(int position) {
        return position;
    }

    @Override
    public View getView(int position,ViewGroup viewGroup) {
        LayoutInflater inflater = LayoutInflater.from(mContext);
        mLayout = (LinearLayout) inflater.inflate(R.layout.item,null);
        TextView content = (TextView) mLayout.findViewById(R.id.list_content);
        TextView time = (TextView) mLayout.findViewById(R.id.list_time);
        mCursor.moveToPosition(position);
        String dbcontext = mCursor.getString(mCursor.getColumnIndex("content"));
        String dbtime = mCursor.getString(mCursor.getColumnIndex("time"));
        content.setText(dbcontext);
        time.setText(dbtime);
        return mLayout;
    }
}
NoteDb.java
package cn.itcast.note;


import android.content.Context;
import android.database.sqlite.SQLiteDatabase;
import android.database.sqlite.SQLiteOpenHelper;
//创建SQLite数据库的步骤
//1.创建一个类继承SQLiteOpenHelper类
//2.在该类中重写onCreate()方法和onUpgrade()方法
public class NoteDb extends SQLiteOpenHelper {
    public static final String TABLE_NAME = "notes";
    public static final String CONTENT = "content";
    public static final String ID = "_id";
    public static final String TIME = "time";

    public NoteDb(Context context) {
        //通过super()调用父类SQLiteOpenHelper的构造方法,并传入4个参数
        //上下文、数据库名称、游标工厂(通常是null)、数据库版本
        super(context,"notes",1);
    }

    @Override
    //数据库第一次被创建时调用该方法
    public void onCreate(SQLiteDatabase db) {
        //初始化数据库的表结构,执行一条建表的SQL语句
        String sql ="create table "+TABLE_NAME+" ( "+ID+" integer primary key AUTOINCREMENT,"+CONTENT
                +" TEXT NOT NULL,"+TIME+" TEXT NOT NULL )";
        db.execSQL(sql);
    }

    @Override
    //onUpgrade()方法在数据库版本号增加时调用,如果版本号不增加,则该方法不调用。
    public void onUpgrade(SQLiteDatabase sqLiteDatabase,int i1) {

    }
}
ShowContent.java
package cn.itcast.note;


import android.database.sqlite.SQLiteDatabase;
import androidx.appcompat.app.AppCompatActivity;
import android.os.Bundle;
import android.view.View;
import android.widget.TextView;

public class ShowContent extends AppCompatActivity {
    private TextView mTextview;
    private TextView time;
    private NoteDb mDb;
    private SQLiteDatabase mSql;
    @Override
    protected void onCreate(Bundle savedInstanceState) {
        super.onCreate(savedInstanceState);
        setContentView(R.layout.activity_show_content);
        mTextview = (TextView)this.findViewById(R.id.showtext);
        time = (TextView)this.findViewById(R.id.showtime);
        mDb = new NoteDb(this);
        mSql = mDb.getWritableDatabase();
        mTextview.setText(getIntent().getStringExtra(NoteDb.CONTENT));
        time.setText(getIntent().getStringExtra(NoteDb.TIME));
    }
    public void delete(View v) {
        int id = getIntent().getIntExtra(NoteDb.ID,0);
        mSql.delete(NoteDb.TABLE_NAME," _id = " + id,null);
        finish();

    }
    public void goBack(View v) {
        finish();
    }
}
activity_add_content.xml
<?xml version="1.0" encoding="utf-8"?>
<LinearLayout xmlns:android="http://schemas.android.com/apk/res/android"
    xmlns:tools="http://schemas.android.com/tools"
    android:layout_width="match_parent"
    android:layout_height="match_parent"
    android:orientation="vertical"
    android:background="@drawable/back"
    tools:context="cn.itcast.note.AddContent">
    <EditText
        android:id="@+id/text"
        android:layout_width="match_parent"
        android:layout_height="wrap_content"
        android:layout_weight="1"
        android:gravity="top"
        android:textColor="#000"
        android:hint="有了记事本,我再也不会忘记事情了!"/>
    <LinearLayout
        android:layout_width="match_parent"
        android:layout_height="wrap_content"
        android:layout_marginTop="10dp">
        <Button
            android:id="@+id/save"
            android:layout_width="wrap_content"
            android:layout_height="wrap_content"
            android:layout_weight="1"
            android:text="保存"
            android:onClick="save"/>
        <Button
            android:id="@+id/cancle"
            android:layout_width="wrap_content"
            android:layout_height="wrap_content"
            android:layout_weight="1"
            android:text="取消"
            android:onClick="cancle"/>
    </LinearLayout>
</LinearLayout>
activity_main.xml
<?xml version="1.0" encoding="utf-8"?>
<LinearLayout xmlns:android="http://schemas.android.com/apk/res/android"
    xmlns:tools="http://schemas.android.com/tools"
    android:layout_width="match_parent"
    android:layout_height="match_parent"
    android:orientation="vertical"
    android:background="@drawable/back"
    tools:context="cn.itcast.note.MainActivity">
    <LinearLayout
        android:layout_width="match_parent"
        android:layout_height="wrap_content"
        android:orientation="horizontal">
        <ImageButton
            android:id="@+id/add"
            android:layout_width="wrap_content"
            android:layout_height="wrap_content"
            android:text="添加"
            android:src="@drawable/btn"
            android:onClick="add"/>
    </LinearLayout>
    <ListView
        android:id="@+id/list"
        android:layout_width="match_parent"
        android:layout_height="wrap_content"
        android:textColor="#000"
        android:layout_marginTop="20dp">

    </ListView>

</LinearLayout>
activity_show_content.xml
<?xml version="1.0" encoding="utf-8"?>
<LinearLayout xmlns:android="http://schemas.android.com/apk/res/android"
    xmlns:tools="http://schemas.android.com/tools"
    android:layout_width="match_parent"
    android:orientation="vertical"
    android:background="@drawable/back"
    android:layout_height="match_parent"
    tools:context="cn.itcast.note.ShowContent">
    <TextView
        android:id="@+id/showtime"
        android:layout_width="match_parent"
        android:layout_height="30dp"
        android:layout_marginLeft="10dp"
        android:textSize="20sp"/>
    <TextView
        android:id="@+id/showtext"
        android:layout_width="match_parent"
        android:layout_height="wrap_content"
        android:textSize="20sp"
        android:gravity="top"
        android:layout_weight="1"
        android:layout_marginTop="10dp"
        android:layout_marginLeft="10dp"
        android:textColor="#000"
        android:hint="有了记事本,我再也不会忘记事情了!"/>
    <LinearLayout
        android:layout_width="match_parent"
        android:layout_height="wrap_content"
        android:layout_marginTop="10dp">
        <Button
            android:id="@+id/delete"
            android:layout_width="wrap_content"
            android:layout_height="wrap_content"
            android:layout_weight="1"
            android:text="删除"
            android:onClick="delete"/>
        <Button
            android:id="@+id/back"
            android:layout_width="wrap_content"
            android:layout_height="wrap_content"
            android:layout_weight="1"
            android:text="返回"
            android:onClick="goBack"/>
    </LinearLayout>
</LinearLayout>
item.xml
<?xml version="1.0" encoding="utf-8"?>
<LinearLayout xmlns:android="http://schemas.android.com/apk/res/android"
    android:layout_width="match_parent"
    android:layout_height="match_parent">
    <LinearLayout
        android:layout_width="match_parent"
        android:layout_height="50dp"
        android:layout_gravity="center_vertical"
        android:orientation="vertical">

        <TextView
            android:layout_width="match_parent"
            android:layout_height="wrap_content"
            android:id="@+id/list_content"
            android:textColor="#000"
            android:textSize="20sp"
            android:text="tv"/>
        <TextView
            android:layout_width="match_parent"
            android:layout_height="wrap_content"
            android:id="@+id/list_time"
            android:textColor="#685B5B"
            android:textSize="17sp"
            android:text="time"/>

    </LinearLayout>
</LinearLayout>代码实现来自这个作者:http://t.csdn.cn/vGQIt
源码:
链接:https://pan.baidu.com/s/1nbYPPP67VszfURzB6A1cyw?pwd=uo6c
提取码:uo6c
原文地址:https://blog.csdn.net/weixin_46499784
版权声明:本文内容由互联网用户自发贡献,该文观点与技术仅代表作者本人。本站仅提供信息存储空间服务,不拥有所有权,不承担相关法律责任。如发现本站有涉嫌侵权/违法违规的内容, 请发送邮件至 dio@foxmail.com 举报,一经查实,本站将立刻删除。

