
实例:
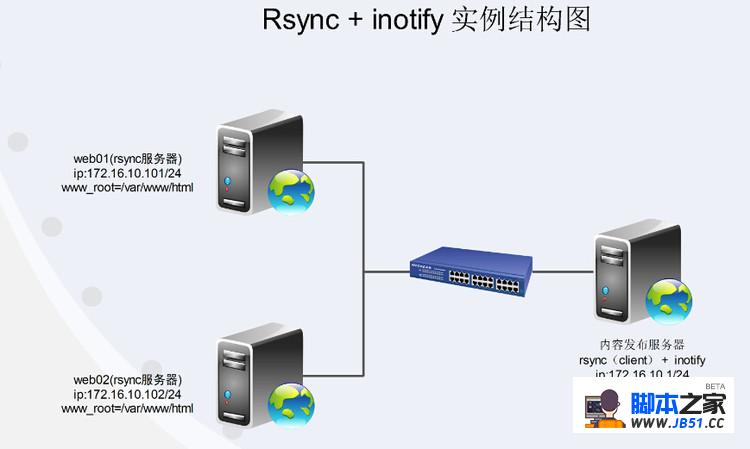
假设web01与web02是公司的网站,我们在内容发布服务器中添加数据,inotify检测到有数据更新通过rsync实时传输到web01与web02。
一、web配置(web01与web02配置几乎一致,留意红色部分)
# vi /etc/rsyncd.conf
# filename:/etc/rsyncd.conf
uid = nobody
gid = nobody
use chroot = no
max connections = 10
# set password
strict modes = yes
pid file = /var/run/rsyncd.pid
lock file = /var/run/rsyncd.lock
log file = /var/log/rsyncd.log
[web_01]
path = /var/www/html
comment = web dir
ignore errors
read only = no
write only = no
hosts allow = 172.16.10.0/255.255.255.0
hosts deny = *
list = false
auth = backup
secrets file = /etc/rsyncd.auth
# echo backup:backup>/etc/rsyncd.auth
# chmod 600 /etc/rsyncd.auth
二、内容发布服务器配置
//安装inotify-tool # tar zxvf inotify-tools-3.14.tar.gz # cd inotify-tools-3.14 # ./configure;make;make install //建立rsync验证文件 # echo backup:backup>/etc/rsyncd.auth # chmod 600 /etc/rsyncd.auth
[root@10.1 ~]# vi inotify_rsync.sh #!/bin/bash # This rsync script based on inotify. export PATH=/bin:/usr/bin:/usr/local/bin src=/var/www/html/ dst=/var/www/html/ client1=172.16.10.101 client2=172.16.10.102 user=backup #password file must not be other-accessible. Passfiles=/etc/rsyncd.auth #Wait for change inotifywait -mrq --timefmt '%d-%m-%y %H:%M' --format '%T %w %fi %e' --event modify,delete,create,attrib $src|while read files do rsync -vzrtopg --progress --delete --password-file=$Passfiles $src $user@$client1::$dst rsync -vzrtopg --progress --delete --password-file=$Passfiles $src $user@$client2::$dst echo "${files} was rsynced" >> /var/log/inotify_web 2>&1 done 后台运行以上shell脚本,并在内容发布服务器上进行文件修改等操作
日志一览
# cat /var/log/inotify_web 12-09-14 14:41 /var/www/html test_01i MODIFY was rsynced 12-09-14 14:42 /var/www/html test_01i MODIFY was rsynced 12-09-14 14:43 /var/www/html auditdi CREATE was rsynced 12-09-14 14:43 /var/www/html auditdi MODIFY was rsynced 12-09-14 14:43 /var/www/html blk-availabilityi CREATE was rsynced 12-09-14 14:43 /var/www/html blk-availabilityi MODIFY was rsynced 12-09-14 14:43 /var/www/html cgconfigi CREATE was rsynced 12-09-14 14:43 /var/www/html cgconfigi MODIFY was rsynced 12-09-14 14:43 /var/www/html cgredi CREATE was rsynced 12-09-14 14:43 /var/www/html cgredi MODIFY was rsynced 12-09-14 14:43 /var/www/html crondi CREATE was rsynced 12-09-14 14:43 /var/www/html crondi MODIFY was rsynced 12-09-14 14:43 /var/www/html drbdi CREATE was rsynced 12-09-14 14:43 /var/www/html drbdi MODIFY was rsynced 12-09-14 14:43 /var/www/html fcoei CREATE was rsynced 12-09-14 14:43 /var/www/html fcoei MODIFY was rsynced 12-09-14 14:43 /var/www/html functionsi CREATE was rsynced 12-09-14 14:43 /var/www/html functionsi MODIFY was rsynced 12-09-14 14:43 /var/www/html halti CREATE was rsynced 12-09-14 14:43 /var/www/html halti MODIFY was rsynced 12-09-14 14:43 /var/www/html htcachecleani CREATE was rsynced 12-09-14 14:43 /var/www/html htcachecleani MODIFY was rsynced
版权声明:本文内容由互联网用户自发贡献,该文观点与技术仅代表作者本人。本站仅提供信息存储空间服务,不拥有所有权,不承担相关法律责任。如发现本站有涉嫌侵权/违法违规的内容, 请发送邮件至 dio@foxmail.com 举报,一经查实,本站将立刻删除。